
Presentation Storytelling Examples & Techniques (2024)
Learn techniques for telling a story in a presentation . Get narrative presentation examples and learn to apply storytelling in business presentations .

Joanne Camarce
8 minute read

Short answer
What should a presentation storytelling structure include?
Introduction
Rising Action
Falling Action
Storytelling in business presentations matters (a lot)
Stories convey a deeper meaning, idea, or lesson. They make us feel, experience, identify, and understand.
Most importantly for storytelling in business presentations, telling a story in a presentation makes people more likely to remember the message.
Researchers Dean and Chip Heath found that after a presentation, 63% of attendees could remember the story told by the presenter.
However, only 5% could recall specific statistics from the event.
Because stories allow audiences to visualize and imagine an idea or message, stories also make them better able to make decisions.
In other words, stories bring buyers, stakeholders, and decision-makers to better understand and remember your message. Which in turn enables them to make a decision and increases the chance they’ll act on it.
What is presentation storytelling?
Presentation storytelling is the art of using a narrative structure to convey information instead of dry facts. It delivers a story with a clear beginning, middle, and end that aligns with the presentation's objectives, making the content more relatable and memorable.
Storytelling in business presentations involves 2 complementing aspects: (1) textual presentation narrative, and (2) visual storytelling.
What is a narrative presentation?
A narrative presentation is a style of delivering information where the content is structured as a relatable story. It typically includes characters, a setting, a conflict, and a resolution, and weaves complex ideas, processes, and metrics into the narrative.
What is a visual storytelling presentation?
A visual storytelling presentation tells a story or multiple anecdotes using visual elements like videos, animations, and interactive content.
Modern storytelling presentations apply scrollytelling design which combines visuals and text seamlessly to let readers interact with the presentation as they scroll down the content.
How to use the 4 storytelling archetypes
Storytelling is the art of describing vivid ideas, beliefs, experiences, and life lessons through stories and narratives.
These stories stimulate a listener's imagination as you take them on an emotional journey. There are many ways to tell a story.
These story structures have been shown to work for narrative presentations and corporate storytelling, and they will work for you.
The Hero's Journey: Communicates a transformation from struggle to success
The Story Mountain: Builds tension and anticipation
Story loop: Joins multiple perspectives into a single narrative
In-Media Res: Grabs attention quickly
There are timeless narrative frameworks that have worked for storytellers throughout the ages from the methodologies of old, through Shakespearian plays to Apple commercials.
1) Hero's Journey

The hero's journey narrative archetype involves a hero who goes on a journey and returns as a changed person.
This storytelling template consists of three distinct parts, or "acts," that include a setup, confrontation, and resolution. It makes for a well-structured and engaging narrative.
2) The Mountain

The mountain storytelling structure strategically maps the tension and drama in a story. This archetype is represented visually as a mountain, with each section building to a complex obstacle that characters need to overcome.
Think of the protagonist at the bottom of the mountain. They must climb the mountain to reach their goal (your business goals in this case). They face obstacles along the way, and they must overcome those obstacles before they can reach the top.
3) Story loop
The story loop structure contains stories within another story. However, they aren't standalone stories.
Your first story is the most important. It's the core of your message, and you use the other stories to elaborate or explain your central point.
But you stop some of the way through it, leaving the audience in suspense. Then, you share part of the second story before moving on to the last.
Eventually, in the end, you bring it all together to make one cohesive point. The purpose of this storytelling technique is to provide context, background, or a different perspective to a central narrative.
Types of anecdotes you can use in your story loop presentation
- Customer success stories
- Personal experiences by clients
- Inspirational stories
- Fictional or hypothetical stories
- Historical or factual stories
Here's a short video explaining how to use a story loop:

4) In medias res (begin from the middle)
In medias res is Latin for "in the middle of things." With this storytelling archetype, the narrative begins in the middle of a scene. It skips over the background of the story and gets straight to the action.
To choose the right type of story for your presentation, consider your audience, the purpose of the presentation, and the emotional impact you want to create.
No matter what narrative structure you choose, include visuals, sensory details, and precise language to bolster your message.
If you want to learn more about this storytelling archetype, check out the video below:

Effective presentation storytelling structure
A well-structured story can engage and persuade your audience, making your corporate presentation much more effective and memorable.
Stories can be applied in any type of business presentation, such as a pitch deck, sales presentation, white paper, report, or business proposal.
A single document can include multiple stories that make up a joint narrative.
5 basic elements of a story structure:
1. Introduction
- Sets a relevant context with background information.
- Introduces the protagonist (business or product) and the current problem or challenge.
2. Rising Action
- Builds tension by detailing the obstacles and complications faced.
- Engages the audience with the steps taken to address the challenge.
- The turning point where the main tension or conflict peaks.
- Highlights the moment of greatest challenge and the decisive action taken.
4. Falling Action
- Shows the aftermath of the climax.
- Begins to lead towards the resolution, detailing the business solution and results of actions taken.
5. Resolution
- Wraps up the story with the outcome of all actions.
- Provides a clear ending, showing how the challenge was overcome and what was learned.
After developing your story structure, be sure to connect it to your core message by creating parallels and reinforcing it with examples.
Most importantly, don’t leave your audience with the realization that they need to take action without offering them an immediate way to act.
Effective storytelling techniques for presentations
The beauty of storytelling is that the possibilities are endless. There are so many ways to tell a story in presentations. It's just a matter of finding the right one for your unique needs and goals.
1) Build your stories around your audience’s pain points
Stories establish connections. But don’t confuse your story with your audience’s story.
Your audience doesn’t care about your story, and they don’t care about your product.
But they will care if they feel you care about them.
Understanding the audience's pain points, values, and opinions can help you weave a story into a narrative that aligns with their interests. It gives you the chance to be part of THEIR story.
Stop talking about yourself. Do this and see engagement blow up, conversions increase, and greater brand loyalty .
2) Establish common ground with your prospects
One effective presentation storytelling technique is to find common ground and share experiences with your audience to establish a connection and make them care about what you say.
These commonalities are what resonate strongest with your target audience.
Common-ground stories tell your audience a satisfied client of yours overcame a particular challenge they are experiencing themselves, and offer the lessons learned while overcoming it.
3) Tell stories that foster peer envy
Peer envy is one of the strongest motivators you can flame in sales presentation storytelling.
Simply put it just means telling the story of a known industry player that achieved remarkable results with the help of your product or service.
A peer envy story should present the initial challenge, the journey to overcome it, and the final enviable outcomes. Yet the reader should feel they can attain similar or better results by following a similar journey.
Here's a fragment of a podcast where Michael Bosworth touches on this very topic:

Business presentation storytelling examples
Here are some examples of famous brands that incorporated personal stories to convey a powerful message in their business presentations.
Zuora sales deck
The Zuora sales deck was aptly named the best sales deck ever . It is truly a best-in-class example of a transformation narrative set within the story mountain framework.
It masterfully narrates the shift to a subscription economy, emphasizing evolving consumer behavior.
And by highlighting the challenges businesses face in this new economy, Zuora positions itself as the essential solution.
The deck's use of data, visuals, and testimonials weaves a compelling story of transformation, urging businesses to adapt and thrive with Zuora or stay behind and decline.
Mign sales deck
Mign’s sales deck highlights the digital shift in musculoskeletal injury recovery, emphasizing the transformation from mass production to personalized care.
Mign applies the hero’s journey story framework and positions itself as the trusted guide in this transformation.
The deck contrasts "winners," who embrace new technologies like additive manufacturing and virtual care, with "losers," traditional manufacturers stuck in outdated processes.
Tinder pitch deck
Tinder's pitch deck effectively narrates the universal challenge of meeting new people and the fear of rejection.
By introducing a hypothetical user named "Matt," Tinder gives the reader a peek into the mind of their target user - an everyday nice guy scared to approach a girl he's interested in.
This concrete personal experience gives life to a basic human need that investors can understand intuitively and even relate to.
Tinder leverages this emotional understanding to make a compelling case for its solution - a platform that eliminates the fear of rejection.
The deck also applied great data storytelling showcasing Tinder's impressive statistics, emphasizing its global reach and popularity among Gen Z.
They also nail the one-liner. Their slogan "It Starts With A Swipe™" encapsulates the simplicity and effectiveness of the app, positioning Tinder as the modern solution to traditional dating challenges.
Brothers Pub restaurant pitch deck
Brothers Pub's pitch deck presents a captivating local business story, emphasizing the need for a fresh, community-focused social pub venue.
The deck tells the story of the owners’ journey, from the initial concept to securing a prime location in Northampton, highlighting their dedication and vision for the future.
The deck outlines the challenges faced by traditional pubs, with 7000 closures in the last decade, and positions Brothers Pub as the innovative solution.
LKE proposal
Legends Kratom Co. (LKE) creates a narrative around the origins and benefits of kratom. By telling the exotic tale of the medicinal tropical evergreen tree and its transformation into a beneficial supplement, the deck creates a vivid backdrop.
They take the reader on their discovery journey to Indonesia to find a supplier for the coveted plant.
This adds authenticity and allure, while their commitment to education and community showcases a heartfelt mission.
Testimonials provide real-world validation, making LKE's story relatable and positioning them as a trusted leader in the supplement industry.
Genius Workshop Event pitch deck
Genius's pitch deck for their storytelling workshop is a masterclass in selling an experience. The deck introduces Gabrielle Dolan's expertise, setting a foundation of trust.
The workshop's structure is presented as a narrative journey, guiding attendees from novice to storyteller.
The deck mixes video, scrollytelling, and vivid language to give rich detail to the experience it promises to provide.
The 90-day follow-up program adds an element of continued growth, while alumni testimonials serve as real-world success stories.
By framing the workshop as a transformative experience, the deck engages and entices potential attendees, showcasing the power of storytelling in action.
Barbie recruitment pitch deck
Barbie's recruitment deck immerses candidates into Barbie's vibrant world. With playful greetings and whimsical descriptions, it sets a creative tone.
The deck focuses on Barbie’s story as a human being (doll in her case), her values, and her experience, instead of focusing on the recruiting company.
The deck lists attributes and responsibilities that align with Barbie's ethos, such as "spreading positivity" and "rocking a pink wardrobe."
Nokia brand guidelines
Nokia's brand guidelines deck uses visual storytelling to effectively communicate the essence of the brand. It lets the visuals tell the story since they speak louder than words.
The deck begins by anchoring the audience in Nokia's mission and values, creating a narrative foundation.
It then unfolds the brand's visual identity, from color schemes to typography, weaving a cohesive story of what Nokia represents.
By providing clear dos and don'ts, Nokia ensures that its brand story remains consistent and impactful across all touchpoints.
This storytelling approach not only educates but also engages, making it easier for stakeholders to internalize and adhere to the guidelines.
nSure one-pager
nSure's one-pager effectively uses visual data storytelling to convey the benefits of their AI fraud protection for digital gift card purchases.
Introducing the challenge of ambiguous transactions, nSure lets the numbers tell the story.
With impressive numbers like their AI solution’s 98% approval rate. They can afford to.
The deck's visuals, combined with endorsements from industry leaders like AXA, make a compelling narrative that instills confidence in nSure's expertise.
Healthy.io proposal
Healthy.io's proposal uses video storytelling with real practitioners who tell the story of their experiences using Healthy.io’s solution.
The video testimonial from a practice nurse adds a personal touch, showing the positive impact on patient care. This brings the user's experience to the front and adds credibility to the proposal’s claims.
The proposal uses a transformation narrative to showcase Healthy.io’s remote kidney screening solution.
They highlight the challenges of legacy ACR testing against their modern home-based test using a smartphone app.
Principles of visual storytelling in business presentations
Storytelling allows you to simplify complex or abstract information and address any objections or resistance. As a result, listeners can better retain and remember the message, which improves the decision-making process.
Here are the main principles that can transform your narrative:
Authenticity
Authentic visuals resonate more with audiences. In an era where people are bombarded with staged and polished images, authentic, candid photos that reflect the reality of your work can make your message stand out and be memorable.
Your visuals should evoke a sensory experience. The goal is to cut through the noise and trigger a stronger emotional response.
For example, you can make the experience more immersive by adding interactive clickable elements, embedding videos, or images that highlight details or visual textures.
Scrollytelling can also play a crucial role here, allowing the story to unfold through interaction, as the audience scrolls through the narrative, engaging them in a multi-sensory journey.
You can see the difference that interactivity makes below. Which presentation would you rather read?

The stories told by your images must be relevant to your audience. Personalized visual storytelling, supported by data to understand what motivates your audience, can turn your story into an experience that resonates deeply.
Every story has characters that fit certain archetypes, such as the caregiver, the explorer, and the creator. Identifying with these archetypes helps your audience connect with the story on a deeper level, making your organization's mission more relatable and memorable.
Make your own storytelling presentation
We've curated an extensive collection of templates to help you achieve effective storytelling for whatever business presentation you need to make.
The business storytelling presentation templates below have been rigorously tested across various devices and refined with insights gleaned from real-world feedback.
They were designed with interactive storytelling at their core. They’ll serve you as handy visual storytelling aids to make your presentations engaging, memorable, and highly converting.
Grab a template!
Why the human brain loves storytelling presentations
According to neuroscientist Uri Hasson , storytelling fosters deep social interactions through brain-to-brain connections.
He found that when we hear stories, our brains mirror each other, helping us understand what the storyteller is feeling.
Called neurocoupling or mirroring, this process occurs across many areas of the brain, including the ones that are responsible for processing and understanding narratives.
So the human brain loves stories. But why?
The short answer is that neural activity in the brain increases when we hear a captivating story. Our brains are made up of neurons, which are nerve cells that send messages throughout the body.
These neurons release neurotransmitters (brain chemicals) that transmit signals from nerve cells to target cells.
The most common neurotransmitters in the brain include:
When we hear a story, the neurons in our brain light up with activity. And according to neuroscientists, "neurons that fire together wire together."
This means that as we hear stories, the neurons in our brains are wiring together. As a result, we're more likely to remember the information we receive from a story.
Storytelling also triggers the release of dopamine ("the brain's form of candy") and oxytocin ("the love drug"). In other words, stories make us feel good.
Here's an infographic showing how storytelling affects the brain:

This can influence buying behavior because it helps to create an emotional connection with potential customers or buyers.
Telling a story, instead of making a sales pitch , is less intimidating to an audience.
The company or product you're describing is easier to understand, seems less complex, and provides relevant information in a format that's easy to digest and remember.
As a result, the buyer can relate to the product or service and will eventually want to purchase it.
Joanne Camarce grows and strategizes B2B marketing and PR efforts @ codeless.io . She loves slaying outreach campaigns and connecting with brands like G2, Wordstream, Process Street, and others. When she's not wearing her marketing hat, you'll find Joanne admiring Japanese music and art or just being a dog mom.

Found this post useful?
Subscribe to our monthly newsletter.
Get notified as more awesome content goes live.
(No spam, no ads, opt-out whenever)
You've just joined an elite group of people that make the top performing 1% of sales and marketing collateral.
Create your best presentation to date
Try Storydoc interactive presentation maker for 14 days free (keep any presentation you make forever!)
Critical PowerPoint Shortcuts – Claim Your FREE Training Module and Get Your Time Back!
How to Narrate a PowerPoint Presentation (Step-by-Step)
- PowerPoint Tutorials
- Shortcuts & Hacks
- October 29, 2019
In this article you’ll learn how to narrate a PowerPoint, with either just your voice or using the new video narration feature.
Firstly, there are two different tools you can use to narrate your PowerPoint slides.

#1: Record Audio is the legacy PowerPoint narration tool. Although this tool doesn’t have as many features, it is faster to open and use, and is handy if you want to drop a voice note on a slide.
Features of this tool include:
- Voice narration only
- Adds narration to one slide at a time only
#2: Record Slide Show is the NEWEST (and best) narration tool in PowerPoint, giving you two different types of narration options plus a variety of other options.
The features here are:
- Voice narration
- Video narration (so your audience can also see your face)
- Allows you to narrate an entire presentation in one sitting
- Automatically sets slide timings for you if you later want to convert PowerPoint into a video
And before you get lost in either tool, let’s cover a few things which will help you out (trust me).
Narration definition in PowerPoint

In PowerPoint, narration simply means recording your presentation as you walk someone through it, so that you can easily share the whole thing with someone else.
On top of that, if you get creative, you can use your narrated PowerPoint files to:
- Share your presentation with team members around the world
- Create a library of best practices for your company
- Build training materials for new hires
1. You don’t need fancy recording equipment
Don’t let fancy equipment or a professional recording studio hold you back from narrating your presentation. For most situations, using the built-in microphone on your personal computer is enough.
For example, if you are doing something relatively informal, such as walking a colleague through something in PowerPoint, the quality of your audio doesn’t need to be extremely high.
If you are creating training materials or giving an important presentation, I recommend getting a decent USB microphone (you can see a list of top rated microphones here ).
That’s because they will help remove any background noise.
2. Find a quiet space and tell people you are recording
Regardless of the quality of your microphone, I recommend finding the quietest place possible to record your narration and let everyone know not to bother you.
When evaluating a quiet place, here are some things to be careful of and to spot check:
- Noisy air conditioners or refrigerators
- Street noise (cars, planes or pedestrians)
- Loud background office or cafe noise
- Cell phones, doorbells or other pinging noises
- Your kids playing in the background
For instance – imagine you are in the middle of narrating your presentation. All of a sudden a colleague knocks on your door or the doorbell rings, and you’re interrupted. It’s not the end of the world, but it will throw you off and likely annoy you.
In addition, if there is too much background noise (like a running air conditioner), the noise can be very distracting to whoever is watching the recording.
3. Check your microphone
The last thing you want to do is walk through your entire presentation, and then discover that your microphone wasn’t working.
Therefore, before narrating your PowerPoint, I recommend double-checking your recording equipment every time before you hit record. This includes ensuring that your equipment is properly plugged in (it happens).

- Right-click the speaker icon in the task bar (lower right-hand corner of your desktop)
- Select Open Sound settings
- Choose your Input device
- Click on Troubleshoot under T est and troubleshoot
Note: If you don’t see the audio bar filling up with color as you talk, that means that your input device is either not selected or not properly connected.
- Connect all your audio and video equipment to your computer
- Restart your computer: Start, Power, Restart
#1. Record audio (audio narration only)
While this is the legacy narration tool in PowerPoint, I want to cover it first.
That’s because even if you decide not to use it to narrate your PowerPoint presentation, it is extremely useful for dropping voice notes on your slides.
When used this way, you can quickly capture your thoughts and ideas about a slide without having to get bogged down editing or building it out on the spot.
Below I’ve detailed how to use this tool to narrate PowerPoint slides.
1. Open the Record Sound dialog box

To open the Record Sound dialog box, simply:
- Navigate to the Insert tab
- Open the Audio drop down
- Select Record Audio
Keep in mind that you can only narrate one slide at a time using this tool. Hence why it’s great for dropping voice notes on a slide, one by one.
2. Record your audio narration

Inside the Record Sound dialog box you can narrate your PowerPoint slide. Simply:
- Type in a Name for your Audio Clip
- Select the Record button (the red dot) to begin narrating
- Click Stop (the square) to stop your narration
- Hit Play (the triangle) to listen to your narration
- Click OK to save the narration to your slide
As a result, you will see a little audio object added to your slide that you can move around and resize if you like.

The audio file can also be played (simply click on the play icon) in both the Normal View and Slide Show View of your presentation.
In this way, you can work your way through your presentation, adding voice notes to your PowerPoint slides that you or your colleagues can play back from within your presentation.
To learn all about adding music to PowerPoint and how to loop your audio files, read our article here .
3. Playing your PowerPoint narration
By default, your audio file will be set to play In Click Sequence (explained below).
That means it will be added at the end of any animation sequences, trigger actions, etc.. If you don’t have any of these on your slide, it will automatically play when you to to advance to the next slide.
All you need to do is advance your slide (click, hit the space bar or arrow keys, etc.) and it will play.

To change when your audio file plays, simply:
- Select your Audio file
- Navigate to the Playback tab
- Open the Start drop down
- Choose either In Click Sequence , Automatically or When Click On
In Click Sequence means that your audio file plays as part of the click sequence of actions that happen on your slide. This includes animated sequences, trigger actions, and videos, all of which you can set in the Animations Pane.
If you do not have any sequences set up on your slide, your audio file will play right before you advance to the next slide in your presentation.
Automatically means your audio file plays as soon as you get to that slide in your presentation, instead of playing right before you advance to the next slide.
When Clicked On means your audio file will only play if someone clicks on it during the presentation in Slide Show mode. For example, you can use this option for a piece of audio that you may not have the time to play, allowing you to choose in the moment whether to play it or not.
4. Delete or overwrite a previous narration file
To delete an audio file narration, simply select the object on your slide and hit Delete on your keyboard.
If you want to overwrite or change an existing narration, simply use the Record Audio dialog box again (as described above). Doing so will overwrite the existing audio file on your slide.
Warning: Two narration audio files cannot exist on a slide at the same time. That means that if you narrate a PowerPoint slide a second time, the first recorded file will be overwritten.
To be clear, that means you will need to start over – from scratch – for the individual slide where you want to change the narration.
While you can trim an audio file in PowerPoint, you cannot split apart or merge different audio files like you could if you used dedicated audio editing software.
#2. Record Slide Show (audio + video narration)
The Record Slide Show command is the NEWEST and BEST way to narrate a PowerPoint presentation for a few reasons, including:
- Record both audio and/or video narrations
- Narrate your entire presentation in one sitting (you are not limited to creating slide-by-slide narrations)
- You can use the pen, highlighter and laser pointer commands and have them captured in your narration too
- The tool allows you to pause and restart your recording
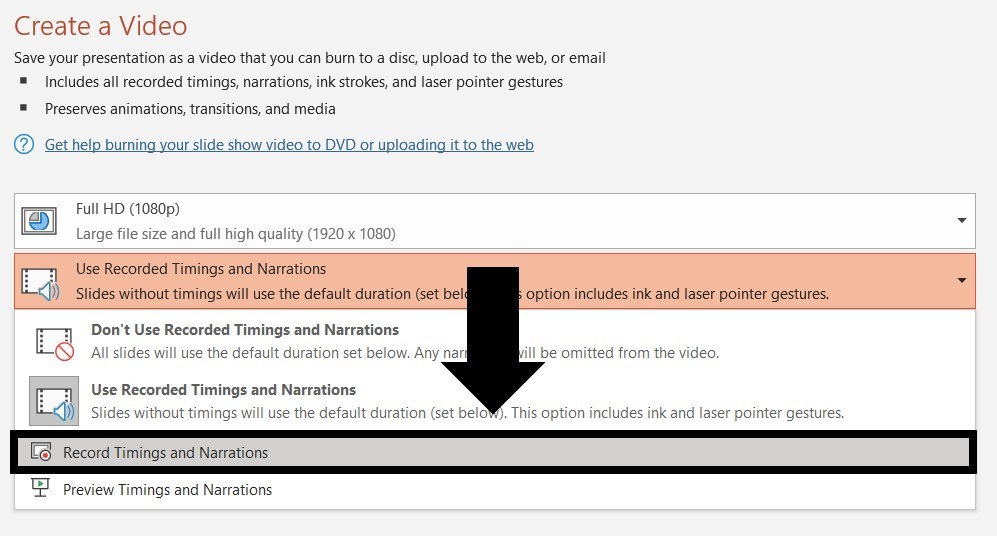
- All your slide timings are automatically recorded, allowing you to use them to turn your PowerPoint presentation into a video (see how to do that here )
In short, unless you have a really good reason not to use the Record Slide Show command to narrate your presentation, this is what you should be using.
As you will see below, there are a lot more settings you can toggle on and off, but don’t let this stop your from recording your presentation.
1. Open the Record Slide Show dialog box

To open the Record Slide Show dialog box, simply:
- Navigate to the Slide Show tab
- Open the Record Slide Show command
- Choose Record from Beginning
If you simply click the Record Slide Show command in the Ribbon (instead of opening up the drop down) it will begin recording from the current slide.
Wait a couple of seconds, and the Record Slide Show commands will load, and you can start narrating your presentation.
2. Record your slide show narration
There are a lot more options you can choose from in the Slide Show dialog box that that I will explain below, but recording your narration is still pretty easy and straight forward

To start recording your slide show narration, simply:
- Choose your Camera and/or Microphone
- Make sure your Camera and/or Microphone is turned on
- Use the Record , Stop and Replay commands to start and stop your narrations
- Use the Arrow (or use your arrow keys) to advance to the next slide
Once you start recording, you get the option to pause the recording. This allows you to pause and collect your thoughts whenever you need to, and continue narrating your presentation when you are ready.

When you are finished, the individual video and/or audio file narrations are added to the lower right-hand corners of each individual slide, as you can see below.

As you can see in the picture above, your audio and video narrations are recorded and saved on a slide-by-slide basis. That means you can review and record narrations on any slide within your presentation.
Warning: You can only have one narration file per slide.
If you re-record an audio or video narration, it automatically overwrites any previous narrations you had on that slide.
The only way to have two different narration files on the same slide, is to record one with the Record Slide Show dialog box, and record the second with the Record Audio command.
3. Set your narration to Play
Your Record Slide Show narrations are set to play Automatically .
That means that whenever you run your presentation (from beginning or from current), your audio and/or video narration will automatically play.

To change when your audio or video narration plays, simply:
- Select the Narration file on your slide
- Choose either In Click Sequence , Automatically or When Clicked On
4. Record Slide Show options

Record (or hit R) to start recording your narration.
Pause (or hit I) to pause your narration and collect your thoughts. This button only displays once you’ve started recording.
Stop (or hit S) to end your narration. If you hit Record again, your new narration will overwrite the existing one.
If you want to stop narrating your current slide before starting on the next one, don’t use the Stop button. Instead, simply navigate to your next slide using your arrow keys or the forward arrow on screen.
Replay to replay your narration for the current slide. This button only becomes active after you have recorded a narration for that slide.
B. Speaker Notes options

Notes (or hit N) to open or close your speaker notes for that slide. The Notes window is fairly small and you cannot resize it very well.
Your action of opening and closing the speaker notes pane will not show up in your recorded narration.
Font Size commands increase and decrease the font size of your speaker notes so that you can see them better.
In my opinion the speaker notes pane is too small and not flexible enough for reviewing lots of speaker notes.
To learn how to print your speaker notes in PowerPoint, read our guide here .
C. Clear Recordings options

Clear Recordings allows you to clear your previous recording on either the current slide or on all the slides in your presentation.
You can also overwrite your recording and slide timings by simply recording over the top of your narrations.
Note: Using Clear Recordings removes both your slide timings and narrations.
That means that if you want to remove your narrations but keep your slide timings, you will want to clear recordings outside of the Record Slide Show dialog box. See how to clear timings and narrations below.
D. Input options: Camera and Microphone

Microphone allows you to choose which microphone you want to record with. So if you are using a microphone other than your computer’s built-in one, this is where you want to select your microphone before you begin recording your narration.
Camera allows you to choose which camera or webcam you want to use if you are recording video narrations. If you are using a camera other than your computer’s built-in one, this is where you want to select it before you begin your narration.
E. Advance Slide options

Next Slide advances the click sequence of your presentation, the same way hitting the right arrow key or clicking your slide with your mouse does.
If you have animated sequences or music that is supposed to play, clicking forwards will trigger those sequences, and eventually advance you to the next slide.
Previous Slide moves you back one slide in your presentation, but it is only available to you when you are not recording.
That’s because re-recording a narration automatically overwrites the previous narration. So once you start your recording, you can only move forward in your presentation.
F. On / Off: Camera and microphone

Microphone (on/off) turns your selected microphone on or off. You can turn your microphone off and still click through your presentation if you want to mute your sound in the recording.
Camera (on/off) turns your selected camera on or off. This allows you to add or remove video recording in your narration.
Camera Preview displays what your camera is recording during your narration. If seeing yourself onscreen while you narrate your presentation bothers you, simply turn camera preview off.

G. Ink options: Eraser, Pen and Highlighter

The Pen (Ctrl + P), Highlighter (Ctrl + I), and Eraser (Ctrl + E) allow you to draw and highlight things on your slides during your presentation.
To change the color of your ink, simply click on one of the colors at the bottom of your screen.
Anything that you draw on your slides during your narration will be recorded as you draw them. That means that someone watching the recording will see you draw on the slide, as you narrate your presentation.
H. Slide Timings options

Slide Timings show you how long you have spent on each slide, and which slide you are on within your presentation.
Therefore, if you are converting your PowerPoint presentation into a video, these slide timings determine how long you spend on each slide.
To learn all about how to convert PowerPoint to video, read our guide here .
I. Close / Minimize options

Close / Minimize allows you to close out of (or minimize) the Record Slide Show app.
Use the Close icon (the x) to exit out of the Record Slide Show dialog box and return to the Normal View of your presentation. You can also hit the Esc key on your keyboard to close out of the dialog box.
#3. How to clear your Timings and Narrations

To clear your Timings and Narrations from the Normal View of PowerPoint, simply:
- Open the Slide Show tab
- Open the Record Slide Show drop down
- Select Clear
- Choose the Timings or Narrations you want to clear
If the Clear command is grayed out when you open the Record Slide Show drop down, that means that you do not have any Narrations or Timings (same as for transitions) set for your presentation.
Clear Timing on Current Slide removes the set transition timing for the current slide.
Clear Timings on All Slides removes the set transition timings on all the slides within your presentation.
Clear Narration on Current Slides removes any voice or video narration you’ve recorded on the current slide.
Clear Narration on All Slides removes any voice or video narrations from your entire presentation.
Note: You can also clear the Timings and Narrations for your slides at the same time from inside the Record Slide Show dialog box.

Inside the dialog box, simply click the X and choose to Clear Recordings on Current or Clear Recordings on All .
#4. How to compress your PowerPoint narrations

Adding audio and video narrations to PowerPoint significantly increases the size of your presentation as you can see in the picture above.
Therefore, I recommend compressing your file after you’re done recording narrations.
After narrating your PowerPoint, you can compress your audio and video narrations. To do that, simply:
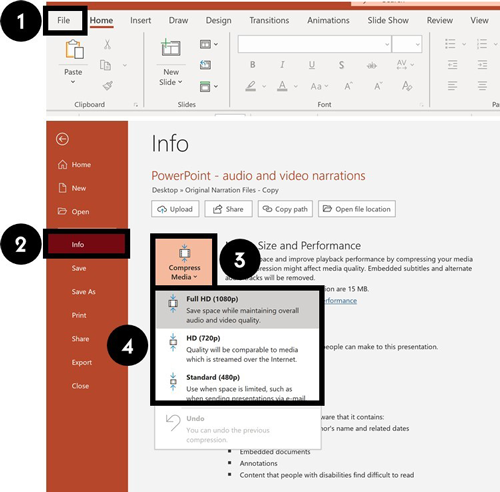
- Navigate to the File tab
- Select the Info group
- Open the Compress Media drop-down
- Choose a compression quality
PowerPoint automatically uses the Full HD (1080p) when recording your voice and video. So if you are tight for space, you will need to choose either the HD (720p) or Standard (480p) options .
To learn a variety of other ways you can reduce your PowerPoint file size, read our compression guide here .
That’s how to narrate a PowerPoint, and the different options you have using the Record Audio and Record Slide Show options.
If you have the latest version of PowerPoint, I highly recommend using the Record Slide Show option as it gives you the most options to work with.
Just keep in mind that narrating your PowerPoint with audio and video can greatly increase the size of your presentation. Therefore, you may end up needing to consider compress it.
If you enjoyed this article, you can learn more about how to improve your PowerPoint skills by visiting us here
What’s Next?
Related articles, about the author.

Popular Tutorials
- How to Strikethrough Text (l̶i̶k̶e̶ ̶t̶h̶i̶s̶) in Word, Excel & PowerPoint
- How to Make Animated Fireworks in PowerPoint (Step-by-Step)
- Strikethrough Shortcut (l̶i̶k̶e̶ ̶t̶h̶i̶s̶) for Word, Excel & PowerPoint
- How to Create a Flash Card Memory Game in PowerPoint (Like Jeopardy)
- Keyboard Shortcuts Not Working: Solved
PowerPoint Tutorial Categories
- Strategies & Opinions
- Presentation Design
- Pictures, Icons, Videos, Etc.
- New Features
- Miscellaneous
- Charts & Data Viz
We help busy professionals save hours and gain peace of mind, with corporate workshops, self-paced courses and tutorials for PowerPoint and Word.
Work With Us
- Corporate Training
- Presentation & Template Design
- Courses & Downloads
- PowerPoint Articles
- Word Articles
- Productivity Resources
Find a Tutorial
- Free Training
- For Businesses
We help busy office workers save hours and gain peace of mind, with tips, training and tutorials for Microsoft PowerPoint and Word.
Master Critical PowerPoint Shortcuts – Secure Your FREE Training Module and Save Valuable Time!
⌛ Master time-saving expert techniques.
🔥 Create powerful presentations.
🚀 Propel your career to new heights.
We value your privacy – we keep your info safe.
Discover PowerPoint Hacks Loved by Industry Giants - KKR, AmEx, HSBC!
Over 114,880 professionals in finance, marketing and sales have revolutionized their PPT skills with our proven methods.
Gain FREE access to a full module of our premium PowerPoint training program – Get started today!
We hate spam too and promise to keep your information safe.
You are currently viewing a placeholder content from Facebook . To access the actual content, click the button below. Please note that doing so will share data with third-party providers.
- Presentation Design
The Best Narrative Structure with examples
A common myth suggests that great presentations are an art form. While some of the world’s best presenters are certainly artists, we know that their presentations obey the kind of narrative structure that allows even novice public speakers the opportunity to deliver great presentations.
What is Narrative Structure?
Well, that depends on the industry, because narrative structure is important in every profession. While different definitions exist, they all point to the “structural framework” of how an idea or story is presented to an audience.
The reliance on structure in a narrative underlines just how attainable great, engaging presentations are. Because if we can show how those are built (e.g. the skeleton), then all that’s left is adding the muscle, or content, and delivering it according to the narrative structure.
The other key element in the narrative structure definition is the idea or story. Without the idea or story, there is no narrative to structure. So we really want to lean on storytelling as a way to engage our audience, and for a good reason.
Importance of Narrative Structure
We all have at least one story to tell. Entrepreneurs often have many. Funding, investment, and commercial acceptance of a product or service aren’t just about the problems they solve, but the story behind the problem itself as well as how these products and services can solve them.
Presenting that story in a proper narrative allows potential investors and customers to engage with the idea. Presentations are no exception.

Serial entrepreneur and four-time New York Times bestselling author, Gary Vaynerchuk, is recognized internationally as one of those artists who deliver great presentations each time he opens his mouth to speak. In his best-selling book, Jab, Jab, Jab, Right Hook: How to Tell Your Story in a Noisy Social World , Vaynerchuk points out the importance delivering the thrust of an idea (the right hook) only after building up the premise through jabs.
In the film industry, this “build up,” which Vaynerchuk calls the jab, jab, jab, is called the plot. Through a three-act structure, screenwriters deliver a plot that gradually builds up (jabs) to a film’s climax (right hook).
Narrative Structure at Work
Let’s take a look at how narrative structure works in a business sense. Again, different industries or experts will label these phases differently. But, without question, great presentations always begin with the first act, a problem, or what Simon Sinek calls the “why.”
First Act / Problem / The "why"
Whether developing a screenplay, pitch deck, or other presentation, engaging narrative always starts with a problem. Presenting that problem to an audience gets them engaged early on.
In a film, someone could be lost and needs to be saved. A common problem that we’ve seen used in blockbuster films like Finding Nemo and San Andreas.
In business, that problem is ultimately the purpose behind the business’s existing in the first place.
In the famous pitch decks listed here , including those used by Airbnb, Intercom, Buffer, and Slidebean, three of the four successful presentations began with listing—in black and white—a problem. These companies are now solving those problems today.
The second act
In the second act, as the audience recognizes and identifies with the problem, the narrative moves on to the next phase. In a film, screenwriters call this the second act. In keeping with the examples above, it’s where Nemo develops independence as a small fish in a new world; where the Rock rekindles his relationship with his ex-wife.
Aka: The solution

In a real-life presentation, the second act involves pitching a solution to the problem identified in the first act and demonstrating how it works. It’s what Vaynerchuk calls “jabs.” Revealing the solution, piece-by-piece, by drip-feeding exciting features with lots of application potential, presenters can quickly build trust and rapport by inviting the audience to rally behind them.
Act II Presentation Tips: Most presentations incorporate visual as well as vocal elements. Visually, point-form icon usage enhances engagement. Vocally, statistics, quotes, and figures engage audiences, but be sure to use the right ones!
For example: In each of the pitch decks on our site , one hundred percent of the presenters used figures in their presentations. Seventy-five percent used icons extensively with minimal text. (See what we did there?)
By this point in the narrative, the audience has been recruited. Everyone has the same goal: to solve the problem that was identified in the first act. And because of the second act, the audience stands behind the presented solution as the best way to achieve their goal, and they trust in the solution's team or company to deliver it.
In our film examples, this is where Nemo has rallied the other fish in the tank to help him escape and return home; the part in San Andreas where the Rock has effectively won over his ex-wife.
In a business setting, this is how Airbnb demonstrated how everyone wins by making or saving money through their social/service platform, and how Intercom and Slidebean demonstrated how their solutions not only solve a problem but do so through simplicity and convenience.
The third act
With the audience rallying behind the Solution, the Third Act is what Vaynerchuk calls the “right hook.” It’s where, in a film, the lost child is reunited with his or her family—Nemo is reunited with his father; the Rock finds and rescues his daughter from a collapsing building after a near-drowning.
The Third Act operates the same in the business world. It’s where the audience gets what it wants or is missing: not just a solution to the common problem identified in the First Act, but a solution to a bigger version of that problem!
Keep in mind that delivering that all-important right hook isn’t about asking for the business… not yet, anyway. As with each of the “jabs” in the Second Act, narrative structure suggests that the presenter reiterates the problem and presents a surprise or twist element that the audience may not have considered. So, a cloud operation might not just solve the second act problems of file access while away from the office, but also the third act problem where file access is prohibited by a complete server hack that locks down all file access fifteen minutes before an important investor meeting that will determine the fate of the company.
In Nemo, that bigger version of the problem is when the father makes it all the way to Sydney only to believe Nemo is dead; in San Andreas, it’s when the Rock’s daughter drowns, and his resuscitation efforts seem to fail. Yes, these are indeed bigger versions of the second-act problems!
In a business presentation, the right hook is preceded by a solution that the team or company has already proven it can competently solve. (Nobody would believe that Stephen Hawking could administer CPR in the film San Andreas, which is why the Rock played a Fire Rescue helicopter pilot with a demonstrated track record of physical heroism).
Tip: Always start the presentation planning process with the why of the presentation itself. In looking at the example pitch decks , we see that Intercom dedicated a slide (What We’re Looking For) to the investment they were seeking. That was the why for their presentation: asking for 600k in a convertible note.

USE THIS TEMPLATE ONLINE
Once the presentation’s why is established, it can be used in the narrative structure of the Third Act. For example, if the why is to capture contact information from attendees, the presentation will end with a call-to-action for that information.
A properly delivered right hook in the third act leaves the audience with no alternative but to act on your call-to-action. The Airbnb pitch deck demonstrated this by showing just how much money can be made, and what gives the Airbnb solution an advantage over competitors.
Rise of the Storyteller

In his article for the Harvard Business Review, executive coach Harrison Monarth outlined the importance of storytelling in $4 million NFL Superbowl ads. What makes them successful? Monarth highlights that “regardless of the content of the ad, the structure of that content predicted its success.”
Given that an audience’s thirst for storytelling lies more in the familiarity of the structure than in the story or idea itself, great presentations that follow the rules of narrative structure will engage audiences each time.
Remember: Start with the Why
Not just why of the idea, story, business solution (which is to solve the problem presented in Act One), but the why of the presentation itself. Knowing the why of the presentation removes any guess work associated with the climax in the Third Act.
Also: Jab, jab, jab
In virtually no great film, novel, pitch deck, or seminar will there be a single act where the sole climax that gets resolved with the only solution to a single problem. The build-up to the climax is essential, and narrative structure proves that.
By demonstrating competence and providing solutions to smaller problems throughout the second act, great presentations engage audiences by winning their support and inviting them to rally behind the presenter or narrator. Simon Sinek’s Ted Talks presentation testifies to this.
Lastly: Structure Isn’t an Art, It’s a Teachable Science
The underlying reality about great presentations is that it’s not the story or any other artistic element that engages an audience. Rather, it’s the familiarity of the narrative structure. Whether the audience is sitting in a Hollywood production studio or a Wall Street boardroom, structure invites engagement—and structure is a three-act science, learned and perfected by all great storytellers, including history’s greatest artists from Shakespeare all the way to Gary Vaynerchuk.
CREATE PRESENTATION
Popular Articles

Pitch Deck Structure: What Investors Want To See

The Startup Financial Model Template by Slidebean
Upcoming events, financial modeling crash course, how to close a funding round.

Let’s move your company to the next stage 🚀
Ai pitch deck software, pitch deck services.

Financial Model Consulting for Startups 🚀

Raise money with our pitch deck writing and design service 🚀

The all-in-one pitch deck software 🚀
-min.webp "narrative ppt presentation")
This article will help you understand the concepts and components of an effective pitch deck.

Check out our list of the top free presentation websites that offer unique features and design options. Discover the best platform for your next presentation now.

This is a functional model you can use to create your own formulas and project your potential business growth. Instructions on how to use it are on the front page.

Book a call with our sales team
In a hurry? Give us a call at
Home Blog PowerPoint Tutorials How to Narrate a PowerPoint Presentation
How to Narrate a PowerPoint Presentation
Similar to doing a commentary to videos, you can also add narrations to your PowerPoint Presentation . It’s an interactive way to provide information to your audience instead of letting them read all points on the slide, with the added value that helps people with visual impairments.
This guide will cover how to create a narrated PowerPoint presentation using Microsoft PowerPoint on Windows.

System Setup
Before going straight to narrating a PowerPoint presentation, make sure that you’re in a quiet environment and free from unnecessary background sound. Noises from air conditioners, fans, street noise, and people nearby can be heard on the narration recording, leading you to start over again. Investing in soundproofing foam for better sound insulation is an expenditure that pays itself over time, you won’t regret such action.
Another factor to look out for is checking if your computer’s microphone is working properly. To double-check the microphone on Windows, follow these steps:
- Go to the Start menu and select Settings > System > Sound .
- Under Input , make sure that it is set on your computer’s default microphone .

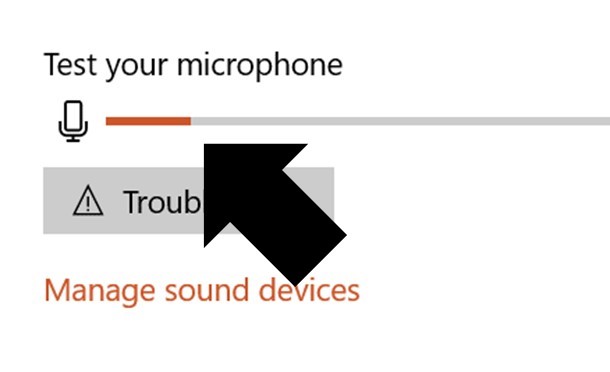
3. Also, try speaking near the microphone and check if the audio bar is moving (under Test your microphone ).

4. If you’re experiencing mic problems, click the Troubleshoot button and follow the on-screen steps. Then, restart your computer and see if the mic issue is solved.

Finally, and as extra caution, be sure to properly place your microphone in the scenario that you use an external microphone (not a handset). Dynamic microphones, thanks to their affordable price, are an option these days for many users, but they do count with a “recordable” side: this means that according to their polar curve, there is a side on the microphone that will record sound in proximity to it, and there’s a side that won’t capture sound at all. Refer to the manufacturer specs prior to blaming any potential issue. In this link , you can find more information about different microphones and their accessories to ensure the best result.
Method #1: Narrate a PowerPoint Presentation (Audio-Only)
This first method to narrate a PowerPoint presentation is ideal to add audio narration to those already-made presentations.
- Open your PowerPoint presentation, navigate to the Insert tab, and click the Audio dropdown icon.

2. You can add audio using two ways; if your audio is pre-recorded and saved on your computer, select the Audio Browser option and select the narration recording. Whereas if you want to record a new narration, click Record Audio .

Note : You can only narrate one slide at a time using the Record Audio option, which makes it suitable for narrating key points.
3. After clicking Record Audio, a new window will appear on the right side of the screen.

4. To record, click the red button; the audio bar will begin moving as you start narrating.

5. To stop the recording, click the Stop button. You can listen to the narration right after by selecting the Play icon.

6. If you want to start over, click the Discard button.

7. When it’s ready, you can add it to the slide by clicking the Insert button.

8. A white audio icon will appear on the slide. You can adjust the icon by selecting it and dragging one of the points on the border. You can also see the play, forward, backward, and volume icons on the playback bar.
9. To set the timing of when the audio will play, go to the Playback tab and find the Start option ( Play icon with lightning ). By default, this will be set to In Click Sequence , but you can also change it to Automatically , or When Clicked On .

- In Click Sequence – The audio will play based on the click actions or animations that are set in the slide. You can adjust this by going to the Animation Panel . If you don’t have any animations on the slide, the narration will play before you advance to the next slide.
- Automatically – The audio will play as soon as you arrive on the slide.
- When Clicked On – The narration will only play once the audio icon is clicked on Slide Show mode . This works great for audio that’s only optional to listen to.

Method #2: Record SlideShow
The second method to narrate PowerPoint presentations may seem more taxing, but it can be done when creating the assets to include in the presentation.
1. Navigate to the SlideShow tab and select the Record SlideShow icon. This will let you record the presentation from the beginning.

2. The Record SlideShow window will soon appear. Here are its parts:
- On the top bar, you’ll see the recording duration, the trash, record, and pause buttons. You can also toggle the camera and microphone by clicking their icons on the right edge of the bar.

To blur your background on the camera, click the Camera dropdown menu and select Blur Background .

- Below, you’ll see the current and next slide previews. You can also add notes under the Next slide preview. You can adjust the font of the notes by clicking the buttons on the bottom-left.
- If you want to move to the next slide or go to the previous one, use the arrow buttons below the Current slide preview.
- To create illustrations or drawings, use the drawing tools that are beside the forward and previous buttons.
- You’ll see all slide thumbnails on the bottom of the screen.
Note : To know more about keyboard shortcuts on the Record SlideShow window, open the Tips button by clicking it.

3. To record the entire presentation, make sure that the camera and microphone features are switched on. Then, press the Record button when you’re ready.
4. You can choose to pause the recording by pressing the Pause button.

5. To stop the recording, click the Stop button. You can check the narration by pressing the Play button; once you want to delete it, click the Trash button.

6. Once it’s ready, select End Show . You can see the narration on each slide, indicated on the slide thumbnails .

7. To set the timing of when the narration video will play, select the narration thumbnail on the bottom-right of the slide and go to the Playback tab.

8. Similar to the first method, navigate to the Start options. By default, the timing is set to Automatic . You can also change this to In Click Sequence , or When Clicked On .

9. To clear timings and narrations on all slides, go to the SlideShow tab and select the Record SlideShow dropdown arrow.

10. Under the Clear options, you can choose if you want to Clear Timings on Current/All Slides or Clear Narrations on Current/All Slides .
Final Thoughts
Adding narration to your PowerPoint presentations is a great strategy to keep your audience engaged . You can use these methods to point out the brief points on each slide, besides letting your audience read the content on the slide.
Keep in mind that narrating is not an alternative to inserting videos into your PowerPoint presentations since they target different objectives from a content perspective.

Like this article? Please share
PowerPoint Tips, PowerPoint Tools Filed under PowerPoint Tutorials
Related Articles

Filed under PowerPoint Tutorials • May 17th, 2024
How to Add Fonts to PowerPoint
Create custom presentation slides by learning how to add new fonts in PowerPoint. Step-by-step guide.

How to Track Changes in PowerPoint
Just like with Google Slides, you can check who made adjustments to your files in collaborative work. Learn how to track changes in PowerPoint here!

Filed under PowerPoint Tutorials • May 14th, 2024
How to Create a Roadmap in PowerPoint
Learn how to create effective roadmap presentations in PowerPoint with this step-by-step guide and recommended templates.
Leave a Reply
- Houston Community College
- Eagle Online
- Charlotte Boykn McKelvy
- Essays: The Different Kinds and How to Write Them
- Personal Narrative Essay
Narrative Essay: Powerpoint on How to Write a Narrative Essay
To print or download this file, click the link below:
Got any suggestions?
We want to hear from you! Send us a message and help improve Slidesgo
Top searches
Trending searches

memorial day
12 templates

151 templates

15 templates

11 templates

39 templates

christian church
29 templates
Storytelling Presentation templates
Reading a book, watching a movie, narrating a story, assisting a play… there are many ways to share a good story storytelling is the social and cultural activity of sharing stories, sometimes with improvisation, theatrics or embellishment. the google slides and powerpoint templates of this set share one thing: they have a well-connected structure for a great presentation about one way or another of storytelling..

It seems that you like this template!
Premium template.
Unlock this template and gain unlimited access
Data Storytelling Workshop
Storytelling is the key to a successful campaign. Everything can be a compelling story if you have the necessary tools! With this creative workshop you can explain your students the basics of data storytelling, a methodology where even numbers can captivate the attention of any audience. The modern design of...

Storytelling in the Classroom
Once upon a time there was a teacher that needed some help with their lesson and that’s when the brave Slidesgo appeared and brought them a very special tool to complete their quest! Maybe we took it too far, but aren’t stories perfect to stimulate young students? Storytelling is key...

Storytelling Infographics
Storytelling is the art of, as its name suggests, telling stories, but using words and images and generally improvising. It is also a communication technique used in marketing or politics to transmit information. This technique seeks to attract the public's attention and convince them in a creative way. Now, if...

Language Arts for Middle School: Storytelling and Narrative Writing using Pear Deck
Download the "Language Arts for Middle School: Storytelling and Narrative Writing using Pear Deck" presentation for PowerPoint or Google Slides. If you’re looking for a way to motivate and engage students who are undergoing significant physical, social, and emotional development, then you can’t go wrong with an educational template designed...

Language Arts for High School - 9th Grade: POV and Narrative Voice
Do you think your students would be able to name how many types of narrators there are and the points of view in a story? Don't worry! Well, if they still don't manage these concepts properly, after a literature class presented with this template, they'll become real experts. And of...

Steps for Writing a Story
Writing a compelling and engaging story can be a challenging task, but with the right tools and techniques, anyone can do it. Our Google Slides and PowerPoint template is designed to help aspiring writers create a structured and effective plan for writing their own stories, as it contains actual content...

Language Arts Subject for Middle School: Elements of Storytelling: Characters, Setting, and Plot
They say there are whole worlds between the pages of a book. Discover these captivating realms with this dreamy Google Slides and PowerPoint template designed for middle school students. Immerse your class in the enchanting universe of storytelling as we explore the fundamental elements of storytelling: characters, setting, and plot....

Storytelling Workshop
Storytelling is the art of telling stories. It is widely used in marketing and is also a great learning tool, through which students can relate and assimilate concepts better. With this Slidesgo template you can prepare a storytelling workshop without having to worry about the design - we'll do that...

Organizers to Improve Your Persuasive Writing
Persuasive writing is continuously used in marketing and sales, but it is a technique that can also be applied to the educational field and, in general, to everything, since it helps us to convince and achieve our goals. In this template we have included notes that you can edit to...

Language Arts for High School - 9th Grade: POV and Narrative Voice Infographics
Have you ever paid attention when reading a book to who’s telling the story? Sometimes, specially when it comes to thrillers, there’s an omniscient narrator. That means that there’s a voice that knows it all and that is none of the characters involved who tells you the story. For dramas...

Writing Fictional Asian Characters Workshop
Writers get inspired from many sources: be it places, things that happened to them, people they know, etc. But being born in Europe or in the Americas might make it difficult to create interesting East Asian characters for books or movies due to the cultural differences. That's where your workshop...

Data Storytelling for Business
At Slidesgo, we also want to be the number one resource for companies. For this reason, we try to create templates that can meet and respond to the needs of any organization. One of these needs is usually the clear and concise representation of data, mostly numerical. You can help...

Brand Storytelling Strategy
Storytelling is a communication technique that consists of capturing the attention of your audience through a story. Its objective is to generate engagement, facilitate brand awareness and create links that last over time. Explain the storytelling strategy that you have designed for your brand with this minimalist template in which...

Brazilian Creative Writing Thesis Defense
Brazilian culture is fascinating, and its writing is no exception, there's a reason you chose to do your thesis on this topic. We wanted to help you with your thesis defense on Brazilian creative writing by designing this delicate template with beautiful illustrations and plant decorations so that you can...

Dragons Fairy Tale for Pre-K
Kids love dragons, don´t they. When you teach them, using something they like is always a good way to make them be interested in learning. Do you agree with us? Then, what about storytelling? Here, we designed this fairy-tale dragons style template just for you! Every slide is full with...

Writing Fictional Asian Characters Workshop Infographics
Perhaps the story that you're writing right now is set in a distant land ruled by the Joseon dynasty, or maybe it's set in the Tibetan mountains, or is about a Thai kid that went to Australia by walking on water. Fiction is fiction, and many writers have different ways...

Brazilian Creative Writing Thesis Defense Infographics
Excited because soon you'll be defending your thesis on Brazilian literature, focusing on the most creative pieces of writing you've found? You must be an expert in the Portuguese language by now (or maybe you're already a Portuguese speaker by birth). What matters here is that you must impress the...

Pre-K Activities to Celebrate Children's Book Day
Download the "Pre-K Activities to Celebrate Children's Book Day" presentation for PowerPoint or Google Slides and create big learning experiences for the littlest students! Dynamic and adorable, this template provides the visual stimuli that Pre-K students thrive on and makes your lessons more playful and exciting — after all, Pre-K...
- Page 1 of 2
- Start the presentation and see your notes in Presenter view Article
- Add speaker notes to your slides Article
- Rehearse and time the delivery of a presentation Article
- Record a slide show with narration and slide timings Article
- Print your PowerPoint slides, handouts, or notes Article
- Create a self-running presentation Article

Record a slide show with narration and slide timings
You can record your PowerPoint presentation—or a single slide—and capture voice, ink gestures, and your video presence. When completed, it’s like any other presentation. You can play it for your audience in a Slide Show or you can save the presentation as a video file. So, instead of just “handing the deck” to someone, people can see your presentation with the passion and personality intact.
A new feature for Microsoft 365 was rolled out in early 2022. Exactly when your business has this feature is also based on when your admin distributes new features in Microsoft 365.
This article contains procedures for both the new experience and the classic experience:
New experience
Classic experience

All recording tools are in the Record tab in the ribbon, but you can start by selecting the Record button.

You can also record by selecting one of the options in the Record section of the Record tab.

If you have notes in your presentation, they’re turned into text at the top of the screen so you can use them like a teleprompter as you record.
Tip: Use the auto-scroll feature in teleprompter and set it to scroll at your preferred speed.

There are several options you can use when you record a presentation. You can turn your camera and microphone on or off by selecting the icons at the top. There are several options you can use when you record a presentation. You can turn your camera and microphone on or off by selecting the icons at the top. To change your camera or microphone, choose the Select more options <···> icon. You can even add a customizable camera that can be resized, repositioned, and formatted to go with your slide content. Select Edit , then select Cameo . Adjust the formatting for the camera, then select Record again to return to the recording environment.
In the Select the camera mode menu, you can select Show Background or Blur Background .

You can also change the layout in the Views menu to switch between Teleprompter , Presenter View , or Slide View .

When you’re ready, select Start recording and a countdown will begin.
Use the onscreen laser, colored pens, or highlighters in the tray below markup slides and it’ll record as well.
To record narration for a specific slide, use the previous or next arrows.
Note: Narration won’t record during slide transitions so let those play first before you start speaking.
Pause the recording as needed or select Stop if you’re done.
To review the video, select the Play button.
To quickly delete and re-record your video on current slide or on all slides, select Delete . While Clear will delete the recorded narration, Reset to Cameo additionally replaces the recorded narration with the camera feed for an easy retake.

When you’re done, select Export > Export Video .
After you successfully export the video, you can view the video by selecting View and share video .

At any time, you can return to your document by selecting the Edit button.
Want more?
About Record in PowerPoint
Create a self-running presentation
Export or turn your presentation into a video
Classic experience
Turn on the Recording tab of the ribbon: On the File tab of the ribbon, click Options . In the Options dialog box, click the Customize Ribbon tab on the left. Then, in the right-hand box that lists the available ribbon tabs, select the Recording check box. Click OK .

To get ready to record, select Record on either the Recording tab or the Slide Show tab of the ribbon.
Clicking the upper half of the button starts you on the current slide.
Clicking the lower half of the button gives you the option to start from the beginning or from the current slide.

(The Clear command deletes narrations or timings, so be careful when you use it. Clear is grayed out unless you have previously recorded some slides.)
The slide show opens in the Recording window (which looks similar to Presenter view), with buttons at the top left for starting, pausing, and stopping the recording. Click the round, red button (or press R on your keyboard) when you are ready to start the recording. A three-second countdown ensues, then the recording begins.

The current slide is shown in the main pane of the Recording window.
You can stop the recording any time by pressing Alt + S on your keyboard.
Navigation arrows on either side of the current slide allow you to move to the previous and next slides.
PowerPoint for Microsoft 365 automatically records the time you spend on each slide, including any Animate text or objects steps that occur, and the use of any triggers on each slide.
You can record audio or video narration as you run through your presentation. The buttons at the lower-right corner of the window allow you to toggle on or off the microphone, camera, and camera preview:

If you use the pen, highlighter, or eraser, PowerPoint records those actions for playback also.

If you re-record your narration (including audio and ink), PowerPoint erases your previously recorded narration (including audio and ink) before you start recording again on the same slide.
You can also re-record by going to Slide Show > Record .
You can pick a pointer tool (pen, eraser, or highlighter) from the array of tools just below the current slide. There are also color selection boxes for changing the color of the ink. ( Eraser is grayed out unless you have previously added ink to some slides.)
To end your recording, select the square Stop button (or press S on your keyboard).
When you finish recording your narration, a small picture appears in the lower-right corner of the recorded slides. The picture is an audio icon, or, if the web camera was on during the recording, a still image from the webcam.

The recorded slide show timing is automatically saved. (In Slide Sorter view, the timings are listed beneath each slide.)
In this process, what you record is embedded in each slide, and the recording can be played back in Slide Show. A video file is not created by this recording process. However, if you need one, you can save your presentation as a video with a few extra steps.
Preview the recorded slide show
On the Slide Show tab, click From Beginning or From Current Slide .
During playback, your animations, inking actions, audio and video will play in sync.

Preview the recorded sound
In the Recording window, the triangular Play button near the top left corner lets you preview the recording of the slide that currently has the focus in that window.

In Normal view, click the sound icon or picture in the lower-right corner of the slide, and then click Play . (When you preview individual audio in this way, you won't see recorded animation or inking.)

You can pause playback while previewing the audio.
Set the slide timings manually
PowerPoint for Microsoft 365 automatically records your slide timings when you add narrations, or you can manually set the slide timings to accompany your narrations.
In Normal view, click the slide that you want to set the timing for.
On the Transitions tab, in the Timing group, under Advance Slide , select the After check box, and then enter the number of seconds that you want the slide to appear on the screen. Repeat the process for each slide that you want to set the timing for.
If you want the next slide to appear either when you click the mouse or automatically after the number of seconds that you enter—whichever comes first—select both the On Mouse Click and the After check boxes.
You can use manual slide timings to the trim the end of a recorded slide segment. For example, if the end of a slide segment concludes with two seconds of unnecessary audio, simply set the timing for advancing to the next slide so that it happens before the unnecessary audio. That way you don't have to re-record the audio for that slide.
Delete timings or narration
The Clear command is for deleting timings or narration from your recording that you don't want or that you want to replace.
In the Recording window, the Clear command in the top margin of the window allows you to:
Clear recordings on the current slide
Clear recordings on all slides
In Normal view, there are four different Clear commands that allow you to:
Delete the timings on the currently selected slide
Delete the timings on all slides at once
Delete the narration on the currently selected slide
Delete the narration on all slides at once
If you do not want to delete all the timings or narration in your presentation, open a specific slide that has a timing or narration that you do want to delete.
On the Recording tab of the PowerPoint for Microsoft 365 ribbon, on the Record Slide Show button, click the down arrow, point to Clear , and then choose the appropriate Clear command for your situation.

Turn off timings or turn off narrations, and ink
After you've recorded your PowerPoint for Microsoft 365 presentation, any timings, gestures, and audio you performed are saved on the individual slides. But you can turn them all off if you want to view the slide show without them:
To turn off recorded slide timings: On the Slide Show tab, clear the Use Timings box.
To turn off recorded narrations and ink: On the Slide Show tab, clear the Play Narrations box.
Publish the recording to share it with others
Once you've edited the recording to your satisfaction, you can make it available to others by publishing to Microsoft Stream.
With the presentation open, on the Recording tab, select Publish to Stream .
Type a title and a description for the video.
Set other options, including whether you want others in your organization to have permission to see the video.
Select the Publish button.
The upload process can take several minutes, depending on the length of the video. A status bar at the bottom of the PowerPoint window tracks the progress, and PowerPoint shows a message when the upload is finished:

Click the message to go directly to the video playback page on Microsoft Stream.
Create closed captions
To make your video more accessible by including closed captions, choose from these options, which are described in separate Help articles:
Manually write a closed caption file yourself
Get a closed-caption file automatically generated by Microsoft Stream
Once you have a closed-caption file, you can add it to your video file by using PowerPoint .
Record a slide show
With your presentation open, on the Slide Show tab, click Record Slide Show .
(The Clear command deletes narrations or timings, so be careful when you use it. Clear is grayed out unless you have previously recorded some slides.)
In the Record Slide Show box, check or clear the boxes for your recording, and click Start Recording .

More about these options:
Slide and animation timings : PowerPoint automatically records the time you spend on each slide, including any animation steps that occur, and the use of any triggers on each slide.
Narrations, ink, and laser pointer: Record your voice as you run through your presentation. If you use the pen, highlighter, eraser, or laser pointer, PowerPoint records those for playback as well.
Important: Pen, highlighter, and eraser recording are available only if you have the February 16, 2015 update for PowerPoint 2013 or a later version of PowerPoint installed. In earlier versions of PowerPoint, pen and highlighter strokes are saved as ink annotation shapes.
At the top left corner of the window is the Recording toolbar, which you can use to:

If you re-record your narration (including audio, ink, and laser pointer), PowerPoint erases your previously recorded narration (including audio, ink, and laser pointer) when you start recording again on the same slide.
You can also re-record by going to Slide Show > Record Slide Show .
To use ink, eraser, or the laser pointer in your recording, right-click the slide, click Pointer options , and pick your tool:
Laser Pointer
Highlighter
Eraser (This option is grayed out unless you have previously added ink to some slides.)
To change the color of the ink, click Ink Color .
To end your recording, right-click the final slide, and click End Show .
Tip: When you finish recording your narration, a sound icon appears in the lower-right corner of each slide that has narration.
The recorded slide show timings are automatically saved. Timings are shown in Slide Sorter view just beneath each slide.
In this process, what you record is embedded in each slide, and the recording can be played back in Slide Show. A video file is not created by this recording process. However, if you want a video file, you can save your presentation as a video with a few extra steps.
On the Slide Show tab, click From Beginning or From Current Slide.
During playback, your animations, inking actions, laser pointer, audio and video play in sync.
Preview the recorded audio
In Normal view, click the sound icon in the lower-right corner of the slide, and then click Play.
PowerPoint automatically records your slide timings when you add narrations, or you can manually set the slide timings to accompany your narrations.
On the Transitions tab, in the Timing group, under Advance Slide , select the After check box, and then enter the number of seconds indicating how long the slide should appear on the screen. Repeat the process for each slide that you want to set the timing for.
Tip: If you want the next slide to appear either when you click the mouse or automatically after the number of seconds that you enter—whichever comes first—select both the On Mouse Click and the After check boxes.
The Clear command is for deleting timings or narration from your recording that you don't want or that you want to replace. There are four different Clear commands that allow you to:
On the Slide Show tab of the PowerPoint ribbon, on the Record Slide Show button, click the down arrow, point to Clear, and then choose the appropriate Clear command for your situation.
Turn off timings or turn off narrations, ink, and laser pointer
After you've recorded your PowerPoint presentation, any timings, gestures, and audio you performed are saved on the individual slides. But you can turn them all off if you want to view the slide show without them:
To turn off recorded narrations, ink, and the laser pointer: On the Slide Show tab, clear the Play Narrations box.
Turn your mouse into a laser pointer
Animate text or objects
Turn your presentation into a video
Create a self-running presentation
Record your presentation

Toggle video and audio options in the options dropdowns in the recording toolbar.

Note: Your video will be re-recorded just as you had styled.
After you exit Recording Studio with the Esc key (or by clicking End show ) you will see narration (audio/video) applied to your slide along with the proper slide timings and ink animations.
Tip: Audio, video, and inking elements can all be resized and moved in edit view after recording.

Reset to Cameo
To delete your recording and retain your camera style, do the following:
On the Record tab, select Reset to Cameo .

Clear timings or narration
On the Record tab, select Clear Recording

Keyboard shortcuts during the recording process
Related information.
Present with Cameo
Save a presentation as a movie file or MP4
Record audio in PowerPoint for Mac
Add or delete audio in your presentation
Prepare to record
To begin, open the presentation you want and click the Slide Show tab.
Tip: If your presentation has a lot of slides, you might find it more convenient to work in Slide Sorter view. Click View > Slide Sorter to try it out.
Here are some things to check before you begin recording:
If you want to record only part of your slide deck, do one of the following before you begin:
Select the slides you don't want to include, and click Hide Slide .
Click Custom Show > Custom Slide Show > + (add).

Use the Rehearse button to change the timing between slides without affecting the narration or gestures you've already recorded.

Make sure your microphone is set up correctly. On the Mac, go to System Preferences > Sound .
Record your slide show
If you want to add narration or commentary to the slide show, make sure your microphone is set up and working.
To start recording:
Click the Slide Show tab, select the slide where you want the recording to begin, and then click Record Slide Show .

During recording, use Ctrl+click to access the recording commands that let you navigate through the slides, change cursors, or trigger screen blackouts or whiteouts.

Click End Show to stop recording.
A Save dialog box appears. Click Yes to save your recording, or No if you want to record it again.
Saving overwrites anything you've previously recorded. If you want to record another slide show with the same set of slides, save your presentation file with a different name.
Click Play from Start to preview your recording.
You may want to print this list of keyboard shortcuts to refer to while you're recording:
Set playback options
When you've finished recording and are ready to distribute the presentation, click Set up Slide Show and choose the options that are right for your audience.

Show type Show full screen or windowed.
Show options Turn off narration or animations.
Slides Choose a subset of slides, or a Custom show if you've set one up.
Advance slides Set up this version of the slide show so someone can page through it manually.
Add, change, or remove transitions between slides
Start the presentation and see your notes in Presenter view
We're sorry. PowerPoint for the web doesn't support recording a slide show.

Need more help?
Want more options.
Explore subscription benefits, browse training courses, learn how to secure your device, and more.

Microsoft 365 subscription benefits

Microsoft 365 training

Microsoft security

Accessibility center
Communities help you ask and answer questions, give feedback, and hear from experts with rich knowledge.

Ask the Microsoft Community

Microsoft Tech Community

Windows Insiders
Microsoft 365 Insiders
Was this information helpful?
Thank you for your feedback.

Writing the Narrative Essay
Mar 19, 2019
760 likes | 1.71k Views
Writing the Narrative Essay. DEFINITION:. A narrative essay tells a story, usually of a personal experience, that makes a point or supports a thesis. The purpose of narrative writing is to recreate the experience for your readers so that your readers can imagine events and
Share Presentation
- narrative essay
- background information
- narrative writing
- good narrative focus
- overboard choose details wisely

Presentation Transcript
DEFINITION: A narrative essay tells a story, usually of a personal experience, that makes a point or supports a thesis. The purpose of narrative writing is to recreate the experience for your readers so that your readers can imagine events and share your experience.
Qualities of a Good Narration Essay • Limited Focus • Thesis/Main point • Lively, Specific Details • Natural use of language • Clear Story Structure or Organization
Limit Your Focus • Decide where your story should begin and where it should end. • Limit your story. Can you narrow it down to a single event or a single day? • Fill in the blanks: The time I realized ______ all started when _________.
Good Narrative Focus? • The night I got arrested was the most harrowing night of my life. • My trip to Spain changed my life in so many ways. • The day my dog Buddy died was the day I realized that pets really are part of the family. • Being in the army was an experience I’ll never forget.
Know the Point of Your Story • The point of your story is also your thesis • Your thesis is the main idea that you wish to convey to your readers. • Your thesis should be supported with plenty of details and examples.
Winning Thesis Statements: The night I got arrested was the most harrowing night of my life. While I was sitting in my cell, I realized that my life was headed down a dangerous path and if I didn’t turn around quickly, I might lose myself forever.
Winning Thesis Statements: On the train that night as I traveled through Spain, I realized that the world was full of mystery and beauty, and I was excited to be a part of it.
Winning Thesis Statements: Although the first week of boot camp was filled with discipline and suffering, I believe that I finally grew up that week—though I wouldn’t have admitted it at the time.
USE DETAILS • Describe the place --describe in “snapshots” --Use all your senses • Describe people --use dialogue, when appropriate --describe significant features and gestures Caution: Don’t go overboard! Choose details wisely.
Use Clear, Natural Language Avoid being too informal or using slang: Oh, man, let me tell you, as I got close to the top of that mountain, I looked up to the top, and I thought, “Whoa, dude…this is so awesome.” It was the coolest thing I ever saw. I knew right then that if could conquer that sucker, I could conquer any damn thing.
Avoid being too formal or too stuffy: As I labored to trudge to the pinnacle of the great mountain peak called Mount Whitney, I paused for a wondrous moment to cast my eyes upon the top of that snowy, lustrous peak, and imagined that if I could accomplish this amazing feat, I could, perhaps climb any mountain on earth.
Improved: As I approached the jagged, snow-covered peak of Mount Whitney, I felt a surge of pride—I knew if I could do this, I could do anything.
Organization Your paper will contain an Introduction, Body, and Conclusion, just like most essays, BUT --Your thesis can appear anywhere in the essay --Your Introduction may begin the story. --Your Introduction may include some background information
SAMPLE OUTLINE Thesis: On the train that night as I traveled through Spain, I realized that the world was full of mystery and beauty, and I was excited to be a part of it. • Introduction: Background Information • A. Why I was in Spain • B. Who I went with • C. When this happened • My first day in Spain when I felt overwhelmed and a little • scared. • A. Finding my way around the subway • B. Getting lost • Discovering the most beautiful Church • A. Feeling closer to God • B. Admiring the beauty of the medieval church
IV. Going to the art museum in Madrid • A. Seeing that famous painting by Picasso • 1. Describe the look of agony on the man’s face • 2. I never realized how a painting can capture so • much emotion! • B. Seeing the paintings by Velasquez • 1. Describe the portrait of King Phillip and his family • 2. Explain how there is something creepy about the • picture. • Traveling by train at night to the coast • A. Staring out the window at the starry landscape • B. Realizing how the trip has changed me • VI. CONCLUSION • A. Now I would like to find a job in Spain • B. I want to travel more and be a part of the world.
Narrative Essay Assignment—Choose ONE of the prompts below and write a 2-3 page essay. All papers must follow MLA formatting. First draft due Friday 9/13 Have you or anyone you’ve ever known purchased a product because you thought it would change your life? Tell about your encounter with this product and explain whether or not this product met your expectations. 2. Tell about a time when you found school to be a sanctuary or the opposite. Be sure to describe the place and tell what people did and said there. 3. Write about a life lesson you learned in high school. Show in detail how particular Events in your experience led to these specific effects. 4. Write about the first time you ever tried a food from another country or culture. After describing the specific situation with details about when and where (and how the food tasted, of course), explain what insights –if any—you gained about the culture through its food.
- More by User

Narrative Essay
Narrative Essay. Central Idea and Concrete Details. Main idea and concrete details.
719 views • 9 slides

Narrative Writing
Canned Lesson. Narrative Writing. Step 1: Read the prompt carefully before you begin. Writing Situation: Your teacher is unexpectedly out sick for one day. Some students in the class decide to misbehave. What do you decide to do? Think about what you might do that day.
855 views • 28 slides

Writing the Narrative Essay. Choose one of the following essay topics: A risk that paid off An event that changed your view of yourself An unforgettable event you witnessed .
346 views • 11 slides

Narrative When you are asked to write a short story, or asked to do some "creative writing", you are doing what is called "Narrative Writing." Narrative writing is meant to entertain! Part of being human is getting to tell great stories!? . . Examples: Story (personal, true, imaginative), Fa
863 views • 16 slides

Writing a Narrative Essay
2. Fall 2008. What is a Narrative Essay?. A personal essay that is built around a main idea. This main idea is the thesis of the essay and will emphasize a point that the story will illustrate. Many times, a narrative essay asks you to describe an experience that lead to an important realization o
370 views • 4 slides

The Narrative Essay
The Narrative Essay. What is a Narrative Essay?. A written account of a true story about something significant in the writer’s life. Book-Length Examples: The Diary of Anne Frank A Narrative of the Life of Frederick Douglas The Story of my Life (by Helen Keller).
528 views • 6 slides

Narrative Essay. ~ eight journal entries ~. Cluster Graph. What is good about a cluster graph (bubble graph, idea web) is that you don’t have to limit yourself to linear thinking as you would if you were making a traditional outline.
486 views • 10 slides

Narrative Essay. Lecture 10. Recap. How to Write a Critical Essay? Steps for Writing an Critical Essay Some Critical Styles Key Points to Consider Dos and Don’ts Common Mistakes Example. Narrative Essay . The narrative essay tells a story. It can also be called a "short story."
8.49k views • 40 slides

The narrative essay
The narrative essay. Composition 9 Mrs. Smith A 413. What is a NARRATIVE essay?. The narrative essay tells a story, usually written from the viewpoint of one person, often the writer, in the first person singular .
781 views • 24 slides

Narrative Essay. Senior Composition Version. What has made me who I am today? Where do I come from and where am I going? What is most meaningful to me? What events and experiences have been significant for me?. The Assignment. Narrative Essay.
554 views • 19 slides

Narrative Essay . Glass Castle Day 7. Do Now: Brainstorm a list of important events, memories, moments in your life. These can be anything and you do not have to share them with anyone. Aim for at least 10 people/events/memories. Learning Target:
283 views • 13 slides

Narrative Writing. A means to an end...not the end. Real Writing vs. Fake Writing. Thought to Ponder.
295 views • 11 slides

Writing Workshop : Narrative Essay
Writing Workshop : Narrative Essay. ENG 101: Writing I Pages from The Writing Process by John Lannon. The Thesis Statement. Step 1 pp. 22-27. Thesis Statement.
379 views • 21 slides

NARRATIVE WRITING
NARRATIVE WRITING. Writing a story. TYPES OF NARRATIVE. A narrative is a story with characters and there is a definite plot line. A narrative normally has a beginning, a middle and an end. There are two types of narrative – fiction and non fiction. NON-FICTION NARRATIVE.
557 views • 18 slides

Narrative Essay. What is a narrative essay, anyway?. Definition:. A narrative essay is simply an essay in which you tell a story. It can recount an event/experience or tell a story. It is a narration .
451 views • 6 slides

The Narrative Essay. The Narrative. The writer evokes the senses to create a picture . The narrator’s goal is to write a detailed account of some memorable experience. Exposition: The Purpose. The text sets up a story by introducing the event/conflict, characters, and setting.
271 views • 9 slides

Narrative Essay-Small Moments Writing Strong Openings
Narrative Essay-Small Moments Writing Strong Openings. Identify/Define: Leads, Hooks, Attention Grabbing Openers (AGOs). Why do we have to do this? Effective and dramatic openers are designed to grab a reader’s attention…like a hook grabs a fish. Hook, Lead or Attention Grabbing Opener ( AGO).
437 views • 19 slides

NARRATIVE ESSAY
NARRATIVE ESSAY. A narrative essay is simply a personal story You are the narrator of your own story. Just choose one moment of your life that you want to share with your readers and write about it. GENERAL GUIDE. Write in first person: Use words such as I, my, mine, me.
529 views • 10 slides

Writing Workshop Writing a Personal Narrative Essay
Writing Workshop Writing a Personal Narrative Essay. Feature Menu. Assignment Prewriting Think About Purpose Choose an Experience Reflect on Your Subject Gather and Record Details Organize Your Reflective Essay Practice and Apply. Writing a Reflective Essay.
205 views • 16 slides

NARRATIVE ESSAY. ASSIGNMENT. To tell the story of a significant moment in your life-history thus far. To have a clear purpose in telling this narrative; that is, to elucidate the valuable lessons you have taken from this experience.
784 views • 59 slides

Narrative essay writing
A narrative essay is written about a person who shares personal experiences or tells a story. in this ppt you can see types , how to write and etc
247 views • 8 slides

Writing a Narrative Essay Like an Expert
For students studying in graduation and masters, they are often assigned with essay writing. Most of the time students ask for u201cnarrative writing helpu201d. Since there are many challenges not only for students but also for the writer. Many times students get confused with what to write. The problem arises due to a lack of ideas, knowledge, or mood swings. If you are this person then try to read more newspapers, blogs, articles, websites on the internet, and many other sources. Also, you can ask for narrative writing help from experts. Try to analyze what experts offering narrative writing help provide.
84 views • 6 slides
- My presentations
Auth with social network:
Download presentation
We think you have liked this presentation. If you wish to download it, please recommend it to your friends in any social system. Share buttons are a little bit lower. Thank you!
Presentation is loading. Please wait.
NARRATIVE WRITING.
Published by Dustin Burke Modified over 8 years ago
Similar presentations
Presentation on theme: "NARRATIVE WRITING."— Presentation transcript:

Narration Essay A Sample Structure.

Elements of a Story What you need to know!.

UNIT 3 WEEK 3 DAY 3 Lead 21. Reinforce the Theme Page Pig Pig Gets a Job What is the name of the job in this picture? What does a builder do? How.

How to write a story.

The world of our senses Do you like reading stories? What kind of stories do you like reading? Why? What are the common elements in stories?

SettingSetting Details that describe: Furniture Furniture Scenery Scenery Customs Customs Transportation Transportation Clothing Clothing Dialects Dialects.

Unit 1 The world of our senses Task Telling a story.

W.5.3 Write narratives to develop real or imagined experiences or events using effective technique, descriptive details, and clear event sequences. By.

An Introduction to The Short Story The long and short of it.

SHORT STORIES. What is a Short Story ? A fictional prose narrative that is from about five to twenty book pages long. Short stories are more limited than.

Stories Gathering ideas Creating Characters Mind mapping

Al Oruba International Schools English Department grade 6 Literature Girls’ Section.

Narrative writing A story with a conflict and a resolution.

Tips for Writing a Short Story Narrative Writing Skills.

HOW TO WRITE A STORY: TIPS: DIVIDE THE STORY IN FOUR PARAGRAPHS BEGIN YOUR STORY BY SETTING THE SCENE (WHO, WHERE, WHEN, WHAT, ETC. IN THE SECOND PARAGRAPH.

Reviewing books, films, plays Postyka Irina, teacher of school 101 Krasnodar.

where/were/we’re/wear

Narrative Narrative Tips: Set the scene Who or What, When, Where

Humanities 8. A short story usually has a limited number of settings, meaning there are few locations. SETTING: Refers to the time and place of a.

Reading Tips Power Point THE MAIN IDEA Main Idea What is the story MOSTLY about Supporting details.
About project
© 2024 SlidePlayer.com Inc. All rights reserved.
7 Best Free AI PPT Maker in 2024

If you are looking for the best free AI PPT maker, then you have come to the right place. In this article, you will find a list of some of the best AI PowerPoint generator tools that you can use and generate the required PPTs of your choice with ease.
Since we were in school, most of us have been utilizing presenting software such as PowerPoint to create our presentations. The preparation of a compelling presentation, on the other hand, requires time from the stage of inspiration to the stage of production. As a result of the use of artificial intelligence in the process of presentation creation, this issue is no longer a concern.
Making use of slide decks and presentations is one of the most effective methods to disseminate information to individuals such as clients, colleagues, students, and friends. On the other hand, the process of designing and developing a professional presentation may take a considerable amount of time, and it is not particularly simple to begin a new presentation from scratch.
You are in luck because if you use an AI PowerPoint generator, you will be able to produce fresh slide decks in a matter of minutes. The purpose of such a free AI presentation maker is to assist users in using generative artificial intelligence in order to generate, design, and modify presentations. This allows users to concentrate on presenting their narrative rather than spending time preparing slides.
We are going to go over some of the greatest tools that you can use as the best free AI PPT maker in the next parts of this instructional tutorial. Inquire about them, should we?
AI PPT Maker: The Best Tools to Use in 2024
Below, you will find a list of the top 7 tools that you can use as the best free AI PPT maker. Before you proceed with any tool, we suggest that you go through its description, check out the tool, try it if required, and then make an informed decision. So, let’s get cracking and have a look at the first PPT maker AI tool in this list below.
1. Sendsteps

In the event that you favor a more personalized approach, Sendsteps is the best free AI PPT maker for you since it also provides you with a collection of various templates from which you can choose. These templates include icebreakers, quizzes, countdown format templates, and pitch decks. You will be able to ask your audience to be a part of quizzes that are made available online on Sendsteps after the slide creation process is complete.
In order to facilitate the creation of interactive presentation slides, Sendsteps provides expanded function capabilities. As is the case with other free AI presentation maker tools, you begin by entering the question and then selecting the customization choices, which include the language, duration, and tone.
Visit the Official Website
Also Read: Best Free AI Search Engine
2. Simplified AI

Simplified AI is the best free AI PPT maker. Why? Here’s why. It is possible that the designs that are created are too simple and limited in terms of variation. To get around this, however, there is a vast collection of templates, icons, graphics, photos, and even stickers and doodles that may be selected from in order to increase the visual variety of the slides. As is the case with the majority of the artificial intelligence PowerPoint generators, all that is required to get it started is for you to submit a question.
A pre-made template selection may also be used as a basis for the customization of the design, which is another choice for this AI PowerPoint generator. Simplified AI is capable of doing a wide variety of jobs for its customers. These duties include the creation of presentations and visual designs, as well as copywriting, video editing , and the maintenance of social media accounts.
3. Canva Doc-to-Deck

Canva is the best free AI PPT maker? How? The way it works is that you create a document in Canva and enter the material that you want to be included in the slides of your presentation. The tool will then turn the text into slides that are presentable in Canva for you, functioning in a manner that is almost identical to that of Slides AI.
Doc-to-Deck is a useful new artificial intelligence technology that was just added to Canva. This AI PPT maker for free enables users to turn the same in a smooth manner. One of the most well-known online design tools , Canva, provides users with a wide variety of templates, visuals, and design components that can be used to create designs for a variety of applications.
Also Read: Best Canva Alternatives for Graphic Design
4. Presentations

Presentations is the next best free AI PPT maker. The artificial intelligence is Clip-E, a creative AI companion inside the application. It is reminiscent of Clippy, the assistant that was used in Microsoft Office in the past. After choosing a starting point, you will have access to several customization choices. You have the ability to construct presentations in a variety of formats, such as class reports, research proposals, book reviews, and more
Before, Presentations offered a greater number of customization choices, which enabled customers to personalize the slides in accordance with their target audience, objectives, business traction, rivals, and other factors. It is Presentations. This AI Power Point generator gives customers the ability to make a presentation using text input, an outline, a PDF that has been imported, or a business template.
5. Decktopus

The artificial intelligence assistant that Decktopus, the best free AI PPT maker, offers extends beyond the production of content to give customers additional customizing possibilities. Users are provided with guided ideas throughout the whole process of slide creation via the magic buttons feature that is included in the Desktop.
These suggestions include advice on appropriate stock icons and pictures to utilize. Additionally, Decktopus provides other presenting tools, such as the ability to record audio and create forms, in order to provide a presentation experience that is intuitive and responsive.
Decktopus goes beyond the capabilities of standard AI-based PPT maker tools by providing the opportunity to customize presentation slides to meet the individual needs of the user. These requirements may include details such as the presentation time, target audience, goals, and themes.
Also Read: Best Free AI Headshot Generator

The toolbox that Gamma has is, without a doubt, far more comprehensive and vast when compared to that of any other best free AI PPT maker. Simply by choosing the plan, you already have access to a wide variety of design choices that can be adapted to your particular requirements. These possibilities range from the construction of a pyramid layout and circular statistics to the construction of a horizontal chronology and staircase layout.
In many ways, the user interface of Gamma is comparable to that of some other PPT maker online AI tools. Gamma, much like a few other AI PPT maker free tools, offers users modifiable layouts and templates, in addition to a variety of tools and blocks that include photographs, videos, charts, diagrams, and smart layouts. All of these elements may be manipulated by the user. Additionally, it combines without any problems with applications such as Figma, Airtable, and Miroboard. This, however, is where their similarities come to a stop.

The slides that are created by Time AI are completely editable, which is a feature that is quite useful for the best free AI PPT maker. Changing the theme, adjusting the font, adding shapes, tables, and charts, and incorporating multimedia from your own collection or the stock image selections offered by Tome are all possibilities that are available to you.
A simple text input is all that is required to produce visually appealing PowerPoint presentations using this free AI presentation maker, which is one of the most popular choices now available on the market. To use Tome, all you have to do is input the title or subject that you are interested in, and then wait for it to work its magic.
Also Read: Best Free AI Video Generator from Text
AI PowerPoint Generator: Final Thoughts
The best free AI PPT maker, powered by artificial intelligence, provides a novel option for simply making outstanding presentations. The use of these tools not only helps save time and effort but also guarantees that the outcomes will be of good quality.
Discover the advantages of using free AI-based PPT maker tools right now, and take your presentations to new heights with their powerful capabilities. Discover the possibilities with the AI Power Point generator, your go-to resource for creating presentations that are both free and inventive.
By using the power of artificial intelligence technology, users are able to rapidly and easily translate their ideas into slideshows that are entertaining. PPT maker online AI tools provide a diverse platform for improving presenting abilities, with features that are designed to cater to both novices and pros alike.
In the end, if you have any questions related to the best free AI PPT maker, use the comments sections below.

Leave a Response Cancel reply
Sign me up for the newsletter!
Subscribe to Our Newsletter and stay informed
Don't worry we don't spam
Related Posts

7 Best Twitter Video Tools in 2024

7 Best CPU Stress Test Software in 2024

Best Reddit Alternatives | Sites Like Reddit 2024
Create video presentations that keep classrooms engaged.
Learn how to craft teaching sessions or class projects that keep eyeballs on the screen with compelling video presentations.

Spice up learning with a video presentation.
As the world shifts toward the virtual classroom, teaching and education tools are moving into digital spaces, as well. With video presentations, students and educators alike have a powerful resource to make learning exciting and fun.
For educators, a video presentation can help introduce topics visually and hold the attention of a class longer. For students, video presentation projects draw on creative and analytical skills that they’ll use throughout their lives.
Go beyond simple PowerPoint slides and explore how Adobe Premiere Pro can help any video presentation maker create their own videos and live presentations that compel audiences with video, animation effects, and more.
Limitless video presentation ideas for any creative occasion.
In a virtual learning environment, students are exposed to limitless knowledge with the drop of a link. Videos offer digestible amounts of information that students can rewatch later to help retain new knowledge.
For teachers, video presentations add variety to teaching materials, which can help keep eyes on the lecture screen instead of the phone screen. Making video presentations can help both students and teachers express themselves, share ideas, and make meaningful learning progress.
Expand the possibilities of virtual learning for students.
Some subject matters lend themselves better to a video presentation than other teaching formats. For example:
- Real-world events and experiences: Watch a video tour of the Parthenon ruins in Greece or experience rare green mambas hatching from their eggs in West Africa.
- Art, creativity, and visual skills: Learn about painting, drawing, geometry, and more with visual aids to help better understand the topic.
- Complex or technical topics: Get a 3D view of the human skeleton to help learn about anatomy, or show all of the elements of the periodic table in action.

Make teaching more accessible and engaging.
Keeping students interested can be a challenge, especially in a virtual classroom setting. Try using videos to change up your course content — and give you a break from lecturing. But, entertaining as videos may be, there are lots of other good reasons to use them in the classroom:
- Inclusivity: Online video presentations with subtitles can accommodate all audiences, including students with hearing impairment. Subtitles can also help students who are learning a new language better understand their teachers.
- Information retention: Smaller chunks of information tend to be easier for learners to remember. Engaging visuals can help overcome learning curves so students can grasp concepts more easily.
- Time efficiency: A brief explainer video or short clip can save you time with lesson planning and help share information from experts in their fields.
- Effortless studying: Students can revisit and rewatch videos outside of the classroom and have time to reprocess the course material.
Types of video presentations.
There’s no limit to what you can create with your video presentation, from a video of you dancing the cha-cha to an animated infographic, or even funny GIFs for a dose of comic relief. Here are a few types of videos you can make yourself — or find online — to use in the classroom:
- Personal narratives: As a class assignment, a personal narrative video can help students learn about themselves and each other. Or, share a personal narrative of people related to the subject you’re teaching.
- Instructional videos: Step-by-step tutorials are a versatile way to break down complicated topics. Try making a how-to video on linear algebra, novel writing, or even a DIY art project.
- YouTube videos: Try using a YouTube video in your presentation slides to connect with younger students in their own language. Many YouTube stars cover educational topics . Or, within a larger video presentation, pop in a short video or two from credible YouTubers to help students stay attentive.
The makings of an engaging video lesson.
Whether you're a student with a video project assignment or a teacher looking to change up your lesson plan, a solid outline will help you or your students create a cohesive video presentation. Start by writing an outline that includes the following:
1. Introduction of your topic:
Hook your audience with an exciting story, fact, or anecdote about your topic.
2. Agenda or overview:
Provide a slide of the talking points you will be sharing with your audience so they can see the full breadth of the presentation.
3. Explain your topic or subject:
Tell the audience about the most important aspects of your topic as you work your way through the sections you presented in your overview.
4. Examples and discussion points:
Get practical on your topic and dive into detail to get the conversation going.
5. Conclusion:
Wrap up your presentation with any last remarks or touch back on the theme of your presentation.
Use Adobe Premiere Pro to create your presentation.
You don’t need a vast knowledge of video editing software to craft a quality video presentation. Adobe Premiere Pro features many video and presentation tools that you can use to customize and finalize your video. Choose from several themed video and presentation templates, slide transitions, and features that let you add subtitles , music, and much more.
Polish off your video by adding some creative components.
Take your video presentation to the next level with these creative tips:

Editing ideas:
- Select short clips : Pick a quick video clip to add variety as a visual aid, but keep it bite-sized so it’s easier for your audience to grasp. You can add video files and clips easily in Premiere Pro and use video templates to speed up that work.
- Add transitions : Premiere Pro features many fun transitions and animated effects you can use within your presentations to keep your audience’s attention.
- Throw in some music: Sometimes a little background music can make a presentation more engaging. Keep the tempo up by adding a tune.
Add the final touches:
- Choose a color scheme or overall design: Slideshow and presentation templates can help you unify the color and theme of your presentations to ensure nothing distracts the viewer. Customization controls can help you update those color schemes too.
- Use stock images: Select a few stock images as visual aids to place throughout your presentation to add high-quality visuals to your piece.
Read more about Premiere Pro tutorials so you can hone your video editing skills and start putting together an engaging video presentation for your next lesson plan or class assignment.
Explore related creative projects and topics…
Share your smarts with educational videos.
Introduction to video editing.
Create a polished school letterhead for your institution.
Get noticed with a stellar college resume.

Shaping the future. One student at a time.
Adobe Ambassadors and campus clubs make it easier to get started with Creative Cloud.
Find out more .
More great benefits.

Get the apps on all your devices.

Learn at your own pace.

Access the latest version of all the apps.
Questions? Ask away
Students get all apps for the price of a single app.
Creative cloud for students and teachers .
Get 20+ apps, including Photoshop, Illustrator, and lnDesign. Save over 60%.
US$19.99/tháng * US$57.99/tháng For the first year, then after that. Check eligibility
stickypromobar
Students save over 60% on Creative Cloud.
Student eligibility
Top Questions
No, the desktop applications in Creative Cloud, such as Photoshop and Illustrator, are installed directly on your computer, so you don't need an ongoing Internet connection to use them.
An Internet connection is required the first time you install and license your apps, but you can use the apps in offline mode with a valid software license. The desktop apps will attempt to validate your software licenses every 30 days.
Annual members can use the apps for up to 99 days in offline mode. Month-to-month members can use the software for up to 30 days in offline mode.
Your Creative Cloud files are stored on your desktop as well as on the Creative Cloud servers. If you cancel or downgrade your paid membership, you will still have access to all of the files in the Creative Cloud folder on your computer and via the Creative Cloud website.
Your account will be downgraded to a free membership, which includes 2GB of storage. If you’re using more than 2GB of storage, you will not be able to upload any new files to the cloud until the amount of online space used in your account drops below your allotted amount.
If you are over your storage limit, you have 90 days to reduce your online usage or you may lose access to some or all of your files saved on the Creative Cloud servers.
No, you can continue using your current version of the product as long as you have an active membership. You have flexibility on when and if you install a new release.
Students and teachers can purchase Creative Cloud at a discounted price. See the Students and Teachers plans page .
Learn the Basics
Get up and running with these great tutorials. Start now ›
Ask the Community
Post, discuss, and be a part of our community. Join now ›
Customer Care
We're here to help. Get support ›
Language Navigation
Cookies on GOV.UK
We use some essential cookies to make this website work.
We’d like to set additional cookies to understand how you use GOV.UK, remember your settings and improve government services.
We also use cookies set by other sites to help us deliver content from their services.
You have accepted additional cookies. You can change your cookie settings at any time.
You have rejected additional cookies. You can change your cookie settings at any time.
- Corporate information
- Nuclear Decommissioning Authority vacancies
D&I Manager (permanent role, flexible location, and £48,620 - £57,200) – closing date 7 June 2024
Updated 28 May 2024

© Crown copyright 2024
This publication is licensed under the terms of the Open Government Licence v3.0 except where otherwise stated. To view this licence, visit nationalarchives.gov.uk/doc/open-government-licence/version/3 or write to the Information Policy Team, The National Archives, Kew, London TW9 4DU, or email: [email protected] .
Where we have identified any third party copyright information you will need to obtain permission from the copyright holders concerned.
This publication is available at https://www.gov.uk/government/publications/nuclear-decommissioning-authority-vacancies/di-manager-permanent-role-flexible-location-and-48620-57200-closing-date-7-june-2024
Role title: D&I Manager
Salary range: £48,620 - £57,200 (level 6)
Function: Human Resources
Role level range: 6-7
Role type: Permanent
Base location: Flexible NDA offices, Cumbria, Warrington, Harwell, London – 40% Hybrid
Reports to: Group Head of Diversity & Inclusion
Closing date: 7 June 2024
The NDA Board and Group Leadership Team have made a strong commitment to diversity and inclusion as a strategic priority. D&I is a critical enabler underpinning the group’s mission, strategy and operating framework. We have an ambitious D&I vision and a transformative programme over the next 5 years. The D&I CoE drives the delivery of the Group NDA Inclusion strategy through the NDA and operating companies. This work is supported and governed by: NDA Board, Sustainability and Governance Committee, Group Leadership Team, D&I Council, People Strategy Board and D&I Delivery Group and multiple internal and external stakeholders. The D&I CoE also represents the NDA on external nuclear and government forums and sector partnerships. You will support the Group Head of D&I with implementation of Group NDA Inclusion Strategy and delivery of improvement plans for the NDA and operating companies.
• Manage and lead delivery of Inclusion Strategy, annual plans, projects and initiatives across the group
• Champion D&I across the NDA and operating companies with key stakeholders, leaders, employees, and externally with sector partners
• Collaborate across the NDA group, within nuclear sector and with stakeholders, as well as, identifying and sharing learning and good practice
• Build successful stakeholder relationships to facilitate the embedding of the Inclusion strategy commitments, goals and targets at a group and local level
Accountabilities:
•Provide support to the NDA Group Head of D&I and represent the D&I Centre of Expertise at internal and external meetings.
• Manage key D&I projects aligned to strategic priorities, delivery plan and supporting the national nuclear sector D&I commitments.
•Support the D&I Council and D&I Delivery Group, and engage internal stakeholders to ensure alignment with strategy goals and provide assurance on progress.
• Build and maintain effective relationships with key external suppliers and subject matter expert organisations
• Produce key HR / D&I related policies and guidance to ensure D&I is embedded into people policies and processes across the employee lifecycle
• Analyse data to provide a narrative and reports on progress for: Board, Committees, HR Governance, Accounting Officer Reviews, Group Business Updates, project management updates, group key targets etc
• Prepare papers, slide decks and presentations for Board, Committees, Group Leadership Team, People Strategy Board, D&I Council, D&I Delivery Group, D&I CoE etc.
• Collaborate with D&I leads, HR Teams, Communications Team and employee networks to support the of delivery of group wide initiatives, campaigns, events and training
• Implement and manage core D&I strategies, plan activities to deliver impact and outcomes across the group. Lead key D&I projects and work streams to deliver on plan commitments.
Knowledge, skills and experience required:
- Shares and demonstrates the NDA values of, Respect, Openness, Collaboration, Performance and Creativity.
- Proven experience in diversity and inclusion delivery, project management or human resources, ideally in a range of settings and delivery positions.
- Experience of working in an HR, D&I, Communications, project management or strategy / policy environment with an understanding of D&I issues in relation to people strategy / policies and employment practices.
- Passionate about Equality, Diversity and Inclusion, with an ability to translate this into plans, policies and initiatives that make a difference.
- Experience of working across complex organisation(s) and leading multiple stakeholders to joint outcomes. Ability to engage with a range of stakeholders including employees, non-executive directors, senior leaders, TUs, D&I Council, D&I Delivery Group etc.
- Strong planning skills with proven experience of managing projects. Ability to organise, prioritise and multi-task and work effectively under pressure to tight deadlines.
- Excellent written and oral communication skills to prepare reports, give presentations, and have an attention to detail.
- Experience of data analysis and presenting results and findings.
- Experience of organising and facilitating meetings, events, workshops, conferences, seminars
- Ability and preference for working collaboratively, a good team player.
- Understands how to manage confidential and sensitive data / information.
- Ability to work pro-actively, look ahead and operate without close supervision
- Confidence to speak up in meetings and challenge appropriately
Other knowledge, skills and experience which are advantageous:
• Knowledge of equality, diversity and inclusion
• IT Proficient, specifically MS Word, Excel and Powerpoint
• CIPD or management qualification or degree or other qualifications an advantage but not essential. Continuous professional development and commitment to learning is an advantage.
To apply: Please complete and send the Equal Opportunity Form accompanied by your CV and covering letter to [email protected]
Is this page useful?
- Yes this page is useful
- No this page is not useful
Help us improve GOV.UK
Don’t include personal or financial information like your National Insurance number or credit card details.
To help us improve GOV.UK, we’d like to know more about your visit today. Please fill in this survey (opens in a new tab) .
IMAGES
VIDEO
COMMENTS
5-sentence Narrative Stories. So far this year we have been working on writing five sentence narrative stories. Here is how these stories were organized: Sentence 1- Topic Sentence introducing the main idea. Sentence 2- Beginning. Sentence 3- Middle. Sentence 4 -End. Sentence 5- Concluding Sentence. Transition words like first, next, and last ...
1) Hero's Journey. The hero's journey narrative archetype involves a hero who goes on a journey and returns as a changed person. This storytelling template consists of three distinct parts, or "acts," that include a setup, confrontation, and resolution. It makes for a well-structured and engaging narrative.
Record your audio narration. Inside the Record Sound dialog box you can narrate your PowerPoint slide. Simply: Type in a Name for your Audio Clip. Select the Record button (the red dot) to begin narrating. Click Stop (the square) to stop your narration. Hit Play (the triangle) to listen to your narration.
The Best Narrative Structure with examples. Vinicio Chanto. A common myth suggests that great presentations are an art form. While some of the world's best presenters are certainly artists, we know that their presentations obey the kind of narrative structure that allows even novice public speakers the opportunity to deliver great presentations.
Method #2: Record SlideShow. The second method to narrate PowerPoint presentations may seem more taxing, but it can be done when creating the assets to include in the presentation. 1. Navigate to the SlideShow tab and select the Record SlideShow icon. This will let you record the presentation from the beginning.
PoweredBlog. June 15, 2023. By weaving a compelling narrative into your slides, you can transform your presentations into immersive experiences that resonate with your audience. This guide will take you through the process of understanding your audience, defining a key message, structuring the narrative, and crafting impactful text.
Take for example the next image on "predicted growth". Slide with a bar chart. Having text represent numbers is torture on your audience's vision. Using graphics such as bars and charts, on the other hand, tells the entire story in a much cleaner and digestible manner.
Download now. Narrative Powerpoint. 1. Narrative Writing. 2. Narrative writing tells a story. A story has certain elements that are not found in other types of writing. 3. Elements of a Story Exposition: The setting and characters.
The Narrative Writing Pack. Nov 19, 2014 •. 44 likes • 34,155 views. AI-enhanced description. Teaching Ideas. This document provides an overview of the key elements of narrative writing, including characters, setting, plot, beginning, middle, and end. It discusses common story features like problems and resolutions.
In this video I explain what Narration in PowerPoint is, and why you;d want to use it (if you're a teacher it's especially useful). I then go on to show you ...
Personal narrative powerpoint ... Narrative Essay Presentation. Narrative Essay Presentation dldixon ...
To print or download this file, click the link below: narrativeessay**-1.ppt — application/vnd.ms-powerpoint, 93 KB (95232 bytes)
SlidesCarnival templates have all the elements you need to effectively communicate your message and impress your audience. Download your presentation as a PowerPoint template or use it online as a Google Slides theme. 100% free, no registration or download limits. Create captivating presentations that tell a compelling story with these ...
Access the Record Slide Show Dialogue Box. Click on the slide show tab and then the Record Slide Show button. You see two options when you click on the command; select the record from the beginning. Note - If you click on the record slide show and not on the drop-down, it will start recording from the current slide. b).
Download the "Language Arts for Middle School: Storytelling and Narrative Writing using Pear Deck" presentation for PowerPoint or Google Slides. If you're looking for a way to motivate and engage students who are undergoing significant physical, social, and emotional development, then you can't go wrong with an educational template designed
In the Options dialog box, click the Customize Ribbon tab on the left. Then, in the right-hand box that lists the available ribbon tabs, select the Recording check box. Click OK. To get ready to record, select Record on either the Recording tab or the Slide Show tab of the ribbon.
Bring stories to life with this beautifully illustrated narrative PowerPoint presentation. Support your students to develop and enhance their narrative writing with this PowerPoint presentation focusing on setting, character descriptions and development. This resource includes explanations, examples, and activities to help students learn how to flesh out their writing with extra detail that ...
Presentation Transcript. Narrative Writing 10 Things to Remember When Writing a Narrative. What is Narrative Writing? It tells a story Can be written in first or third person It may communicate a main idea, a theme, or a moral Uses descriptive language. Number 1 - Your Story Beginning Your story needs a strong beginning.
Writing the Narrative Essay. DEFINITION: A narrative essay tells a story, usually of a personal experience, that makes a point or supports a thesis. The purpose of narrative writing is to recreate the experience for your readers so that your readers can imagine events and share your experience. Qualities of a Good Narration Essay • Limited ...
Download presentation. Presentation on theme: "NARRATIVE WRITING."—. Presentation transcript: 1 NARRATIVE WRITING. 2 Examples of narration Short stories Novels Biographies Fairy-tales. Fantasy Detective stories. 3 Purpose: The purpose of a narrative text is to tell a story. Provide details in the sequence the events occur.
1. Sendsteps. In the event that you favor a more personalized approach, Sendsteps is the best free AI PPT maker for you since it also provides you with a collection of various templates from which you can choose. These templates include icebreakers, quizzes, countdown format templates, and pitch decks.
Free Google Slides theme, PowerPoint template, and Canva presentation template. Get your aviation venture off the ground with our sleek, modern PowerPoint and Google Slides template, tailored specifically for the industrial sectors eyeing the skies. Whether you're pitching to investors, strategizing with partners, or presenting at industry ...
Jun 13, 2013 • Download as PPTX, PDF •. 9 likes • 17,959 views. Ghina Aldila. Slideshow view. Download now. Narrative text presentation - Download as a PDF or view online for free.
The PowerPoint presentation argues that the seven-day structure of Genesis 1 is intentionally designed to show a progressive development toward the goal of Day 7. It highlights the increasing complexity of God's speech and the creation narrative, the strategic use of the Hebrew word "bara" (create), and the escalation in the types of life forms ...
Provide a slide of the talking points you will be sharing with your audience so they can see the full breadth of the presentation. 3. Explain your topic or subject: Tell the audience about the most important aspects of your topic as you work your way through the sections you presented in your overview. 4.
Excellent written and oral communication skills to prepare reports, give presentations, and have an attention to detail. Experience of data analysis and presenting results and findings.
Narrative Essay Presentation. This document provides guidance on writing a narrative essay, including defining what a narrative is, choosing a subject and details, incorporating song lyrics, and developing structure and style. Key points include: - A narrative tells a story from a unique perspective, usually personal, about events or people ...
In its presentation, Microsoft's execs showed off how the new integrations with the Copilot AI companion will allow users to improve image resolution and create narrative text for photos. Heck ...