How-To Geek
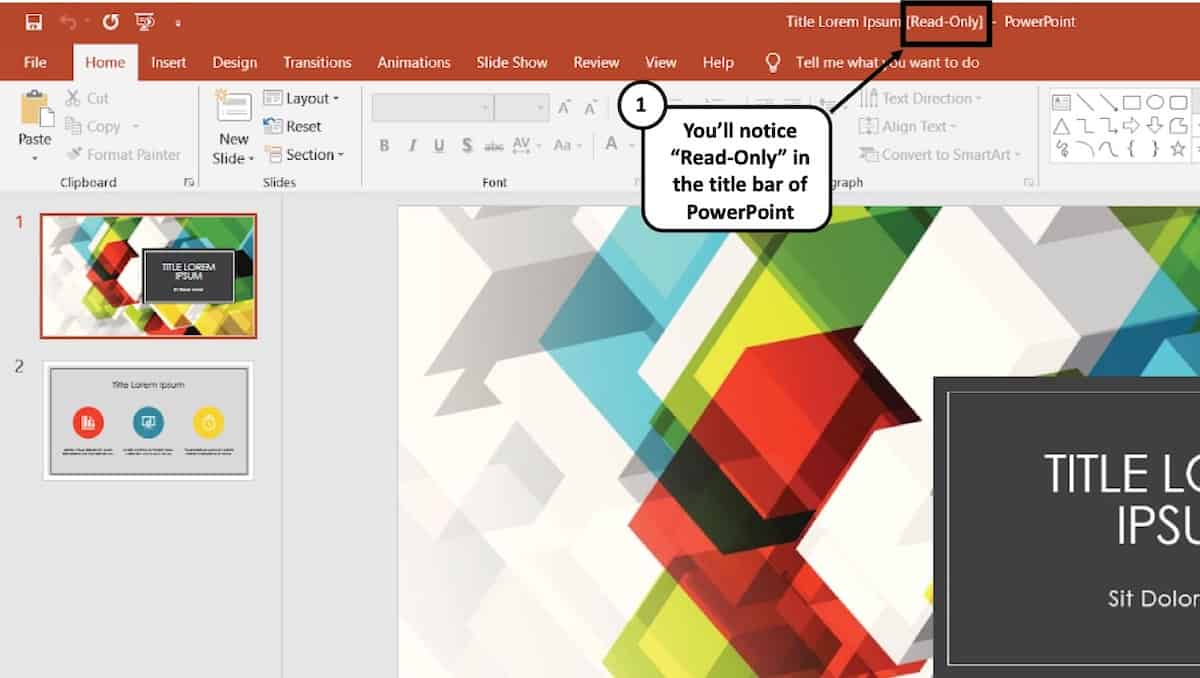
How to make a microsoft powerpoint presentation read-only.
You can set your PowerPoint presentation to "read-only" to discourage others from making edits to your content. Here's how.
If you want to discourage others from making edits to your Microsoft PowerPoint presentation or let them know the file you sent is the final version, you can do so by making it read-only. Here's how it's done.
While making your PowerPoint presentation read-only is a good deterrent from having others edit your content, it's easy to unlock a read-only presentation . It's by no means un-editable.
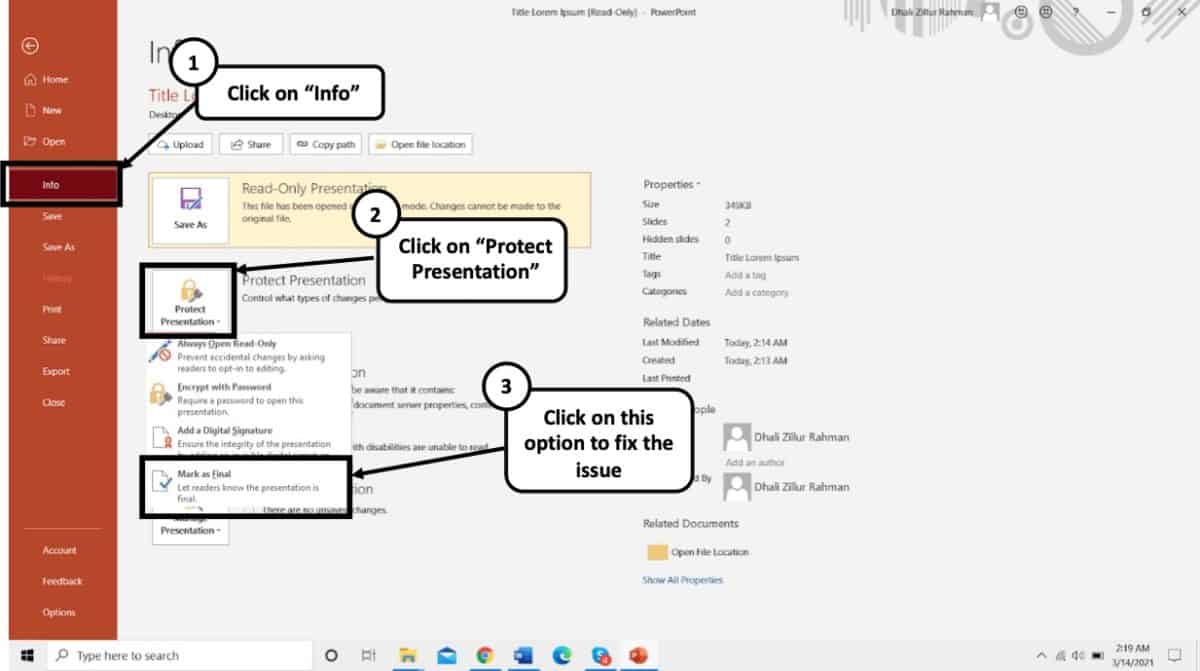
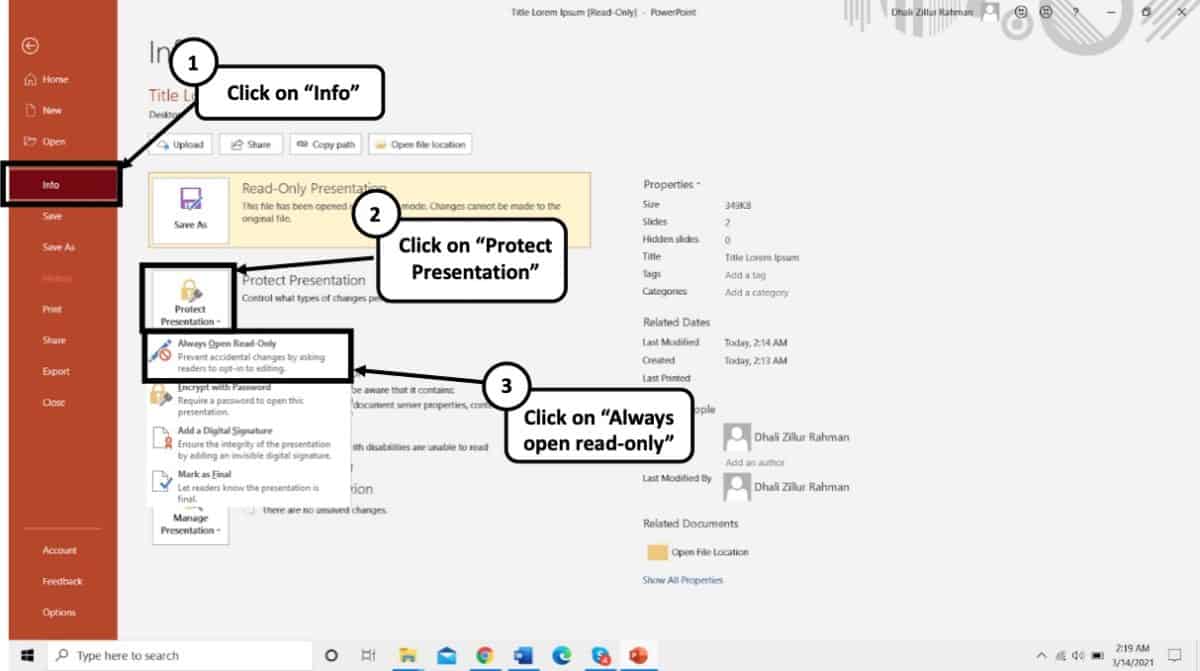
Open the presentation that you want to make read-only, then click the "File" tab.
Next, in the left-hand pane, select "Info."
You'll now see a "Protect Presentation" section, which lets you (to an extent) protect against any editing of your presentation. Click "Protect Presentation."
Once selected, a drop-down menu will appear with these four options:
- Always Open Read-Only: This asks the reader to opt-in to edit the presentation. This prevents accidental edits.
- Encrypt with Password: This password protects your presentation.
- Add a Digital Signature: This adds an invisible digital signature to your presentation.
- Mark as Final: This lets the reader know that this is the final version of the presentation.
All of these options are good for protecting the integrity of your Microsoft PowerPoint, but the two we'll need here to make the presentation read-only are (1) Always Open Read-Only and (2) Mark as Final.
Selecting either option will prevent the reader from editing the presentation--unless they opt-in to do so.
If you chose the Always Open Read-Only option, the reader will see this message when opening the presentation:
"To prevent accidental changes, the author has set this file to open as read-only."
If you chose the Mark as Final option, the reader will see this message:
"An author has marked this presentation as final to discourage editing."
In either case, your Microsoft PowerPoint presentation is now set to read-only. However, in both cases, all the reader has to do to edit the presentation is click the "Edit Anyway" button.
Passper Online
Unlock all file formats online
Passper for Excel
Excel password remover
Passper for Word
Word password remover
Passper for PowerPoint
Powerpoint password remover
Passper for PDF
PDF password remover
Passper for RAR
Rar password unlocker
Passper for ZIP
Zip password unlocker
- Windows Password Recovery

Top 5 Methods to Make PowerPoint Read Only
There are a lot of reasons why you would want to make a PowerPoint document read-only. But perhaps the most important one is to keep someone else from making changes on the document. PowerPoint presentations are often sensitive and just a small change can cause the whole presentation to lose meaning. Therefore, it would make sense to make the document read-only as soon as it is done to prevent accidental changes that can alter the whole concept of the presentation. You may also want to protect the content of the presentation and the easiest way to do that would be to make it harder to edit the presentation.
Whatever your reasons for making your PowerPoint presentation read-only, this article will share with you numerous ways you can do that. We will also take the time to share with you the easiest way to unlock a read-only PowerPoint presentation.
Part 1. How to Make PowerPoint Read Only
The following are just some of the ways you can make a PowerPoint presentation read only.
1. Set Presentations to Read Only
2. set password to modify presentation, 3. burn powerpoint to cd/dvd, 4. convert powerpoint to read-only video, 5. set restrict access.
One of the easiest ways to make your presentation read only is to mark it as "Final". This is a feature available in MS Office that is used to let other users know that you have completed all edits on the document. Here's how to do it;
Step 1: Open the document you want to protect and then click on "File".
Step 2: Click on "Info" and then select "Protect Presentation". Step 3: In the options on the drop-down menu, click on "Mark as Final".

Step 4: Click "OK" in the dialogue box that appears and click "OK" again to confirm.
The next time you open the document, you will see a yellow "Marked as Final" message at the top. If you want to edit the document, simply click on "Edit Anyway" to restore your editing privileges.

You can also choose to set a password to restrict modification of the document. Here's how to do that;
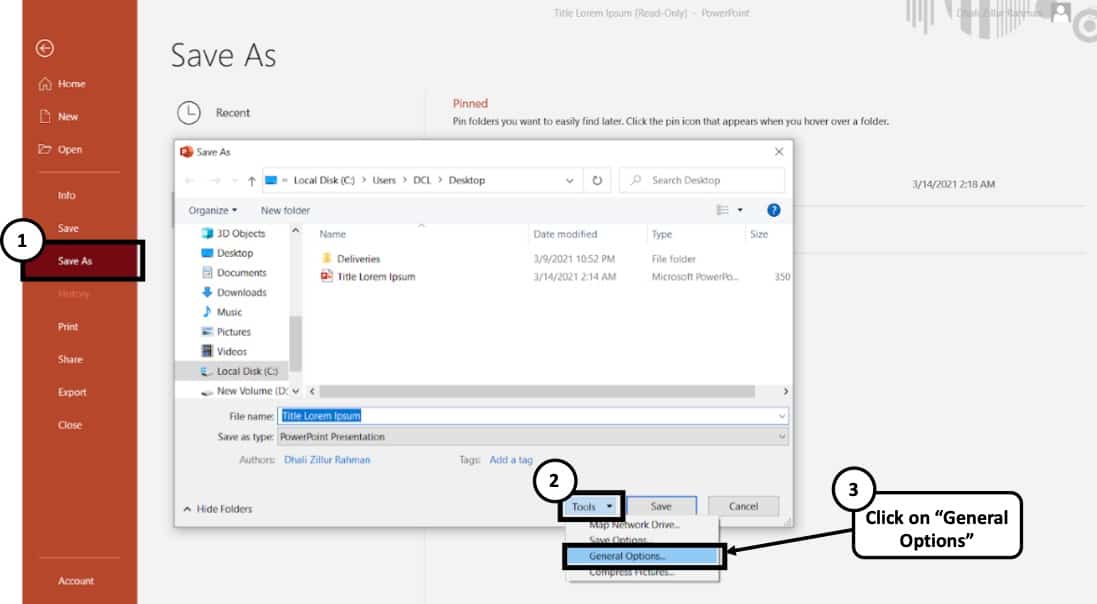
Step 1: Open the presentation and then click on "File > Save As".
Step 2: Click on "Tools" at the bottom of the "Save As" dialogue box and then click on "General Options".
Step 3: In the box marked "Password to Modify", type in the password you would like to use and then click "OK". Reenter the password and then click "OK".

Step 4: Click "Save" to save the PowerPoint presentation and the next time someone tries to edit the document, they will be required to enter the password.
Another really easy way to make a PowerPoint not read only is to burn the file onto CD/DVD. There are a lot of programs that can help you do that and since storage media like CD/DVD is read-only, you are assured of the safety of the data on the presentation. It is also much easier to playback the presentation when it is on CD/DVD.

In the same way, you can also convert your PowerPoint presentation into read-only video. This will not just make it impossible for others to edit the content on the presentation, but it will also make it easier to distribute the presentation.
There are a lot of tools that can help you convert the PowerPoint presentation to video, including screen recorders like Adobe Captivate and Camtasia Studio or Quick Time Movie and Windows Movie Maker.

You may also be able to prevent others from editing the presentation if you use the "Restrict Access" option. The following is how to do that;
Step 1: Open the document and then click on "File".
Step 2: Click on "Info > Protect Document" and from then choose "Restrict Access" from the dropdown menu.

This option will allow people to open and read the document but they will be unable to print, edit or copy any of the content on the presentation.
Part 2. How to Unlock a Read Only PowerPoint
What if you find yourself unable to edit a read only PowerPoint presentation? If someone has sent you an incomplete presentation that has restrictions, the best way to lift these restrictions and edit the document is to use Passper for PowerPoint . This is a password recovery tool that makes it very easy for you to unlock any presentation and lift any restrictions placed on the document. The following are some of the program's features;
Check 2,900,000 passwords /S: It has one of the fastest password recovery rates in the market because it can check up to 2,900,000 passwords per second.
4 Attack Modes Available: 4 different attack modes are used to make it easier to recover the password in the shortest time possible. The fact that it has a database of millions of frequently used passwords is just an added bonus.
Remove Edit Restrictions: It can remove any editing restrictions on the presentation within 2 seconds in a single click.
It is compatible with all versions of MS Office and 100% safe to use. None of the data on the program will be lost or damaged in any way during the recovery process.
Free Download Buy Now
Follow these simple steps to use Passper for PowerPoint to unlock a read-only presentation.
Step 1: Download and install Passper for PowerPoint on your computer and then launch the program. In the main window, click on "Remove Restrictions".

Step 2: Import the presentation into the program and then click on "Remove".

In a few seconds all editing restrictions will be lifted from the document, allowing you to edit the presentation any way you want.
How to Recover PowerPoint Presentation if You Can't Open the File
If you are unable to open the presentation because it is password protected and you don't have the password, Passper for PowerPoint can also help you easily recover the password and use it to open the presentation. Here's how to do that;
Step 1: Open Passper for PowerPoint and choose "Recover Passwords" in the main window.

Step 2: Add the protected presentation into the program and then select a recovery method to use. Click "Recover".

Step 3: The program will immediately begin the process of recovering the password. When the process is complete, the password will be displayed on the screen. You can use it to unlock the document.

Make PowerPoint read only is a simple, yet highly effective technique to help you prevent accidental edits on your presentation and also keep the content safe. But sometimes this well-meaning feature can keep you locked out of your own document. If you find yourself unable to access the PowerPoint presentation or unable to edit it, Passper for PowerPoint presents the best solution to help you recover the password or lift restrictions thanks to its faster recovery speeds, more attack methods and higher recovery rates.
Related Articles:
- Top 9 PowerPoint Password Recovery Software That Unlock Your PowerPoint
- 6 Free Ways to Lock PowerPoint from Editing
- [Updated] 4 Methods to Unlock Read-Only PowerPoint

By Ronnie Barnes to PowerPoint
Posted on Mar 17, 2023 ( Updated: Mar 17, 2023)
Ronnie Barnes, a blogger with more than 5-year experience in writing tips about password recovery for Windows and office files.
How to Make a Microsoft PowerPoint Presentation Read-only

Sharing a PowerPoint presentation with others is common practice in business settings. However, you may not want recipients to edit or change your carefully crafted presentation. Making a PowerPoint presentation read-only prevents unauthorized changes while still allowing viewers to see the content.
There are a few simple ways to make a PowerPoint presentation read-only, both built into PowerPoint itself and using other Microsoft services. Read on to learn how to lock down your presentation and protect it from unwanted alterations.
Mark the Presentation as Final in PowerPoint
The easiest way to make a PowerPoint presentation read-only is to mark it as final right within PowerPoint. Here are the steps:
- Open the PowerPoint presentation you want to make read-only.
- Click on the “File” tab.
- Select “Info” on the left side of the menu.
- Click on “Protect Presentation” and choose “Mark as Final” from the drop-down menu.
Marking a presentation as final sets it to read-only mode within PowerPoint. Other users will be able to view the presentation but will be prevented from making changes.
There is also an option to select “Always Open Read-Only” which prompts users to actively choose to edit the presentation rather than opening it in editing mode by default.
The main downside of this method is users can still override the read-only status by clicking “Edit Anyway.” So it discourages edits but does not completely prevent them.
Set File Permissions in SharePoint or OneDrive
If you store your PowerPoint presentation in SharePoint or OneDrive, you can restrict editing permissions through those platforms. Here’s how:
- Upload or save your PowerPoint file to OneDrive or a SharePoint document library.
- Right click on the file and select “Manage Access.”
- For each person you share with, change their access from “Can Edit” to “Can View.”
With editing rights revoked at the platform level, users will only be able to view or download the presentation in SharePoint or OneDrive. To enable co-authoring abilities again, you can restore edit access.
Save as PDF
Another way to effectively make a PowerPoint presentation read-only is to export or save it as a PDF. PDF files are inherently non-editable documents.
Simply open your presentation in PowerPoint and select “File > Export > Create PDF/XPS.” The presentation will save as a PDF, after which you can share or distribute the new non-editable version.
If you want recipients to still be able to view the PowerPoint and its animations/transitions, you can also save it as a PowerPoint Show (.ppsx) from the “Save As” menu. This format runs the slideshow without the editing interface.
Set a Read-Only File Attribute
For Windows users, you can make a PowerPoint presentation read-only by adjusting file attributes rather than relying on PowerPoint settings.
- Locate your PowerPoint file in File Explorer.
- Right click, select “Properties”, and click the Attributes tab.
- Check the box next to “Read-only.”
- Click “OK” to save the changes.
Now Windows will treat the file as read-only system-wide, blocking any program from opening it in an editable mode. You can repeat these steps to remove the read-only status later on.
Use DRM Software
If you need to share presentations with highly sensitive information, consider using digital rights management (DRM) software. DRM tools like Microsoft Azure Rights Management let you encrypt files, set detailed usage permissions, and revoke access remotely.
While the methods above discourage or hinder editing, DRM solutions like Microsoft’s provide complete protection of intellectual property. Explore enterprise-grade DRM tools if unauthorized changes to a shared presentation could cause harm.
Preventing unintended modifications to a PowerPoint presentation ensures your original version remains intact. The techniques covered in this article, from marking as final to adjusting file attributes, make it simple to keep your presentation read-only and guarded from unwanted changes.
Choose the read-only method that aligns with your use case, whether it’s quick sharing inside your organization or distributing sensitive materials with partners. Just remember edits can still happen if recipients override some read-only settings within PowerPoint itself. For true restrictions, rely on platform permissions, file formats like PDF, or robust DRM systems.
About The Author
Vegaslide staff, related posts.

How to Create a Slide Master in Microsoft PowerPoint

How to Make a PowerPoint Loop

How to Link a Part of Data in Excel Worksheet in PowerPoint

3 Ways to Reduce PowerPoint File Size

Is Your PowerPoint Read-Only? Here’s How to Edit and Save it!
By: Author Shrot Katewa

Are you trying to open a PowerPoint presentation that sadly opens up as a read-only file? If the answer is yes, then you are not alone! This isn’t a pleasant situation for anyone, however, there are many complications and reasons behind why this happens. On a larger note, the solution to this problem is fairly simple.
To edit your PowerPoint read-only file, simply click on the “Edit Anyway” button on the horizontal yellow bar under the ribbon. You can also click on the “File” tab. Then, click on “Info”. Next, locate and click on “Protect Presentation”, and finally click on “Mark as Final”.
Interestingly, one of the reasons why your presentation shows as read-only is because of an in-built feature within PowerPoint! (We’ll get to the details of that in a bit). So, this is not something that you need to fear. We just need to be a bit more informed on how to fix it!
So, in this article, I will be sharing with you the details of why a PowerPoint file shows “Read-only”, and what can you do to save the file and make it editable. Let’s get started!
A Quick Note Before We Begin – if you want to make jaw-dropping presentations, I would recommend using one of these Presentation Designs . The best part is – it is only $16.5 a month, but you get to download and use as many presentation designs as you like! I personally use it from time-to-time, and it makes my task of making beautiful presentations really quick and easy!
Why is My PowerPoint Read-Only?
One of the most common reasons for PowerPoint to become a read-only file as when it has been done so intentionally. Why would anyone want to do this intentionally?
1. “Mark as Final” Feature is Enabled
Well, it turns out, PowerPoint actually provides a built-in feature known as “Mark as Final”. This feature turns the PowerPoint file into “Read-Only” mode . The “Mark as Final” feature of PowerPoint is designed to let the readers know that the version of the presentation that they are viewing is the final version and no changes are to be made to that version!
Thus, even though such a presentation can be opened by viewers, they will see a “Read-Only” prompt both at the top of the PowerPoint application where the title appears (otherwise known as the title bar), and a yellow strip just below the ribbons with a button that says “Edit Anyway”.
Obviously, there are other ways to prevent your viewers from editing your PowerPoint file which is more fool-proof. More on that later in the article.
2. PowerPoint has just Recovered from a Crash
Another common reason for PowerPoint to get into “Read-Only” mode is when your PowerPoint may have recovered from a crash . Irrespective of whether the PowerPoint application was abruptly closed intentionally or unintentionally when a presentation file was open, PowerPoint may open the file in “Read-Only” mode when restarted.
PowerPoint automatically marks the previous saved version as the final version of the file and opens it up in the read-only mode.
3. Same PPT file is Opened Twice at the Same time!
Lastly, PowerPoint may also convert a presentation into “Read-Only” mode when two presentations that have the same name are opened at the same time. Alternatively, the file may also become read-only when the same file has been opened twice by mistake.
This can happen especially when PowerPoint takes some time to respond to the user’s first request to open a presentation file leading to the user double-clicking on the same file twice. Although there are checks and balances in place to avoid this issue, nevertheless, such issues can still take place.
Furthermore, if you have perhaps saved a presentation file that has the same name in two different locations on your computer, and you open both of them together, PowerPoint can sometimes open the file that has been opened later in read-only mode.
How to Unlock Read-Only in PowerPoint?
As annoying as it may seem, it is quite easy to unlock the read-only mode from PowerPoint!
Here’s how to exit from the “Read-Only” mode in PowerPoint –
- Open the “Read-Only” PowerPoint (PPT) file.
- At the top part just below the ribbon options, you’ll see a long yellow banner.
- Hover your mouse towards the banner and click on the option “Edit Anyway”.
You will now be able to edit the PowerPoint file as you usually would.
Furthermore, make sure that you haven’t opened the same file twice by chance. If so, try to close one or both the files and re-open the presentation once again.
Why Does Read-Only Keep Coming Back in PowerPoint?
One of the key reasons why your PowerPoint file may become read-only every time you open it is because the “Mark as Final” feature has been enabled in the settings. As long as this feature has been enabled, your PowerPoint file may keep reopening as a read-only file from time to time.
Let us understand how to turn off read-only mode in PowerPoint so that you don’t have to deal with this issue.
How to Turn Off Read-Only Mode in PowerPoint?
Even though clicking on “Edit Anyway” as described above will fix the issue, however, if the presentation has been marked as final by the original author, it may continue to show the read-only mode sometimes.
In order to fix that issue, you will need to take a slightly longer route. Here’s a step-by-step process to turn off read-only mode in PowerPoint.
1. Start by opening your “read-only” PowerPoint presentation.
2. Hover to the top menu and then click on the tab named ‘File’. Then click on Info.
3. There will be a ‘Protect Presentation’ option in clear yellow.
4. You might come across a dialog box telling you “The presentation has been marked as final to discourage any editing.”
5. To undo this feature, simply click on Protect Presentation. A menu will appear, click on the ‘Mark as Final’ to fully unlock the desired presentation.
After doing this you will see that the Read-Only suffix from your PPT file’s name will be gone and you would be able to freely edit further.
How to Edit a Read-Only PowerPoint File?
After you have done removing the read-only feature from your PowerPoint, you can simply edit texts, add animations, images and use features with absolute free will. Just getting through the read-only barrier is the only thing that you need to know to get started with editing.
Interestingly, you can also get out of the read-only mode in PowerPoint by saving the file with a different name. This will not only allow you to get rid of the read-only mode but also allow you to save a copy of the edits that you may have made while the file was in the read-only mode.
Let’s learn how to save a read-only presentation file.
How to Save a Read-Only PowerPoint File?
Saving a PowerPoint file that is in a read-only mode is rather quite simple. Although you don’t need to enable “Edit Anyway”, doing so would be recommended. The next step is really saving a file in a different location on your computer with either the same name or under a different name.
Here’s how you can save a read-only PowerPoint presentation –
- Click on the “File” tab.
- Click on “Save As” from the option provided on the left part of your screen.
- Navigate to a folder location where you want to save the file. Feel free to change the name of the file if needed.
- Click “Save”.
- Lastly, browse to the specific folder where you saved the PowerPoint file. Open it and check to see if the “Read-Only” mode has been removed.
Why Does Every PowerPoint File Open in Read-Only Mode?
As we have learned so far, one of the key reasons for PowerPoint to open a presentation file in read-only mode is when it has been “Marked as Final” by the author of the file. By now, you’ve also learned how to get rid of this problem.
However, the “Mark as Final” feature should only restrict the specific file shared by a particular author . It typically shouldn’t make all your PowerPoint files “Read-Only”.
If this is the case for you, the problem may be slightly different. Let’s understand this a bit further.
Sometimes, t he file or the folder in which the PowerPoint presentation has been saved itself becomes read-only due to a glitch in the operating system . There are several reasons why this could happen. I won’t go into details of each of those reasons. However, it is important for us to understand how to make this file or folder editable.
Here’s what you could do to remove the read-only from a particular presentation file –
- Navigate to the folder in which the file has been saved, and locate the file.
- Right-click on the file and select “Properties” from the window the just opens up.
- A new window will open up. Click on the “General” tab. Next, clear the check-box from the “Read-Only” attribute option.
- Finally, click “OK” and save your changes.
This should solve the problem. If it still doesn’t fix the issue, you may want to check whether the folder in which the PowerPoint file has been saved has the editable rights to it and is not marked as read-only.
If the folder is also being marked as read-only, you will need to remove the “Read-Only” attributes from the folder first. Here’s an article that can help you remove the read-only attribute from a folder in Windows.
How to Prevent PowerPoint from Being Edited?
There are quite a few different ways in which you can lock a PowerPoint file or prevent it from being edited. Here are some of the options that you can choose from –
- Save a PowerPoint File as Read-Only
- Password protect your PowerPoint file.
- Convert a PowerPoint file into a PowerPoint Show File (PPSX)
- Convert a PowerPoint file into a PDF file
- Convert a PowerPoint file into a Video
Let’s look at some of these methods in detail –
Method 1 – Save a PowerPoint File as Read-Only
To get this done, simply do the opposite of turning off the read-only mode. Here’s a step-by-step process to save a PowerPoint file as Read-Only:
- Open the desired PowerPoint presentation, and click on the “ File ” tab.
- Next, click on the “ Info ” tab from the options presented on the left part of the screen.
- Select the “ Protect Presentation ” option.
- From the dropdown, select “ Always Open Read-Only “.
- Finally, save the file by pressing Ctrl+S.
Your presentation file will now be opened as a read-only file.
Method 2 – Password Protect your PowerPoint presentation
If your colleagues or students haven’t been very familiar with your polite way of discouraging any edits on your final PowerPoint file, then the best option for you is to simply encrypt your presentation file using a password protection feature.
Here’s what you need to do to password protect your PowerPoint presentation –
- Open your desired presentation and select the File tab and then click on “ Save As ”.
- At the bottom of the “Save As” dialogue box, a “ Tools ” option will appear.
- Click on “ General Options ”.
- The box marked as “ Password to Modify ” can be used to type in the desired password you wish to set.
- After setting up your password and re-entering it for further verification, simply click “ OK ”
Similarly, you can also enable password protection from the “ Info ” tab. To do that, click on the “ File ” tab first. Then, click the “ Info ” tab. Next, click on “ Protect Presentation “, and finally from the dropdown, click on “ Encrypt with Password “. You will then be asked to set a password. Simply re-enter the same password and click “ OK “.
While encrypting the PowerPoint file with a password, you will be presented with 2 options – either to restrict access to the PowerPoint file or to restrict modifying the presentation file. Choose the latter as this will allow your audience to at least view the presentation file without editing it.
Method 3 – Convert PowerPoint presentation as a PPSX file
Another method of preventing a PowerPoint presentation from being editing is to convert it into a PowerPoint show file or a PPSX file format. Doing so will directly open the presentation file in a PowerPoint Slide Show mode thereby restricting the editing capabilities of an individual for such a file.
Here’s how to convert a PowerPoint presentation to a PowerPoint Show file (PPSX file)
- Click on the “ File ” tab.
- Then, click on “ Save As ” from the panel on the left part of your screen.
- On the new window that pops-up, click on the “ Save As Type ” option.
- From the dropdown, scroll down and locate the “ PowerPoint Show ” file type option.
- Navigate to the desired location and rename the file if needed.
- Click on “ Save “.
Method 4 – Convert PowerPoint Presentation into a PDF File
Another alternative method is to share a PDF version of the presentation instead of the PPT file. All you need to do is convert the file to the PDF file format. To do that, you can follow the below steps –
- Then, click on “ Export ” from the panel on the left part of your screen.
- On the new window that pops-up, click on the “ Create PDF ” option.
You will now notice that there is a PDF file added to the folder in which you saved the file. Make sure that you share this PDF file instead of the PPT presentation.
Method 5 – Convert PowerPoint File into a Video
Last, but not the least, you can also convert your presentation into a video. Although the use of this method is more suited for creating videos using PowerPoint, however, you can also use this method to ensure that you are able to prevent your viewers from editing it.
Here’s how to convert a PowerPoint file into a video –
- On the new window that pops-up, click on the “ MPEG/MP4 ” option.
How to Remove Restricted Access in PowerPoint?
PowerPoint also provides you with an option to remove access restrictions that the original author may have put in place.
To remove the restricted access setting in your file, simply follow the below steps:
- Next, click on the “Info” tab.
- Then, click on “Protect Presentation” and change the permissions which have been applied.
Unselecting the previous options will remove the existing restrictions.
It is important to note that if the file is password-protected, you will need the password to change the permissions of the file. Without the original password, you won’t be able to unlock the permission protections.
More Related Topics
- Change the Style of Your Bullet Points and Stand-out from the Crowd!
- 7 EASY Tips to Always Make your Presentations Attractive! (Even if You are a Beginner)
- How to Reduce the Size of Your PowerPoint File? The Perfect Method!
- Auto Create Your PowerPoint Slides using Design Ideas Feature!
- Main Features of PowerPoint! [I bet You DIDN’T Know These]
Credit to Cookie_Studio for the featured image of this article.
You’re using an older browser version. Update to the latest version of Google Chrome , Safari , Mozilla Firefox , or Microsoft Edge for the best site experience.
- Corporate Training
- Course Selling
- Academic Learning
- Learning Basics
- Instructional Design
- Online Training Tools
- Manufacturing
- Products iSpring Suite iSpring Learn
- Use Cases Onboarding Compliance Training Induction Training Product Training Channel Partner Training Sales Training Microlearning Mobile Learning
- Company About Us Case Studies Customers Partnership Course Development Contact Us
- Knowledge Hub Knowledge Hub Academy Webinars Articles Guides Experts on iSpring
- Language EN English Français Deutsch Español Italiano Nederlands Português Polski 中文 日本語 العربية Indonesia
- Shopping Cart
How to Protect PowerPoint Presentations – Methods that Really Work

content creator
Paulina Fox See full bio →

You have a PowerPoint presentation you need to share with others, such as an explanation of unique training materials. But how can you protect it from being copied or modified? Protecting the intellectual property in your PowerPoint slides is actually not that hard.
Method #1. Protect Your Presentation with a Watermark or a Password
If you need to safeguard your PPT presentation and distribute it using a physical device or place it on the web providing a possibility for users to download it, a good way to prevent your project from being stolen is to protect it using iSpring Suite . It’s an eLearning authoring toolkit for PowerPoint that offers a bunch of presentation protection settings.
Download iSpring Suite for free and install it on your computer. Open the presentation you want to keep safe, switch to the iSpring Suite 9 tab, and click Publish .

In the Publish Presentation window, select the My Computer tab and head over to the Protection section .

In the opened window, you can configure the security settings you need.
1. Copyright your PowerPoint slides by adding a watermark
With iSpring Suite, you can watermark your presentation with, for example, your corporate logo or copyright notice like © 2020 John Smith . It’s possible to set the watermark’s transparency and position on the slides. You can also specify a webpage that will open when your viewers click on the watermark. It could be anything from terms of use to your profile page on a social network site.

2. Set a password
This option is pretty straightforward. You create a password and no one can view your presentation without entering it first.

3. Restrict time
You can set a special time period when your audience will be able to view your presentation. For example, you can set up a 2-week interval when your slides will be available.

When you’re finished with the settings, save any changes and publish the slides. By default, the output presentation is saved on your PC. You can then transfer it to a pen drive or CD and distribute it to your learners or colleagues.
Method #2. Make Your Presentation Read-Only
This method won’t prevent your copyrighted PPT slides from being copied and shared, but it will protect them from being modified. The upside is that to lock a presentation from editing you don’t need any third-party services – you can do this right in PowerPoint by using the Mark as Final option. When a presentation is marked as final, other users can read and view it, but can’t make any alterations.
To lock the slides, click the File tab in PowerPoint and choose the Protect Presentation command in the Info pane. In the drop-down menu, select Mark as Final . That will set your presentation in read-only mode.

Method #3. Restrict Permission to Selected Individuals
You can set the restriction to your readers so they can read the presentation but won’t be able to change, print, or copy the content.
As with the previous method, you can do this right in PowerPoint. Simply go to File → Info → Protect Presentation → Restrict Access .

However, to grant people access, you need to connect to the Rights Management Service (RMS). It is integrated into Microsoft Office and is available for faculty and staff. Ask your IT department to help you to enable RMS for your account.
Note: RMS allows employees to share restricted documents only within their company or campus. It won’t be possible to share your presentation with individuals that are not your colleagues or faculty members.
We hope this article gave you insights on ways that you can protect your PowerPoint presentations. If you know of any alternative ways to safeguard the slides, please share your ideas in the comment section.
Useful Resources on PowerPoint
Are you a PowerPoint lover? If so, here are some other helpful articles for you:
- How to Share a PowerPoint Presentation Online
- How to Add Narration to a PowerPoint Presentation
- How to Add YouTube Video Into PPT Presentation
- How to Structure a PowerPoint Presentation
Table of Contents
iSpring Suite
Create online courses and assessments in record time.

Content creator
Paulina Fox
Passionate about design and tech, Paulina crafts content that helps customers delve deeper into iSpring products.
The Best Online Learning Platforms in 2024

How to Convert PowerPoint to Video for Windows and macOS
How to Convert Your PowerPoint to an eLearning Module

Subscribe to our blog
Stay tuned to get our latest eLearning tips and tricks!
By clicking “Subscribe”, you agree to our Privacy Policy . All emails include an unsubscribe link, so that you can opt-out at any time.
We use cookies to give you the best possible experience on our website and also for analytics and marketing purposes. You can enable or disable optional cookies as desired. See our Cookie Policy for more details.
Manage your cookies
Essential cookies are always on. You can turn off other cookies if you wish.
Essential cookies
Analytics cookies
Social media cookies
How to Make PowerPoint Read Only: A Comprehensive Guide

In today's fast-paced digital world, PowerPoint presentations are indispensable tools for communication and collaboration. However, maintaining the integrity of your content, especially when sharing it with others, is crucial. This article explores the essential steps to make a PowerPoint presentation read-only, ensuring that your work remains unaltered and secure. Additionally, we will introduce the innovative features of Smallppt.com's AI PowerPoint Generator, enhancing your presentation experience.
1. The Significance of Read-Only Presentations
Understanding the significance of read-only presentations is fundamental. By making your PowerPoint files read-only, you preserve the original content, safeguarding it from unintended modifications, thereby ensuring the accuracy and integrity of your message.
2. How to Create a Read-Only PowerPoint Presentation
Step 1: Open Your Presentation
Begin by opening your PowerPoint file on your computer.
Step 2: Save the Presentation
Click on the "File" tab, then select "Save As." Choose the destination where you want to save your presentation. Before clicking "Save," locate the "Tools" button and click on "General Options."
Step 3: Mark as Read-Only
In the "General Options" window, check the box that says "Read-only recommended." This prompts users to open the presentation as read-only, discouraging them from making changes. Click "OK" to confirm your selection.
Step 4: Password Protection (Optional)
For an additional layer of security, you can set a password to modify the presentation. This ensures that only authorized individuals can make changes.
Step 5: Test the Read-Only Presentation
Before sharing your presentation, test it to ensure it opens as read-only. Close the file and reopen it to confirm that viewers won't be able to edit the content.

3. Introducing Smallppt.com's AI PowerPoint Generator
Smallppt.com offers a cutting-edge AI PowerPoint Generator that revolutionizes the way you create presentations. This innovative tool leverages artificial intelligence to enhance your content:
1.Automated Content Creation: Generate compelling PowerPoint slides with AI-driven content creation, saving you valuable time and effort.
2.Smart Design Templates: Access a vast library of professionally designed templates tailored to various themes and industries, ensuring visually appealing presentations.
3.Intelligent Suggestions: Receive intelligent suggestions for slide layouts, content placement, and design elements, optimizing the overall presentation flow.
4.Language Enhancement: Improve the clarity and coherence of your content with AI-powered language enhancement, making your message more impactful.
Incorporating Smallppt.com's AI PowerPoint Generator into your workflow empowers you to create impressive presentations effortlessly, enhancing your productivity and communication effectiveness.
Creating read-only PowerPoint presentations is essential for preserving your content's integrity. By following the outlined steps, you can secure your presentations from unauthorized modifications. Additionally, embracing Smallppt.com's AI PowerPoint Generator enriches your presentation creation process, ensuring your content is not only secure but also visually engaging and impactful.
Q1: Can I remove the read-only status from a presentation created with Smallppt.com's AI PowerPoint Generator?
Yes, you can remove the read-only status by accessing the presentation's settings and unchecking the "Read-only recommended" option.
Q2: Does Smallppt.com's AI PowerPoint Generator support multiple languages?
Yes, Smallppt.com's AI PowerPoint Generator supports various languages, catering to a global user base.
Q3: Can I customize the design templates provided by Smallppt.com?
Absolutely, you can customize the design templates according to your preferences, ensuring your presentations align with your brand identity.
Q4: Is the AI-generated content unique and plagiarism-free?
Yes, the content generated by Smallppt.com's AI PowerPoint Generator is unique and plagiarism-free, providing you with original and high-quality material for your presentations.
Q5: Does Smallppt.com offer customer support for technical assistance?
Yes, Smallppt.com provides dedicated customer support to assist users with any technical queries or challenges they might encounter during the presentation creation process.

Title / Email address / Description can not be empty!
- Presentation
Why is my PowerPoint read only, and how make it read only?

- January 19, 2023

Table of Contents
Why is my PowerPoint read only?
You can make your Microsoft PowerPoint presentation read only file to deter others from editing it or to let them know that the final version is what you sent. When a presentation is protected or read-only, features such as the Poll Everywhere activity are disabled. To present your activities, you might need to alter the file’s permissions or trust it differently manually. This is how to make a read-only presentation.
Why is my PowerPoint presentation open as read-only?
It is possible that files are opened as read-only when you open them. This may be for security reasons, like when you open files from the internet. Other times it could be because of a setting that can’t be changed. These are some situations where files open read-only. There are steps that you can take to fix it.
You may like: How To Change The Hyperlink Color In PowerPoint?
Your antivirus causes them to open read only.
Antivirus programs can protect you against potentially dangerous files by opening them only read-only. Also, to adjust these settings, you may need to consult your antivirus provider. BitDefender has information on how to add application exclusions.
“Mark as Final” feature is enabled
It turns out that PowerPoint has a built-in feature called “Mark as Final”. This feature converts the PowerPoint file to “Read-Only”. PowerPoint’s “Mark as Final” feature is intended to inform the reader that the PowerPoint presentation they are currently viewing is the final one and that no changes can be made!
Even though viewers can open such a presentation, they will see a prompt that says “Read-Only”, at the top of PowerPoint where the title appears.
There are many ways your viewers can edit your PowerPoint file. These methods are more foolproof. We’ll get to that in a moment.
Are file properties set to read only?
Right-click on the PowerPoint file to view its properties and choose Properties . You can check the Read-only attribute and uncheck it by clicking OK .
PowerPoint just recovered from a crash
PowerPoint can also go into “Read-Only mode” after a crash . PowerPoint can open a file in “Ready-Only” mode if it is accidentally closed abruptly or intentionally.
PowerPoint automatically marks the last saved version as the final file version and opens it in the read-only state.
This content is protected view
Files downloaded from the internet or from other unsafe places can contain viruses, trojans, and other malware that could cause damage to your computer. This frequently happens with attachments to emails or files that you have downloaded. A protected view is used to open files in potentially dangerous locations. Protected view allows you to view files and its contents while decreasing the risk.
The same PPT file can be opened twice at the same time
PowerPoint can also change a presentation to “Read-Only” mode if two presentations with the same name are open at the same moment. Alternately, the file can be made read-only if it is accidentally opened twice.
This is especially true if PowerPoint takes a while to respond to the first request for a presentation file. If this happens, the user may end up double-clicking the same file twice. Despite the fact that there are safeguards to prevent this from happening, it can still happen.
Is OneDrive fully loaded?
If you have too much space on OneDrive, the file will not be able to be saved. You can check your free space on OneDrive by clicking the OneDrive icon in the notification center and choosing Manage storage , or you can go to http://onedrive.live.com , sign in, and note the amount of used space in the lower left of the screen.
Is the Office active?
You could be in read-only Reduced Functionality Mode if Office isn’t activated or expired.
Make a PowerPoint Presentation Read Only
You can’t edit the presentation if read-only is turned on in Microsoft PowerPoint. This means that you should not make any changes to the presentation until you are done with it. You can make a PowerPoint presentation read-only by following these steps:
- Your PowerPoint presentation is now open.
- Select and click the File button at the top.
- Select Info from the bar to the left.
- Click Protect Presentation .
You’ll find four options in the pull-down menu:
- Always open Read-Only and informs readers that the selected PowerPoint file is read only, and should not be edited.
- Mark as Final informs readers that this is the final copy of this file.
- Use a Password to encrypt files.
- Add Digital Signature activates the function and adds an invisible signature that ensures the integrity of the presentation.
Only two options will make your PowerPoint presentation unreadable: Always Open Read Only or Mark it as Final.
If Always Open Read-Only has been selected, everyone who opens the presentation will be notified that the author has made it safe to do so. Files marked as Final will also display the message “An author has marked the presentation as final to discourage editing.”
NOTE: If you don’t want anyone altering your presentation, the best option is to choose “Encrypt with Password” from the Protect Presentation menu. This option, as you probably know, means that no one can read or edit the file without your Password. This is the best way to secure your document.
Password for Modifying Presentation
To prevent others from altering the document, you can also set a password. Here are the steps to accomplish this.
1: Open the presentation, then click “File > Save as.”
2: Click “Tools” at the bottom of the “Save As” dialog box, and then click “General Options.”
3: Type the Password you want to use in the box marked “Password To M; modify” and click “OK.” Enter the Password again and click “OK.”
4: Click “Save” to save the PowerPoint presentation. The next time someone attempts to edit the document, they will need to enter the Password.
Convert PowerPoint into Read-Only Video
You can also convert your PowerPoint presentation to read-only video in the same manner. This will make it difficult for others to modify the presentation’s content and make it easier to distribute it.
You can convert PowerPoint presentations to video with many tools, such as screen recorders like Adobe Captivate or Camtasia Studio, Quick Time Movie Maker, and Windows Movie Maker.
Restrict Access
You can also restrict access to the presentation so that others cannot edit it. Here’s how you do it:
- Open the document, then click “File.”
- Click “Info > Protect Document” then “Restrict Access” in the dropdown menu.

Presentation design services :
With our presentation design services , we can help you create an amazing visual representation of your business. They are designed by professional strategists and designers who understand how important it is to have visuals that communicate clearly and effectively while still being aesthetically pleasing. They’re also created using the most up-to-date data so they won’t become obsolete quickly like other types of marketing material might be.

- Graphic Design , UI-UX
How to Become a Motion Graphic Designer?

A Brief Overview of Lean UX

UX Strategy and Its Components
you'r more than welcome
7 days a week, 9:30 AM – 5:30 PM
contact info
[email protected] +971581974748
- LB07129, Jebel Ali Freezone, Dubai, UAE
Got a Project?
We’re a team of creatives who are excited about unique ideas and help companies to create amazing identity by offering wide range of digital services
© 2021 All rights reserved.
Be the first one who knows about updates!
enter your email address 📩
Welcome to the club 🎉.
From now on, Temis will inform you of its most valuable content and offers. You can also subscribe to this list at the moment. We will also protect your privacy
- Password Tools For Windows Password Genius Windows Password Genius Windows 10 Password Genius Windows 7 Password Genius RAR Password Genius ZIP Password Genius SQL Password Genius Chrome Password Genius WiFi Password Genius For Office Office Password Genius Word Password Genius Excel Password Genius PowerPoint Password Genius Access Password Genius Outlook Password Genius Outlook Email Password Genius PDF Password Genius For Removing Office Password Remover Word Password Remover Excel Password Remover Workbook Unprotect Genius PowerPoint Unprotect Genius Word Unprotect Genius
- More Utilities Data Recovery BitGenius Word Repair Genius Excel Repair Genius PowerPoint Repair Genius Office Repair Genius Photo Data Genius Android Data Genius BitLocker Tools BitLocker Genius for Mac BitLocker Genius for Windows More Tools Product Key Finder SafeUSB Genius ISO Genius All Products
- Support Support Center FAQ & Contact Resource Center How-to Articles Blog Blog, News & Guides
3 Methods to Make a MS PowerPoint 2010 Presentation Read Only
By Achilles Hill | Last Updated January 03, 2024
"I made a presentation for the school teaching and my students asked me to share it with them. I do not want them to edit the content and change the format. How do I make the MS PowerPoint 2010 presentation read only? Is there any reliable way?" .
For the Microsoft users who want to protect PowerPoint presentation from editing and modifying, they can make a presentation created with MS PowerPoint 2010 read only in three methods.
- Method 1: Mark the PowerPoint Presentation as Final Version
Method 2: Restrict Editing with the Password
Method 3: save the presentation with modify password, how to make a powerpoint presentation read only.
In the following, we use Microsoft PowerPoint 2010 to show you the process to make a PowerPoint presentation read only.
If you want to make the PowerPoint presentation protected, Mark as Final is the first option that let readers know the content is final and make it read-only. In this way, you turn off the typing, inserting and other editing features on the final content version.
Step 1: Open File > Info > Protect Presentation .
Step 2: Click Protect Presentation and get several options.
Step 3: Click Mark as Final and get the warning box from Microsoft PowerPoint. Click OK to continue.

After that, when others open this presentation, they will see a yellow alert on the top. If they want to edit the content, they can click Edit Anyway to modify the text and layout. Therefore, it is not a safe option to protect the presentation.

This option is chosen by most people to make the MS PowerPoint 2010 presentation read only. You can add restrict permission to remove others' ability to edit, copy and print the presentation.
Step 1: Access File > Info > Protect Presentation .
Step 2: Click Protect Presentation and select Restrict Access from Restrict Permission by People option.
Step 3: Set a password to protect the presentation.

For the MS PowerPoint 2010/2013/2016 presentation, they can also add the modify password to protect the content from editing.
Step 1: Click File > Save As .

Step 2: In the Save As interface, besides setting the file name and type to save, you are also provided tools to set general options. Right click Tools button and select General Options from the drop-down menu.

Step 3: Set your password to modify the presentation. After that, click the OK button to end this process.

For the question showing in the beginning, the answer should be the latter two methods which enable users to set the modify password in security settings. In this way, users can distribute a PPT (*ppt and.*pptx) as a read only document with password.
Related Links:
- How to Remove Restriction to Unprotect PowerPoint Presentation without Password
- How to Unlock PPT Presentation with Modify or Open Password
- How to Edit Encrypted and Read Only PowerPoint 2016 Presentation
- How to Add a Watermark on PowerPoint Presentation
iSunshare is dedicated to providing the best service for Windows, Mac, Android users who are in demand for password recovery and data recovery.
Copyright © 2024 iSunshare Studio All Rights Reserved.
- PDFelement for Windows
- PDFelement for Mac
- PDFelement on Mac App Store
- PDF Reader for Windows
- PDFelement for iPhone/iPad
- Get from App Store
- PDFelement for Android
- Get from App Google Play
- PDF Scanner for iPhone
Cloud & SDK
- Document Cloud
- PDFelement Pro DC
- PDFelement SDK
Online PDF Tools
- PDF to Word
- Compress PDF
- Word to PDF
Educational Users
- Annotate PDF
- Combine PDF
Personal Users
- Convert PDF
- Organize PDF
Professional Users
- eSign PDFs Legally
- Extract Data from PDF
- Password Protect PDF
PDF Solutions for
- Chat with PDF
- AI PDF Summarizer
- AI PDF Translator
- AI Content Detector
- AI Rewrite PDF
- Proofread PDF
- Add Bookmarks to PDF
- Explain PDF
- Mac Software
- OCR PDF Tips
- Online PDF Tips
- Edit PDF like Word
- PDF Converter Tips
- PDF Compressor Tips
Why PDFelement
- Customer Stories
- PDF Software Comparison
- Contact Support
- PDFelement for iOS
- InstaScan for iPhone
Explore More
- Reviews See what our users say.
- Free PDF Templates Edit, print, and customize free templates.
- PDF Knowledge PDF-related information you need.
- Download Center Download the most powerful and simple PDF tools.
- Download Download Pricing Pricing
- How To Make a PowerPoint Presentation Read-Only
Learn to make PowerPoint presentations read-only, ensuring content protection.

- Embed Video in PowerPoint Mac
- Make Video from PowerPoint
- How to Print PowerPoint with Notes
- How to Make a Picture Transparent in PowerPoint
- Morph Transition
- Curved Text in PowerPoint
- Gantt Chart in PowerPoint
- Venn Diagram in PowerPoint
- PowerPoint Alternatives
- How to Embed a YouTube Video in PowerPoint
- crop images online
- print screen mac
- How to take a screenshot on a Mac
- Cropro: A must have screenshot capture tool
- windows 11 screenshot
- How to take a screen grab
- Best screenshot tools for Windows and Mac
- How to Edit a Screenshot Online
- How to Paste a Screenshot on a Mac
- How to Take a Scrolling Screenshot
- Best Solution to Sign PDF on Linux and More
- esign pdf online, esign pdf online free, esign pdf free online, online esign pdf, electronically sign pdf online
- How to Save Documents to Cloud
- How to Share Files on the Cloud to Improve Collaboration
- Best Free Document Cloud Solution - Easy to Use
- How To Use Cloud Storage - the Complete Guide
- How to eSign a Document on Cloud in Two Ways
- How to Add Signature to PDF on Linux
- How to Add an Electronic Signature to a PDF File Online Free
- How to Upload File to Cloud: Easiest Way Explained
In today's world, sharing information is key. We often use PowerPoint to do this. But, when we share these presentations, we might not want others to change them. This is where making a PowerPoint read-only comes in handy. It means others can look but can't edit. This is very important for many reasons.
For example, when you share your work with others for feedback, you might not want them to make changes. Or, when you give a presentation to a big audience, you want to ensure your message stays the same. Making your PowerPoint read-only keeps your information safe and as you intended. It's a simple step that can save much trouble later. This way, you can share your hard work with peace of mind, knowing it will stay just as you made it.
In this article
Method 1: convert ppt to pdf, method 2: set ppt in read-only mode, method 3: lock ppt for read-only, method 4: set restrict access for powerpoint read-only, method 5: record a slideshow to make powerpoint read-only, part 2. the importance of making powerpoint presentations read-only, part 1. how to make a powerpoint read only.
Making your PowerPoint read-only is a smart move. It's like putting a lock on your presentation. This stops others from making changes to it. In this part, we will show you how to do it step by step. It's an easy process that anyone can follow. Let's get started.
One way to keep your PowerPoint safe is by turning it into a PDF. This means changing it from a PPT file to a PDF file. When you do this, people can still see your presentation, but they can't change it. This is a good idea because PDFs are easy to open on all computers and phones. Plus, your slides will look just as you made them. This method is simple and doesn't need any special skills. Let's see how you can do this to protect your work and keep it just the way you want.
How to Convert PPT to PDF Using PDFelement

PDFelement is a great tool to turn your PowerPoint (PPT) into a PDF. This keeps your presentation safe from changes. Here's how to do it:
Step 1. First, open PDFelement on your computer. Finding your way around is easy because everything is clear and simple.

Step 2. Look for a " + " > " From File " button on the main screen. Click it. This lets you make a PDF from another file, like your PowerPoint.

Step 3. A window will open. Find your PowerPoint file, click the " Sample PPT ," and open it.
Step 4. After you pick your file, PDFelement changes your PPT to a PDF. It's quick. Just wait a bit until it's done.

Step 5. Your new PDF opens in PDFelement. Now, you can change it if you want. PDFelement has tools to edit text, pictures, and more. Change anything you need.

Step 6. When you're finished, go to " File " > " Save ." Pick a place on your computer, name your file, and click "Save."

Step 7. Sometimes, you might want to go back to a PowerPoint. PDFelement does this, too. Click " Convert " > " To PPT ," choose where to save, and it turns your PDF into a PPT again.

Using PDFelement for this is smart. It makes your presentation safe across different computers and phones. Your slides look just right, adding an extra layer of security. This way, sharing your work is easy and safe.

Setting your PowerPoint presentation to read-only mode is another good way to protect it. Here’s how you can do it step by step:
Step 1. First, open your PowerPoint presentation on your computer.
Step 2. Click on " File " > " Info ."
Step 3. Look for an option that says " Protect Presentation ." Click on it. A menu will appear.
Step 4. In the menu, select " Mark as Final. " This tells PowerPoint and anyone who opens it that your presentation is finished and shouldn't be changed.
By choosing "Mark as Final," you're letting others know your presentation is the final version. This doesn't lock your file with a password but adds a mark suggesting people shouldn't edit it. When someone opens your presentation, they'll see a message marked as final. This discourages editing.
However, it's important to remember that this method doesn't fully lock your presentation. If someone wants to, they can still make changes. They just need to click "Edit Anyway." So, while "Mark as Final" is a good way to suggest your work shouldn't be altered, it's not the strongest protection. It's best used when you trust the people you're sharing your presentation with to respect your wish to keep it as is.

Locking your PowerPoint for read-only with a password is a strong way to protect it. You can set two types of passwords: one to open the presentation and another to modify it. Here's how to set it up:
Step 1. Start by opening your PowerPoint presentation.
Step 2. Go to " File " > " Info ."
Step 3. Find " Protect Presentation ." Click it to see more options.
Step 4. Choose " Encrypt with Password ." Here, you can set your passwords.
When you set a password to open, anyone who wants to see the presentation must enter the password. A modified password lets people open the presentation but not change it unless they know this second password.
It's important to share these passwords safely. If you use a password to open it, make sure to send it through a secure way, like a secure email or messaging app. Remember, you can't access or change your presentation if you forget these passwords.
Using passwords is very secure, but it comes with responsibility. Ensure you keep the passwords safe and share them only with people who need to know. This method is great for keeping your presentation the way you want without worrying about unwanted changes.

Using the restrict access feature in PowerPoint is a smart way to control who can do what with your presentation. Here’s how you can make your presentation read-only for others:
Step 1. Start by opening your presentation in PowerPoint.
Step 2. Find and click on " File " at the top left corner, then select " Info " from the menu.
Step 3. Now, look for " Protect Presentation. " Click on it to see more options.
Step 4 . From the options, choose " Restrict Access. " This lets you set rules on who can read or change your presentation.
By using restricted access, you can ensure that only certain people can edit your presentation, while others can only view it. This is great when you need to share your work with a team but want to control who can make changes.
The advantage of this method is that it gives you more control. You can decide exactly who gets to edit and who doesn't. However, there are some things to keep in mind. First, everyone you're sharing with needs the right software or service to respect these restrictions. If they don't, they might be unable to open your presentation. Also, managing who has what permission can take extra work, especially if you share with many people.
Restrict access is a powerful way to protect your presentation. It helps keep your work safe while still letting others view it. Think about how it fits with how you plan to share and collaborate on your presentation.

Recording your slideshow is a creative way to share your PowerPoint while keeping it read-only. This method turns your presentation into a video, which means people can watch it but can't change any part of it. Here's how to do it:
Step 1. First, open your presentation in PowerPoint.
Step 2. Find the " Slideshow " tab at the top. Click on it, and then look for " Record Slideshow ." Choose to start recording from the beginning or a current slide.
Step 3. Press the record button. As you go through your slides, you can talk and explain them, just like you would if you were presenting live. You can also use your mouse as a pointer.
Step 4. After finishing your recording, save your presentation. Then, go to " File " > " Export " and select " Create a Video ." Choose the video quality you prefer.
Step 5. Once your video is ready, you can share it. Because it's a video, no one can edit your slides.
Recording your slideshow has many benefits. It keeps your presentation safe from changes, which is great. But it also lets you share exactly how you want your presentation to be viewed. You control the flow and timing, ensuring your audience sees and hears what you intend in the order you intend. This method works well when you can't present live but want to make an impact.
Remember, a video might be larger than a PowerPoint file, and viewers can't interact with it as they can with slides. But if keeping your content safe and controlling how it's shown are your top priorities, this could be the perfect solution.
Making your PowerPoint presentations read-only is like putting a "Do Not Alter" sign on your work. It lets you keep control when you share your presentation. This is important because if someone changes your slides, it can cause problems. For example, wrong information could be shared, or your message might not come across as intended. This could confuse or mislead people.
When your presentation is read-only, it stays just as you made it. This means your professional touch, how you arranged your slides, and the information you included are the same. It helps make sure your brand looks consistent everywhere your presentation goes. This consistency is key to keeping a strong and trustworthy image.
There are also bigger legal and ethical issues when someone changes your work without asking. If someone edits your presentation, it could be seen as them putting words in your mouth. This isn't fair and can lead to problems. Keeping your presentation read-only helps avoid these issues, ensuring your work stays safe and respected.
Making your PowerPoint read-only is a smart step to protect your work. It helps keep your presentation the way you want, safe from changes. This ensures your message stays clear and your brand remains consistent. Remember, sharing your ideas is important, but so is keeping them as you intended.
You May Also Like
- How to Print PowerPoint with Notes and PDFelement on Mac
- Highlight Text in PowerPoint
- The Easiest Way to Insert a Word Document into PowerPoint
Stack Exchange Network
Stack Exchange network consists of 183 Q&A communities including Stack Overflow , the largest, most trusted online community for developers to learn, share their knowledge, and build their careers.
Q&A for work
Connect and share knowledge within a single location that is structured and easy to search.
How to open Powerpoint slides in read-only or protected view by default? (Windows 10, Office 365 version 2107)
How can I open all open Powerpoint presentations in read-only or protected-view by default -allowing me to enable editing and saving if I wish once open?
PptView is gone now :-(
Shift+right-click "Open as Read-only" doesn't seem to work at all Shift+right-click "Open in Protected View"seems to work ok sometimes (How do I use "Open in Protected View" by default?)
I don't want to set options such as "final" or "read only" or set Sharepoint options for each file ... i want this to happen for all Powerpoint files when i open them. (Local files and files from Sharepoint/Ondrive)
The options in How to open Office 365 documents in "Viewing" mode by default? assume the file always comes from sharepoint, or requires each file to be modifies to readonly.
If I use "Trust Center" "File Block Settings" I can't save the file even after enabling editing (for local files)
If I try https://gist.github.com/yoshimov/1253177 I cannot save the file - can only save-as
The solutions at How to make an office file always open in Protected View? and Shift+Right Click to Open .pptx as Read-Only? have no effect.
Anyone have any ideas?
- microsoft-office
- microsoft-powerpoint
- microsoft-powerpoint-2016
Not sure if it can help you. Generally, Office files opened from unsafe locations will be opened in protected view. We can try to use " Group Policy " to add the unsafe locations:
- Search Group Policy in search bar, select Edit group policy to open it.
- Go to User Configuration>Administrative Templates>Microsoft Office 2016>Security Settings>Trust Center>Protected View to add the unsafe locations.
(If there is no Microsoft Office 2016 under Administrative Templates, please download and add Administrative Template files for Office 2016 first. )

- Super. This works perfect for all local files :-) But doesn't seem to work for files in synced Onedrive/Sharepoint folders. Maybe I need some special path? For me those folders appear in c:\Users\myname\SharepointServerName\... I added an untrusted location c:\Users\myname ( with subfolders ) and c:\Users\myname\SharepointServerName ( with subfolders ) and c:\ ( with subfolders ). – JohnK Sep 17, 2021 at 18:34
You must log in to answer this question.
Not the answer you're looking for browse other questions tagged windows-10 microsoft-office microsoft-powerpoint office365 microsoft-powerpoint-2016 ..
- The Overflow Blog
- You should keep a developer’s journal
- Would you board a plane safety-tested by GenAI?
- Featured on Meta
- Testing a new version of Stack Overflow Jobs
- What deliverables would you like to see out of a working group?
Hot Network Questions
- Are transponders sometimes referred to as ‘parrots’?
- DFT of a pure sine wave not showing ideal sine wave
- In which situations is it okay to exceptionally prefix いち/一 to powers of 10 (ten) which are not powers of 10000 (ten thousand)?
- What's the official German translation for Revel's End?
- Authorship issue between two PhD students
- Regarding a Coin Toss Experiment by Neil DeGrasse Tyson, and its validity
- Declare a math operator with only lower limit
- Extract result of Reap in a natural way no matter if it's empty
- Does a Sunday Celebration in the Absence of a Priest fulfill the holy day of obligation?
- Represent Hadamard gate in terms of rotations and reflections in Bloch sphere
- Altiplano distribution---Distributions very flat around the center?
- Can Maglev trains ever reach escape velocity?
- Create a minimum phase filter from an elliptic digital filter
- 4 Wire connections to fuse box
- Contribution of dark matter to running of physical constants
- How to check the validity of a BGP prefix?
- Train-validation-test split for small and unbalanced dataset?
- Short "moral" story about atomic power and a book of civilizations
- Torus Flow Free
- Understanding summation identity
- A client did an unannounced penetration test on our platform - is this even legal?
- Given the maximum likelihood function- estimate the value of the parameter
- Which signals (wifi, mobile phone, gps) can reliably be blocked by aluminum foil
- What is known/expected on the co-growth series of the braid group?
How to Unlock Read Only PowerPoint Presentations
- Small Business
- Business Communications & Etiquette
- Presentations
- ')" data-event="social share" data-info="Pinterest" aria-label="Share on Pinterest">
- ')" data-event="social share" data-info="Reddit" aria-label="Share on Reddit">
- ')" data-event="social share" data-info="Flipboard" aria-label="Share on Flipboard">
How to Convert a PowerPoint to an RTF
Can i turn off 4g on iphone 5, how to automatically text wrap in powerpoint 2007.
- How to Convert PowerPoint Presentations to an HTML Format
- How to Open a Word for Mac Document in Microsoft Word for PC
Microsoft PowerPoint's "Mark as Final" feature makes your business presentation read-only to prevent accidental changes. It is typically enabled prior to distribution so your workers, clients or business partners are assured a final, unaltered version of your PowerPoint presentation. Marking the presentation as final also reminds you of its completed status. If you later decide to make changes, removing the Mark as Final setting will permit you to edit the presentation.
Open the read-only PowerPoint presentation and click the "File" tab.
Click "Info" from the left pane.
Click "Protect Presentation" and select "Mark as Final." This acts as a toggle selection. If the presentation was read-only, it will now be editable, and if it was not protected, the Mark as Final option is now enabled.
Press "Ctrl-S" to save the presentation with the Mark as Final feature disabled.
- Microsoft Office: Remove Mark As Final From a Presentation
- The Mark as Final feature is not a security measure. Anyone with access to the file can disable this option.
C. Taylor embarked on a professional writing career in 2009 and frequently writes about technology, science, business, finance, martial arts and the great outdoors. He writes for both online and offline publications, including the Journal of Asian Martial Arts, Samsung, Radio Shack, Motley Fool, Chron, Synonym and more. He received a Master of Science degree in wildlife biology from Clemson University and a Bachelor of Arts in biological sciences at College of Charleston. He also holds minors in statistics, physics and visual arts.
Related Articles
How to make powerpoint uneditable, how to mark a document as final in microsoft word, does powerpoint have an option that would allow someone to open & print but not allow them to edit, how to rotate a slide in powerpoint, how to alphabetize last names in excel, how to display a ruler on powerpoint 2007, how to: powerpoint looping presentations, how to wrap text in microsoft excel 2003, how to read-only on a network in excel, most popular.
- 1 How to Make PowerPoint Uneditable
- 2 How to Mark a Document as Final in Microsoft Word
- 3 Does PowerPoint Have an Option That Would Allow Someone to Open & Print but Not Allow Them to Edit?
- 4 How to Rotate a Slide in PowerPoint
- Defragmentation
- PC & Devices
- Go to category
- Privacy Tips
- Security Tips
- Social Media
- Windows Registry
- Data Recovery
- Windows Update Errors
- Performance
- FPS Improvement
- Tips & Tricks
How to remove Read-Only mode in PowerPoint presentations?
So, your colleague sent you the PowerPoint presentation for your big client meeting. However, you noticed some errors that you want to fix and certain areas you want to improve. You try to edit the file, but to your dismay, you have no editorial rights to it as it is in Read-Only mode. Well, the…
- 4 min to read

How to Unlock Read-Only PowerPoint Presentations
Method 1: clicking edit anyway, method 2: selecting mark as final, the importance of using the read-only feature on powerpoint presentations, method 1: enabling read-only, method 2: restricting access, method 3: encrypting the presentation.
So, your colleague sent you the PowerPoint presentation for your big client meeting. However, you noticed some errors that you want to fix and certain areas you want to improve. You try to edit the file, but to your dismay, you have no editorial rights to it as it is in Read-Only mode. Well, the good news is, you can still perfect that presentation! In this post, we will teach you how to unlock a Read-Only PowerPoint 2019 presentation. By the end of the article, you will be able to open that file and edit without any restrictions.
Some people still wonder how they’ll know if a PPT file is in Read-Only mode. Well, there are two ways to identify locked presentations. The first method is to check if there is the ‘Read-Only’ text after the title of the file. Secondly, when you open the presentation, you will see a yellow message bar across the top of the presentation, telling you that you have limited access to the file. Now, we will show you two methods for unlocking a PPT file.
- Open the PowerPoint presentation.
- Now, go to the yellow banner message and look for the button which says, ‘Edit Anyway.’
- To unlock the PowerPoint presentation, click the Edit Anyway button.
You will notice that the yellow message bar will disappear. Also, you will no longer see the ‘Read-Only’ suffix at the file name. Try making some changes to the PPT file to see if it is now editable.
Of course, there is more than one way to learn how to unlock Read-Only PowerPoint files. If you prefer taking the scenic route, you would not mind using a few extra steps in removing the Read-Only feature in your PPT presentation. Here are the steps:
- Of course, the first thing you need to do is open the PowerPoint presentation.
- Now, go to the top menu and click the File tab. You should be taken to the Info page when you do this.
- You will notice that the Protect Presentation option is in yellow. You may even see a message saying, “The presentation has been marked as final to discourage any editing.”
- To reverse this feature, select Protect Presentation.
- A context menu will appear. Click Mark as Final to unlock the PowerPoint Presentation.
After performing the steps above, you will notice that the yellow message banner has disappeared. Of course, the Read-Only suffix at the file name will also be gone.
You may wonder why the Read-Only feature exists in the first place. It is worth noting that it has various uses for many people. For example, locking the file enables users to discourage edits. Activating this feature allows them to alert recipients that they already have the final version of the file. Moreover, the Read-Only feature secures the file against accidental edits that other people may unknowingly perform. In many ways, locking a presentation is a protective measure. It is also a polite way to ask other people to avoid modifying the file.
While this locking feature is a protective measure, it may negatively affect user experience: some users download the PowerPoint files they need to work on from the Internet, only to realize Protected View is enabled when opening them. Popular presentation template provider SlideModel is aware of this issue and helps to unlock read-only PowerPoint presentations. By following simple steps, users can download PowerPoint templates and easily edit them to make their presentations and save their work.
Various Ways to Protect Your PowerPoint Presentation
You may be interested to know how to secure your PPT files. If this is true, then you will be delighted to know that we can show you three ways to do so. Here are some of the methods you can use to prevent other users from tampering with your presentation:
- Open the PowerPoint presentation, then click the File tab at the top of the window.
- Once you get to the Info page, click Protect Presentation.
- Select Mark as Final from the drop-down menu.
- You will see a dialog box which will tell you that the action will mark the file as final and saved. Click OK.
You can also use the Restrict Access option to prevent other people from editing your PowerPoint presentation. Here are the steps:
- Launch the PPT file, then go to the File tab.
- Select Protect Presentation to show its drop-down menu.
- Select Restrict Access.
Once you enable the Restrict Access feature, people will still have access to the file. However, they won’t have the ability to modify, copy, or print the presentation.
If you are using PowerPoint 2010, 2013, or 2016, you can use the steps below:
- Open the PowerPoint file, then click the File tab at the top of the window.
- Go to the left-pane menu, then select Save As.
- Choose a location for saving the file.
- At the bottom of the Save As window, click Tools.
- Select General Options from the context menu.
- Click the Password to Modify box, then enter any password you want.
- Save the changes by clicking OK.
- Submit the password again, then click OK to confirm the action.
- Once you get back to the Save As dialog, click Save.
Do not forget the password you used because there is no way to recover it. Microsoft won’t even be able to help you remove the password.
Pro Tip: If you are worried about your PowerPoint files getting corrupted or damaged, we suggest that you install a reliable antivirus. There are many security software programs out there, but Auslogics Anti-Malware is among the few that can provide comprehensive protection. This tool can detect malicious items you’d never suspect existed. It is also easy to set up and run, especially since it has a user-friendly interface.
What’s great about Auslogics Anti-Malware is it was designed by a certified Microsoft Gold Application Developer. So, you can rest easy knowing that it won’t interfere with your operating system and your main anti-virus. In a way, installing this program is like adding another layer of protection on your computer.
Do you have suggestions on how we can improve this article?
We’d love to hear from you! Let us know your thoughts in the comments below!
Leave a Reply Cancel reply
Your email address will not be published. Required fields are marked *
You may also like
- Optimization
- 31 Oct 2018
How to video record yourself presenting a PowerPoint

What type of content do you primarily create?
Recording yourself presenting a PowerPoint can be challenging, especially getting the technical aspects right. You need to capture your screen, webcam, and audio seamlessly while delivering your content naturally and avoiding awkward transitions between slides.
Finding a tool that integrates all these components can seem daunting. However, recording yourself presenting a PowerPoint doesn't have to be reserved for the tech-savvy or professional speakers.
Whether you're a teacher creating online lessons, a marketer producing a product demo, or someone looking to improve their presentation skills, this guide will walk you through user-friendly tools and strategies that will teach you how to video record yourself presenting a PowerPoint.
- Recording yourself presenting a PowerPoint can be challenging, but it doesn't have to be reserved for experts.
- Video recording offers unlimited reach, repurposing opportunities, and a more engaging experience.
- Use PowerPoint's built-in recording feature or tools like Descript for a polished presentation.
- Other tools like Zoom, Loom, OBS Studio, Clipchamp, and Quick Time Player can also be used for recording.
- Tips include practicing your script, using slide notes, ensuring high-quality audio and lighting, and incorporating storytelling techniques.
Why video record yourself presenting a PowerPoint?
Video recording your PowerPoint presentations offers several advantages:
- Unlimited reach : Unlike in-person presentations confined to a specific time and location, recorded videos allow your message to reach audiences globally at their convenience.
- Repurposing opportunities: Recorded presentations can be repurposed as evergreen content across multiple platforms, such as social media, online courses, webinars, and internal training materials, maximizing their value.
- Personal and engaging : Recording yourself narrating a presentation adds a personal touch and dynamic element that static slides alone cannot replicate. Your viewers can see and hear you deliver the content, creating a more immersive and engaging experience.
How to record your presentation with the PowerPoint app
Built-in recording feature in powerpoint.
1. Open the PowerPoint slide you want to record.
2. Click on the Record tab of the top toolbar.
3. Click on the Record button and choose from any of the following options:
- From Current Slide
- From Beginning
4. You'll see the PowerPoint screen recording window.
5. Select the microphone and camera from the icon on the top-right.
6. Click the Stop and Replay buttons to end or replay your recording.
7. To export your presentation's recording, click Export to Video within the Recording tab.
Benefits : Easy to use, no external tools needed
Limitations : Limited editing capabilities.
How to make a more polished recording of your presentation with Descript
While PowerPoint's built-in recording features are helpful, they may not produce the refined result you want for your presentation. That's where Descript comes in handy.
It’s a whole production studio at your fingertips, with video recording, transcription, and editing capabilities, ready to transform dull PowerPoint slides into an engaging experience for your audience. Descript also has a built-in screen recorder.
You can use Descript on Windows, Mac, or even straight from your web browser.
Here's step-by-step guide to recording your PowerPoint presentation with Descript.
Set up your screen recording
1. Install and open Descript. At the top of the editor, click and open the Record panel.
2. Select Screen.
3. Set Recorder settings:
Adjust the default recording settings to your liking, including the transcription language, the maximum recording resolution, and more.
4. Set recording options. Choose which audio and video sources to record (e.g., microphone, computer audio, camera). Remember to turn the camera on to capture your talking head video alongside your PowerPoint presentation.
5. Click the Additional Settings icon for
- Studio Sound (Optional): Enhance audio quality with noise reduction and background removal
- Transcription (Optional): Enable automatic transcription for easier editing
- Recording separate audio tracks
6. Add (optional) Speaker labels for each audio track (e.g., "Narrator," "Expert") by typing them in the text box next to your audio inputs.
Capture your screen recording
1. Select the right recording option:
- Recording into script : Choose this if you haven’t recorded anything yet.
- Replace selection : Choose this if you already have a script and want to replace a specific section with a new recording.
- Record new layer : Pick this for recording your video as a new layer on top of an existing recording.
2. Click Record at the bottom of the Record panel.
3. Drag over the area of your screen you wish to record. Click Start Recording. Press Space to start recording the full screen.
4. Click Stop to finish recording
Bonus: Descript creates separate tracks for camera, microphone, and computer audio. You can edit each track individually for more precise control.
- Do a short test recording to ensure everything is set up correctly.
- Set your recording to transibe for easier editing.
Editing and polishing your PowerPoint recording in Descript
Descript's AI video editing tool makes it a breeze to trim, cut, and splice your video footage, ensuring a seamless flow from start to finish. You can add smooth transitions and other visual effects to make your presentation pop.
Here’s a glimpse of how to edit and polish your PowerPoint recording in Descript:
Edit your recording like a doc
Did you make a mistake during a slide transition? No problem. Just delete those sections in the text transcript (created automatically by Descript) and the video will adjust to match.
Remove filler words
Sound smoother and more confident by easily removing filler words like "um" and "uh" from the transcript.
Fix voiceover mistakes by typing
Didn't nail your delivery on a specific slide? No need to start from scratch! Descript's Overdub feature lets you simply type in the correct narration and replace the audio on that slide with AI voice cloning.
Boost video quality and engagement :
- Crisp up audio quality by reducing background noise and room reverb with the AI-powered Studio Sound feature.
- Replace your background completely with the Green Screen Video Editor —look like you're presenting in a sleek studio or broadcasting from a beach.
- Enable Eye Contact simulation with AI, so it appears you're making direct eye contact with viewers, even if you’re looking or reading something off-camera.
Other ways to video record yourself presenting a PowerPoint
Use Zoom’s meeting recording feature to record yourself giving a PowerPoint presentation. Start a Zoom meeting with yourself, share your PowerPoint window, and enable recording
Loom is a handy screen recording tool that also offers a webcam overlay. Launch the Loom app or Chrome extension and set it to record your screen and webcam. Expect high-quality recordings but no advanced editing features. The free plan offers only five minutes of recording at a stretch.
3. OBS Studio
OBS Studio is a free, open-source screen recorder/streaming software with a steeper learning curve. It’s popular among advanced or tech-savvy users who need granular customization and control.
To record your presentation, add a "Screen Capture" source to capture your PowerPoint window and a "Video Capture Device" source for your webcam.
4. Clipchamp: Recording natively in Windows
You can use Microsoft’s Clipchamp , the built-in screen recorder and video editor for Windows, to simultaneously capture your computer screen, webcam, and audio for recording your PowerPoint presentation. It’s also available as a browser-based app. You can record up to 30 minutes on screen and webcam recordings.
Users can also adjust the screen and webcam recordings in the editing timeline separately.
5. Quick Time Player Recording natively in Mac
Use Mac’s Quick Time Player to record your PowerPoint presentation. It’s not as straightforward as the other options on this list, so here’s a quick guide to help you out:
- Launch Quick Time Player.
- Select File and go to New Movie Recording.
- You'll be recording your entire screen in addition to recording your face, so adjust the size and location of the recording window so that it's in a nonintrusive corner of your PowerPoint.
- Go to View and select Float on Top .
- Next, go to File and select New Screen Recording.
- On the menu that appears, select Record Selected Portion and drag a border around your PowerPoint and the webcam recording window.
- Press Record and start presenting.
- You can adjust the video quality and the audio source in the webcam recording window.
How to turn your PowerPoint presentation slides into a video
Did you know PowerPoint lets you save your presentation as a video, too?
Here's a breakdown of the two ways you can do so—keeping all the presentation elements (narration, animation, pointer movements, timings, and so on) intact in the presentation itself.
Save your PowerPoint presentation as a video
This creates a separate video file (MP4 or WMV) that anyone can play, even without PowerPoint.
Follow these steps:
- Save your presentation
- Go to File > Export > Create a Video
- Ultra HD (4K): Best for large screens (if you have Windows 10+)
- Full HD (1080p): Great for computers and TVs
- HD (720p): Good for streaming online or on DVDs
- Standard (480p): Smallest size, good for phones
4. Decide on narration
- If you haven't recorded yourself talking, choose "Don't Use Recorded Timings and Narrations" from the dropdown menu
- If you have a recording, choose "Use Recorded Timings and Narrations." You can also set how long each slide shows for (default is 5 seconds)
5. Click Create Video
6. Name your video, pick a folder to save it in, and choose a file type (MPEG-4 or Windows Media Video)
Creating the video might take a while, especially for longer presentations. You can even leave it running overnight. Once done, find your video in the chosen folder and double-click to play it.
Save your PowerPoint presentation as a slideshow
This saves your presentation as a special file (PPSX) that starts playing automatically on full screen when opened. It only works with PowerPoint.
Here’s how it works:
- Make sure your presentation is saved (regular PowerPoint file)
- Go to File > Save As .
- Pick a folder to save the slideshow in.
- Under Save as type, choose PowerPoint Show (*.ppsx) .
- Click Save .
Now when someone opens the file, it will automatically play the slideshow.
Pro tips for making better video PowerPoint presentations
Practice your script.
Recording a flawless PowerPoint video rarely happens in one take. The key is practice.
Record practice run-throughs and watch them back. Make notes on areas that need improvement or parts lacking clarity. The more you drill your script, the more confident and natural you'll sound in the final recording.
Take advantage of PowerPoint's built-in Speaker Coach . The feature shows you whether your pace is too fast or slow, your use of filler words like "um," and suggestions to improve your voice modulation.
Use slide notes for coherent delivery
Wouldn’t a personal teleprompter make presentations so much easier? That’s what slide notes are for.
Having your thoughts and talking points organized within your PowerPoint file lets you have all crucial information and prompts readily available when recording.
Go ahead and add detailed notes or even a full script for each slide. This will help you stay on track and provide a handy transcript reference if you need to do any editing or voiceover work in post-production.
Use high-quality audio equipment or turn on Studio Sound
Poor audio recording quality is a surefire way to make even the most visually polished video feel amateurish. Do your presentation justice by investing in a decent external or Bluetooth microphone and audio interface to capture clear voiceover audio.
If you must use a built-in mic, record in a quiet environment to minimize background noise pickup. Or better yet, pair up with an AI-powered audio enhancement tool like Descript's Studio Sound , which reduces background noise , reverb, and other artifacts.
Ensure a clean background and even lighting
Ditch cluttered backgrounds. You want people to focus on the content of your PowerPoint and not be distracted by the funny shapes and colors in your video.
Your video lighting and framing matters, too. Position yourself facing a natural light source or bring supplemental video lighting to eliminate weird shadows and squinting-level glare.
Look directly into the camera or turn on Eye Contact
Looking directly into the camera is essential to create a sense of connection with the audience. Position your webcam or camera at eye level and imagine you're talking to a friend. If you're using Descript, enable the Eye Contact feature to auto-adjust your gaze towards the camera.
- Dress professionally and maintain a good posture to project confidence and authority.
- Use visuals, animations, and multimedia elements to enhance your presentation and keep your audience engaged.
- Consider adding closed captions or subtitles to your video for better accessibility and engagement, especially for those watching without sound.
- Speak clearly and at a moderate pace, using vocal variety to emphasize key points and maintain interest.
- Incorporate storytelling techniques, real-life examples, or personal anecdotes to make your video presentation more relatable and memorable .
Take your PowerPoint presentations from amateur to amazing
Recording yourself virtually presenting a PowerPoint allows you to distribute your message using the most engaging type of content: video. And there are many screen recording tools out there that can capture your screen and web camera footage with just a few clicks.
But how do you stand out?
By focusing on the presentation's depth, your delivery, and the video's quality. The first two are the bare minimum to communicate your message effectively.
But the right screen capture software and all-in-one video creation tool like Descript can help you with third. Use the tool to improve the quality of your recorded PPT presentations.
With Descript, it's easier than ever to record your screen, polish up the audio, and create stunning visuals all in one place. So why wait?
Sign up for Descript today and simplify your workflow while creating a PowerPoint presentation video that sticks with your audience in the long term.
How do you make a presentation video with your face?
To create a presentation video with your face, follow these steps:
- Open your presentation in PowerPoint.
- Go to the Slide Show tab.
- Click on Record and choose From Current Slide or From Beginning .
- Choose your microphone and camera by clicking on a sound icon on the top-right.
- Start recording by clicking on the record button.
- Speak into your microphone to narrate the presentation.
- Your webcam will capture your face during the recording.
- Click Stop when you finish recording.
- Export your recorded presentation by clicking on File> Export>Create a video.
How do you present yourself in PowerPoint?
To present yourself effectively in PowerPoint, follow these steps:
- Determine the key information to include in your presentation.
- Design and prepare your PowerPoint slides with a cohesive theme.
- Craft a compelling introduction to engage your audience.
- Tailor your presentation to different time constraints for flexibility.
- Capture the audience's attention before you begin speaking.
Related articles

Featured articles:
10 excellent Loom alternatives to record your screen
Looking for the best ways to record your screen without Loom? Find out 10 Loom alternatives, their features, and pricing.

How to record a YouTube video: A guide for all devices
If you want to record a YouTube video for personal use or fair-use repurposing, here are the steps to get started.

For Business
Social media video marketing: Everything you need to know
Learn how to win over potential customers (and the algorithms) with the right social media video marketing tools, strategy, and optimizations.

How to record a podcast on Zoom: A beginner’s guide
Follow this step-by-step guide on how to record a podcast on Zoom, then learn about why it may not be your best recording option.

How to record a Microsoft Teams meeting: 5 easy ways
Learn how to record a Microsoft Teams meeting on any device and get answers to common problems.

10 effective how-to videos to engage your audience
How-to videos are a great way to educate your audience. Whether you’re recording a software demo or training instructions, here’s how to create a how-to video.

Articles you might find interesting
20 Instagram Reels ideas for influencers, creators, and businesses
Struggling with Instagram Reels ideas? Get inspired with our creative suggestions for engaging content that'll boost your Reels game.

How do you know when a video is done?
We asked some of our favorite creators to get a well-rounded take on this eternal question.

How to upload YouTube Shorts: A complete guide
The process to upload YouTube Shorts isn’t super intuitive. Learn how to do it with this step-by-step guide.
How to screen record on iPad in 6 steps: A 2024 guide
Need to share a tutorial or presentation with your team? Learn how to screen record on your iPad with sound, plus the best recording apps available.

The best AI tools for podcasters: From scriptwriting to audio editing to marketing your show
You’re not going to love every part of podcasting all the time, and that’s okay. For everything else, there’s AI. We’ve rounded up the AI tools we find most useful.

Everything you need to know about YouTube video formats
Learn the best video format for YouTube, as well as YouTube resolution sizes, frame rates, and aspect ratios, for the time you upload your next video to your channel.

Join millions of creators who already have a head start.
Get free recording and editing tips, and resources delivered to your inbox.
Related articles:
Share this article

Introducing Copilot+ PCs
May 20, 2024 | Yusuf Mehdi - Executive Vice President, Consumer Chief Marketing Officer
- Share on Facebook (opens new window)
- Share on Twitter (opens new window)
- Share on LinkedIn (opens new window)

An on-demand recording of our May 20 event is available .
Today, at a special event on our new Microsoft campus, we introduced the world to a new category of Windows PCs designed for AI, Copilot+ PCs.
Copilot+ PCs are the fastest, most intelligent Windows PCs ever built. With powerful new silicon capable of an incredible 40+ TOPS (trillion operations per second), all – day battery life and access to the most advanced AI models, Copilot+ PCs will enable you to do things you can’t on any other PC. Easily find and remember what you have seen in your PC with Recall, generate and refine AI images in near real-time directly on the device using Cocreator, and bridge language barriers with Live Captions, translating audio from 40+ languages into English .
These experiences come to life on a set of thin, light and beautiful devices from Microsoft Surface and our OEM partners Acer, ASUS, Dell, HP, Lenovo and Samsung, with pre-orders beginning today and availability starting on June 18. Starting at $999, Copilot+ PCs offer incredible value.
This first wave of Copilot+ PCs is just the beginning. Over the past year, we have seen an incredible pace of innovation of AI in the cloud with Copilot allowing us to do things that we never dreamed possible. Now, we begin a new chapter with AI innovation on the device. We have completely reimagined the entirety of the PC – from silicon to the operating system, the application layer to the cloud – with AI at the center, marking the most significant change to the Windows platform in decades.
YouTube Video
The fastest, most secure Windows PCs ever built
We introduced an all-new system architecture to bring the power of the CPU, GPU, and now a new high performance Neural Processing Unit (NPU) together. Connected to and enhanced by the large language models (LLMs) running in our Azure Cloud in concert with small language models (SLMs), Copilot+ PCs can now achieve a level of performance never seen before. They are up to 20x more powerful [1] and up to 100x as efficient [2] for running AI workloads and deliver industry-leading AI acceleration. They outperform Apple’s MacBook Air 15” by up to 58% in sustained multithreaded performance [3] , all while delivering all-day battery life. With incredible efficiency, Copilot+ PCs can deliver up to 22 hours of local video playback or 15 hours of web browsing on a single charge. [4] That is up to 20% more battery in local video playback than the MacBook Air 15”. [5]
Windows now has the best implementation of apps on the fastest chip, starting with Qualcomm. We now offer more native Arm64 experiences than ever before, including our fastest implementation of Microsoft 365 apps like Teams, PowerPoint, Outlook, Word, Excel, OneDrive and OneNote. Chrome, Spotify, Zoom, WhatsApp, Adobe Photoshop, Adobe Lightroom, Blender, Affinity Suite, DaVinci Resolve and many more now run natively on Arm to give you great performance with additional apps, like Slack, releasing later this year. In fact, 87% of the total app minutes people spend in apps today have native Arm versions. [6] With a powerful new emulator, Prism, your apps run great, whether native or emulated.
Every Copilot+ PC comes secured out of the box. The Microsoft Pluton Security processor will be enabled by default on all Copilot+ PCs and we have introduced a number of new features, updates and defaults to Windows 11 that make it easy for users to stay secure. And, we’ve built in personalized privacy controls to help you protect what’s important to you. You can read more about how we are making Windows more secure here .
Entirely new, powerful AI experiences
Copilot+ PCs leverage powerful processors and multiple state-of-the-art AI models, including several of Microsoft’s world-class SLMs, to unlock a new set of experiences you can run locally, directly on the device. This removes previous limitations on things like latency, cost and even privacy to help you be more productive, creative and communicate more effectively.
Recall instantly
We set out to solve one of the most frustrating problems we encounter daily – finding something we know we have seen before on our PC. Today, we must remember what file folder it was stored in, what website it was on, or scroll through hundreds of emails trying to find it.
Now with Recall, you can access virtually what you have seen or done on your PC in a way that feels like having photographic memory. Copilot+ PCs organize information like we do – based on relationships and associations unique to each of our individual experiences. This helps you remember things you may have forgotten so you can find what you’re looking for quickly and intuitively by simply using the cues you remember. [7]
You can scroll across time to find the content you need in your timeline across any application, website, document, or more. Interact intuitively using snapshots with screenray to help you take the next step using suggested actions based on object recognition. And get back to where you were, whether to a specific email in Outlook or the right chat in Teams.
Recall leverages your personal semantic index, built and stored entirely on your device. Your snapshots are yours; they stay locally on your PC. You can delete individual snapshots, adjust and delete ranges of time in Settings, or pause at any point right from the icon in the System Tray on your Taskbar. You can also filter apps and websites from ever being saved. You are always in control with privacy you can trust.
Cocreate with AI-powered image creation and editing, built into Windows
Since the launch of Image Creator, almost 10 billion images have been generated, helping more people bring their ideas to life easily by using natural language to describe what they want to create. Yet, today’s cloud offerings may limit the number of images you can create, keep you waiting while the artwork processes or even present privacy concerns. By using the Neural Processing Units (NPUs) and powerful local small language models, we are bringing innovative new experiences to your favorite creative applications like Paint and Photos.
Combine your ink strokes with text prompts to generate new images in nearly real time with Cocreator. As you iterate, so does the artwork, helping you more easily refine, edit and evolve your ideas. Powerful diffusion-based algorithms optimize for the highest quality output over minimum steps to make it feel like you are creating alongside AI. Use the creativity slider to choose from a range of artwork from more literal to more expressive. Once you select your artwork, you can continue iterating on top of it, helping you express your ideas, regardless of your creative skills.

Take photo editing and image creation to the next level. With Restyle Image, you can reimagine your personal photos with a new style combining image generation and photo editing in Photos. Use a pre-set style like Cyberpunk or Claymation to change the background, foreground or full picture to create an entirely new image. Or jumpstart your next creative project and get visual inspiration with Image Creator in Photos. On Copilot+ PCs you can generate endless images for free, fast, with the ability to fine tune images to your liking and to save your favorites to collections.
Innovative AI experiences from the creative apps you love
We are also partnering with some of the biggest and most-loved applications on the planet to leverage the power of the NPU to deliver new innovative AI experiences.
Together with Adobe, we are thrilled to announce Adobe’s flagship apps are coming to Copilot+ PCs, including Photoshop, Lightroom and Express – available today. Illustrator, Premiere Pro and more are coming this summer. And we’re continuing to partner to optimize AI in these apps for the NPU. For Adobe Creative Cloud customers, they will benefit from the full performance advantages of Copilot+ PCs to express their creativity faster than ever before.

DaVinci Resolve Studio
Effortlessly apply visual effects to objects and people using NPU-accelerated Magic Mask in DaVinci Resolve Studio.

Remove the background from any video clip in a snap using Auto Cutout running on the NPU in CapCut.
Stay in your flow with faster, more responsive adaptive input controls, like head movement or facial expressions via the new NPU-powered camera pipeline in Cephable.

LiquidText
Make quicker and smarter annotations to documents, using AI features that run entirely on-device via NPU, so data stays private in LiquidText.

Have fun breaking down and remixing any music track, with a new, higher-quality version of NeuralMix™ that’s exclusive to NPU in Algoriddim’s djay Pro.

Connect and communicate effortlessly with live captions
In an increasingly connected and global world, Windows wants to bring people closer together. Whether catching up on your favorite podcast from a different country, or watching your favorite international sports team, or even collaborating with friends and colleagues across the world, we want to make more content accessible to more people.
Live Captions now has live translations and will turn any audio that passes through your PC into a single, English-language caption experience, in real time on your screen across all your apps consistently. You can translate any live or pre-recorded audio in any app or video platform from over 40 languages into English subtitles instantly, automatically and even while you’re offline. Powered by the NPU and available across all Copilot+ PCs, now you can have confidence your words are understood as intended.
New and enhanced Windows Studio Effects
Look and sound your best automatically with easily accessible controls at your fingertips in Quick Settings. Portrait light automatically adjusts the image to improve your perceived illumination in a dark environment or brighten the foreground pixels when in a low-light environment. Three new creative filters (illustrated, animated or watercolor) add an artistic flare. Eye contact teleprompter helps you maintain eye contact while reading your screen. New improvements to voice focus and portrait blur help ensure you’re always in focus.
Copilot, your everyday AI companion

Every Copilot+ PC comes with your personal powerful AI agent that is just a single tap away on keyboards with the new Copilot key. [8] Copilot will now have the full application experience customers have been asking for in a streamlined, simple yet powerful and personal design. Copilot puts the most advanced AI models at your fingertips. In the coming weeks, get access to the latest models including GPT-4o from our partners at OpenAI, so you can have voice conversations that feel more natural.
Advancing AI responsibly
At Microsoft, we have a company-wide commitment to develop ethical, safe and secure AI. Our responsible AI principles guided the development of these new experiences, and all AI features are aligned with our standards. Learn more here .
New Copilot+ PCs from Microsoft Surface and our partners
We have worked with each of the top OEMs — Acer, ASUS, Dell, HP, Lenovo, Samsung — and of course Surface, to bring exciting new Copilot+ PCs that will begin to launch on June 18. Starting at $999, these devices are up to $200 less than similar spec’d devices [9] .
Surface plays a key role in the Windows ecosystem, as we design software and hardware together to deliver innovative designs and meaningful experiences to our customers and fans. We are introducing the first-ever Copilot+ PCs from Surface: The all-new Surface Pro and Surface Laptop.

The new Surface Laptop is a powerhouse in an updated, modern laptop design with razor-thin bezels, a brilliant touchscreen display, AI-enhanced camera, premium audio, and now with a haptic touchpad.
Choose between a 13.8” and 15” display and four stunning colors. Enjoy up to 22 hours of local video playback on Surface Laptop 15” or up to 20 hours on Surface Laptop13.8” on top of incredible performance and all-new AI experiences.
The new Surface Pro is the most flexible 2-in-1 laptop, now reimagined with more speed and battery life to power all-new AI experiences. It introduces a new, optional OLED with HDR display, and ultrawide field of view camera perfect for Windows Studio Effects. The new Surface Pro Flex Keyboard is the first 2-in-1 keyboard designed to be used both attached or detached. It delivers enhanced stability, with Surface Slim Pen storage and charging integrated seamlessly, as well as a quiet, haptic touchpad. Learn more here.
New Copilot+ PCs from the biggest brands available starting June 18:
- Acer : Acer’s Swift 14 AI 2.5K touchscreen enables you to draw and edit your vision with greater accuracy and with color-accurate imagery. Launch and discover AI-enhanced features, like Acer PurifiedVoice 2.0 and Purified View, with a touch of the dedicated AcerSense button.
- ASUS : The ASUS Vivobook S 15 is a powerful device that brings AI experiences to life with its Snapdragon X Elite Platform and built-in Qualcomm® AI. It boasts 40+ NPU TOPS, a dual-fan cooling system, and up to 1 TB of storage. Next-gen AI enhancements include Windows Studio effects v2 and ASUS AiSense camera, with presence-detection capabilities for Adaptive Dimming and Lock. Built for portability, it has an ultra-slim and light all-metal design, a high-capacity battery, and premium styling with a single-zone RGB backlit keyboard.
- Dell : Dell is launching five new Copilot+ PCs, including the XPS 13, Inspiron 14 Plus, Inspiron 14, Latitude 7455, and Latitude 5455, offering a range of consumer and commercial options that deliver groundbreaking battery life and unique AI experiences. The XPS 13 is powered by Snapdragon X Elite processors and features a premium, futuristic design, while the Latitude 7455 boasts a stunning QHD+ display and quad speakers with AI noise reduction. The Inspiron14 and Inspiron 14 Plus feature a Snapdragon X Plus 1and are crafted with lightweight, low carbon aluminum and are energy efficient with EPEAT Gold rating.
- HP : HP’s OmniBook X AI PC and HP EliteBook Ultra G1q AI PC with Snapdragon X Elite are slim and sleek designs, delivering advanced performance and mobility for a more personalized computing experience. Features include long-lasting battery life and AI-powered productivity tools, such as real-time transcription and meeting summaries. A 5MP camera with automatic framing and eye focus is supported by Poly Studio’s crystal-clear audio for enhanced virtual interactions.
- Lenovo : Lenovo is launching two AI PCs: one built for consumers, Yoga Slim 7x, and one for commercial, ThinkPad T14s Gen 6. The Yoga Slim 7x brings efficiency for creatives, featuring a 14.5” touchscreen with 3K Dolby Vision and optimized power for 3D rendering and video editing. The T14s Gen 6 brings enterprise-level experiences and AI performance to your work tasks, with features including a webcam privacy shutter, Wi-Fi 7 connectivity and up to 64GB RAM.
- Samsung : Samsung’s new Galaxy Book4 Edge is ultra-thin and light, with a 3K resolution 2x AMOLED display and Wi-Fi 7 connectivity. It has a long-lasting battery that provides up to 22 hours of video playback, making it perfect for work or entertainment on the go.
Learn more about new Copilot+ PCs and pre-order today at Microsoft.com and from major PC manufacturers, as well as other leading global retailers.
Start testing for commercial deployment today
Copilot+ PCs offer businesses the most performant Windows 11 devices with unique AI capabilities to unlock productivity, improve collaboration and drive efficiency. As a Windows PC, businesses can deploy and manage a Copilot+ PC with the same tools and processes used today including IT controls for new features and AppAssure support. We recommend IT admins begin testing and readying for deployment to start empowering your workforce with access to powerful AI features on these high-performance devices. You can read more about our commercial experiences here .

AI innovation across the Windows ecosystem
Like we’ve always done with Windows, we have built a platform for our ecosystem partners to build on.
The first Copilot+ PCs will launch with both the Snapdragon® X Elite and Snapdragon® X Plus processors and feature leading performance per watt thanks to the custom Qualcomm Oryon™ CPU, which delivers unrivaled performance and battery efficiency. Snapdragon X Series delivers 45 NPU TOPS all-in-one system on a chip (SoC). The premium integrated Qualcomm® Adreno ™ GPU delivers stunning graphics for immersive entertainment. We look forward to expanding through deep partnerships with Intel and AMD, starting with Lunar Lake and Strix Point. We will bring new Copilot+ PC experiences at a later date. In the future we expect to see devices with this silicon paired with powerful graphics cards like NVIDIA GeForce RTX and AMD Radeon™, bringing Copilot+ PC experiences to reach even broader audiences like advanced gamers and creators.
We are at an inflection point where the PC will accelerate AI innovation. We believe the richest AI experiences will only be possible when the cloud and device work together in concert. Together with our partners, we’re setting the frame for the next decade of Windows innovation.
[1] Based on snapshot of aggregated, non-gaming app usage data as of April 2024 for iGPU-based laptops and 2-in-1 devices running Windows 10 and Windows 11 in US, UK, CA, FR, AU, DE, JP.
[2] Tested April 2024 using Phi SLM workload running 512-token prompt processing in a loop with default settings comparing pre-release Copilot+ PC builds with Snapdragon Elite X 12 Core and Snapdragon X Plus 10 core configurations (QNN build) to Windows 11 PC with NVIDIA 4080 GPU configuration (CUDA build).
[3] Tested May 2024 using Cinebench 2024 Multi-Core benchmark comparing Copilot+ PCs with Snapdragon X Elite 12 core and Snapdragon X Plus 10 core configurations to MacBook Air 15” with M3 8 core CPU / 10 Core GPU configuration. Performance will vary significantly between device configuration and usage.
[4] *Battery life varies significantly by device and with settings, usage and other factors. See aka.ms/cpclaims*
[5] *Battery life varies significantly based on device configuration, usage, network and feature configuration, signal strength, settings and other factors. Testing conducted May 2024 using the prelease Windows ADK full screen local video playback assessment under standard testing conditions, with the device connected to Wi-Fi and screen brightness set to 150 nits, comparing Copilot+ PCs with Snapdragon X Elite 12 core and Snapdragon X Plus 10 core configurations running Windows Version 26097.5003 (24H2) to MacBook Air 15” M3 8-Core CPU/ 10 Core GPU running macOS 14.4 with similar device configurations and testing scenario.
[6] Based on snapshot of aggregated, non-gaming app usage data as of April 2024 for iGPU-based laptops and 2-in-1 devices running Windows 10 and Windows 11 in US, UK, CA, FR, AU, DE, JP.
[7] Recall is optimized for select languages (English, Chinese (simplified), French, German, Japanese, and Spanish.) Content-based and storage limitations apply. Learn more here .
[8] Copilot key functionality may vary. See aka.ms/keysupport
[9] Based on MSRPs; actual savings may vary
Tags: AI , Copilot+ PC
- Check us out on RSS
Error: Can't read file, or Presentation cannot be opened
If you've arrived at this article because you got an error message that PowerPoint can't read a file or that the presentation cannot be opened, it's likely that Microsoft 365 has blocked the file for security reasons. You can unblock the file so it can be opened:
Open Windows File Explorer (Open Start in Windows and type File Explorer .)
Locate the problematic file on your computer.
Right-click the file and select Properties .
In the Properties dialog box, look for an Unblock button near the bottom right. If it exists, click Unblock , then click Apply , and then click OK to dismiss the dialog box.

Now, attempt to open the presentation again. Right-click the file in File Explorer and select Open .
Still having trouble?
If you're having a problem with PowerPoint that's not resolved here, please contact us for technical support.
For a discussion about why Microsoft 365 blocks files, read Block or unblock external content in Microsoft 365 documents .

Need more help?
Want more options.
Explore subscription benefits, browse training courses, learn how to secure your device, and more.

Microsoft 365 subscription benefits

Microsoft 365 training

Microsoft security

Accessibility center
Communities help you ask and answer questions, give feedback, and hear from experts with rich knowledge.

Ask the Microsoft Community

Microsoft Tech Community

Windows Insiders
Microsoft 365 Insiders
Find solutions to common problems or get help from a support agent.

Online support
Was this information helpful?
Thank you for your feedback.
IMAGES
VIDEO
COMMENTS
It's by no means un-editable. Open the presentation that you want to make read-only, then click the "File" tab. Next, in the left-hand pane, select "Info." You'll now see a "Protect Presentation" section, which lets you (to an extent) protect against any editing of your presentation. Click "Protect Presentation."
In PowerPoint for the web, click the Share tab. Under Share, click Get a link. Under View only, click Create. Tip: Click Shorten to decrease the length of the URL that you share with others. Right-click the URL and click Copy. Under Share, click Send email. Enter the email address in the To box. Paste the URL in the message box, and click Share.
To make a PowerPoint Presentation read-only: Open your Powerpoint presentation. Choose File at the top left. Select Info on the bar on the left. Click Protect Presentation. In the pull-down menu ...
Select File > Info. Select Protect Presentation, point to Restrict Access, and then select Restricted Access. In the Permission dialog box, select Restrict permission to this presentation, and then select More Options. Under Additional permissions for users, select the This presentation expires on check box, and then enter a date.
1] Open the presentation you want to make read-only. The first step is to fire up the PowerPoint presentation you want to make read-only. Simply launch the program then, right away, you should see ...
Follow these simple steps to use Passper for PowerPoint to unlock a read-only presentation. Step 1: Download and install Passper for PowerPoint on your computer and then launch the program. In the main window, click on "Remove Restrictions". Step 2: Import the presentation into the program and then click on "Remove".
Here are the steps: Open the PowerPoint presentation you want to make read-only. Click on the "File" tab. Select "Info" on the left side of the menu. Click on "Protect Presentation" and choose "Mark as Final" from the drop-down menu. Marking a presentation as final sets it to read-only mode within PowerPoint.
Open the desired PowerPoint presentation, and click on the " File " tab. Next, click on the " Info " tab from the options presented on the left part of the screen. Select the " Protect Presentation " option. From the dropdown, select " Always Open Read-Only ". Finally, save the file by pressing Ctrl+S.
Method #3. Restrict Permission to Selected Individuals. You can set the restriction to your readers so they can read the presentation but won't be able to change, print, or copy the content. As with the previous method, you can do this right in PowerPoint. Simply go to File → Info → Protect Presentation → Restrict Access .
Way1: Restrict Permission by People. 1. Open the PowerPoint that you want to set read-only protection. 2. In the ribbon, select the " File " tab. And then click the " Info " in the left of the panel. 3. Click the " Protection Presentation " function button, and then four options will show up. We will choose the second one " Restrict Permission ...
Step 2: Save the Presentation. Click on the "File" tab, then select "Save As." Choose the destination where you want to save your presentation. Before clicking "Save," locate the "Tools" button and click on "General Options." Step 3: Mark as Read-Only. In the "General Options" window, check the box that says "Read-only recommended."
In PowerPoint for the web, click the Share tab. Under Share, click Get a link. Under View only, click Create. Tip: Click Shorten to decrease the length of the URL that you share with others. Right-click the URL and click Copy. Under Share, click Send email. Enter the email address in the To box. Paste the URL in the message box, and click Share.
1: Open the presentation, then click "File > Save as.". 2: Click "Tools" at the bottom of the "Save As" dialog box, and then click "General Options.". 3: Type the Password you want to use in the box marked "Password To M; modify" and click "OK.". Enter the Password again and click "OK.".
This option is chosen by most people to make the MS PowerPoint 2010 presentation read only. You can add restrict permission to remove others' ability to edit, copy and print the presentation. Step 1: Access File > Info > Protect Presentation. Step 2: Click Protect Presentation and select Restrict Access from Restrict Permission by People option.
Step 2. Look for a " + " > " From File " button on the main screen. Click it. This lets you make a PDF from another file, like your PowerPoint. Step 3. A window will open. Find your PowerPoint file, click the " SamplePPT ," and open it. Step 4. After you pick your file, PDFelement changes your PPT to a PDF.
-In today's tutorial, we will teach you how to save PowerPoint as read only.Open PowerPoint presentation you need. Click on ´File´ at the top left corner of ...
PowerPoint for the web. If you want to reuse some of the slides in a read-only presentation, you can download a copy to your computer and make changes to the copy. On the File tab, click Save As. Click Download. Pick the steps below for your browser to save and open the file.
How can I open all open Powerpoint presentations in read-only or protected-view by default -allowing me to enable editing and saving if I wish once open? PptView is gone now :-( Shift+right-click "Open as Read-only" doesn't seem to work at all Shift+right-click "Open in Protected View"seems to work ok sometimes (How do I use "Open in Protected ...
3. Click "Protect Presentation" and select "Mark as Final." This acts as a toggle selection. If the presentation was read-only, it will now be editable, and if it was not protected, the Mark as ...
Method 1: Clicking Edit Anyway. Method 2: Selecting Mark as Final. The Importance of Using the Read-Only Feature on PowerPoint Presentations. Various Ways to Protect Your PowerPoint Presentation. Method 1: Enabling Read-Only. Method 2: Restricting Access. Method 3: Encrypting the Presentation.
Record new layer: Pick this for recording your video as a new layer on top of an existing recording. 2. Click Record at the bottom of the Record panel. 3. Drag over the area of your screen you wish to record. Click Start Recording. Press Space to start recording the full screen. 4. Click Stop to finish recording.
You can read more about how we are making Windows more secure here. Entirely new, powerful AI experiences Copilot+ PCs leverage powerful processors and multiple state-of-the-art AI models, including several of Microsoft's world-class SLMs, to unlock a new set of experiences you can run locally, directly on the device.
PowerPoint for the web. If you want to reuse some of the slides in a read-only presentation, you can download a copy to your computer and make changes to the copy. On the File tab, click Save As. Click Download. Pick the steps below for your browser to save and open the file.
PowerPoint for the web. If you want to reuse some of the slides in a read-only presentation, you can download a copy to your computer and make changes to the copy. On the File tab, click Save As. Click Download. Pick the steps below for your browser to save and open the file.
With a template, all you need to do is customize the existing design and add your own content to create a stunning one-pager. You can get a head start with Visme's many pre-made, beautiful one-page designs. After selecting a template, take advantage of the graphs, diagrams, and figures available in the Visme editor. 4.
Right-click the file and select Properties. In the Properties dialog box, look for an Unblock button near the bottom right. If it exists, click Unblock, then click Apply, and then click OK to dismiss the dialog box. Now, attempt to open the presentation again. Right-click the file in File Explorer and select Open.