- Margin Notes
- ► Literacy Reflections
- ► TRY THIS TOMORROW: TWO-PAGE SPREAD

TRY THIS TOMORROW: TWO-PAGE SPREAD

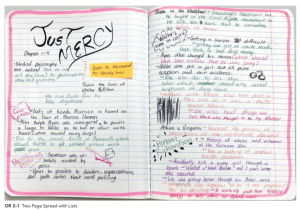
Here are some examples:
Students used lists and categories.
Students used sticky-notes in their books and transferred them to the two-pager.
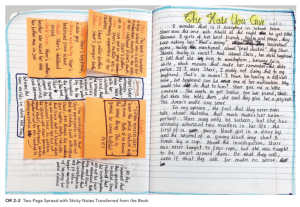
Students organized their thinking with different colors of sticky-notes.

Students wrote notes and highlighted the main points.

Some students may require support with such an open-ended activity and this resource provides other options that are more guided, while maintaining the goal of student-generated talk. Here are some guiding questions that might help students get started on their two-page spread:
- Find a gossipy moment in the book.
- Identify the turns in the book.
- Discuss a critical decision made in the chapter or book.
- Capture a shift in your thinking.
- Discuss a minor character of major importance.
- Pick a passage and read it the way the author intended it to be read.
- Identify and discuss the most important word in the passage, chapter, or book.
- Annotate poetry
You can find more student spreads under “Book Love workshop handouts” on http://pennykittle.net
Kittle, Penny, and Kelly Gallagher. 4 Essential Studies: Beliefs and Practices to Reclaim Student Agency . Heinemann, 2021.
Share this:
- Click to share on Twitter (Opens in new window)
- Click to share on Facebook (Opens in new window)
Leave a Reply Cancel reply
How to Create Double Page Layout on Word: A Step-by-Step Guide
Creating a double-page layout in Word is a relatively simple process that involves adjusting the settings in the Page Setup dialog box. By selecting the “Book fold” option under “Multiple pages”, you can format your document to print as a booklet or create a two-page spread.
After completing these steps, your document will be formatted as a double-page layout, allowing you to view, edit, and print it as a booklet or two-page spread.
Introduction
There’s something about a double-page spread that gives your document a touch of professionalism and elegance. Whether you’re designing a magazine, creating a booklet for an event, or just want to view your document in a new way, knowing how to create a double-page layout in Word is a handy skill to have. This feature is particularly useful for writers, designers, educators, and anyone who wants to present their work in a visually appealing manner. Creating a double-page layout can seem daunting if you’re not familiar with Word’s more advanced features. But don’t worry, it’s actually quite simple once you know where to look and what settings to tweak. This article will walk you through the process step by step, so you can create stunning double-page layouts like a pro. So, let’s dive in and learn how to transform your documents!
Step-by-Step Tutorial: Creating a Double Page Layout on Word
Before we begin, it’s essential to understand what we’re aiming to achieve with these steps. By following this tutorial, you’ll be able to format your Word document into a double-page layout, commonly used for booklets, catalogs, or magazines.
Step 1: Open the Page Setup Dialog Box
Navigate to the “Layout” tab and click on “Margins”, then select “Custom Margins” at the bottom of the drop-down menu.
In this step, you’re accessing the settings that will allow you to adjust how your document’s pages are laid out. The Page Setup dialog box is where all the magic happens.
Step 2: Select the “Multiple pages” Dropdown
Within the Page Setup dialog box, look for the “Multiple pages” dropdown menu and select “Book fold”.
By choosing “Book fold”, you’re telling Word to format your document so that it prints as a booklet, which is essentially what a double-page layout is. This option will change how your document appears on the screen and how it prints out.
Step 3: Adjust Margins as Needed
Set appropriate margins for your document, ensuring you have enough space for binding if you’re planning to print the document as a booklet.
Margins are crucial for readability and aesthetics. Make sure to leave sufficient space so that your text doesn’t disappear into the binding of your booklet.
Step 4: Set Sheets per Booklet
If necessary, specify the number of sheets per booklet to control how your document is paginated and printed.
This setting is particularly useful if you’re printing your document. It ensures that your booklet has the correct number of pages and that everything is in order when it’s time to put it all together.
Additional Information
Creating a double-page layout on Word can enhance the readability and presentation of your document. However, it’s important to remember that this layout is best suited for longer documents that are intended to be printed, like booklets or manuals. If you’re working on a digital-only document, it may be more practical to stick with a single-page layout.
When setting up your document, pay attention to the page orientation and the size of your paper. These elements will affect how your double-page layout looks both on-screen and in print. Additionally, consider the binding method you’ll use if you plan to print the document, as it will influence the margin settings.
Remember to use the print preview feature before finalizing your document. This tool allows you to see how your double-page layout will look when printed and can help catch any formatting issues early on.
- Open the Page Setup Dialog Box
- Select the “Multiple pages” Dropdown
- Adjust Margins as Needed
- Set Sheets per Booklet
Frequently Asked Questions
What is a double-page layout.
A double-page layout formats your document to appear as a two-page spread, typically used for printing booklets or magazines.
Can I revert back to a single-page layout after setting up a double-page layout?
Yes, you can change the layout back to single-page by going into the Page Setup dialog box and selecting “Normal” from the “Multiple pages” dropdown menu.
Will a double-page layout affect the way my document is printed?
Yes, a double-page layout is meant for duplex printing and will organize pages to be printed as a booklet.
Do I need a special printer to print a double-page layout?
You’ll need a printer that supports duplex (double-sided) printing, or you’ll have to manually print on both sides of the paper.
Can I create a double-page layout on any version of Word?
Most modern versions of Word support the creation of a double-page layout, but the exact steps may vary slightly.
Learning how to create a double-page layout on Word is a valuable skill that can take your documents to the next level. Whether you’re working on a personal project, creating materials for work, or just want to experiment with your document’s layout, mastering this feature will definitely set you apart.
With the detailed guide provided, you should now feel confident in navigating the Page Setup dialog box and transforming your single pages into stunning spreads. Remember, the key to a successful double-page layout is careful planning and attention to detail. Happy formatting!

Matthew Burleigh has been writing tech tutorials since 2008. His writing has appeared on dozens of different websites and been read over 50 million times.
After receiving his Bachelor’s and Master’s degrees in Computer Science he spent several years working in IT management for small businesses. However, he now works full time writing content online and creating websites.
His main writing topics include iPhones, Microsoft Office, Google Apps, Android, and Photoshop, but he has also written about many other tech topics as well.
Read his full bio here.
Share this:
Join our free newsletter.
Featured guides and deals
You may opt out at any time. Read our Privacy Policy
Related posts:
- How to Change Page Margins in Excel 2010
- 1 Inch Margins in Word: How to Guide
- How to Vertically Center Text in Word 2013
- How to Center Worksheet Horizontally and Vertically in Excel 2010
- How to Change Microsoft Word Margins in Office 365: A Step-by-Step Guide
- How to Set Print Margins in Excel 2010
- 1 Inch Margins Google Docs Guide
- How to Set Margins in Word 2010
- How to Insert Text Box in Google Docs
- How to Return to Normal View in Word 2010
- How to Print from Microsoft Word for Office 365: A Step-by-Step Guide
- How to Remove Section Breaks in Word Documents
- Excel Print Guide – Changing Important Print Settings in Excel 2010
- How to Print Two Pages on One Sheet – Word 2010
- Can I Repeat Rows in Excel When I Print?
- How to Remove the Page Number from the First Page in Word 2013
- How to Change Margins in Word 2010 from Inches to Centimeters
- How to Double Space in Word Documents
- How to Double Space on Google Docs – iPad, iPhone, and Desktop
- Rotating a Single Page on Microsoft Word: A Step-by-Step Guide
2 Page Essay: Examples, Topics, & Word Count
What does a two page essay look like? If you’re a student, you’ve probably asked yourself this question. 2 page essays are usually assigned to check one’s ability to formulate their thoughts. A two page essay word count is 450 to 500 words (12 pt double-spaced). A paper of 2 pages usually consists of 5 to 6 paragraphs.
When choosing a topic for a 2 pages essay, remember that it is quite a short piece. That’s why your topic shouldn’t be too complicated. You might want to focus on football, bullying, basketball, or responsibility.
If you’re searching for 2 page essay examples, look at the list below. We’ve gathered a collection of A+ samples for you to get inspired. Knock them dead!
2-page Essay Examples: 41780 Samples
Repairing donated children books.
- Subjects: Education Education Issues
Henry Thoreau: The Concept of the Friendship
- Subjects: Literature Poems
The Articles of Confederation. Nullification and Secession
- Subjects: Politics & Government Social & Political Theory
Early Musique Concrète Co-Composition: Pierre Schaeffer, Pierre Henry, John Cage, Vladimir Ussachevsky, and Otto Luening
- Subjects: Art Music Genre
Neuropsychological Assessment: Individually Administered Intelligence Tests
- Subjects: Applications of Psychology Psychology
The Way to Rainy Mountain: Analysis of the Text
- Subjects: American Literature Literature
Organizational Behaviour: Leading Human Resources
- Subjects: Business Management
Father and Son Relations: Analysis of the Movies
- Subjects: Entertainment & Media Movies
Sex Marriage: Personal Opinion
- Subjects: Family, Life & Experiences Marriage
Globalization: Metaphysical Perspective of the Western Industrialized World
- Subjects: Sociological Theories Sociology
Why We Fight: Military Industrial Complex and Its Impact on the American Life
- Subjects: History United States
Navy White Hat Eulogy Essay
- Subjects: Culture Traditions
Debate: Fingerprinting and Background Check vs. Invasion of Privacy
- Subjects: Criminology Law
The Bible: Eve and Female Place in the World
- Subjects: Religion Theology
What Makes a Real Hero: Ideas by Bolt, Douglas, and Albom
- Subjects: British Literature Literature
Public Health Communication: Quit Smoking
- Subjects: Health & Medicine Public Health
Report of an Orchestra Concert
- Subjects: Art Concerts
The Case in Huntingdon as One More Cause to Talk about Inequality
Where rampages begin: the issue with the school shootings.
- Subjects: Sociology Violence
Love is women’s whole existence
How did it feel being a governor.
- Subjects: Government Politics & Government
Innovation Of The Workplace
- Subjects: Business Employees Management
Sense of Humor: How Does It Help?
- Subjects: Emotions Family, Life & Experiences
Approaches To Capacity Planning And Control
A clockwork orange by anthony burgess, the lord of the rings: the fellowship of the ring and its production by means of detailed planning, storyboarding, and collaboration.
- Subjects: Art Film Studies
Changes in Life: Positive and Negative Effects
- Subjects: Life Philosophy Philosophy
“Soldier’s Home” by Ernest Hemingway
The virtue of moving forward in “a rose for emily” by william faulkner, travelling along the oregon trail, a new dawn: the abolishment of slavery in the usa, “city of god” (2002) by fernando meirelles, discovering cumberland island.
- Subjects: Geography Sciences
Common Sense and Related Writings
How serfdom saved the woman’s movement.
- Subjects: Literature World Literature
An Overbooking Problem in Calgary
- Subjects: Business Company Information
Disguise: Does It Reveal More than It Hides?
- Subjects: Psychology Social Psychology Deviations
Challenges of HRM: Conclusion & Solutions
- Subjects: Business Managerial Duties
The Types of Plate Tectonics Essay
- Subjects: Ecology Environment
Exhaustion in Victim Care Professions
- Subjects: Psychological Issues Psychology
Effects of the New Deal on America
Self-reliance: the communal past as a model for the future, evaluation of operant conditioning theory by b.f. skinner.
- Subjects: Behavior Management Psychology
Gambling in Four Perspectives
Metamorphoses by ovid: the character of phaeton, team leader: exploiting new opportunities, the government is invading people’s privacy, the gain of consciousness in the “epic of gilgamesh”, the neo-vygotskian approach to child development.
- Subjects: Education Pedagogy
Quality Management for Organizational Excellence
Some thoughts on what is to be done.
- Subjects: Historical Literature Literature
Maslow’s Hierarchy of Needs: Maximum Input and Output
- Subjects: Psychologists Psychology
Oral versus Written Administration of the Geriatric Depression Scale
Freud’s theory of personality development and ocd.
- Subjects: Development Psychology
How to Prevent School Violence
Plato’s theory of forms: summary essay.
- Subjects: Philosophical Theories Philosophy
Accounting in Business
- Subjects: Accounting Business
Stylistic Analysis of Film Script
Blanchard and fiedler leadership models, juvenile justice system in “sleepers” film by barry levinson, segway ht: business model and planning.
- Subjects: Business Case Study
Do People Choose What They Are Attracted To?
‘sociometric stability and the behavioral correlates of peer acceptance in early childhood’, “the visitor” by thomas mccarthy, the book of genesis: towards understanding creation theology, the long voyage by jorge semprun, google refused trademark for nexus one.
- Subjects: Business Marketing
Roman Civilization: Senate and Augustan Regime
- Subjects: Ancient History History
The Cold War and Its Influence on Europe
- Subjects: Eastern Europe History
Objective Personality Tests
A critical evaluation of criteria for a successful presidency from a citizen’s perspective.
- Subjects: Politicians Politics & Government
“Brain Plasticity and Behavior” by Bryan Kolb, Robbin Gibb, and Terry E. Robinson
- Subjects: Health & Medicine Neurology
China Town – New York
- Subjects: Entertainment & Media Journalism
Use of Performance Appraisals as a Reward System
Status, role, primary groups, and secondary groups in social interactions between different racial and ethnic groups, paris and its tourist places.
- Subjects: Countries Studies Sciences
ART VITALIS The New Jersey New Music Forum – CONCERT REPORT
Socrates: his life, philosophy, & death.
- Subjects: Historical Figures History
After the Oil Crisis, a Food Crisis? Global Rising Food Prices and Their Effects
- Subjects: Economics Finance
The Importance of the Logical – Mathematical Intelligence in Mathematics Teaching
- Subjects: Approach to Learning Education
Do People Inherit their Personality?
Conceptual approaches to learning and performance, rise of christianity in europe and islam in the middle east.
- Subjects: Religion Religion History
Chicago: Crossroads of America
- Subjects: Art Art Exhibitions
My life in Western Europe in 600 AD
- Subjects: History Medieval History
US-China: The Art of Negotiation
- Subjects: Business Business Critique
The Problem with Mr. Gunes
- Subjects: Literature Plays
Pursuit of Happiness by Women in Modern Day America
- Subjects: History Women Studies
UN Summit in New York: Ending Global Poverty
Important characteristics for effective teaching.
- Subjects: Education Pedagogical Skills
Principle of Observation
Data analysis and maintenance.
- Subjects: Data Tech & Engineering
Leon Golub: Historical witness
- Subjects: Art Artists
Technology and Communication Connection: Benefits and Shortcomings
What makes airplanes fly the industrial revolution, heredity and natural selection.
- Subjects: Genetics Sciences
- Words: 1108
Formative Assessment: Gauging the Outcome of Educational Activities
- Subjects: Education Education Theories
Innovation, creativity and design
- Subjects: Business Entrepreneurship
Marketing environments and their effects on business
Total quality management in the hospitality industry, eddy cue as a creative thinker, the ethical dilemma – how to make the right decision.
- Subjects: Family, Life & Experiences Personal Experiences
The Major Medical Causes of Maternal Deaths and Ways to Reduce It
- Subjects: Health & Medicine Healthcare Research
Journal Entry, Hermaphrodite or Intersex
- Subjects: Gender Studies Sociology
Spotlight on Plagiarism Phenomenon
- Subjects: Education Writing & Assignments
Story of Jacob and Esau
Marlow in “heart of darkness”, simplicius simplicissimus: the thirty years’ war period.
- Subjects: History Western Europe
First Look into Human Development in United Arab Emirates
Learning to see & learning to listen, contrasting an online class to a traditional class, why i am studying engineering.
- Subjects: Engineering Tech & Engineering
Water Resources Management
- Subjects: Environment Environmental Management
Solving the Raised Issues: Gateway Resort Ltd
Measuring economic health, understand buying trends and the psychology of consumer behavior.
- Subjects: Brand Management Business
Okrent, Daniel. Last Call: The Rise and Fall of Prohibition. Scribner (May 11, 2010)
Blood clot risk from stents seen in african-americans, marketing: sales function.
- Subjects: Business Financial Marketing
A Critical Discussion of the Family Medical Leave Act
- Subjects: Family Law Law
- Words: 1001
- PRO Courses Guides New Tech Help Pro Expert Videos About wikiHow Pro Upgrade Sign In
- EDIT Edit this Article
- EXPLORE Tech Help Pro About Us Random Article Quizzes Request a New Article Community Dashboard This Or That Game Popular Categories Arts and Entertainment Artwork Books Movies Computers and Electronics Computers Phone Skills Technology Hacks Health Men's Health Mental Health Women's Health Relationships Dating Love Relationship Issues Hobbies and Crafts Crafts Drawing Games Education & Communication Communication Skills Personal Development Studying Personal Care and Style Fashion Hair Care Personal Hygiene Youth Personal Care School Stuff Dating All Categories Arts and Entertainment Finance and Business Home and Garden Relationship Quizzes Cars & Other Vehicles Food and Entertaining Personal Care and Style Sports and Fitness Computers and Electronics Health Pets and Animals Travel Education & Communication Hobbies and Crafts Philosophy and Religion Work World Family Life Holidays and Traditions Relationships Youth
- Browse Articles
- Learn Something New
- Quizzes Hot
- This Or That Game
- Train Your Brain
- Explore More
- Support wikiHow
- About wikiHow
- Log in / Sign up
- Education and Communications
- College University and Postgraduate
- Academic Writing
How to Write a Two Page Essay Quickly
Last Updated: March 28, 2023 Fact Checked
This article was co-authored by Megan Morgan, PhD . Megan Morgan is a Graduate Program Academic Advisor in the School of Public & International Affairs at the University of Georgia. She earned her PhD in English from the University of Georgia in 2015. There are 9 references cited in this article, which can be found at the bottom of the page. This article has been fact-checked, ensuring the accuracy of any cited facts and confirming the authority of its sources. This article has been viewed 98,604 times.
Writing a two page essay can be a daunting task. After all, writing takes specific skills and a lot of practice. If you are well-organized and have a specific plan, it can be done both successfully and quickly. College students, high school students, and people in most professions have to write from time to time (or every day). For many people, writing can be stressful. It helps to have a system in place to help make the process as efficient (and painless) as possible.
Getting Organized

- If your instructor has given you a clear prompt, decide now how you will approach the question. For example, if the given assignment is "Write an essay on the women's movement. Was it successful?", you will need to decide which side you are going to take. Once you narrow your focus, your essay will be much easier to organize.
- If you have a much broader assignment, it will be up to you to focus your topic. For example, if your assignment is "Write about something that interests you", you will not want to make the topic of your essay "Sports," especially for a short two-page essay. Choose a very specific topic, such as "Tailgating in the American South."

- It's unlikely that you will need further research for a two-page paper, but if you aren't sure about the requirements, ask your teacher.

Drafting Your Essay

- For example, if you're supposed to write a two-page essay about something that interests you, think about who your audience is (and how much explaining you'll have to do), what is the most relevant information, and why your topic is interesting to you.
- Branching is another technique you can use while creating your thesis. Try to imagine your topic as a tree. Write your basic idea in the middle of your paper, and then "branch" out from there, adding ideas and thoughts to your central topic.
- Another approach to try is brainstorming. To do this, write down anything and everything you know or need to know about your topic. Don't edit yourself, just get some thoughts down on paper. Once you can see your ideas, they will start to take shape. It's often helpful to do this before you try to write a formal outline, as you'll have a better idea of what you want to cover.

- For example, if you were writing an essay about college sports, a poor thesis would be, "College sports are very controversial in many ways." This is too vague, and it does not clearly take a position to argue. It will leave your reader wondering what argument you are making in your essay.
- An example of a strong thesis for the same topic might be, "College athletes should be paid a salary for playing their sport." This is more successful because it indicates the topic you will address. It's also limited enough that you can adequately discuss it in a two-page paper.

- You don't necessarily need to do a formal outline to start with. Brainstorming or making a list-type outline, where you list out ideas that are related to your topic without putting them in a specific order, can help you know what you want to write about.
- Once you have listed the ideas that support your thesis, you'll have a better sense of how to organize them.

- Note that not all teachers prefer or even accept this type of thesis, which is often referred to as a "multi-prong" or "three-prong" thesis. However, this type of thesis is often appropriate for very short writing assignments such as a two-page essay. If you're not sure what your teacher's preferences are, ask before you begin writing.
- It's helpful to list specific examples in your outline, so that you know what evidence you have for each point. This can also be helpful to show you whether you have gaps or imbalances in your approach. For example, do you have just one example for one point, but three for another point? It would be better to use roughly the same number of examples per point, or even see if the less-supported point could be incorporated elsewhere.

- One type of citation is known as parenthetical documentation. For this method, you provide information about the source within the text of your essay. An example of this would be, "Brown argues that Einstein's theory of relativity is the most important scholarly achievement of the twentieth century (292)." The name Brown refers to the author of the book in this example, and 292 is the page number where this information is found. There are different ways to cite various sources, so make sure you know how to properly credit all of the sources you plan to use. [1] X Research source
- Sometimes you may be asked to use footnotes or endnotes. While less common in brief essays, some teachers and bosses prefer them. Footnotes and endnotes include more thorough information about the source used. Often, when they replace parenthetical documentation, a Works Cited page is not required. [2] X Research source
Writing Your Essay

- Make sure that each body paragraph has a topic sentence . This sentence makes it clear to your reader what each paragraph is about. For example, if you were writing an essay about the labor force during World War II, you might say, "Women were an important part of the workforce in World War II because they learned new jobs that were previously reserved only for men."
- Include specific supporting examples in each body paragraph. For instance, if you were writing an essay about the labor force during World War II, you might say, "Many women became welders during World War II, which illustrates that gender roles in the workplace were changing."

- Start off with a broad contextual statement, but don't make it so broad as to have no relevance. Statements that begin like "Throughout history" or "In modern society" are "fluff" statements and don't provide any real context for your argument.
- A good way to think of your introduction is as an inverted pyramid. Start with the broad statement that sets the scene, and then narrow down until you reach your thesis.
- Include your thesis statement at the end of the conclusion.
- Spend some time on your first sentence. It should be interesting and grab the attention of your reader. Try starting with a fascinating example or an exciting quotation.
- Use your conclusion to tie together the strands of your argument. In some cases, such as persuasive essays , it's appropriate to include a call to action. You can also return to an anecdote or theme you brought up in the introduction to give your paper great symmetry.

- Watch out for the passive voice. Beginning writers often use the passive voice because it's wordier, which may be mistaken for "fancier." Here's an example of the passive voice: "It is believed by many that today's growing social violence is being caused by video games." Be verbs are often signs of passive voice. Reword it actively this way: "Many people blame video games for today's growing social violence." This is a clear grammatical order: People (subject) blame (verb) video games (direct object).
- Avoid wordy constructions such as "It is believed that" or "This is suggestive of that." You can communicate these ideas more clearly and concisely: "People believe that" or "This suggests that."

- Some short essays may be more appropriate in the first-person, using "I." If you've been assigned to write a personal or persuasive essay, the first-person voice is often more personal and effective than using third-person.
- Aim for parallel structure in sentences. Often, sentences end up sounding clunky if you ignore parallel structure. For example: "Paying college athletes is more important than to give them scholarships." Convert the infinitive "to give" to the gerund form "giving" for parallelism: "Paying college athletes is more important than giving them scholarships."

- Here are some examples of transition words: similarly, in comparison, as a result, otherwise. During the editing process, you can try using several variations to see which best fits your style of writing. [8] X Research source
Editing Your Essay

- Be aware that the "grammar check" in word processors is often incorrect about issues, and may even suggest changes that make your writing incorrect. Don't rely only on technology.

- There are several methods for creating a title. One idea is to begin your title with a question, such as "How..." or "Why...". Another method is to choose a specific example that occurs within your paper and use that as a starting point for your title. [10] X Research source

Community Q&A
- Take a break if you need to. Writing takes a lot of practice! Ask for help if you need it, and just keep practicing and editing. Thanks Helpful 0 Not Helpful 0

You Might Also Like

- ↑ https://apastyle.apa.org/style-grammar-guidelines/citations/basic-principles/parenthetical-versus-narrative
- ↑ https://www.trentu.ca/academicskills/documentation-guide/chicago-style/footnotes-and-endnotes
- ↑ https://writingcenter.uagc.edu/body-paragraphs
- ↑ https://writingcenter.unc.edu/tips-and-tools/introductions/
- ↑ https://apastyle.apa.org/style-grammar-guidelines
- ↑ https://www.tacoma.uw.edu/sites/default/files/2021-05/accs_elements-and-structure-of-an-essay_rev2016.pdf
- ↑ https://grammar.yourdictionary.com/style-and-usage/list-transition-words.html
- ↑ https://researchguides.uic.edu/c.php?g=252299&p=1683205
- ↑ https://writing.umn.edu/sws/assets/pdf/quicktips/titles.pdf
About This Article

- Send fan mail to authors
Reader Success Stories
Sue Pattillo
Aug 31, 2016
Did this article help you?

Jasmin Robbins
Apr 16, 2018

Featured Articles

Trending Articles

Watch Articles

- Terms of Use
- Privacy Policy
- Do Not Sell or Share My Info
- Not Selling Info
Don’t miss out! Sign up for
wikiHow’s newsletter

View a two-page spread
The "two-page spread" concept can be a little confusing, so before you jump to the last section about how to view two-page spreads, you might want to take a look at the first two sections, which define the concept.
What a two-page spread is
What a two-page spread is not.
How to view two-page spreads
A two-page spread is a printing convention that represents leading and trailing pages in a bound or folded project such as a book, booklet, newsletter, or greeting card. Often, the pages in a two-page spread mirror one another.
For example, pages 2 and 3 of this four-page newsletter make up a two-page spread.
If you compare the locations of page numbers, running titles, and margins on pages 2 and 3, you can see that page 3 is a mirror image of page 2.
Not all two-page spreads have a mirrored-page layout, however.
In this greeting card that opens from bottom to top, the inside of the card is a two-page spread.
The page sorter (the control at the bottom right of the publication window that consists of page-shaped icons) looks like this for both the four-page newsletter and the greeting card.
In the newsletter, each page is represented by one page icon in the page sorter. In the greeting card, each surface that contains unique content is considered to be a page. Notice how the icon for pages 2 and 3 looks like facing pages.
A two-page spread is not just any two pages in a publication. For example:
In publications such as postcards and brochures that have a front and back side, the two sides are not a two-page spread. Each side has content on it, but the sides are not meant to be viewed at the same time.
You can view either the front or back side of this postcard.
The page sorter for a postcard looks like the following.
The front and back sides of the card are each represented by a page icon. Even if you set a postcard publication for two-page spreads, you won't be able to see both sides of the postcard at the same time.
Web publications consist of a series of individual pages that cannot be viewed as two-page spreads.
Note: To find out if you are in a Web publication, look at the title bar. It displays either Print Publication or Web Publication, depending on the type of publication that you have open.
On a Web site, each page stands alone. It doesn't make sense to design two Web pages as if someone would be viewing them at the same time. When you have a Web publication open, therefore, the Two-Page Spread option is not available on the View menu.
Tip In postcards, brochures, and Web publications, you can't view two pages at the same time so you can work on the content. If you just want to display two or more pages at the same time so that you can see them in relation to one another, you can do that in Print Preview . On the File menu, click Print Preview . Click the Multiple Pages button and then choose the number of pages you want to display.
How do I view two-page spreads?
On the View menu, select Two-Page Spread .
If you don't see Two-Page Spread on the View menu, you're working in a Web publication. You can't view two-page spreads in Web publications.
In publications such as postcards and brochures, you can't view the front and back sides of the publication at the same time. Selecting Two-Page Spread won't have any effect.
A publication must have at least three pages in order for you to see the results of selecting Two-Page Spread .
In a multipage publication, if you're looking at the first page, you may not notice the effects of selecting Two-Page Spread . On the page sorter, click the icon for pages 2 and 3 to see a two-page spread.
You can't view two nonsequential pages at the same time.
To switch back to viewing one page at a time, on the View menu, clear the Two-Page Spread check box.

Need more help?
Want more options.
Explore subscription benefits, browse training courses, learn how to secure your device, and more.

Microsoft 365 subscription benefits

Microsoft 365 training

Microsoft security

Accessibility center
Communities help you ask and answer questions, give feedback, and hear from experts with rich knowledge.

Ask the Microsoft Community

Microsoft Tech Community

Windows Insiders
Microsoft 365 Insiders
Was this information helpful?
Thank you for your feedback.

Creating a Double-Page Spread
Introduction.
Traditional print magazines have long production cycles and rely on physical distribution. The costs are substantial. By contrast, online publications provide immediate access to news and features to anyone around the world with a device connected to the internet. These digital formats tend to have fewer overheads as well.
It is no surprise print media struggled to adapt to changing consumer habits and remain profitable. Lots of mainstream titles shifted from physical copies to focus on their online presence, such as Teen Vogue . Some well-known titles were no longer viable and ended their production run.
Independent magazines are popular with readers because they offer unique perspectives or target niche audiences. They can prioritise high-quality design and deliver visually appealing content. For example, The Gentlewoman is curated by experts who give their community great insight into the fashion industry and the most important trends.
If you are interested in designing a double page spread or have an assignment to complete, this step-by-step guide will help you create following layout in Photoshop :

Once you become more proficient in using the Rectangle and Type Tools, you will be able to design your own unique spreads and get the top marks in your assignment. This tutorial will also develop your understanding of key terms used by editors and designers.
Step One – Creating a New Document
We are going to start with a blank canvas so choose your preferred method to open Photoshop’s New Document dialog box and select A3 from the Print presets.
Make sure the resolution is set to 300 pixels per inch before you close the Preset Details panel. This resolution is a common standard for print because it maintains the integrity and quality of your work – you don’t want your images and graphics to pixelate or your text to become unreadable.
We called our document “two page spread assignment”.

Once you press the “Create” button, the canvas will probably open in portrait mode. Go to the top menu bar, click “Image”, hover the cursor over “Image Rotation” and then select “90 o clockwise”.
Step Two – Organise Your Workspace
We just want the Tools and Layers options. Inevitably, we are going to make mistakes so keep the History panel open as well.
Step Three – The Gutter
When you flick through a magazine, you will notice how the inner margins fold where the two pages meet at the binding. This space between the two facing pages is called the gutter. Since magazines are signifying processes and we want to create a positive reader experience, it is important not to lose content in the gutter.
Each page of our magazine will be A4 in size, but we are using the A3 preset to create both sides of the double-page spread. We need a guide to help locate the gutter and work out appropriate margins for our copy and images.
First, make sure your rulers are visible. Press Ctrl+R to toggle them on and off.
Then right-click on a ruler and select “Centimeters” to make it easier to define the gutter.

Press and hold the left mouse button over the side ruler and drag the thin line to the middle of the document. An X-value of 21cm should work.
If you need to move the guide, hover your cursor over the line, left-click and drag. To delete the guide, drag the line back to the ruler or select the line with the Move Tool and press the Delete key.
Step Four – Image Placeholders
We are going to add some rectangles to act as placeholders for images. If you read our Rectangle Tool tutorial and completed the tasks, you will already be familiar with its different functions.
Click and drag your mouse diagonally in any direction to create the rectangle. You should see the Properties Panel appear on the screen. Our shape defaulted to a black fill and 1px stroke. Click on the thumbnails if you want to change the colour or remove the stroke style.

We are bleeding the rectangle across the gutter because positioning the image on both pages is a good way of visually connecting the two spaces. Go ahead and add a couple more rectangles. The red rectangle in our example will act as the background for the sidebar.

Step Five – Add a Headline
Headlines are large, attention-grabbing text elements that should introduce the article and communicate its significance to the reader. To insert text, press the T button or select the icon from the toolbar. The ribbon at the top of the screen should change to the text options. We are going to use the Arial Black font – size 48pt and white:

Arial is a very accessible sans serif font. This size and weight should also make the headline stand out against the image.
Left click and drag the mouse close to our gutter guide to create an appropriate text layer. Your text layer will auto-populate with the “lorem ipsum” placeholder text.

This default setting can be incredibly annoying, but you can change it by clicking “Edit” and selecting “Preferences” and then “Type” at the bottom of the menu. When the new dialog box appears, untick the “Fill new type layers with placeholder text”. However, we are going to keep this setting to help create dummy copy for our subheadings and columns later in the tutorial.
What happens if your words are a horrible mess?

The spacing between the lines of text is called the lead. It defaulted to “Auto” in our example, but you might need to adjust your leading so the words are legible. Open up the Character tab for the different settings:

You can also adjust the tracking – the space between letters – and scale the letters along the vertical and horizontal axes. Play around with the settings and find a style that suits your product.
For more information on adding text to a Photoshop document, check out our introduction to the Type Tool . It takes a closer look at modifying text layers, including the various options in the Character panel.
Step Six – The Kicker
Subheadings provide additional information or context to the main headline and “kick” the reader into the main copy.
Left click beneath the main image and drag your mouse towards the gutter guide. We opted for Arial with the Narrow Bold weight and size 18pt, so the reader knows this copy is separate from the headline.

Step Seven – The Byline
The byline contains the name of the article’s author.
Click “T” on your keyboard to select the Type Tool and create a new text layer. We used Arial with a narrow weighting and size 9pt font. Try underlining your name to differentiate the byline from the kicker and main copy.
Step Eight – The Main Copy
We are going to add three columns of text to the verso (left page):

Once again, left click and drag the cursor to create a text layer. However, pay attention to the width and height values and aim for these dimensions: 6cm width x 11cm height.
Change the font weight to regular.
When you are satisfied with the text settings, make sure the layer is selected in the panel and then press Ctrl+C and Ctrl+V. We are duplicating the first column because we want the look of the main copy to be consistent. The space between the columns is called the alley. Again, make sure the space is even.
Step Nine – The Sidebar
The sidebar appears next to the main article on the spread and is added to develop a particular aspect of the story or offer an alternative perspective on the issue. It usually has its own headline and formatting.
First, we duplicated the headline from the main story and then adjusted the settings so both the font size and leading were 24pt. Making the text smaller and more compact should reflect the hierarchy of information on the double-page spread.
We also duplicated the kicker and changed the font colour to white, so it stood out against the red background.
Finally, we duplicated a text layer from the main article, changed the font to white and made the column 8cm wide to occupy the space more effectively. Here is the result:

Step Ten – Adding the Folio
The folio can include the page number, magazine title, date, and issue name. Create yet another text layer and add the page number. We also added our branding:

If you are creating a double-page spread in response to a media brief, you will get marks for following the codes and conventions of the print industry. Attention to detail is crucial. That is why we duplicated the columns for a consistent look and added the folio to the bottom of the page.
You could also use a dropcap at the start of the opening paragraph to signal where your article begins. Or a pull-quote to split the main copy and highlight an important aspect of the story. A caption might help anchor the reader’s interpretation of the second image.
You will probably need to create the front page as well so make sure you check out that guide.
For more practice making print products in Photoshop, follow our tutorial on creating a magazine cover or design the front cover for a media studies textbook in our introduction to combining shapes and text .
Further Reading

Create a Front Page in Photoshop

Creating a Magazine Cover

Navigating Around Your Photoshop Document

Combining Images and Text in Photoshop

Using the Type Tool in Photoshop

Using the Rectangle Tool in Photoshop
Thanks for reading!
Recently Added

Rule of Thirds

The Classification of Advertisements

Narrative Functions
Key concepts.

- Quest Plots

- Paul Gilroy

Jean Baudrillard’s Simulacra and Simulation
Media studies.
- The Study of Signs
- Ferdinand de Saussure and Signs
- Roland Barthes
- Charles Peirce’s Sign Categories
- Jean Baudrillard’s Simulacra and Simulation
- Binary Opposition
- Vladimir Propp
- Tzvetan Todorov
- Barthes’ 5 Narrative Codes
- Key Concepts in Genre
- David Gauntlett and Identity
- Liesbet van Zoonen
- The Male Gaze
- The Bechdel Test
- bell hooks and Intersectionality
- The Cultural Industries
- Hypodermic Needle Theory
- Two-Step Flow Theory
- Cultivation Theory
- Stuart Hall’s Reception Theory
- Abraham Maslow
- Uses and Gratifications
- Moral Panic
- Camera Shots
- Indicative Content
- Statement of Intent
- AQA A-Level
- Exam Practice
Daniel's OCA Blog: Book Design 1
Daniel Sutton 516636
Exercise 2: Double-page spread
Understanding layouts Research into book layouts that you find interesting. These could be art or design books, or others that have more complex layouts that balance images, typography and other content across multiple columns. Trace the grid structure of your chosen double-page spread using tracing paper and a sharp pencil. Measure the margins, column width and depth, plus spaces between the columns. Transcribe the tracing onto a clean sheet of paper, drawing on the measurements. Compare your drawings to other double-page spreads within the same publication. Identify the similarities and differences – is there an underlying grid system and how does it adapt to deal with different content? Now recreate the same double-page spread using DTP software. Use your traced drawing measurements as a guide. There is no need to copy out all the text – you can use ‘dummy’ text or ‘blurb’ such as lorem ipsum. Lorem ipsum is Latin text which has a distribution of letters that make it look like readable English. You can download some from http://www.lipsum.com and incorporate it into your layout. Similarly, there is no need to recreate the images – indicate images by a 10% shaded area, whether these are cut-out, full-bleed or within a box. Try to match the typeface as closely as possible. It doesn’t need to be exactly the same, but try to retain something of the original – for example, make sure you use a sans-serif font if the original is sans-serif.
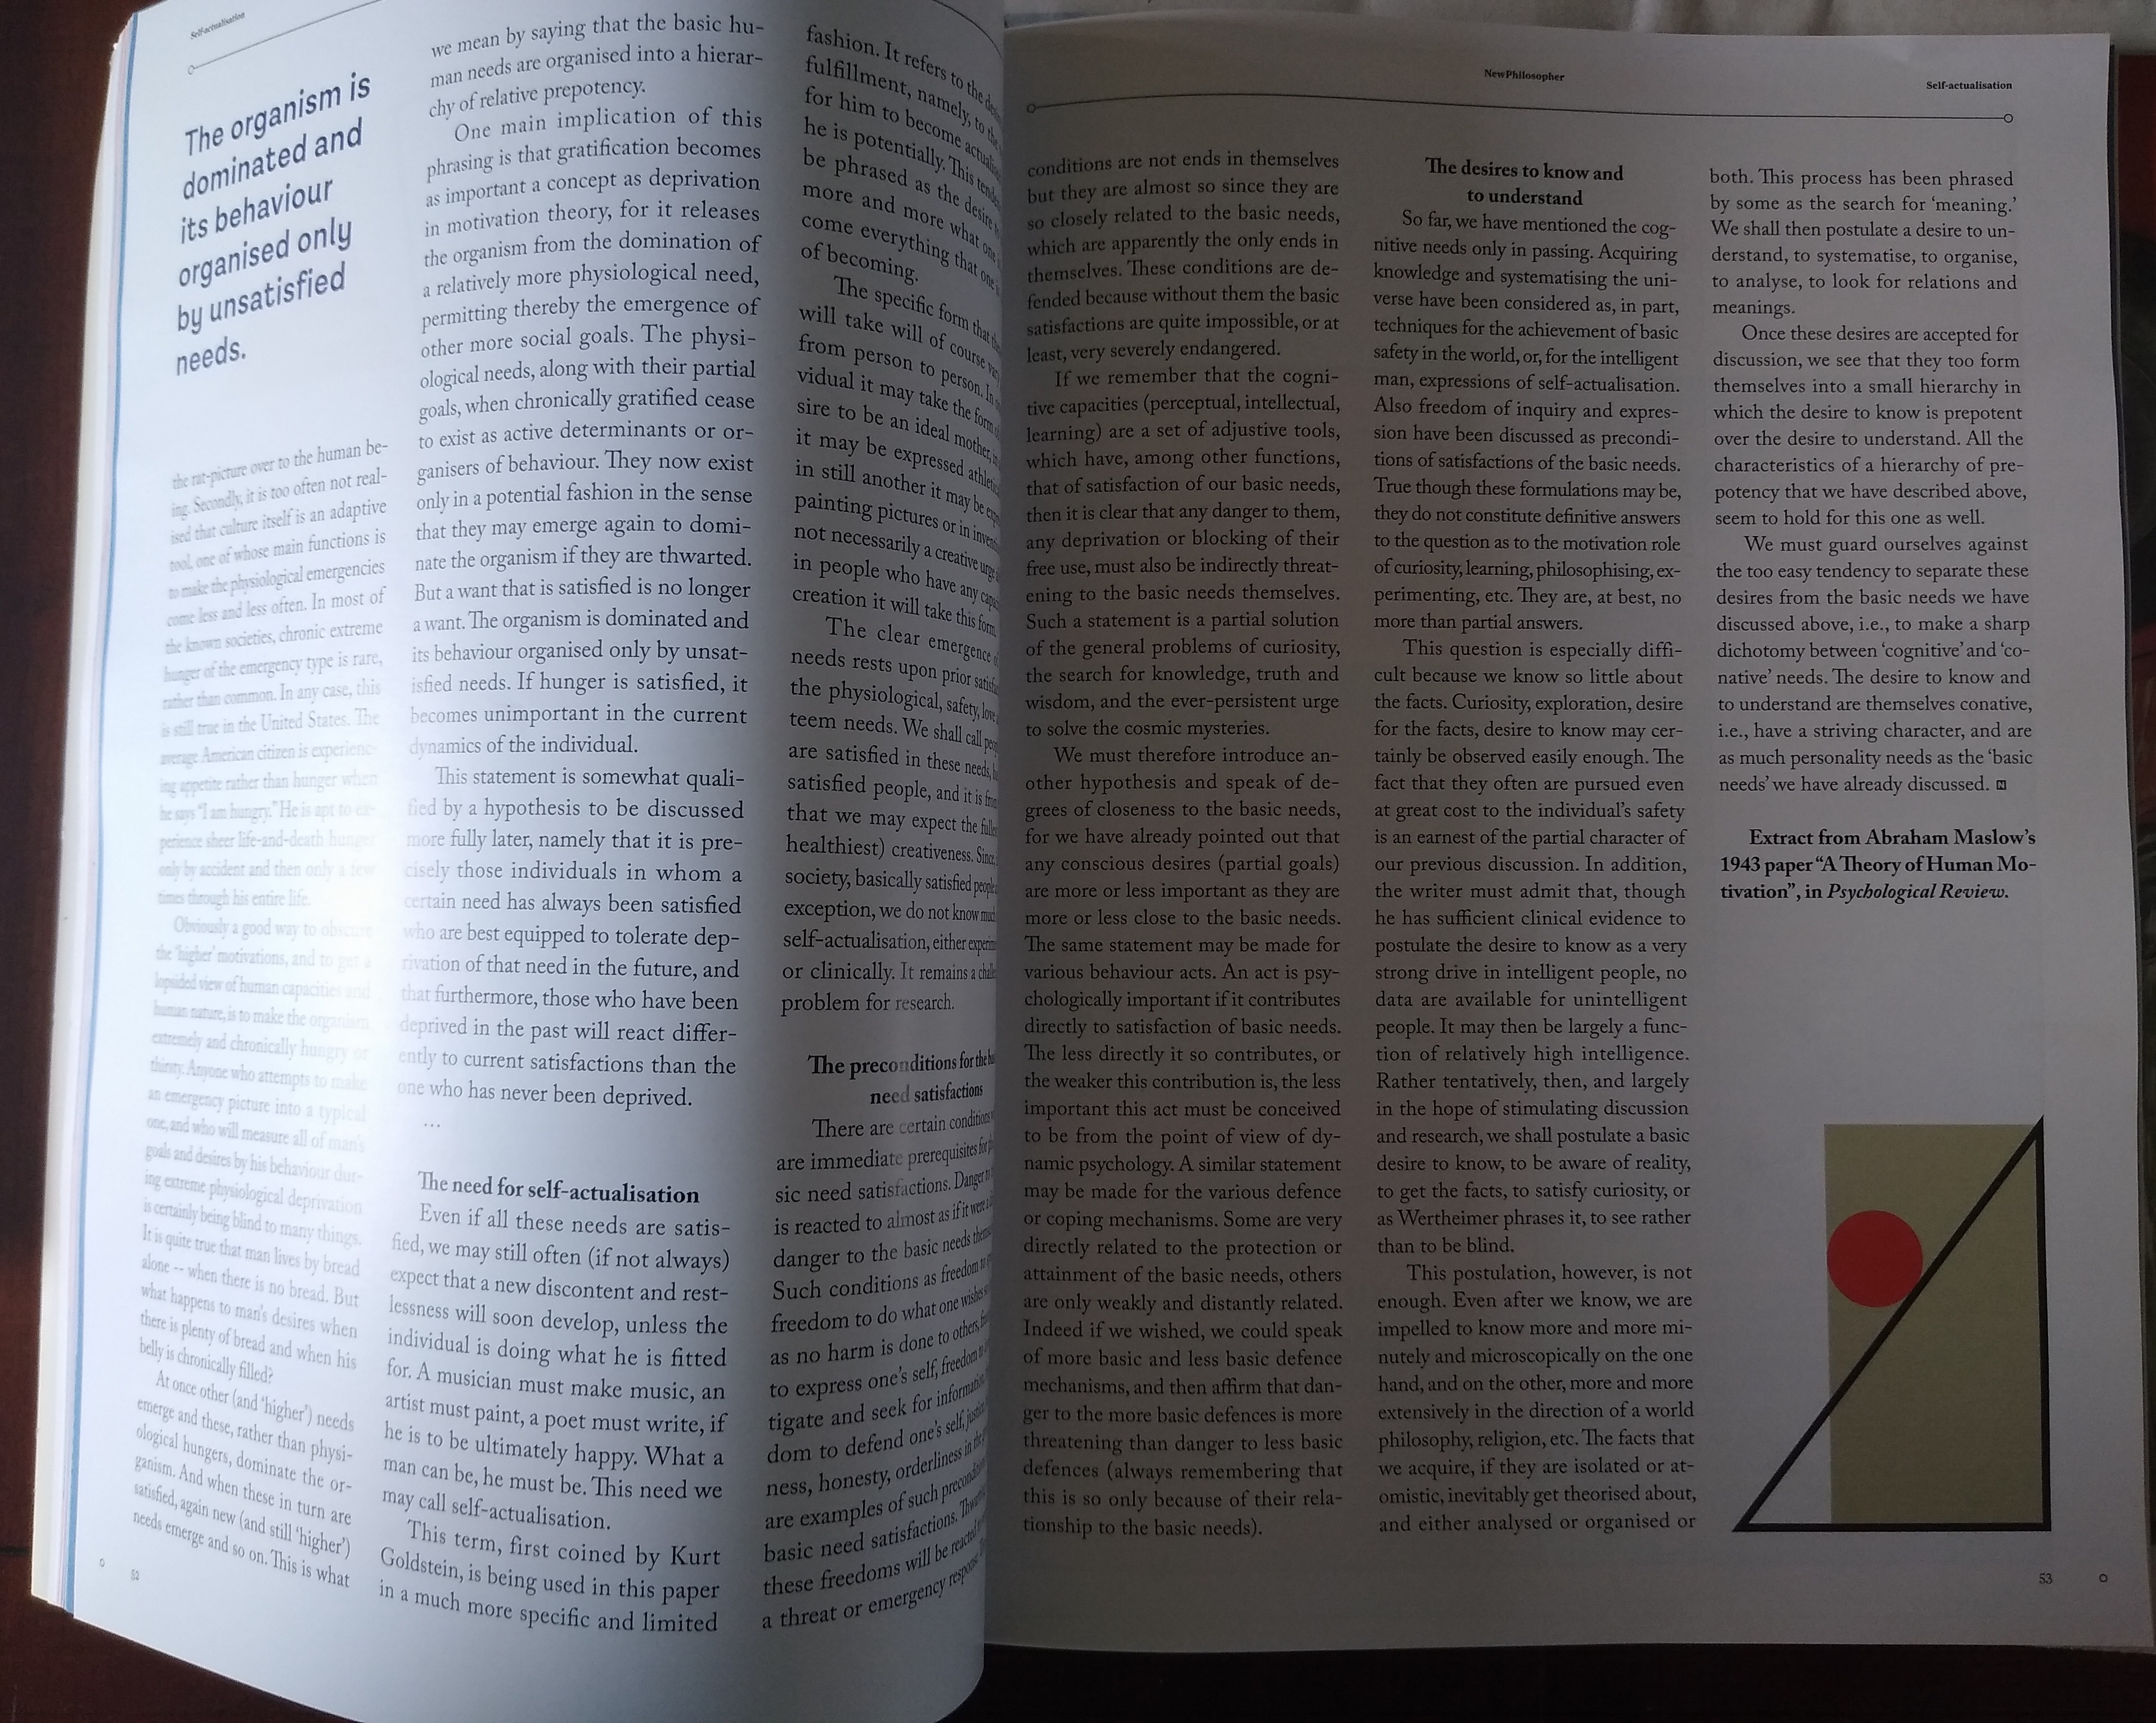
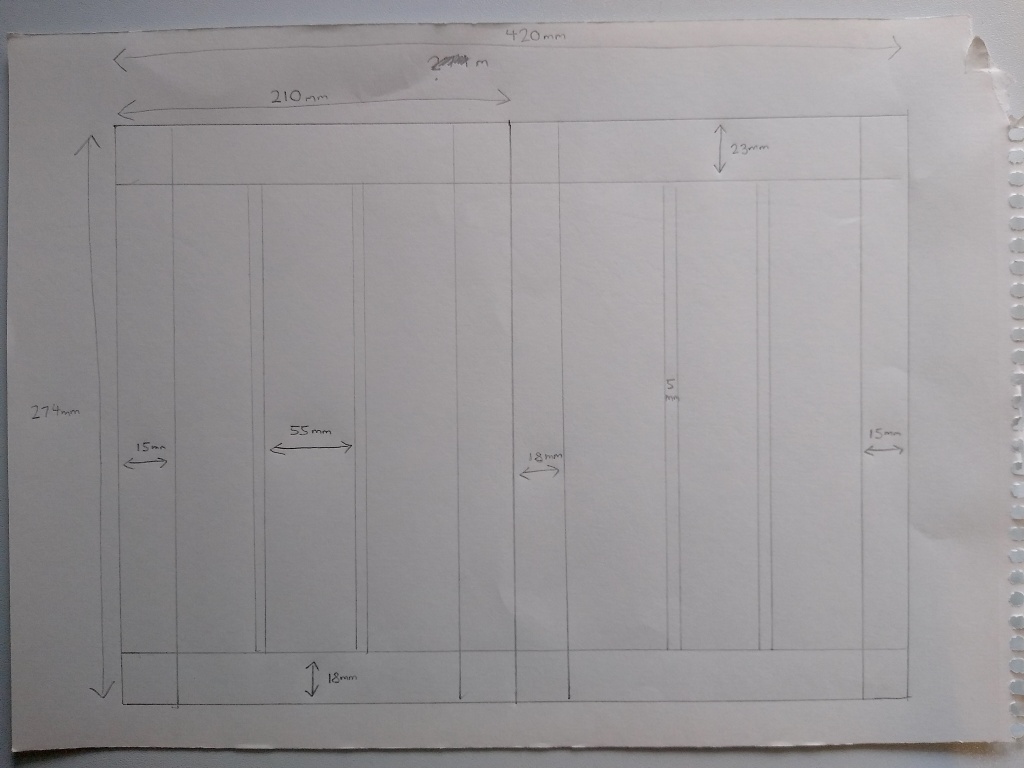
For this exercise I have chosen to look at the New Philosopher magazine and I have identified a double page spread to trace.
I found that both pages have the following measurements:
Double-page spread width 420mm (210mm each page), page height 274mm, top margin 23mm, bottom margin 18mm, outer margin 15mm, inner margin 18mm, column width 55mm, column space 5mm.
When looking at the rest of the publication I discovered that this grid is used for the majority of pages and the margins are used throughout.
There are deviations from this grid when certain spreads use 2 columns or 4 columns as can be seen below.
Infographics and photographs create other deviations from the grid.
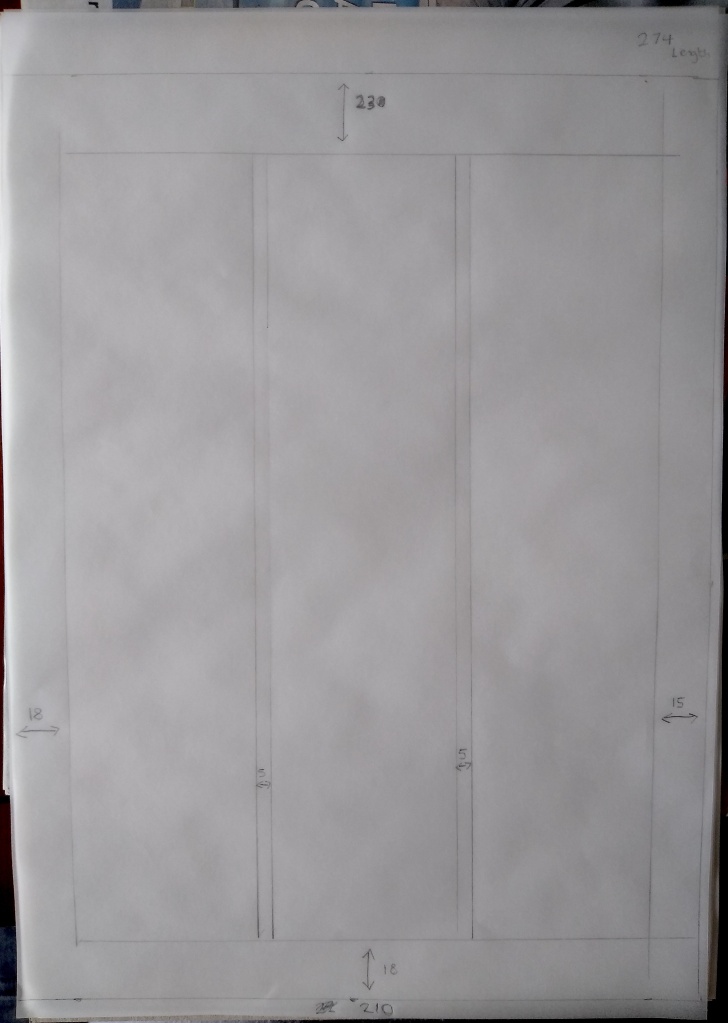
Before moving onto the computer to recreate the layout I created a finalised sketch of the measurements on the spread (not to scale).
After I created the document in InDesign my first task was to find the typefaces in use. Luckily, I have Adobe Capture on my phone and with a quick photograph taken I discovered the body text was Adobe Carlson Pro. I figured the size to be 10.5 and the alignment to be justified. However, InDesign created big gaps between words whereas the publication used equal spacing but more hyphenation. With some alterations in the paragraph styles I improved upon this. Some of the subheadings use a bold or italic font and with these subheadings there is also centre justification. The other detail I noticed was that paragraphs had an ident. The top left corner featured a quote in a sans serif typeface. I didn’t match the exact typeface but I got fairly close to it. The illustration was simple so I copied it myself.
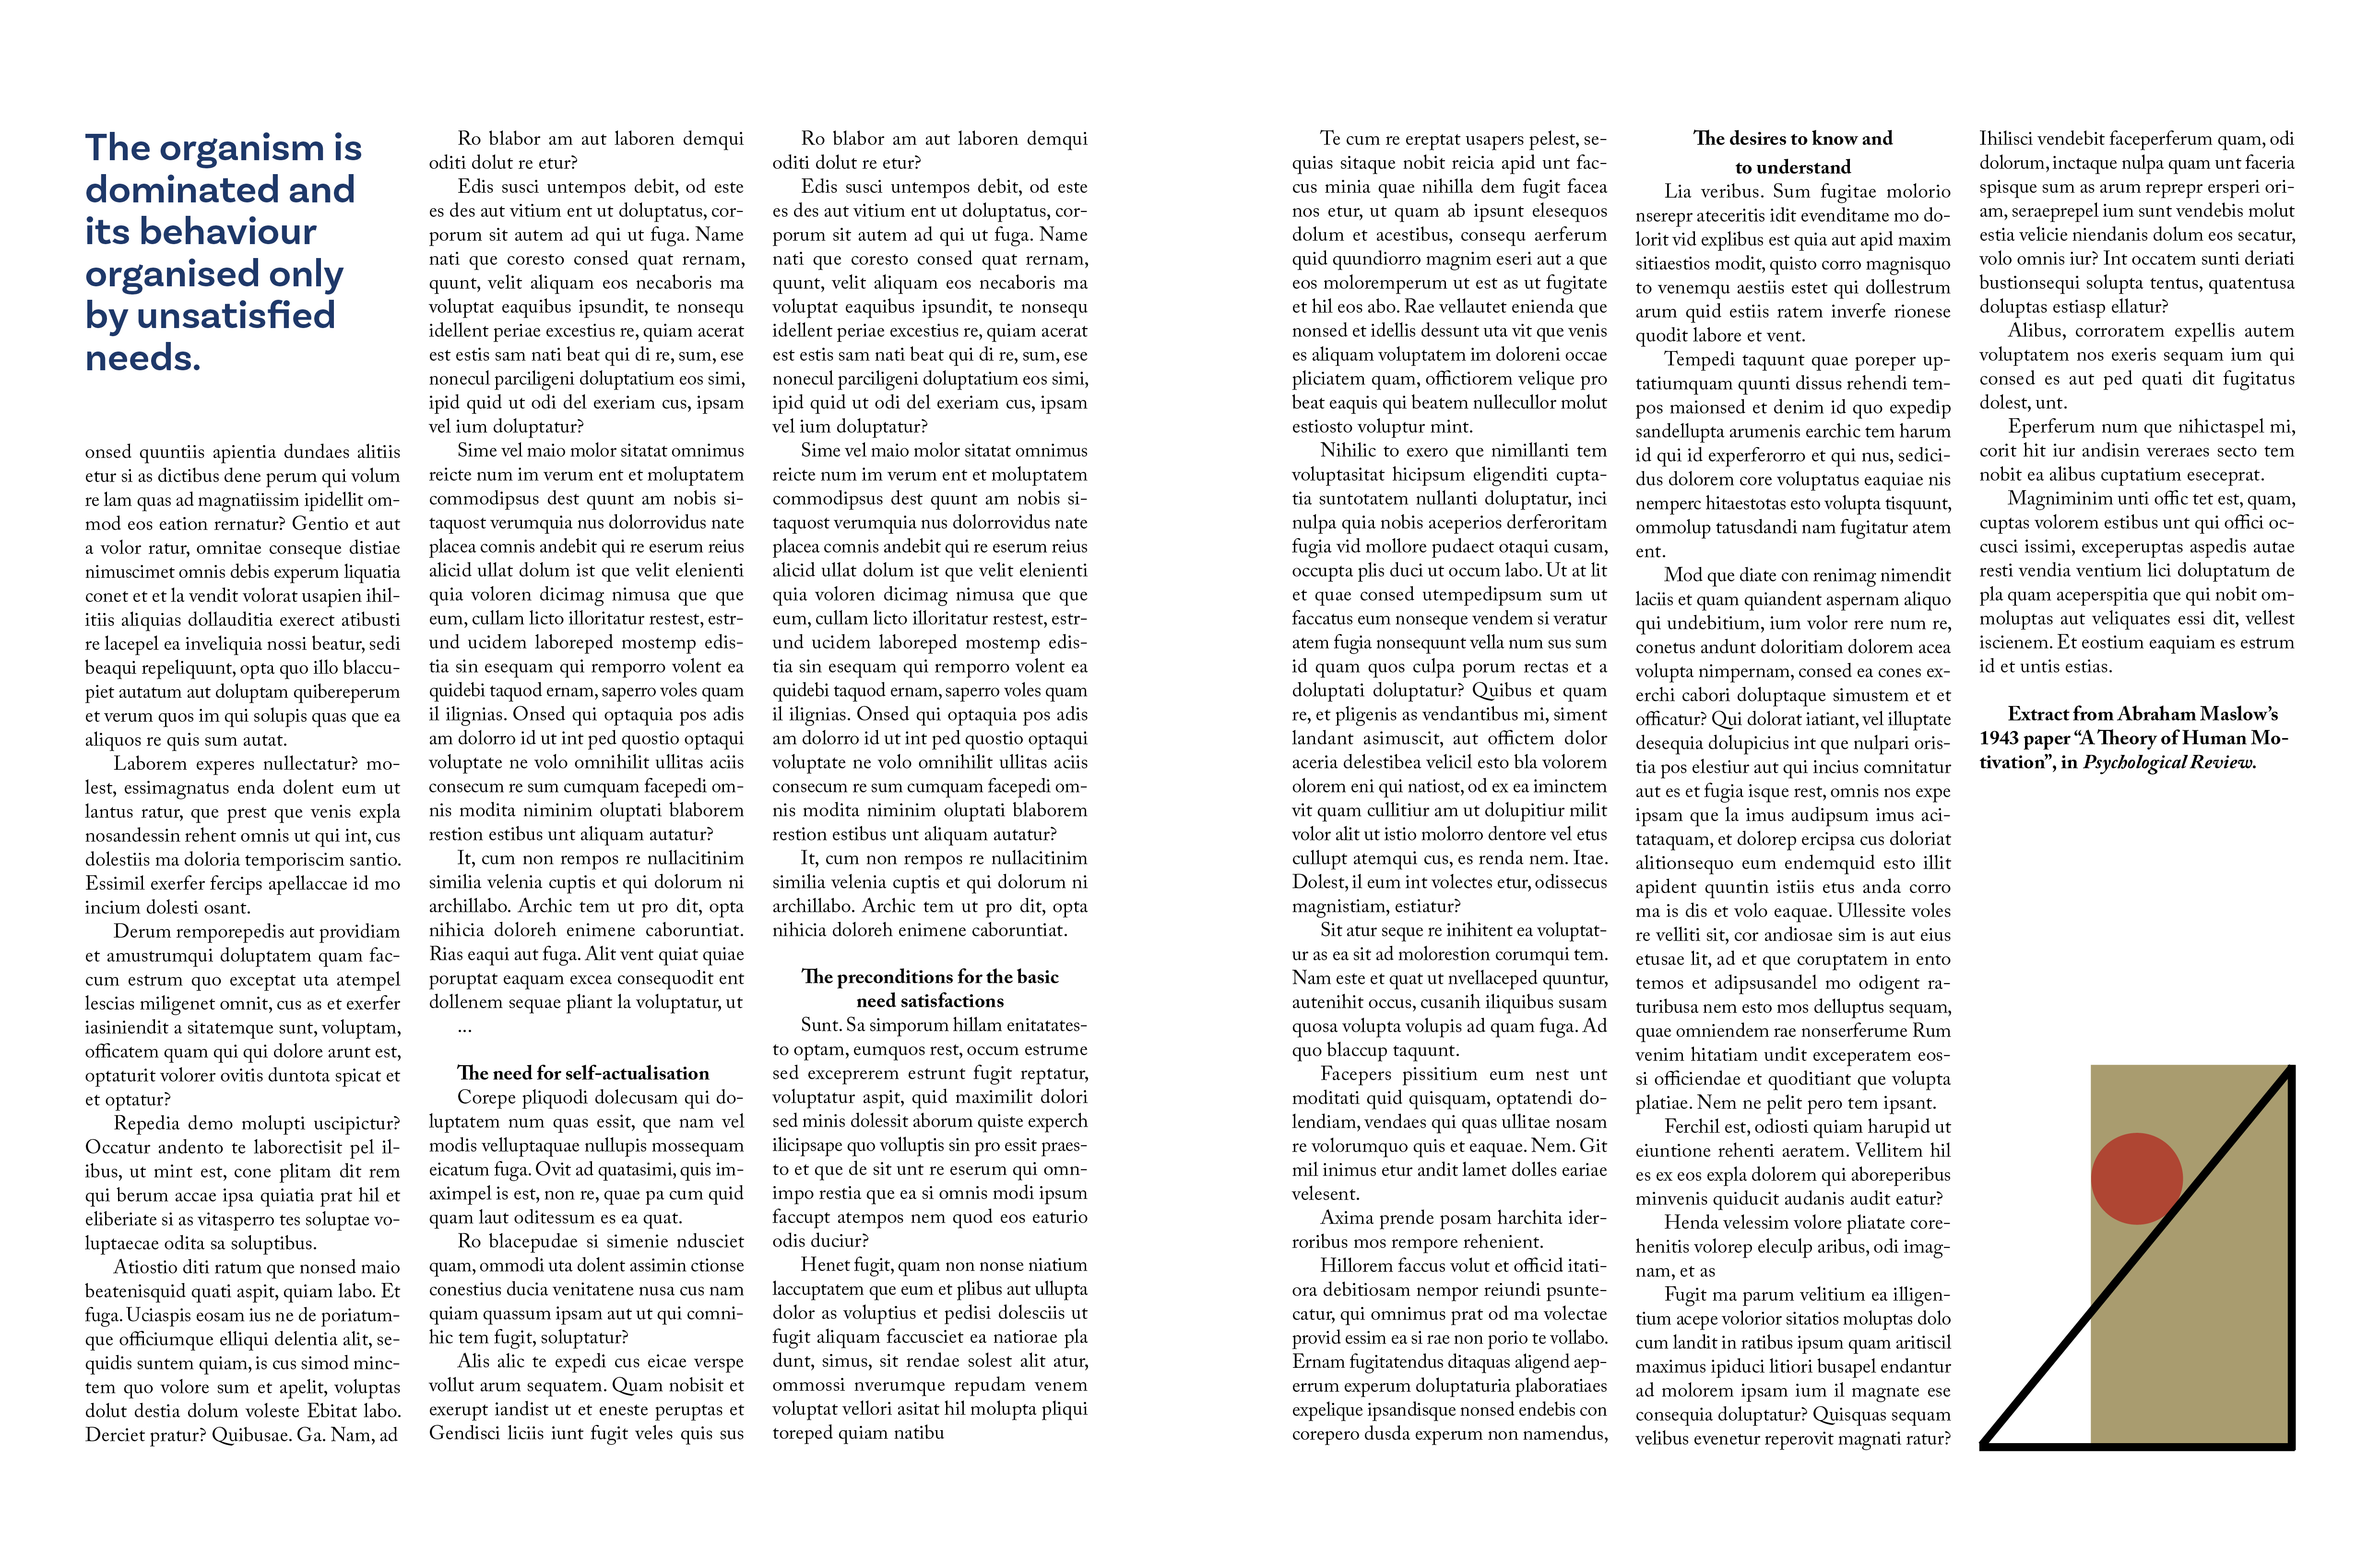
I think my creation was a very accurate representation of the double page spread.
Experimental layouts Extend the project by thinking about how you might radically change these layouts – what creative decisions around the grid would you make to improve these designs? Develop layout ideas that ignore the grid structure, challenge it, or offer radical alternatives to the existing layouts. Develop a range of ideas through thumbnail drawings and DTP layouts, in a similar way to the first part of the exercise. Use this as an opportunity to take creative risks, and find radically different ways to layout the existing content. This process might challenge any preconceived rules about how a layout should normally work. Reflect on the process in your learning log.
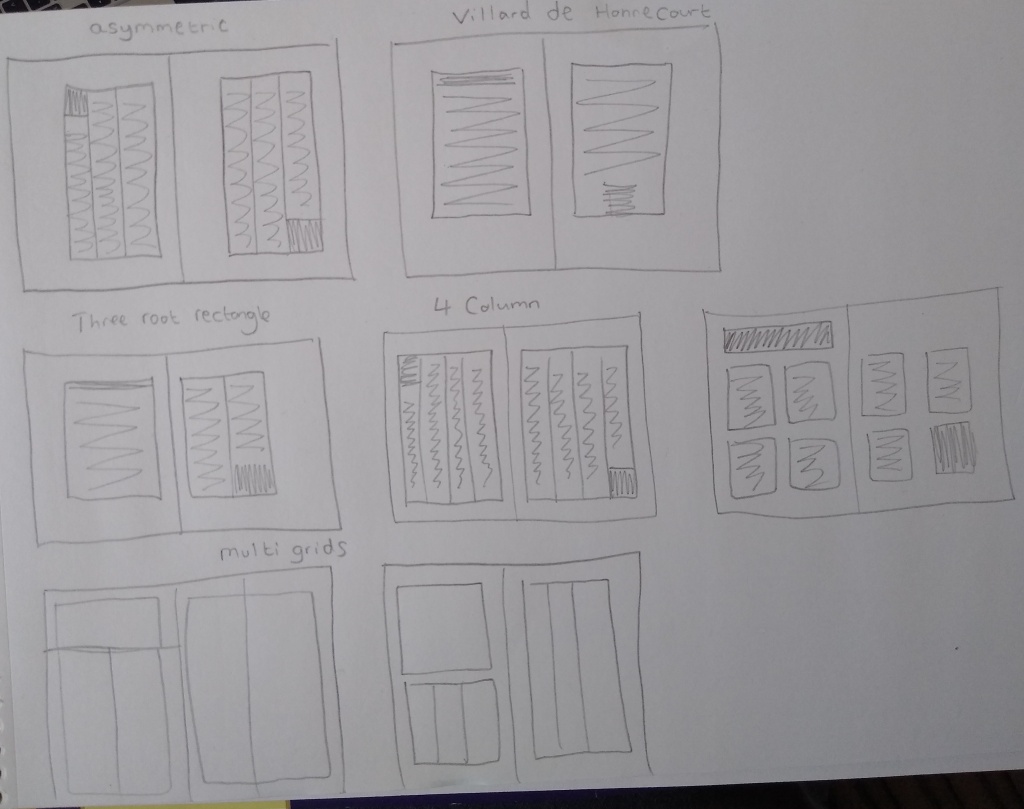
I created some thumbnails with a a range of different layout ideas. I then took three of them and tried them out on my DTP.
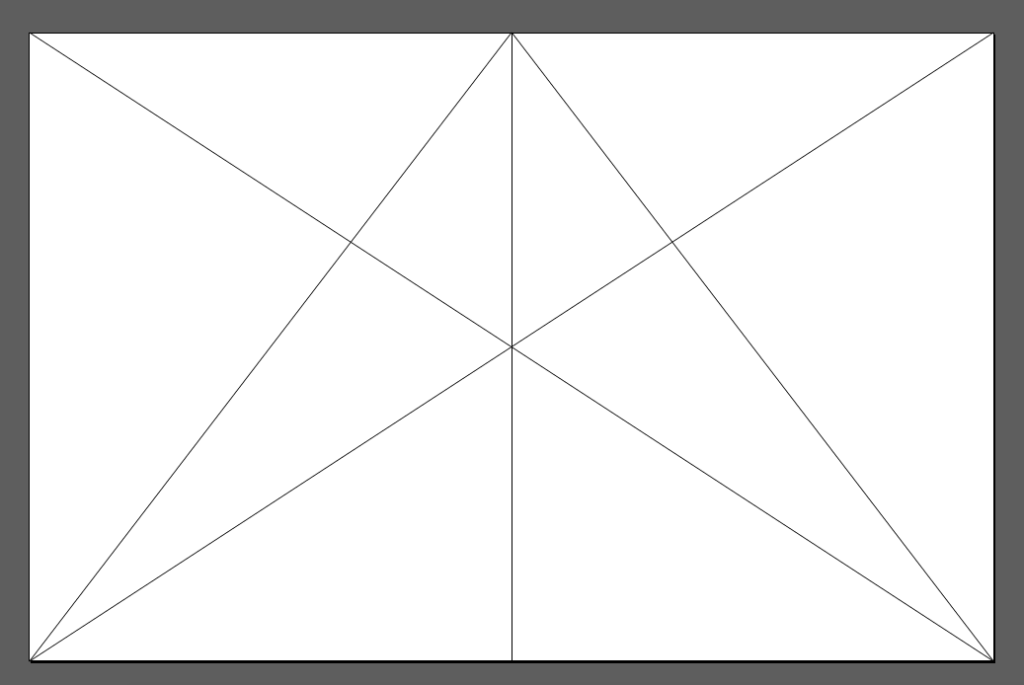
Villard’s diagram is something I experimented with for my Robinson Crusoe book design. I wanted to test it out on this double page spread. Diagonals are drawn in the following way to establish a text area:
On the first page I have used a single column and two columns on the second page. A major problem with this grid is that you lose a lot of space to the margins. This means that you can’t fit all the text into this spread unless you make the text smaller, which would cause issues with readability. To overcome this a change of the magazine format would be needed. The contrast between a single column and double column does give an interesting visual look to the spread.
With this version I used a double column grid predominantly with a single column grid also added to the first page. The contrast is more striking here because of the close proximity of the column disparity. One unforeseen consequence of this change was that I had to enlarge the illustration, and it upset the balance of the spread.
With my final alteration I used a three column grid and a single column for half of the first page. I positioned the quote in the middle of the page. Maybe I should have done a better job of positioning the text on the first page because it looks a bit messy to me.
I think the original layout is superior to any of the three alterations I created. In hindsight, I could have altered the dimensions of the magazine to accommodate my grids more appropriately. This exercise has taught me that there are many different things to consider when creating a double page spread and they are all very important and crucial to balancing the composition while also making the page readable. These include but perhaps are not limited to:
- Page dimensions
- Grid considerations such as margins and columns
- Typefaces and size
- Layout/composition
When all of these elements are considered properly it creates a readable and aesthetically pleasing reading experience.
Share this:
Leave a comment cancel reply.
- Already have a WordPress.com account? Log in now.
- Subscribe Subscribed
- Copy shortlink
- Report this content
- View post in Reader
- Manage subscriptions
- Collapse this bar
Bullet Journal Monthly Spreads Recipe: 2 Page Layout
Bullet Journal Monthly Spreads are quick and easy to make with a step-by-step process and the right tools. Here are two different methods for creating a Monthly Calendar on a 2 Page Spread. I decided to create a traditional layout split across 2 pages in my bullet journal (also called a bujo). This gives us enough room to write in a few appointments, events, or important deadlines on each day. Plus, we’ll have space for a few extra monthly notes, goals, or tasks.
There are several ways we could create a monthly calendar across 2 pages in our bujo. We can start at the top left on the first day of the month. We could even turn our notebook 45 degrees and make a long calendar. But for this layout, I’m going to stick to the normal open-faced book orientation. This has 7 weekdays across the pages in columns. From here, we just need to figure out what to make on each page.
Deciding Calendar Layout and Size

Columns, Rows, and Calendar Days Layout
First, I decided to make 5 rows and 4 columns per page. Using 7 out of the eight columns across both pages will allow us to have 7 days per week. And the 5 rows give us 35 boxes – more than enough for our 28-31 days in a month.
Monthly Items vs. Weeks
Next, on the left page, I started the days of the week in the 2nd column instead of the 1st. I split the 1st column into 3/5 and 2/5. In my example, I’d use the larger top column for notes or tasks. Then I’ll designate the smaller bottom column for 3 monthly goals.
Monday Start
And finally, I started my days of the week on Monday. This leaves the weekend days (Saturday and Sunday) next to each other in the last 2 columns on the right page. You can certainly start your weeks on Sunday instead – it’s just personal preference.
So now that we’ve fleshed out our idea, what does it look like and how do we create it?
Finished Bullet Journal Monthly Spread Layout
Here’s how the grid in my Bullet Journal Monthly Spread – 2 Page layout turned out:

In this example, my ME to We A5 journal has a 5x5mm dot grid pattern. Each page has 27 x39 dots – printed full -bleed (no margins).
This calendar grid layout is minimal and clean. In the photo, I had already dated it with the month, year, and days of the week. But when you get to this point you can use it with any month in any year.
Next, you can add date numbers, sections for tasks and goals in the first column on the left, and colors.
For example, I folded a piece of red and white polka-dotted washi tape on the right page edge. This makes it easy to quickly find my calendar.
I also ran a transparent yellow highlighter marker down the left side of each box on Saturdays and Sundays. This visually separates them from the week (as the “weekend”).
And I started adding in major holidays and events on certain days. Sometimes I even drew cute little icons.
But to get to this point, you have to start somewhere. So here are 2 step-by-step recipes with a list of tools, instructions, and photos.
Recipe: Bullet Journal Monthly Spread – 2 Page Layout
4×5 grid (per page).
4 Columns 5 Rows
Method #1 – Bullet Journal Monthly Spreads without The Grid Tool
With this method, you’ll create a pencil draft first. To finish, you’ll trace over your lines with a pen or marker for your final layout.
I recommend lightly using a pencil and eraser for your first draft so you can erase any mistakes. I also recommend a calculator and scratch paper for your calculations, and a straightedge or ruler to keep your lines straight.
- Your Journal
- A Pencil and Eraser
- A Pen or Marker
- A Calculator (optional)
- Scratch Paper (optional)
- A Straightedge or Ruler (optional)
Directions:
To make columns:.
Step #1: Count the number of spaces (not dots) horizontally across one page (for clarity, we’ll call this your Total Spaces).
Step #2: Divide your Total Spaces by 4*. The resulting number is the amount of spaces in each block.
*NOTE: If you don’t get a whole number (vs. a fraction or decimal), you’ll have an extra space (or more), and two choices:
1.) I don’t recommend it, but, for EXACT even divisions, ignore the dots on the page and make marks in between your spaces. Note: this might make things look a little messy if you can’t line everything up exactly.
2.) I recommend following the dots and using any “extra” spaces as margins. Multiply 4 by a number that gets you close to (but not over) your Total Spaces. Alternatively, you can divide your Total Spaces minus 1 and repeat subtracting 1 space until dividing results in a whole number. Then, decide on which side (or sides) you want to add those extra spaces as margins.
Step #3: Using your pencil and starting with a light mark at one corner of where you’re planning your grid, count up to the resulting number you got in Step #2, and make a mark.
Step #4: Repeat Step #3 four more times, until you have all the columns marked out.
Step #5: Draw vertical lines at each mark to make columns**.
* *Note: Before drawing lines for your columns, I recommend making your marks for your rows first. Then you’ll know where to start and stop each line, so you don’t accidentally go over into the margin(s).
To make Rows:
Step #1: Count the number of spaces (not dots) vertically down one page (for clarity, we’ll call this your Total Spaces).
Step #2: Divide your Total Spaces by 5*. The resulting number is the amount of spaces in each block.
2.) I recommend following the dots and using any “extra” spaces as margins. Multiply 5 by a number that gets you close to (but not over) your Total Spaces. Alternatively, you can divide your Total Spaces minus 1 and repeat subtracting 1 space until dividing results in a whole number. Then, decide whether you want to add those extra spaces as margins at the top, bottom, or both.
Step #3: Using your pencil and starting with a light mark at one corner of where you’re planning your grid, count up to the resulting number you got in Step #2, and make a mark**.
**NOTE: Start making your marks about halfway into the page, so you don’t put them inside the first column – see more under Step #5 below.
Step #4: Repeat Step #3 five more times until you have all the rows marked out.
Step #5: Draw horizontal lines at each mark to make rows***.
***NOTE: Before drawing lines for your rows, keep in mind the rows in the 1st column are different than the rest of the grid. You’ll only draw lines at the top, bottom, and under the 3rd row, to split the 1st column into 3/5 and 2/5, respectively.
To finalize:
- Using your pen or marker and a straightedge or ruler, trace over each of your grid lines.
- Wait until the ink/marker dries thoroughly (or you’ll make a smeary mess – ask me how I know).
- Erase all your pencil marks.
Method #2 – Bullet Journal Monthly Spreads with The Grid Tool
With this method, we can create this spread up to 3x faster than using Method #1 (above) or a Grid Spacing Cheat Sheet. In fact, I made a video where I timed myself making this exact spread all 3 ways – you can watch it on my other blog post: Bullet Journal Monthly Spread: TIME CHALLENGE!
You won’t need a calculator or math – because The Grid Tool does all the work for you.
You’ll use The Grid Tool to draw your lines ONCE. That means you can just use your favorite writing tool – even pen or marker – saving you the time you’d usually spend tracing over your lines.
And the side of The Grid Tool will be your straightedge, so there’s no need for a separate tool!
- Your Journal with dot grid pages
- Your favorite Pen or Marker
- The Grid Tool
In this example, I used The Grid Tool 5mm Size A5 with an A5 journal with a 5x5mm pattern (see more details above). But you can use these directions with almost any size dot grid journal with a compatible version of The Grid Tool .

Step #1: Lay The Grid Tool on the page horizontally and move it around on the page until you see where your margins and columns will be with a “4” block section. In this example, I used the “4 Columns” blocks (see photo). The Grid Tool showed me how this 4 column option would leave a 1 space margin on either side.
Step #2: Using your pen or marker, make your first mark at the far left on The Grid Tool (the start of your blocks, and the first red arrow on the left in the photo above), and more marks at the end of each “4” block section you chose (at each of the other red arrows).
Step #3: Using the side of The Grid Tool as a straightedge, draw vertical lines at each mark to make columns*.
*Note: Before drawing lines for your columns, I recommend making your marks for your rows first. Then you’ll know where to start and stop each line, so you don’t accidentally go over into the margin(s).

Step #1: Lay The Grid Tool on the page vertically and move it around on the page until you see where your margins and rows will be with a “5” block section. In this example, I used the “5 Rows” blocks (see photo).
Step #2: Using your pen or marker, make your first mark at the top of The Grid Tool (the start of your blocks), and more marks at the end of each “5” block section you chose*.
*NOTE: Start making your marks about halfway into the page, so you don’t put them inside the first column – see more under Step #3 below.
Step #3: Using the side of The Grid Tool as a straightedge, draw horizontal lines at each mark to make rows**.
**NOTE: Before drawing lines for your rows, keep in mind the rows in the 1st column are different than the rest of the grid. You’ll only draw lines at the top, bottom, and under the 3rd row, to split the 1st column into 3/5 and 2/5, respectively.
When you use The Grid Tool, you don’t have to count, calculate, or measure. It shows you both the divisions AND margins. In fact, sometimes it can show you more than one way to divide your page. All you have to do is decide how many divisions you want and where on the page you want them.
If you’re using a dot grid journal and making bullet journal monthly spreads, how do you make them? Or do you even use monthly layouts in your bujo? Are they a pain to make?
Do you have an idea for a bullet journal monthly spread you’d like me to create a recipe for? Let me know!
About the author
Hi, I'm Cas! I'm a Minnesota gal who parents, teaches, gardens, crafts, cooks, and reads. I'm an Inventor, Entrepreneur, Professor, Marketer, and Technologist. Thousands of amazing people have purchased my art and designs online since 2001, and I'm here to offer you a lifetime's worth of experience. Enjoy!
Related Posts
8.5×11 Bullet Journal – An Unconventional but Accessible Option
Hobonichi techo weeks works with the grid tool ruler, keep your bullet journal key handy, bullet journal – is bigger better.
Free printable worksheets for kindergartners, grade 1 and more. Download Free Worksheets for Kids
Free Printable Student Planner
- Facebook 16
- Pinterest 4.9K
Stay organized with this free printable student planner and keep track of your school assignments, homework, tests, grades, and everything school related. It has everything you need to get more productive and stay organized.

This post contains affiliate links and we will earn commission if you buy the products through those links. For more information, please read our disclosures here
Another school year is about to start. But this one is not going to be your traditional kind of back-to-school year.
Things have been so unpredictable lately, and it’s been the same with the schools. We are not sure if we are going to have in-person classes, online classes, or a mix of the two.
In such a case, it is more than important to have a handy tool that can help you stay organized, productive, and creative.
This student planner printable will help you do just that since it comes filled with pages to help you keep track of your school activities.
FREE PRINTABLE STUDENT PLANNER

Download your FREE Planner
No matter how you decide to spend this school year, it should be exciting for students and teachers to get back to school , to the books, assignments, tests and everything school related.
This free printable student planner is a wonderful resource that you can use to keep track of everything that will be happening in the upcoming academic year.
Related: Free Printable Homeschool Planner
There will be tests, exams, assignments, projects, activities, and so much more. This planner makes it convenient and easy to keep everything at your fingertips.
Setting your daily routine as well as a weekly and monthly routine will help students stay on track with their studies.
It is ideal for older kids or college students. When you download this free printable planner , you will find it filled with everything students need to stay on top of everything school related.
STUDENT PLANNER BINDER SUPPLIES
Once you download this student planner printable, you can put together this student binder using the following or similar supplies:
- 3 Ring Binder
- 3 Ring Binder Hole Punch
- Heavy Weight 32 Lb Paper
- Divider Tabs
WHAT’S INCLUDED IN THIS PRINTABLE STUDENT PLANNER?
This student planner covers very basic components to help you stay organized and productive during your school year.
Here are the pages included in this free student planner printable binder:
- Monthly Calendar (Undated 2 Page Spread)
- Daily Schedule
- Weekly Schedule
- Assignment Schedule
- Class Schedule
- Exam Schedule
- Reading Log
- Grade Tracker
- Project Schedule
- Homework Schedule
This free printable student planner PDF is perfect to start your academic school year.
================================================================
Looking for a more detailed student planner? Upgrade to premium version with this Printable Student Planner .
Let’s look into some of sections of this premium student planner in more detail:
First thing when you download this student planner printable, you will notice this cute cover page . This colorful cover page can be printed on heavy thick card stock paper so that you can get study support.
UNDATED MONTHLY PLANNER

Monthly Planner is 2 page spread and comes with 12 months of the academic year. Starting from August all the way to July.
Since these are undated you can use it over and over again every year. Plan your months easily with this 2 page monthly spread. There’s plenty of space to write in those boxes.
The notes section on the right hand side can be used to write down important notes and things to do.
WEEKLY PLANNER

Weekly Planner comes with the days of the week listed on the left hand side. The week starts from Sunday to Saturday.
Right hand side can be used to write the main points about assignments, class and due date.
Related: Free Travel Packing Checklist
If you have any tests scheduled in that week, write them down in the section below along with the date that the test is scheduled.
The notes section on the bottom can be used to write down any notes about that week, assignment or the tests.
PROJECT PLANNER

Download Student Planner
Need to complete a project? Use this project planner to make sure you have everything you need to make sure you are on the right track.
With this project planner, you can write down the subject, the due date, and all the project details.
Related: Free Printables Planner Binder Covers
Write the main points and to do list in the To do List below that section.
Next section can be used to write down all the materials and resources you will need for that project. Below is the notes section where you can write important notes about the project.
WEEKLY SCHEDULE

Just like monthly spread, you can use this weekly schedule to plan your week’s tasks. You can use these pages to get the glimpse of the important tasks for the week.
On top right hand side, you can write the week for your reference. Right hand section has the Notes and To Do List for you to write down important notes and things to do.
ASSIGNMENT SCHEDULE

Other sections included in this student planner are assignment schedule, class schedule, exam schedule, reading log, grade tracker, goal tracker, homework schedule etc.
HOW TO PRINT STUDENT PLANNER PRINTABLE?
Although most of the pages included in this planner binder will be useful, but if you think you don’t need any pages, simply skip printing them.
As for printing, you can print the pages on one side of the page or go with back to back printing .
For back to back printing, make sure to follow these instructions on How to Print Letter Size Printables Back to Back
And that’s it. Simply print the pages and put them together in this binder. This planner has everything you need to stay on top of your homeschooling plan .

Related Posts

2023 Monthly Calendar Free Printable

Printable Party Planner to Plan a Perfect Party
Good day, I already downloaded the pdf and I am very thankful that the free planner is legit. I’ve been visiting tons of sites already and I loved this one the most. Thank you so much, Ms. May God bless you.
Leave a Reply Cancel reply
Your email address will not be published. Required fields are marked *
Quick Links
- Free Printables
Information
- Terms of Use
- Privacy Policy
Social Media
- Puzzle Books
- Back to School
As an Amazon Associate I earn from qualifying purchases.

GLOBAL SUPPORT: 1-909-373-4087
We deliver internationally.

- Mar 9, 2023
Completing Page Spreads

It’s always easier to get things started but finishing them is a different story. If you look at people’s garages, they’re like a little museum of unfinished projects. That’s how it often becomes with yearbook pages. Kids start pages, they get lost, and then they move on to something else. Sometimes students don’t want to finalize things. They don’t want to let go of the page because once you’re done, you submit it, and it’s over. They tend to cling to pages. The biggest problem here is that the longer you take to make a page, the more difficult it is to finish it in the end. You can forget quotes, memories will start to fade, the people you interviewed will also have forgotten the event, there’s more chances that you’ll misplace files. It's important to try to start and finish pieces as soon as possible. There are a few ways to make complete spreads with the added bonus of finishing them fast.
The first technique is called the 5-hour spread.
Not all spreads can be finished within one day, but you’d be surprised by the work your staff can put in when it’s all hands on deck.

Spreads like:
-Assembly pages (homecoming assembly, winter fest assembly, etc.)
-Halloween page (if you have it)
-Christmas page
When they go in as a team they’ll see how they can most literally get that page done within one day

The key to this 5-hour spread is the staff’s participation. Divide the class into 2-3 teams, each composed of 5-8 people: 3-4 photographers, 1-2 interviewers, 1 layout, and 1 manager. Each team is responsible for creating their own spread for this one assignment; it's sort of a competition, but also a way for everyone to experience what it feels like to finish a page within 5 hours. On the day of the assembly, you’ll have the photographers in charge of taking photos. Then, a few staff members will be conducting the interviews. Whoever is working on the layout can have a template done ahead of time. After school that day, everyone brings in their pictures, interviews have to be submitted right after lunch, and within the next two hours they’re done with the spread. There’s power in that experience. The staff may go in thinking that the spread will take three weeks to finish, but when they go in as a team they’ll see how they can most literally get that page done within one day. Of course, there are spreads that take longer, but it’s important for the staff to experience that togetherness. For page spreads that take longer, try doing a FedEx Friday!
FedEx Friday
My staff developed FedEx Fridays as a strategy to get spreads done faster than they thought they could. It came about because some companies implemented this strategy to encourage employees to come up with innovative ideas with the pressure of quick deadlines. Our staff would get together on a Friday morning. After lunch they would have to present something no matter what they had done. Every staff member knew that they would have to deliver and would be graded on the page as it was. Sometimes we would have to split it up into two FedEx Fridays. The first Friday would be the rough draft and the second Friday would be the final draft. It’s not always possible to finish a page spread within one week, but you’d be surprised how much can be done when the staff is given a shorter time span.
Parkinson’s Law:
You’re not doing your students any favors by extending deadlines and giving them too much time
Parkinson’s Law is a good example of why shortening deadlines can actually be a positive thing. Parkinson’s law states: “Work expands so as to fill the time available for its completion.” Basically, the amount of time you spend on a task will expand or contract depending on the amount of time you have to do something. If you have 5 weeks, it will take you 5 weeks, if you have 5 hours, it will take you 5 hours. There’s no guarantee that the 5 week deadline will give you better results, in fact it will probably come out worse. You’re not doing your students any favors by extending deadlines and giving them too much time. That’s when things will get lost or forgotten. You need to contract that time as much as possible. Determine teams, set up who will work on what, and get the spread done!

Contributor: Joon Kim is starting his 29th year as a public school teacher. For the first ten years, he taught English at Bellflower High School, and for the past 18 years, he has been teaching Graphic Design, Video Production, Photography, Yearbook and Journalism at Garden Grove High School. He received his B.A. in English from UC Irvine in 1991 and while his formal education ended then, he is always learning, sharing, growing, and mentoring.
- Resources: Yearbook Tips
- Resources: Yearbook Class
- Resources: Yearbook Ideas
Recent Posts
Student Motivation
The Ins & Outs of PLICBooks
Page Spread Ideas
JEA Curriculum Initiative
This site is available only to JEA members. Please log in below.
Design basics for double-page spreads
Please enable JavaScript in your browser to enjoy a better experience.
30 Creative Double-Spread Magazine Ads That Keep You Engaged
Magazine ads are considered a more traditional form of advertising and take up over 30% of conventional magazine space. However, if done correctly, marketers can use their ads to focus on a particular target audience by choosing the right magazine to feature them in. This also paves the way for higher reader involvement .
Thinking outside the box definitely helps in creating impactful and effective ads, and double-page spreads leave plenty of room for creativity and innovation. I have put together 30 creative examples of double-page magazine ads to show you what I mean. Let’s just say you probably wouldn’t mind a magazine filled with ads if they are as interesting as these!
20 Editorial Design Pieces for Your Inspiration
With so many websites having similar designs and structures nowadays, it's very important for any web designer to... Read more
DHL: “Turning Page” Print Ad
Created by: Shanghai J&j Advertising Co., Ltd
DHL is known for its speedy delivery service. Here, their ad cleverly utilizes a transparent sheet of PVC paper to reflect just how fast their service is, regardless of how you turn the page.
Smuckers: Better Together
Created by: Art Director Elinor Buchler
Just like peanut butter and jelly, Bert and Ernie from Sesame Street also complement each other. Smuckers uses recognizable icons like them (among others) to showcase just how well they work together.
MacBook Pro: Ultra thin
Created by: SVA New York, USA
So this is what it feels like to have a Macbook Pro on your lap. Well, it’s not “paper”-thin, but considering the power a Macbook Pro packs at only 1-inch thick, it’s definitely thin enough by laptop standards.
Olimpia, La Fabril: Magazine
Created by: Maruri Grey Ecuador
When we see a bug flying around, our first reaction is usually to take a magazine and kill it. But seriously, why ruin a good magazine when you can use a floor cleaner that has insect repellent action in it,1111 too?
SulAmerica Health Insurance: Torn
Created by: MPM Advertising
Oops, did you that tear that dollar bill in two? Don’t worry, it’s just SulAmerica’s way of telling you that they won’t let you do the same with your company’s resources.
Furniture: “Folding Chair” Print Ad
Created by: Grey Group Vietnam
How’s this for how small a space you can store away your folding chairs? Pop-up ads put to good use.
Adidas Forever Sport Campaign
Created by: Unknown Agency
If only workouts are as easy as flipping the page back and forth. But hey, a girl can dream.
Clinique: “Lashes” Print Ad
Created by: WE Marketing Group
Now this is an ad that really gets you up close and personal with what the product can do. Flirty lashes, anyone?
Arcor Bubble Gum Ad
Created by: Leo Burnett
A fun ad that banks on your childhood need to blow the biggest bubble gum on the land (without breaking it)!
Shikun & Binui Solaria: Sun light
Created by: BBR Saatchi & Saatchi
Alright, I admit that this one isn’t a double-spread, but the illusion still needs two pages, pretty thin paper, strategic color placement, and a little ingenuity to work. “Solar-powered” ads FTW.
EDF: Clap Clap
Created by: Euro RSCG C&O
Put your hands, er, pages together to help celebrate the major wins of athletes from the EDF company in European championships, world championships, the Olympics and Paraolympics.
Hawaiian Tropic: Enjoy the sun
Created by: Grey
Not only is this an ad for a tanning product, but even the magazine also wants to get in on the act. A handy tanning tool to bring on the go.
WMF Kitchen Knives Ad
Created by: Leo Burnett Bangkok
The ad may be exaggerating but knives that can split food into two identical halves are definitely a chef’s dream tool.
Kotex: Dry leaf
Created by: Piyush Pandey
Readers open the pages to discover that there’s a dried leaf in between. How much more absorbent can these products get?
Seat Ibiza Cupra: Wheel
Created by: ACW Grey
Take the wheel. Yes, literally.
Depilatory Strips: “EPILDOU” Print Ad by
Created by: Lg2
Want clean and smooth legs free from hair? If only the deed is as easy as flipping a page. Well, lookie here.
BR Petrobras Oil: Victory
Created by: Master Rio de Janeiro
F1 fans would love to wave the checkered flag at the end of an exciting race. This is as close to a reenactment as you can get. Flip their pages!
Bic Soleil Clic: Hand
Created by: Dragster
The right razor can let you get into hard-to-reach spaces with ease. The differences are laid apparent perfectly with the use of white on bright orange.
Conto Barriers: Lift
Created by: McCann Erickson Prague
Your life can turn in a second, says the ad. And when you do turn the page, a simple icon alteration switches from being on a ski lift, to being on a wheelchair.
McDonald’s: Extra large coffee
Created by: DDB
A cheeky ad that uses a lot of white space and four strategically placed coffee stains to illustrate how large coffee at McDonald’s is.
TV6 / I’d do anything for money: Wax
Created by: Le Bureau
With the flip of a page, you, the reader, just ripped the eyebrows and beard off this guy’s face! Great opener for a show with the title, “‘I’d do anything for money”.
Revlon: “Roots” Print Ad
Created by: Martin/williams
Another product that lets you get to the hard-to-reach places easily, this one lets you get your roots done in a jiffy.
Subaru Forester: “King of the hills” Print Ad
Created by: Jwt
King of the hills doesn’t necessarily mean hills of lucious green and great forests. This four-wheel drive can master in sandy hills on the great desert. Way to drive the point home.
This is not easy
A powerful way to leave a powerful message and raise awareness about modern day slavery.
Vicks Nyquil: Boogers
Created by: Saatchi & Saatchi X
This ad may require a bit of strength as it’s glued to the other page and as it’s slowly revealed, you’ll understand why. Icky? Kind of. Makes a point? You bet.
Domino’s Pizza: Hole Reykjavik
Pizza so hot it burned through the back of your magazine. Now that’s good pizza delivery.
This sun block ad uses the sun to illustrate just how one can burn without proper protection. Without the right protection, be prepared to turn red (like the guy on the left). Stay protected, love your skin.
Audi: Grip, 2
Created by: BBH London
This is part of a series of Audi ads. In this one, you get a view of the type of grid you get when at the wheel of an Audi. You could be holding the wheel like you’re holding a stress ball, a snowball, a bird’s egg or a sponge, you’d still be in control.
American Apparel: Double-page spread
So that’s what it looks like when you are in men’s underwear.
Terminix: Roach Chip
Created by: Publicis Dallas
Oh, this roach is definitely getting to me. And my food! Better grab some Terminix, just to be safe. Flip that darn page!
Exercise 2: Double page spread

First Thoughts
I remember having an exercise very similar to this in Core Concepts and I have to say that even though I very much see the relevance and significance, I hated it all the same!- the mundane task of dissecting a layout and then recreating it in various ways…
But! Here I go…
Choosing a layout
I started off by choosing a book to pick a layout from to dissect – the book I chose is very relevant to this unit and to the upcoming assignment; “ Stop stealing sheep and find out how type works “. My copy is very worn and tatty with all the pages loose and barely hanging in there but I chose a double page spread that I could analyze and copy for this exercise!
The double page spread I chose was completely at random by simply opening the book up and seeing which pages I ended up with; it turned out that I did rather appreciate the sentiment of the article which is why I have chosen to replicate the main verse of it instead of using all Lorem Ipsum:

An article about appreciating the value of time!
Despite what the authors state in the top right paragraph about this spread, (they suggest that this DPS is quite a minimalist layout) I feel that there is quite a lot crammed onto it!
The layout and the colours remind me of something that I might find in a Bauhaus book, there is everything here to make a Swiss classic! – Sans-Serif font, a layout to a structured grid, lack of photography or images, geometric shapes, 3 contrasting colours…
Despite my personal opinion that I would have liked to have seen less content on this spread, everything on this layout does flow nicely. It jumps comfortably up and down and from left to right… there are no curves or need for the eye to jump massive spaces from one element to another. It is all very “blocky” and quite regimental in its approach. It is clean and for the amount of text that is being presented on this spread, legibility and readability is the most important factor.
The rule of 3 is being used; there are 3 blocks of black to tie the elements together and the same with the Yellow colour – the yellow text clearly is related to the diagram in yellow.
I think that this grid is quite simple.. columns of 6 potentially:

Just because of the way the layout is very “blocky” and flows that way I think that it is following a simple grid like this one and that the elements are being lined up to its relevant column.
Recreating the layout…
I then went about the painful process of drawing out the layout and measuring everything on it:

At the end of this long drawn out process it looked like I have drawn a floorplan of a house!
Next came the slightly less painful process of recreating this in InDesign:
Below shows the elements sat in their measured positions.

Below shows the layout without the guides and grid present:
Using a 10% shaded area for the decoration on the page, I also used Lorem Ipsum for the main body text apart from the lecture by Frank Franklin which I enjoyed and wanted to show.
Before I even read this spread I was trying to guess what font had been used and the point sizes of the text. I knew that the typeface used is a Sans-Serif; my first thought was Franklin Gothic to tie in nicely with the authors name! I did try it out and it did work but it wasn’t quite right.. I then did think about Frutiger as the letters were more bold and rounded and then as I read the article I realised that they actually mentioned they used Frutiger on this spread for its “more humanistic touch” which improves legibility by keeping the shape of the letters more open and more distinct from each other.
On the right hand side looking at the point sizes of the text I figured that the main body of text was a bigger size and that the two accompanying pieces of text would be about 2 point sizes smaller. I went for 10 on the main body text and then 8 for the two other pieces of text. I figured 10 is possibly more on the smaller size for print and would be the least I could go for this large piece of text to keep the legibility and readability.
Again, above is the layout without the grid and guides present.
Below is what my final recreated layout looks like! (I did make the coloured boxes full opacity just to show the likeness to the original!)

Extending the Exercise: new layouts
I then looked at how I could further change the original layout some more by completely changing and moving the elements around.
I decided to create my own grid, using the same page measurements as the original (A5) but by bringing in my 6 column grid and creating a Golden Ratio and spiral:
From the research I have done previously on The Golden Ratio and Golden Spiral, I learned that the main focal point of a layout is at eye level and at the smallest point of the spiral (where I have highlighted using the grey rectangle below!). I knew that this is where I needed to place the most important information or elements from the layout.
Alternative layout no.1

I like negative space and felt that the original layout didn’t really seem to have a lot of it, in this version I have created space around the outside to allow the layout to breathe. I have organised the elements of the layout by importance by putting the information that I feel needs to be read first around the “eye” of the spiral (eye level). My eye is first drawn to the title and then straight to the accompanying article with my eye then travelling on to absorb the rest of the (less relevant) information. I have aligned the text boxes to the columns of the grid gently allowing the eye to comfortably navigate and jump between the text. On the right hand side page I have allowed for space in the bottom corner and aligned the main body of text next to the main body of text on the previous page (again at eye level).
The only thing that would need to be well thought out is how far near the spine the text is on each of the pages because if this double page layout was going into a 400 page thick book, the text might get lost in the gutter of the spine when the pages cannot be opened fully.
Alternative Layout no.2
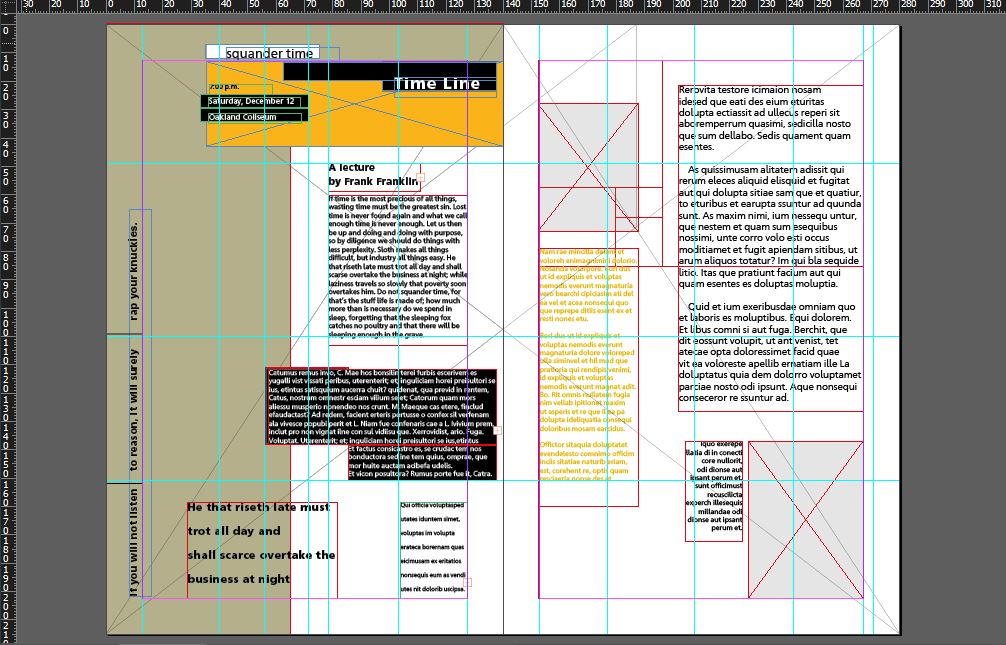
Alternative Layout No.3
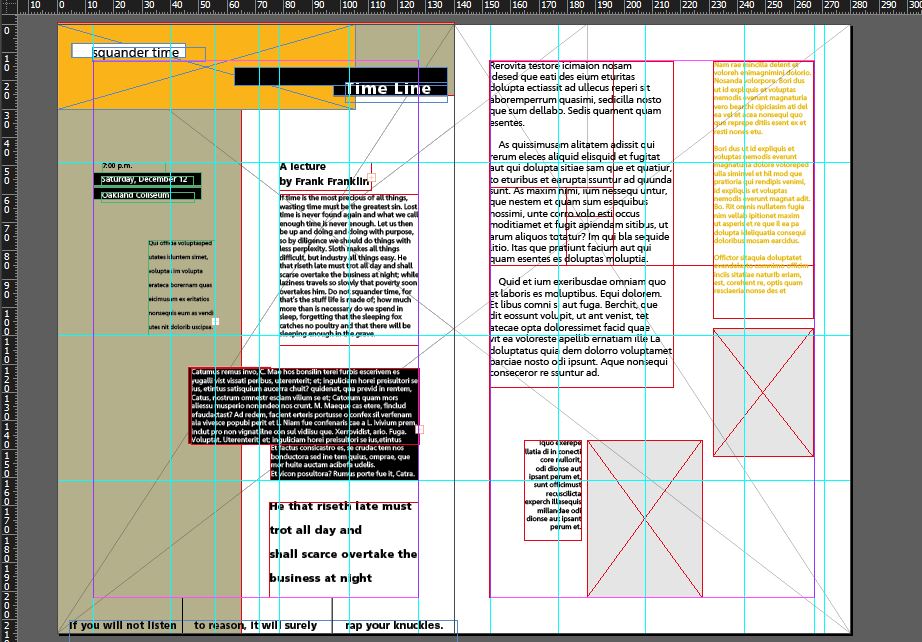
Alternative Layout No.4
The page that I have changed on this layout is the right hand page. I was trying to take all the elements away from the focal point (eye level) just to see if this made a difference to where the eye travelled and what information was absorbed first; it does, but I am surprised that I don’t think it distracts in a bad way. My eye is now drawn to the area of negative space in the top corner and negative space is as much a part of the design as anything else and I think it also helps balance the double page spread out; on the left hand page the bottom corner is the negative space – there is balance in the hierarchy.
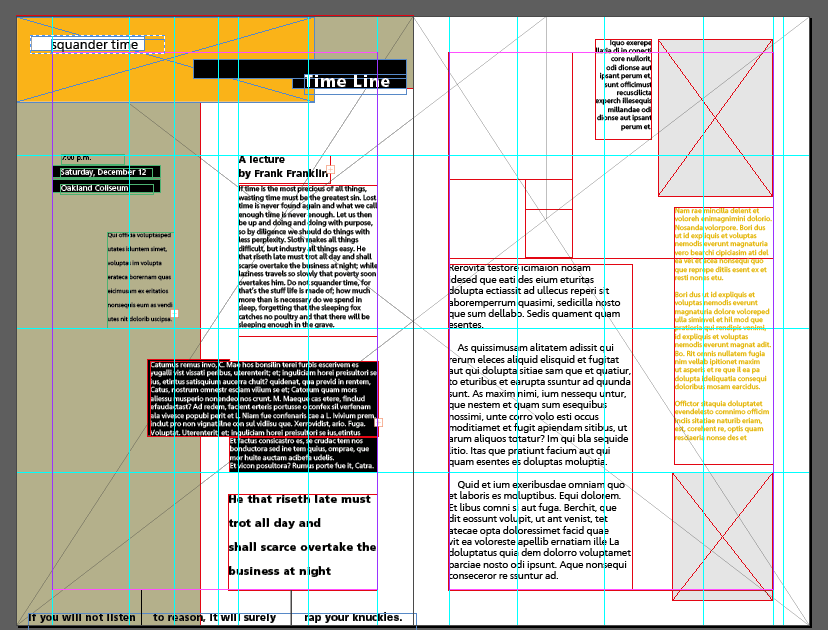
The Conclusion
So, although this exercise has been painful it has also been worth while completing as I have learned a lot about hierarchy and where to position elements on a layout. Again, the importance of a grid has been emphasized to me once more. I am learning to see the grid as more of my friend than a bunch of confusing, mathematical lines and workings outs on a page! Although I still think I need to research, study and learn more about grids so that I can comfortably use them without the fear of doing it wrong and feeling nervous and apprehensive about the process!
Published by Amy Moore
Creativity is nothing but a mind set free. View all posts by Amy Moore
Leave a comment Cancel reply
This site uses Akismet to reduce spam. Learn how your comment data is processed .
- Already have a WordPress.com account? Log in now.
- Subscribe Subscribed
- Copy shortlink
- Report this content
- View post in Reader
- Manage subscriptions
- Collapse this bar

35 Free Weekly Planner Template Printables for 2024
There might be affiliate links on this page, which means we get a small commission of anything you buy. As an Amazon Associate we earn from qualifying purchases. Please do your own research before making any online purchase.
Like most of us, you probably start the week strong, determined to get as many things done as possible.
However, as the weekend approaches, you realize that you’ve accomplished very little when it comes to your priority tasks. It seems like all the time you had was used on non-priority tasks.
You might be wondering, “How could this be?”
No matter how much you clarify your intentions, if you don’t have a solid plan, things will most likely go awry.
You may have heard the quote, “ If you fail to plan, you plan to fail. ” This applies to everything, including daily life.
So stop for a moment and envision how the coming week will go. To help you plan your week , we have collected a list of printable weekly planner templates that you can download from their creators’ sites for free.
For more flexibility in your goal setting, these planners are all undated. And some include time-blocking features to further support your goal of better productivity and increased efficiency.
One thing: If you prefer a done-for-you version of a weekly planner, then check out the Weekly Action Pad where you can optimize your week and maximize your output with a one-page planning tool .
Let’s get to it.
Table of Contents
Free Weekly Planner Template Printables
1. daily focus weekly planner.

Download the PDF
We designed this template to energize and inspire you while you’re busy taking care of your weekly to-dos. It features an electric-blue and lemon-yellow theme to dispel any gloominess caused by a heavy schedule or an overwhelming number of tasks to finish for the week. It has boxes assigned for every day of the week. Spaces are also designated for a to-do list and notes.
2. Weekly Planner with To-Do List

Having a busy week ahead of you? Here’s our very own template to help organize your hectic schedule and overwhelming tasks to regain a sense of control. This template has sections for an undated weekly planner, a to-do checklist, a goals box, and a notes box. It features a splash of yellow in the header, infusing your weekly planning with a cheerful vibe. ( Here are more weekly to-do list templates you can check out. )
3. Whimsical Weekly Plan

via Clementine Creative
You no longer have to miss any important dates with this weekly planner. You can print it out on A4 or letter-sized paper, and there is ample space for all the things you are planning for the entire week.
In addition, there are a couple of useful features for ensuring that you stay on top of things, including the week’s goals and notes.
You can place this printable in a highly visible area, such as your fridge, or you can keep it on a clipboard for constant reference wherever you go.
RELATED : Habits that Stick!
Want to build a new habit that will stick for the rest of your lifetime? In this video, you will discover a simple 9-step process about building habits that you can immediately implement.
4. Undated Black-and-White Planner

via Passion Planner
This free downloadable planner is just the thing if you prefer a subtler time-management tool. It includes a lot of useful elements that help you keep track of the things you need to take care of.
You can create an overview of important things you need to focus on for the week, as well note the priority tasks for the day. This ensures that you get things done at the right time.
The planner comes with a 30-minute interval time block. This allows you to focus on important tasks, increasing your productivity and efficiency as you get more things done each day.
Lastly, the planner has a space for you to take note of good things that happened within the week. This helps you stay focused on the positive and cultivate a gratitude habit. Perhaps this will be your prompt to start a gratitude journal , too!
5. 3-Column Minimalist Planner

via The Housewife Modern
This planner’s minimalist design is both versatile and ink-friendly.
The planner features three main columns that you can use for specific areas of your life where you need to plan.
For example, if you are a student, you can use the leftmost column for listing your daily class schedule. The middle column can be used for keeping track of your extracurricular activities, such as game practices or study groups. Finally, you can then use the rightmost column for general reminders for the day, such as returning books to the library or doing your weekly laundry.
6. Printable Weekly Planners for the Family

via More Like Grace
With the right planner, you can get your whole family involved in weekly planning. If you have kids, they will soon be reaping the benefits of a good time-management habit.
This planner was designed with the whole family in mind. There are two eye-catching designs to choose from for planning your weekly schedule: one with a floral header and one with color blocks.
For those who are new to using a planner to improve their time-management skills, you’ll find that having one is a great motivator for reaching your goals.
7. Weekly Planning With Valentine the Llama

via Goodie Mood
Here’s another charming planner design for animal lovers. Meet Valentine the llama, who will help you plan your week with precision and cuteness.
This two-column planner provides spaces for you to write your plans for the week. On the right column, there is also ample space for a to-do list.
No matter how hectic your week is, this charming design will work wonders to cheer you up.
There’s nothing more liberating than knowing that you have your schedule under control for the entire week. This planner template can help you with that. Plus, it comes with a lovely floral header, adding a touch of beauty as you prepare yourself mentally for what the week will bring.
The planner features space where you can list the Top 3 priorities for the week, with check boxes you can tick once you’re done with them.
In this planner, the space for writing your weekend schedule is bigger than those for the weekdays. This is a visual cue to give yourself some “me” time and enjoy some much-needed self-care, especially when you’ve been focused on supporting your family during the week.
By the way, you might want to check out this post featuring over 200 self-care ideas you can choose from for your “me” time .
9. Weekly Planner With Checkboxes
With a minimalist weekly planner, you can immediately see what the week’s priorities are. In addition, black-and-white printables are cost-efficient because they are more ink-friendly than their decorated counterparts.
Regardless of your reason for choosing a simple planner, this design serves its purpose very well.
It has sufficient space for writing down the things you need to take care of from Monday to Sunday. The check boxes for every item on your to-do list are helpful for keeping track of what you’ve already accomplished and what still needs to be done before the day/week ends.
This planner also comes with a space for notes to flag priority items and tasks.
10. Rainbow Weekly Overview
In contrast to a minimalist design, this planner is bursting with vibrant colors. It features several elements that are quite useful when you’re organizing your week, including:
- Space for writing down a quick overview of your entire week’s schedule
- Detailed listing of your daily tasks
- A weekly meal plan for dinner
- Notes section
All of these features are found on one page, allowing you to see everything quickly.
11. Kids’ Activity Planner
Here is another weekly planner design that’s geared specifically for kids. It’s cute and colorful, so the kids will be more willing to join in with the rest of the family in their new time-management habit.
This planner features spaces where kids can write down all their activities for the whole week. There is also ample space for writing notes, and another space that can be utilized as a reminder box. The writing spaces are just right for kids who are still mastering their penmanship.
12 . Productive Week Planner
Although to-do list apps have already become quite popular, helping us efficiently manage our time, nothing beats the feeling of satisfaction when you get to cross an item off of your handwritten to-do list.
This minimalistic weekly planner allows you to do just that.
It also comes with added features to further boost your productivity, such as:
- A weekly habit tracker for up to three important habits
- Priority for the week (located at the header)
- Ample space for a to-do list
- Boxes designated for your weekday appointments
Now you’ll never miss out on anything important!
13. Organize Your Week Printables
Having a weekly planning system is of great help when you want to be organized and stay on-task with your deliverables. And a good time-management system helps you weed out time-sink activities that tend to become hurdles to your productivity. The right planner makes this possible.
It comes with a time-blocking feature with one-hour intervals to help you focus on your tasks. The printable also comes with a space at the bottom of the page that allows you to set goals for the week.
Print out the two-page spread and use with a ring-binder notebook so you can take it anywhere.
14. Grayscale Weekly Planner
If you are looking for ink-friendly printable planner templates, you might want to try this one, which comes in a grayscale theme. It includes spaces for writing your schedule from Monday to Sunday.
It also contains a box for listing your goals, a to-do list, and a space for notes.
This clean look is ideal for those who want a straightforward weekly planner so they can get to the business of accomplishing everything they planned for the week.
15. Super Cute Cats Weekly Planner
Cat lovers rejoice, for this planner celebrates your favorite members of the animal kingdom. It has several design variations all revolving around the same cat theme.
This planner comes in pastel colors and features several extremely cute cat illustrations (there is one for each day of the week). This can be a purr-fectly suitable gift for someone who loves cats and being organized.
16. Pink Weekly Planner
If you love pink, you’ll love this printable planner. It comes with enough writing spaces for all your schedules, appointments, and to-do’s for every day of the week. The spaces for Saturday and Sunday are noticeably larger than for the weekdays. Perhaps this is designed to encourage you to do more relaxing stuff during the weekends!
This planner also has a to-do list, a box for your goal of the week, and some space at the bottom of the page for your notes.
One standout feature of this planner is the space reserved for “positive thoughts,” where you can write an affirmation to get you going for the rest of the week. In line with this, you might want to visit this post featuring over 160 positivity quotes to brighten your day.
17. Unicorn and Rainbow Planner
If you are looking for a cute planner design, this one features a unicorn and a rainbow for the fantasy life you are working to build.
Meet all your weekly goals by writing them on this planner that provides spaces for your schedule from Sunday to Saturday. There is also space for your notes.
This is one template that we highly recommend using planner stickers with!
18. Plan Ahead Minimalist Weekly Planner
This planner has the simplest design among all of those featured today. The template gives you an uncluttered view of the entire schedule for the week. Plus, like most grayscale designs, this printable planner helps you save on ink.
19. Weeklies and Main Goal
This planner comes in a botanical theme that allows you to view your entire weekly schedule all at once.
It has spaces for all the seven days of the week. Furthermore, there are boxes where you can write your main goals, calls and emails you need to answer, and other reminders for the whole week.
The free version does come with a watermark, and isn’t fully editable. Nevertheless, all the features mentioned above are accessible and usable.
A weekly planner is highly advantageous for several reasons, including:
- Keeping track of all your tasks and responsibilities at any given moment
- Focusing on important projects
- Increasing your productivity
20. Minimalist Weekly Planner
Here is another minimalist and ink-friendly planner design that you might want to try. The default size of this template is A4, and it can be easily adjusted to your preferred paper size.
You can choose either a Monday or Sunday start of the week for your planner. It has ample space in the boxes for writing down your plans for each day of the week, plus some notes.
What can you use your planner for, specifically? Some people use their planners for the following:
- Long-term goals
- Establishing good daily habits
- Fulfilling social media goals
21. My Weekly Planner
Here is a template with a festive theme. It features a to-do list, along with a six-day calendar (Saturday and Sunday are merged in one box). This planner is ideal for keeping track of your schedule during the weekdays, such as at work or in school.
In addition to the calendar and the space for your to-do list, there is also an area where you can write down notes, ideas, and other personal reminders for the week.
This planner comes in landscape format. You might consider pinning it to your memo board, to provide a quick view of your weekly schedule.
22. Weekly Printable Page
This printable template has two variants: an ink-friendly, black-and-white page, and a vibrant, festive one. Choose whichever best reflects your mood for the week.
At the bottom of the page, there is space where you can write notes and personal reminders. The calendar has a Sunday start, with columns allocated for each day of the week.
23. Hexagonal Weekly Planner
For those who like hand-drawn and hand-painted planner designs, this one from PB and J Studio is a great option. It features a black-and-white, hexagonal weekly planner template.
In addition to the spaces allocated for the seven days of the week, you’ll also find a section for writing down your thoughts. There is also a water tracker, which is quite useful if you’re making it a habit to increase your water intake .
24. At a Glance Weekly Printable Template
If you’ve been using a weekly planner to plot out your schedule, there were probably times when you wished that there were a monthly calendar right on the planner page. This is helpful, as you can have a quick look at the days ahead in order to plan your week.
This printable features a template for a monthly calendar, along with the weekly planner. There is sufficient space within each day of the week to list down all of your scheduled activities. There is also a separate, two-column to-do list, as well as a section for errands.
Everything is available at a glance—isn’t that convenient?
25. The Free Floral Weekly Planner
This elegantly designed, weekly planner is bordered by floral bouquets on two sides of the page, and features boxes for six days of the week (with the weekend merged into one). You can write down up to five weekly objectives in the appropriate space. Furthermore, there are spaces for your to-do list and personal notes.
You can print out this template in letter, half-letter, A4, or A5 size.
26. Printable Cute Weekly Planner
Here’s a cute template that also gives you ample space to plan your week right.
It has boxes for each day of the workweek and a bigger box set for your weekend plans.
In addition, this printable template also features dedicated boxes for:
- Top Weekly Priorities (up to three priority tasks)
- Things to Do This Week (a two-column to-do list)
- Habit Tracker (up to six habits with tracking for the entire week)
27. Your Important Weekly Tasks
If you’re looking for a minimalist planner template, this one is worth your attention. There are boxes allocated for each day of the week that are sufficient for writing even the most detailed plans.
The boxes are off-white and set against a black background. The stark contrast makes this template eye-catching. When placed in a prominent spot, it is less likely to forget the plans written on it. Isn’t that what we all want when it comes to making plans?
28. Modern Minimalist Weekly Planner
Here is another example of a minimalist weekly planner design. Its monochromatic color scheme exudes elegance and modernity.
The planner has a landscape orientation and sections for plotting out your weekly plans, with the weekend combined in one column. A notes section allows you to write down important information for the week.
This template is available in both English and Portuguese.
29. Pink Dots Weekly Calendar Planner
Love pink? This planner with a pink polka-dotted header could be what you’re looking for.
This calendar planner was created using Picmonkey, a graphic design app used for creating printable templates and digital vision boards .
30. Unicorn Planner
If you’re into fantasy, or if you just happen to love unicorns, here’s a planner that you may want to try.
Designed with a soft teal color scheme and a drawing of a unicorn on the header, this planner will give inspiration as you plot your weekly schedule using the spaces dedicated to each day of the week.
There is also ample space to write information about the week’s goals, projects, and other notes.
31. Plans for This Week
This printable planner was designed for college students to organize their weekly schedules and keep track of important tasks related to college life.
It features a simple black-and-white design. At the top half portion of the planner’s page, there are dedicated spaces for noting your schedule for the entire week.
Meanwhile, the bottom half of the page has boxes for listing each of the following:
- Most Important Tasks
- Daily Tasks
32. Pastel Rainbow Weekly Scheduler
If you prefer a colorful template, here’s one to try. It features an overall pastel theme, with dedicated spaces to write down an entire week’s worth of schedules and plans.
The weekly schedule also has a to-do checklist, a notes section, and a general list box.
33. A Simple Planner
Organize your hectic schedule with this simple yet elegant planner.
When using this template, you have the option of a Monday or Sunday start for your weekly calendar. A section of the page is dedicated to a to-do checklist, habit tracker, and notes box.
34. Confetti-Themed Template
Printable weekly planners are versatile organizational and time-management tools. You can use them for meal planning, time blocking, tracking your workouts, setting your study schedule, etc.
Here’s a confetti-themed planner to help organize your busy schedule. It has a section for writing your schedule and plans for the whole week.
The template also has spaces allocated for writing your weekly goals and a to-do list for the week.
There is also a writing prompt at the bottom of the page that asks you to write down the daily habits and procedures necessary to achieve your goals.
35. Daybreak Weekly Planner Template
Here’s an undated planner template that comes in a subdued pastel theme. It has seven unmarked sections where you can write your plans and schedule for each day of the week.
The right-hand side of the planner features a to-do list, space where you can write important information, and a notes section.
Final Thoughts on Weekly Planner Templates
As a reminder, if you're looking for a simple solution, then check out the Weekly Action Pad where you can optimize your week and maximize your output with a one-page planning tool .
And if you're looking for other printables and templates related to getting things done, then be sure to check out these blog posts.
- Free Goal Setting & Tracking Printables
- Morning Routine Charts to Print and Track Your Habits
- Free Vision Board Printables to Inspire Your Dreams
- Vision Board Templates to Map Out Your Dream Goals
- Printable Weekly Meal Planner Templates
- Free Printable Habit Tracker Templates for Your Goals
- Free SMART Goal Setting Worksheets and Templates
- Free Time Management Worksheet for Students & Adults
Finally, if you want to level up your productivity and time management skills, then watch this free video about the 9 productivity habits you can build at work .

calendar 2 page spread
All Formats
Resource types, all resource types.
- Rating Count
- Price (Ascending)
- Price (Descending)
- Most Recent
Calendar 2 page spread

Printable Weekly Lesson Planner - 2 Page Spread Color and Gray

Teacher Planning - 2 - Page Spread Editable Monthly Calendar for 2023-2024 SY

2024-2025 Printable Monthly Calendar Planner - Tropical Rainbow ( 2 - Page Spread )

Perpetual Calendar Templates: year-at-a-glace and two - page monthly spreads

2023-24 Calendar Printable + Digital 2 page spread Google Slides PowerPoint
2 - Page Spread Editable Monthly Calendar for 2023-2024 SY Simply Scallops Style

Blank Weekly Planner - 2 page spread - PP

2023-24 Painted Floral Two Page Spread Calendar

Student Weekly Planner Page - 2 page spread

Undated Printable Calendar - 2 page spread

- Google Docs™

Monthly Blank Calendar - 2 page spread - PP

July 2023 to June 2024 Monthly Planner (Letter Size, Two - Page Spread )

Teacher Planner 2 - Page Spread / Binder / Calendar 2020-2021
Monthly Calendar Two Page Spread

2023-24 Calendar - 2 page spread RAINBOW printable!

School Year Undated calendar - 2 pages spread months.

Printable School Year Calendar - August 2022 - June 2023 ( 2 Page Spread )

2020 Printable Planner : Two - page Spread , Narrow Ruled, US Holidays

Homeschool Weekly Lesson Planner - with 2 - page spread (4 pages total)

2015-2016 Calendar 2 page spread

Undated Planner Pages - 1 week, 2 page spread

- Word Document File

Weekly Lesson Planner : Two Page Landscape Spread

School Counselor Planner 2023-2024 (Lifetime Edition - FREE Yearly Updates)

- We're hiring
- Help & FAQ
- Privacy policy
- Student privacy
- Terms of service
- Tell us what you think
A .gov website belongs to an official government organization in the United States.
A lock ( ) or https:// means you've safely connected to the .gov website. Share sensitive information only on official, secure websites.
- About One Health
- About CDC's One Health Office
- One Health Publications
- Trainings and Events
- Zoonoses & One Health Updates (ZOHU) Call Webinar Series
One Health Communication Resources
- Zoonotic Disease Prioritization
- National Center for Emerging and Zoonotic Infectious Diseases (NCEZID)
At a glance
One Health is a collaborative, multisectoral, and transdisciplinary approach — working at the local, regional, national, and global levels — with the goal of achieving optimal health outcomes recognizing the interconnection between people, animals, plants, and their shared environment.
What is One Health?
One Health is an approach that recognizes that the health of people is closely connected to the health of animals and our shared environment. One Health is not new, but it has become more important in recent years. This is because many factors have changed interactions between people, animals, plants, and our environment.

- Human populations are growing and expanding into new geographic areas. As a result, more people live in close contact with wild and domestic animals, both livestock and pets. Animals play an important role in our lives, whether for food, fiber, livelihoods, travel, sport, education, or companionship. Close contact with animals and their environments provides more opportunities for diseases to pass between animals and people.
- The earth has experienced changes in climate and land use, such as deforestation and intensive farming practices. Disruptions in environmental conditions and habitats can provide new opportunities for diseases to pass to animals.
- The movement of people, animals, and animal products has increased from international travel and trade. As a result, diseases can spread quickly across borders and around the globe.
These changes have led to the spread of existing or known (endemic) and new or emerging zoonotic diseases , which are diseases that can spread between animals and people. Every year, millions of people and animals around the world are affected by zoonotic diseases. Examples of zoonotic diseases include:
- Salmonella infection
- West Nile virus infection
- Q Fever (Coxiella burnetii)
- Brucellosis
- Lyme disease
Similar to humans, animals are also at risk of getting sick from some diseases and environmental hazards. Because of this, they can sometimes serve as early warning signs of potential human illness. For example, birds often die of West Nile virus before people in the same area get sick with West Nile virus infection.
One Health Fact Sheet
What are common one health issues.
One Health issues include emerging, re-emerging, and endemic zoonotic diseases, neglected tropical diseases, vector-borne diseases, antimicrobial resistance , food safety and food security, environmental contamination, climate change and other health threats shared by people, animals, and the environment. For example:
- Antimicrobial-resistant germs can quickly spread through communities, the food supply, healthcare facilities, and the environment (soil, water), making it harder to treat certain infections in animals and people.
- Vector-borne diseases are on the rise with warmer temperatures and expanded mosquito and tick habitats.
- Diseases in food animals can threaten supplies, livelihoods, and economies.
- The human-animal bond can help improve mental well-being.
- Contamination of water used for drinking, recreation, and more can make people and animals sick.
Even the fields of chronic disease, mental health, injury, occupational health, and noncommunicable diseases can benefit from a One Health approach involving collaboration across disciplines and sectors.
How does a One Health approach work?
One Health is gaining recognition in the United States and globally as an effective way to fight health issues at the human-animal-environment interface, including zoonotic diseases. CDC uses a One Health approach by involving experts in human, animal, environmental health, and other relevant disciplines and sectors in monitoring and controlling public health threats and to learn about how diseases spread among people, animals, plants, and the environment.
Successful public health interventions require the cooperation of human, animal, and environmental health partners. Professionals in human health (doctors, nurses, public health practitioners, epidemiologists), animal health (veterinarians, paraprofessionals, agricultural workers), environment (ecologists, wildlife experts), and other areas of expertise need to communicate, collaborate on, and coordinate activities. Other relevant players in a One Health approach could include law enforcement, policymakers, agriculture, communities, and even pet owners. No one person, organization, or sector can address issues at the animal-human-environment interface alone.

The One Health approach can:
- Prevent outbreaks of zoonotic disease in animals and people.
- Improve food safety and security.
- Reduce antimicrobial-resistant infections and improve human and animal health.
- Protect global health security.
- Protect biodiversity and conservation.
By promoting collaboration across all sectors, a One Health approach can achieve the best health outcomes for people, animals, and plants in a shared environment.
Other Resources
One Health in Action
CDC’s One Health Office leads the agency’s One Health efforts in the United States and supports One Health activities worldwide.
For Everyone
Public health.
IMAGES
VIDEO
COMMENTS
Here are some guiding questions that might help students get started on their two-page spread: Find a gossipy moment in the book. Identify the turns in the book. Discuss a critical decision made in the chapter or book. Capture a shift in your thinking. Discuss a minor character of major importance. Pick a passage and read it the way the author ...
Science Writer: writes the text to go on the two-page spread; the text from this project will be taken from the Square of Life final report Sidebar Creator: creates a sidebar with interesting facts The following are examples of jobs you could use for the class two-page spread, along with a checklist of the roles and responsibilities for each.
Two-Page Spreads. A common aspect of publication layout design is the two-page spread, or a set of pages viewed together. Spreads are often used as a visually interesting introduction to an article in magazines, with the layout designed to have the two pages working as a unified whole. It is this specific type of spread which we'll explore in ...
STUDENT EXAMPLES OF TWO-PAGE SPREADS Did You Know fact Page heading Caption Close-up photograph Border Description Arrow pointing from text to illustration. Title: sample-spread.qxp Author: kolney Created Date: 9/30/2004 1:33:07 PM
Step 1: Open the Page Setup Dialog Box. Navigate to the "Layout" tab and click on "Margins", then select "Custom Margins" at the bottom of the drop-down menu. In this step, you're accessing the settings that will allow you to adjust how your document's pages are laid out. The Page Setup dialog box is where all the magic happens.
A two page essay word count is 450 to 500 words (12 pt double-spaced). A paper of 2 pages usually consists of 5 to 6 paragraphs. When choosing a topic for a 2 pages essay, remember that it is quite a short piece. That's why your topic shouldn't be too complicated. You might want to focus on football, bullying, basketball, or responsibility.
2. Choose your topic. A successful essay will have a clear focus, so it is important that you clearly define the topic of your essay. It is easier to write about something that interests you, so if at all possible, try to tailor the topic of your essay to something that appeals to your curiosity.
Often, the pages in a two-page spread mirror one another. For example, pages 2 and 3 of this four-page newsletter make up a two-page spread. If you compare the locations of page numbers, running titles, and margins on pages 2 and 3, you can see that page 3 is a mirror image of page 2. Not all two-page spreads have a mirrored-page layout, however.
We called our document "two page spread assignment". The Document Panel. Once you press the "Create" button, the canvas will probably open in portrait mode. Go to the top menu bar, click "Image", hover the cursor over "Image Rotation" and then select "90 o clockwise". Step Two - Organise Your Workspace
Double-page spread width 420mm (210mm each page), page height 274mm, top margin 23mm, bottom margin 18mm, outer margin 15mm, inner margin 18mm, column width 55mm, column space 5mm. When looking at the rest of the publication I discovered that this grid is used for the majority of pages and the margins are used throughout.
Bullet Journal Monthly Spread - 2 Page layout turned out: The completed grid of my 2-page monthly calendar spread. Monthly Calendar 2-page spread dated and marked with a few major events. In this example, my ME to We A5 journal has a 5x5mm dot grid pattern. Each page has 27 x39 dots - printed full -bleed (no margins). ...
Your assignment is to design a dynamic two-page spread for the first two pages of the article — in the magazine's style. Suggestion: Obtain a "real" magazine and use it as a reference for the two-page spread's style. STEP 1 — SHARE RESEARCH, find examples of Two-Page Spreads. Create a text document titled — My 2 Page Spread Research.
On the bottom half of the right page, I list non-school tasks, a small box for next week, and a small box to track my fitness habits. I also do a "semester overview" 2 page spread where I list each major assignment/test for the semester by date.
Monthly Planner is 2 page spread and comes with 12 months of the academic year. Starting from August all the way to July. ... Other sections included in this student planner are assignment schedule, class schedule, exam schedule, reading log, grade tracker, goal tracker, homework schedule etc. ...
Divide the class into 2-3 teams, each composed of 5-8 people: 3-4 photographers, 1-2 interviewers, 1 layout, and 1 manager. Each team is responsible for creating their own spread for this one assignment; it's sort of a competition, but also a way for everyone to experience what it feels like to finish a page within 5 hours.
Design basics for double-page spreads Tags CCSS.ELA-Literacy.W.9-10.2 CCSS.ELA-Literacy.W.9-10.3c direct instruction more than 90 minutes some computer access ABOUT THE INITIATIVE Learn more about what JEA is doing to help teachers in the classroom.
Audi: Grip, 2. Created by: BBH London. This is part of a series of Audi ads. In this one, you get a view of the type of grid you get when at the wheel of an Audi. You could be holding the wheel like you're holding a stress ball, a snowball, a bird's egg or a sponge, you'd still be in control.
This project can be assigned to an individual, partnership, or small group for completion. The parameters of the assignment are clearly laid out, so students can work independently. The student assignment page works for all regions. The two page spread gives you the opportunity to assess: • Writing. • Map skills. • Student knowledge of ...
02. Set Your Grid. What you really want in multi-page layouts is a sense of consistency across the pages. This may seem tricky and annoying at first but, like making a cake, consistency comes from the mixture not the baking. The first step is to set up a grid. Your grid is your friend and everything should sit inside it.
Step 7. Select the heading text frame on your magazine layout. Create a new style in the Paragraph Style panel. Then double-click on the new style in the Paragraph Style panel to open the Paragraph Style Options. Adjust the Font to your preference, and set the text to a generous size.
The only thing that would need to be well thought out is how far near the spine the text is on each of the pages because if this double page layout was going into a 400 page thick book, the text might get lost in the gutter of the spine when the pages cannot be opened fully. Alternative Layout no.2 Alternative Layout No.3 Alternative Layout No.4
25. The Free Floral Weekly Planner. This elegantly designed, weekly planner is bordered by floral bouquets on two sides of the page, and features boxes for six days of the week (with the weekend merged into one). You can write down up to five weekly objectives in the appropriate space.
The bacteria that cause leptospirosis are spread through the urine (pee) of infected animals. The bacteria can survive in contaminated water or soil for weeks to months. Many different kinds of wild and domestic animals carry the bacteria, including: Livestock (cows, pigs, horses, sheep, goats, etc,) Dogs; Cats; Rodents (rats, mice, etc.)
Simply Smart Teaching. 4.9. (15) $1.50. PDF. This is a printable weekly lesson planner on a two page spread. It includes eight vertical space for class planning. This download includes two planner options: one version is in color and the other is a gray-scale version. Perfect for a teacher notebook.
About HIV How HIV Spreads Getting Tested for HIV Preventing HIV Treating HIV Living with HIV Stigma and HIV HIV Awareness Days All January 24, 2024 About HIV. Key points. HIV is a virus that attacks the body's immune system. ... Most people have flu-like symptoms within 2 to 4 weeks after infection. Symptoms may last for a few days or several ...
How it spreads. Rocky Mountain spotted fever is a serious tickborne illness which can be deadly if not treated early. It is spread by several species of ticks in the United States, including: American dog tick (Dermacentor variabilis) Brown dog tick (Rhipicephalus sanguineus) - parts of southwestern United States and Mexico
The movement of people, animals, and animal products has increased from international travel and trade. As a result, diseases can spread quickly across borders and around the globe. These changes have led to the spread of existing or known (endemic) and new or emerging zoonotic diseases, which are diseases that can spread between animals and ...