Let's start a new assignment project together, Get Exclusive Free Assistance Now!
Need Help? Call Us :
- Assignment Writing Service
- Assignment Editing Service
- Assignment Masters
- Assignment Provider
- Buy Assignment Online
- Do My Assignment
- Assignment Writers
- College Assignment Help
- Essay Writing Service
- Online Essay Help
- Do My Essay
- Write My Essay
- Essay Assignment Help
- Essay Writer
- Essay Typer
- College Essay Help
- Essay Editor
- Types Of Essays
- Expository Essays
- Types Of Expository Essays
- Narrative Essays
- Narrative Essay Examples
- Narrative Essay Hooks
- Narrative Essay Childhood Memory
- Descriptive Essay About An Event
- Types Of Essays In Ielts
- Application Essay
- Argumentative Essay
- Essay Writing
- Essay Types
- Paper Writing Service
- Research Paper Help
- Term Paper Help
- Write My paper
- Paper Editor
- Research Proposal Help
- Thesis Writing Help
- Thesis Statement Help
- Homework Help
- Do My Homework
- Statistics Homework Help
- Physics Homework Help
- Word Problem Solver
- Accounting Homework Help
- Math Homework Help
- Solve my Math Problem
- College Homework Help
- Online Tutoring Service
- Algebra Homework Help
- CPM Homework Help
- Homework Answers
- Lab Report Help
- Pestel Analysis Help
- Business Report Help
- Book Review Help
- Book Report Help
- University Assignment Help
- Capstone Project Help
- Resume Writing Services
- Annotated Bibliography
- Ghostwriter
- Personal Statement Help
- Speech Writer
- Proofreading
- computation assignment help
- dbms assignment help
- microprocessor assignment help
- oracle assignment help
- pascal assignment help
- perl assignment help
- ruby assignment help
- sql assignment help
- uml assignment help
- web designing assignment help
- epidemiology assignment help
- nursing assignment help
- pharmacology assignment help
- psychology assignment help
- brand management assignment help
- construction management assignment help
- customer relationship management
- healthcare management assignment help
- mba assignment help
- myob assignment help
- recruitment assignment help
- strategy analysis assignment help
- pricing strategy assignment help
- business analytics assignment help
- business communication assignment help
- e commerce assignment help
- international finance assignment help
- quantitative analysis assignment help
- engineering mathematics assignment help
- civil engineering assignment help
- transportation assignment
- electronics assignment help
- geotechnical engineering assignment help
- telecommunication assignment help
- biomedical engineering assignment help
- mechanical engineering assignment help
- system analysis and design assignment help
- rationalism assignment help
- religion assignment help
- physics assignment help
- biology assignment help
- botany assignment help
- bioinformatics assignment help
- eviews assignment help
- linear programming assignment help
- minitab assignment help
- probability assignment help
- spss assignment help
- stata assignment help
- android assignment help
- c programing assignment help
- c sharp assignment help
- c plus plus assignment help
- fortran assignment help
- haskell assignment help
- html assignment help
- java assignment help
- python programming assignment help
- sap assignment help
- web programming assignment help
- Taxation Law Aassignment Help
- Constitutional Law Assignment help
- contract law assignment help
- civil law assignment help
- company law assignment help
- property law assignment help
- international law assignment help
- human rights law assignment help
- agriculture assignment help
- anthropology assignment help
- childcare assignment help
- english assignment help
- fashion assignment help
- music assignment help
- How It Works
- Uncategorized

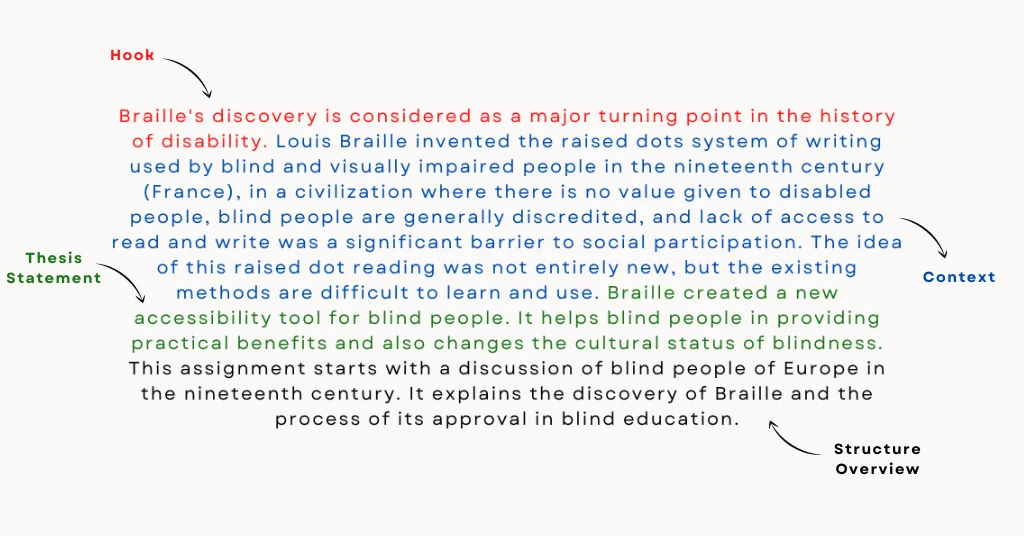
How Do You Write An Introduction to An Assignment? (With Examples of Assignment Introduction)
")
Whether you’re in school or college, you can’t avoid academic writing. It’s essential to write assignments to complete your course and graduate from it successfully. As a student, you must have discussed your assignments and academic writing projects with your friends, seniors, and mentors. Most assignments aim to gauge students’ knowledge about the subject and how well they express themselves while solving a problem or presenting their ideas and opinions.
Writing an assignment introduction paves the way of how a reader or a teacher perceives an entire assignment and can be considered a face of an assignment. Our assignment help experts are here to offer you the best tips on how to write an assignment introduction.
How to introduce an assignment?
As they say – well begun is half done. Our assignment writers agree and believe in this adage. Countless times, you must have skipped a video because you didn’t find its first 5 seconds interesting or catchy enough to hold your attention. Or you must have chosen to watch a movie because you liked its trailer. Similarly, an introduction is a bait for your readers to read your assignment, report, essay, or dissertation with interest. It’s the first impression you will cast on your professors.
GoAssignmentHelp assignment assistance experts who handle hundreds of ‘ do my assignment ’ requests every month share that most students find it difficult to write an introductory paragraph that is clear and concise. Here, we will simplify the process of writing an introduction for the given assignment for you.
A good introduction to an assignment example is always one that gives a clear idea to the readers about what your assignment topic is or what are you going to talk about in the rest of the copy. An old trick is to talk about general ideas about the topic and narrow down your discussion to the specific problem or aspect of the topic you are going to discuss.
An introduction is a guide to your assignment. It should include:
- Some background about the assignment topic, and
- An outline of opinions and arguments you are going to present.
An assignment introduction example or two can perhaps give you a better idea of what needs to be done.
Contact our experts for a powerful introduction to your assignment!
Different Elements of the Introduction of an Assignment
Before we delve into introduction assignment examples, you must understand elements that constitute a good introduction to an assignment:
- Importance of an assignment topic or the purpose of essay writing or dissertation writing,
- Keywords from the essay topic or assignment question to show how well you have understood the writing task,
- What is the proper definition of the assignment topic or the key terms it contains – and what can readers expect from the written piece,
- Student’s reason for writing on the topic. You may get some hints on it from what your teacher mentions on the assignment list or what he/she shares in the class about it,
- A quick bird-eye’s view of your approach on the assignment topic,
- Key points of your discussion that you will elaborate in the body of the paper,
- Quick discussion on previous studies, articles, news, or other works on the topic, and
- What are some of the limitations of the topic?
You don’t have to include everything in an introduction – just enough to make your reader or teacher curious about the topic. The following example of introduction for assignment starts with a central issue, goes on to add some background, and then, presents the argument the assignment writer elaborated further in the essay. It ends with a smooth transition statement meant to transport the reader to the next part of the essay.

How to write an introduction for a report?
When you are stuck with how to start a writing assignment, writing an introduction can solve most of your problems. Different types of assignments have different types of introductory paragraphs. The student introduction assignment example mentioned above is suitable for an essay. Now, we will see an example of an assignment introduction for a report.

Note that this kind of assignment introduction contains:
- A Background: A quick mention of previous studies and articles on the topic gives your teachers a perspective on what is already known about the topic, key issues that need to be addressed, and what you are going to discuss in your report.
- An Objective or a Thesis Statement: A hypothesis or a thesis statement is based on earlier findings and previous works on the topic. It provides a structure to your report. Check how the assignment writing service expert has mentioned the purpose of the study and a quick outline of the entailing discussion in one statement – right after the background.
- Importance of the Study: If you’ve not already highlighted the importance of the study yet, you may include a few more lines to mention the gaps in the topic research and how your paper is going to bridge those gaps.
Consult our assignment writers for fresh ideas and introduction samples for any type of assignment!
How to write an introduction for a thesis or a dissertation?
Most students come across a dissertation or a thesis writing task in their Master’s or Ph.D. degree course. A few need to write a dissertation in their Bachelor’s degree programs. But since they are new to dissertation writing, they wonder how to write an introduction for an assignment that is much longer than a normal essay writing task they have encountered yet. The truth is that writing an introduction for a dissertation is not much different from writing an introduction for an essay or a report (depending on the nature of your dissertation topic).
You can use the points mentioned above to learn how to write a good assignment introduction longer than a paragraph. The ideal length for a dissertation introduction is 5-7% of the total length of your research paper. Most Master’s dissertations are around 15,000 to 50,000 words long – depending on the subject area. Hence, their introductions can have anywhere between 750 and 2,500 words.
We provide affordable writing services for students who find it difficult to paraphrase their ideas succinctly in an introduction. Besides the general introduction, we also help students write an introduction for each chapter, which will help you include more references throughout your research paper. It will also help research paper writers to remind their readers of the purpose of the dissertation again and to retain their interest.
You must also read : Tips and Examples of The Conclusion Section of Assignments
Tips of Top-Rated Experts on How to Start an Assignment
Our essay writers advise students on how to write a good introduction for an assignment all the time. Besides what’s mentioned above, they also advise students to:
- make their introduction eye-catching,
- build up curiosity,
- outline the arguments, and
- maintain suspense.
Experts warn that merely stating the assignment question in other words or trying to state everything in the introduction like a summary of a story is not a good idea at all. You must follow the word limit suggested by your instructor for the assignment introduction and maintain a sharp, focused approach while penning the intro.
Need help with how to start an assignment introduction?
Introduction matters! Whether it’s a superstar or an assignment, the introduction is a key to his/its popularity. GoAssignmentHelp is a leading online assignment help service that brings you the best and most experienced assignment writers from the major cities of Canada, such as Calgary, Edmonton, Montreal, Ottawa, Quebec City, Winnipeg, and more. You can seek help from them for writing the best introduction for your homework , essays , dissertations , thesis , and research papers .
Looking for an assignment introduction sample? Ask our experts!
0 responses on "How Do You Write An Introduction to An Assignment? (With Examples of Assignment Introduction)"
Leave a message cancel reply.
Your email address will not be published. Required fields are marked *
Save my name, email, and website in this browser for the next time I comment.
Recent Posts
- Figurative Language and Its Importance
- A’s and B’s: The True Story Behind The Letter Grades
- How to Write an Article Review: Tips, Outline, Format
- Explanatory Essay Writing Guide
- Poem Analysis Essay Guide: Outline, Template, Structure

Securing Higher Grades is no more expensive!
We can help you boost your grades at best price., get exclusive 20% off.

[email protected] | (+1)617-933-5480
187 Wolf Road, Albany, New York, 12205, USA
100% Secure Payment

We offer assignment writing services in :
- Los Angeles
Disclaimer: Any material such as academic assignments, essays, articles, term and research papers, dissertations, coursework, case studies, PowerPoint presentations, reviews, etc. is solely for referential purposes. We do not encourage plagiarism in any form. We trust that our clients will use the provided material purely as a reference point in their own writing efforts.
GoAssignmentHelp Rated 4.4/5 based on 123 Reviews Copyright © 2010-2024 | www.goassignmenthelp.com | All rights reserved.

Tap to Chat
Get instant assignment help

How to write Introduction for a Project
Why write introduction for a project, tips for writing an introduction , keep it brief but impactful, use factual information, start with a punchline, mention the details, inspiration for the project, it should be in sync with the description, it should be different from the conclusion, language of the project introduction, 1. creative project, 2. business project, 3. research project, 4. college project.
A project is a task done by an individual or a group to achieve a specific aim within a stipulated time . A project includes many interrelated sub-tasks to reach the final objective. A project may have particular rules to follow for individuals or groups. It also outlines the use of resources to complete the project. Any project needs an introduction as it mentions the entire details about the project, including the resources used and the timeline in which it was executed.
Like any mail, composition, or letter, a project also needs an introduction, as it introduces the team, the topic, and all other details. With an introduction, the project will retain identity, interest, and professionalism. Hence, a well-thought-out project introduction is imperative.
With an effective introduction, all your hard work can go to good use. As that’s the first para, a person reads, and it needs to be outlined well, or your project may look flat despite all the hours that went into it. A project intro is generally counted as one heading, but there may be cases when subheadings are required. While we are at this point, below are some tips for writing a goof introduction for a project.
An introduction should be brief, as more details can follow in subsequent paragraphs. The work of opening is to provide inputs that will be discussed later. It should also be noted that the brief here is relative to the entire project’s length. On average, the length of the introduction should be at most twenty per cent of the entire project and not less than ten per cent of the total count of words in the project. E.g. a project of 3000 words, will have an introduction between 300(10%) and 600(20%) words.
An introduction for a project should contain factual information. Factual information means information in numbers and figures. This will make the introduction brief and to the point. Numbers in the start mean significant information will be passed on, but it will require details in the description part to explain the source of those numbers. Using graphs or pictures will also make the introduction colourful or exciting.
Starting the project, an introduction with quotes or figures will give it a good punchline and generate reader interest. But it depends upon the type of project. Quoting a number would be a better option if the topic is related to business. In contrast, a creative project can have a quote from a famous person as the first line. E.g. “A deal of $5 million between company X and Y” will arouse sufficient interest and be impactful for a business project.
A gist of all the details that will follow suit can entice a reader to read further. Many times, if you submit a project that may be insignificant, but even if the superior reads all the relevant points covered in the introduction, half your battle is won.
It is a good idea to write about the inspiration for the project. Some ventures, when starting, have to make a project report, and they can briefly write about how they (the individual or group of people behind the project) got the idea. It could be an event that makes for an exciting read. This can also serve as a reminder for other people about how thoughts turn into projects due to inspiration.
The introduction for a project provides specific pointers for the description, and the details of the project should remain in that outline so that they do not look like elements added as an afterthought. The sync of the introduction should be with the description. Since the introduction of a project is written first, the report will have to follow the lead to be relevant.
The conclusion is written at the end and summarizes the whole project. To summarize does not mean repeating the introduction of the project. The introduction should be different from the conclusion. However, the length of the conclusion can be the same as the introduction. Again as in the case of description, the conclusion should follow the lead of the opening but have ending remarks that shapes the completion of project writing.
The language of the introduction of a project should be relevant to the topic of the project. There are many types of projects like projects done in college, projects done for professional courses or work, and creative projects. For example, a Business project will have a formal tone, while creative projects will have an informal style.

Examples of introduction for a project
There are different types of projects, and the examples given here can help you with more clarity and help you with introduction writing. To understand the difference better, we will take the same sample and present it differently as per the project type. Here are some examples of writing a project introduction according to the kind of project.
In the below examples, emphasis is given according to the topic. For instance, a creative project gives more importance to the video, while a medicinal research project gives more weightage to the medicinal properties.
Let us take an example of a creative project about making videos on types of medicinal plants . The creative part of this project is making a video. The Project introduction will contain how videos will be taken, where and the project’s duration. It can start with a quote like “healing comes from nature” and then describe the process of taking videos of medicinal plants. The camera used, and the type of mode used for shooting, the narration part, and light (natural or use of lights) will take a front seat.
If the same example is taken for a business project introduction, then it will contain lots of factual data. The starting line can be “profit of millions from medicinal plants.” Introducing a business project can be making medicines out of plants and selling them for a profit or on sales projection with projections of numbers and figures. Graphs or charts can be used to portray numerical and statistical information better.
If the same example is for a research project, then the start of the introduction can be “50 types of medicinal plants that can help mankind live a healthy life.” The opening should emphasize what kind of plants can be termed medicinal plants. It will further categorize the plants according to usage or the area they flourish. The introduction can use some pictures related to the healing properties of plants.
The introduction of a college project will again depend on the type of course selected. If the course of the college project is related to biosciences, then the opening will be similar to the above. If the college project is a photo management course, the introduction can be similar to the creative project. Write your college project introduction based on your course and its weightage on your overall marks.
Remember any project; the base remains the same – make it brief and impactful, be it with a quote, facts, or numbers. Ultimately, the motive is to impress a reader or your professor or employer and entice them to read through the entire thing.
Get in touch with us for professional content writing for your requirements. Learn More

Share with your friends
Related Posts:

Leave a Reply Cancel reply
Your email address will not be published. Required fields are marked *
Save my name, email, and website in this browser for the next time I comment.
How to Write An Assignment Introduction Like A Pro

Assignments become a crucial part of students’ academic lives as they have to encounter writing assignments daily. Writing an assignment in itself is a big and tough task, but most students face problems in writing an introduction for such assignments.
An introduction has to be precise and complete to give a brief about your assignment, and there is a fixed word limit for writing an introduction of an assignment. That is why the most searched question about the assignment is
How To Write An Assignment Introduction!
Table of Contents
If you want to make sure that your assignment’s introduction is eye-catching and précis, then follow the following guidelines on how to write an introduction for an assignment.
What is the Assignment Introduction?
The introduction gives an outline of the whole paper. It is the presentation of key ideas and also the purpose of your work. The introduction tells the readers about what you are going to tell in the assignment. An introduction has its own grading rules as it is counted distinctly from the body.
Significance of Writing Assignment Introduction
First, we need to understand the significance of writing a good introduction to an assignment. So you must have heard that the first impression is the last impression, and an introduction of your assignment works as a first impression for your assignment.
Thus, if you wish to attract your examiner’s attention or your readers, you should write a good introduction for your assignment. Moreover, the important role of the introduction is to give an overview of the assignment, which helps the reader determine whether they want to read it.
Hence, before writing an assignment, it is very important to understand how to write an introduction of an assignment .
Strategies: How to write an assignment introduction
- A good introduction to the assignment manifests the following strategies –
- It must show the main objective and purpose of the assignment.
- The importance of assignment.
- The purview of the assignment’s study that is what it includes.
- A brief description of the assignment’s content and its organization.
Characteristics of Good Introduction
Before knowing how to write an assignment introduction, the most crucial thing is to know the characteristics of a good introduction. Because then only you can write a good introduction. So following are the essential characteristics of a good introduction-
- A good introduction is written precisely and clearly so that everyone can understand it. In short, there must not be any language errors.
- It must be written while remembering that it should be attention-grabbing so that it can grab the attention of its readers.
- A good introduction always shows the purpose of the study and what the study is about.
- A Good Assignment should be grammatical error free and plagiarism free. It will be a wise decision to take help from AI Content Detector tool like Content at Scale’s AI detector.
- Best Guide on How to Write a Case Study Assignment?
- Useful Guide on How to Submit Assignment on Google Classroom
- Handy Tips on How to Write an Assignment From Scratch
Elements: How to Write Introduction For Assignment
1. background.
The first thing you have to write in an introduction is a brief background of the study. You have to give an overview of your assignment, what your assignment is about, its impact, and its area of study.
2. Context in brief
You have to include a gist of the context of your assignment. It helps the readers to get information about the scope of the study in the assignment.
3. Your Contention
You have to write your stance on the question involved in the statement. It should be limited to one statement. It will help the readers understand your stance on such points and that the assignment is based on such points.
4. Main points of study
You will write one line on the main points of your study as it will help the readers circumscribe the assignment’s limits.
5. Definition of the Topic
The most important step in how to write an introduction for an assignment is to write a definition of the topic of the assignment very briefly. So that readers can understand the title of the study at once.
6. Why are you writing on this topic only
It is always suggested that you write in the introduction of an assignment why you are writing on this topic only.
7. Outline
Write briefly about the outline or structure of the assignment so that readers can read accordingly, and also it will help you to define the scope of the assignment in short.
However, students often look for how to write assignment pdf. So, below we provide the assignment introduction pdf.
How To Write An Introduction Of An Assignment Pdf
Download this PDF of how to write an introduction on an assignment:
How Long Should An Assignment Introduction Be?
It is true that students find this question while looking for an answer on the assignment’s introduction page. Let’s state that while writing an assignment, the introduction section should not be too long. Furthermore, the context should not be more than a few pages long.
Keep your assignment’s introduction simple and readable. Replace difficult words with simpler ones to fix readability issues (if any). To save time and effort, online paraphrasing tools such as Editpad or Paraphraser can be used to paraphrase text in a simple way.
If you are writing a 2000-word assignment, the introduction should be 200-250 words long.
But if you are writing a 3000-word assignment, the introduction should be 350-400 words long.
Guidelines/Tips On How To Write An Assignment Introduction
- Always start your assignment’s introduction with a broad idea about the topic of the assignment. After giving a broader picture of the study, you have to narrow down the discussion and write the main object of the study.
- Don’t forget to state the significance of your assignment in brief. It is the prominent part of the introduction.
- You have to smartly write about the tasks you are dealing with in the assignment in brief.
- Make sure you use easy and understandable language so that readers don’t find it difficult to understand the introduction; otherwise, they will not read the other parts of the assignment as well.
- Double-check and proofread your assignment introduction to ensure it is free from spelling mistakes and grammar mistakes.
These guidelines are very important in writing a good introduction to your assignment. If you want to be well-versed in writing an assignment introduction, it is mandatory first to be acquainted with these tips and guidelines.
Assignment Introduction Example
For more clarity, you can see the following assignment example;
Is There Any Other Way To Write Or Get An Effective Assignment Introduction?
Yes, there is!
It has been seen that there are several writers who are confused when it comes to the assignment’s introduction writing. And it is true that they struggle to summarise the broad issue and write an introduction without conducting sufficient research. However, because the subject experts or online assignments help provide experts who are well-versed in the field, they easily write the introduction in minutes.
- The majority of students do not properly understand the English language. The experts who work in the writing industry have years of experience in writing assignments. That is why they always make sure to write an engaging introduction that also seems professional.
- Furthermore, the requirements of the writer are always given priority by the professionals. After that, they write a professional article that will, without a doubt, engage the reader.
- The expert not only helps the student in preparing the assignment’s introduction. They offer their support in completing the entire home task and guarantee that they will get an A+ grade.
- Besides that, the professionals’ support is available 24/7/365/366 days. So you won’t have to worry about coming up with a solution for your writing task.
What Makes A Good Introduction?
As you already know that, the rules are always subject to change, and our perspectives may be different. However, the academic standards for writing an introduction are quite clear. When creating a great introduction for an assignment, you have to make sure some of the points that are given below:
- Motivates the audience.
- Introduces your thesis statement.
- Defines the topic you’re talking about.
- Emphasizes the significance of your topic.
- Highlights the main points you want to discuss.
- Provides your reasoning for approaching your topic.
- Gives a high-level overview of your methodology.
- Provides statistical information and the purpose of your methodology.
Note: Remember that even creative writing tasks require an inspiring introduction that discusses your purpose for writing.
On the other hand, writing an introduction is relatively easy. Some important things must be clear, including:
- Your topic’s importance.
- The goal of your paper.
- An element of explanation.
- A powerful opening hook sentence.
- Include a link to your thesis statement.
Quick recap
To write an engaging assignment introduction, remember to:
- Make their introduction interesting,
- outline the reasons,
- make the audience curious about your assignment,
- and keep the audience guessing.
Experts warn that rephrasing the assignment question or telling everything in the opening like a story synopsis is not a good idea. You must stick to your tutor’s specified word limit for the assignment introduction and write it with a clear, focused approach.
Since the time assignments have become a crucial part of our studies and grades, and the need to learn the concept and structure of assignments has arisen.
An introduction is the important part of the assignment to grab readers’ attention and tell in brief about the background and information of the assignment. Thus it is very important to learn how to write assignment introductions. The introduction of an assignment should be eye-catching and alluring to capture the audience and make them read the whole assignment.
Browse related content
Frequently Asked Questions
Q1. what are the 3 parts of an introduction paragraph.
Following are the three parts of an introduction: 1. Parts of an introduction 2. The opening statement 3. The supporting sentences 4. The introductory topic sentence.
Q2. What are the key elements of an introduction?
The introduction must have the following responsibilities: 1. Get the audience’s attention 2. Introduce the topic 3. Explain its relevance to the audience 4. State a thesis or purpose 5. Outline the main points.
Q3. How to write introduction for assignment?
A good introduction shows the reader that the essay will provide a relevant answer to the assignment question. As a result, the introduction should link back to the question. That is done by writing a paragraph that deals with all the key content mentioned in the assignment question.
Related Posts

7+ Tips On How To Get Higher Grades In Exams In 2023

How to Write a Research Paper- A guide From Professionals
Get science-backed answers as you write with Paperpal's Research feature
How to Write a Research Paper Introduction (with Examples)

The research paper introduction section, along with the Title and Abstract, can be considered the face of any research paper. The following article is intended to guide you in organizing and writing the research paper introduction for a quality academic article or dissertation.
The research paper introduction aims to present the topic to the reader. A study will only be accepted for publishing if you can ascertain that the available literature cannot answer your research question. So it is important to ensure that you have read important studies on that particular topic, especially those within the last five to ten years, and that they are properly referenced in this section. 1 What should be included in the research paper introduction is decided by what you want to tell readers about the reason behind the research and how you plan to fill the knowledge gap. The best research paper introduction provides a systemic review of existing work and demonstrates additional work that needs to be done. It needs to be brief, captivating, and well-referenced; a well-drafted research paper introduction will help the researcher win half the battle.
The introduction for a research paper is where you set up your topic and approach for the reader. It has several key goals:
- Present your research topic
- Capture reader interest
- Summarize existing research
- Position your own approach
- Define your specific research problem and problem statement
- Highlight the novelty and contributions of the study
- Give an overview of the paper’s structure
The research paper introduction can vary in size and structure depending on whether your paper presents the results of original empirical research or is a review paper. Some research paper introduction examples are only half a page while others are a few pages long. In many cases, the introduction will be shorter than all of the other sections of your paper; its length depends on the size of your paper as a whole.
- Break through writer’s block. Write your research paper introduction with Paperpal Copilot
Table of Contents
What is the introduction for a research paper, why is the introduction important in a research paper, craft a compelling introduction section with paperpal. try now, 1. introduce the research topic:, 2. determine a research niche:, 3. place your research within the research niche:, craft accurate research paper introductions with paperpal. start writing now, frequently asked questions on research paper introduction, key points to remember.
The introduction in a research paper is placed at the beginning to guide the reader from a broad subject area to the specific topic that your research addresses. They present the following information to the reader
- Scope: The topic covered in the research paper
- Context: Background of your topic
- Importance: Why your research matters in that particular area of research and the industry problem that can be targeted
The research paper introduction conveys a lot of information and can be considered an essential roadmap for the rest of your paper. A good introduction for a research paper is important for the following reasons:
- It stimulates your reader’s interest: A good introduction section can make your readers want to read your paper by capturing their interest. It informs the reader what they are going to learn and helps determine if the topic is of interest to them.
- It helps the reader understand the research background: Without a clear introduction, your readers may feel confused and even struggle when reading your paper. A good research paper introduction will prepare them for the in-depth research to come. It provides you the opportunity to engage with the readers and demonstrate your knowledge and authority on the specific topic.
- It explains why your research paper is worth reading: Your introduction can convey a lot of information to your readers. It introduces the topic, why the topic is important, and how you plan to proceed with your research.
- It helps guide the reader through the rest of the paper: The research paper introduction gives the reader a sense of the nature of the information that will support your arguments and the general organization of the paragraphs that will follow. It offers an overview of what to expect when reading the main body of your paper.
What are the parts of introduction in the research?
A good research paper introduction section should comprise three main elements: 2
- What is known: This sets the stage for your research. It informs the readers of what is known on the subject.
- What is lacking: This is aimed at justifying the reason for carrying out your research. This could involve investigating a new concept or method or building upon previous research.
- What you aim to do: This part briefly states the objectives of your research and its major contributions. Your detailed hypothesis will also form a part of this section.
How to write a research paper introduction?
The first step in writing the research paper introduction is to inform the reader what your topic is and why it’s interesting or important. This is generally accomplished with a strong opening statement. The second step involves establishing the kinds of research that have been done and ending with limitations or gaps in the research that you intend to address. Finally, the research paper introduction clarifies how your own research fits in and what problem it addresses. If your research involved testing hypotheses, these should be stated along with your research question. The hypothesis should be presented in the past tense since it will have been tested by the time you are writing the research paper introduction.
The following key points, with examples, can guide you when writing the research paper introduction section:
- Highlight the importance of the research field or topic
- Describe the background of the topic
- Present an overview of current research on the topic
Example: The inclusion of experiential and competency-based learning has benefitted electronics engineering education. Industry partnerships provide an excellent alternative for students wanting to engage in solving real-world challenges. Industry-academia participation has grown in recent years due to the need for skilled engineers with practical training and specialized expertise. However, from the educational perspective, many activities are needed to incorporate sustainable development goals into the university curricula and consolidate learning innovation in universities.
- Reveal a gap in existing research or oppose an existing assumption
- Formulate the research question
Example: There have been plausible efforts to integrate educational activities in higher education electronics engineering programs. However, very few studies have considered using educational research methods for performance evaluation of competency-based higher engineering education, with a focus on technical and or transversal skills. To remedy the current need for evaluating competencies in STEM fields and providing sustainable development goals in engineering education, in this study, a comparison was drawn between study groups without and with industry partners.
- State the purpose of your study
- Highlight the key characteristics of your study
- Describe important results
- Highlight the novelty of the study.
- Offer a brief overview of the structure of the paper.
Example: The study evaluates the main competency needed in the applied electronics course, which is a fundamental core subject for many electronics engineering undergraduate programs. We compared two groups, without and with an industrial partner, that offered real-world projects to solve during the semester. This comparison can help determine significant differences in both groups in terms of developing subject competency and achieving sustainable development goals.
Write a Research Paper Introduction in Minutes with Paperpal
Paperpal Copilot is a generative AI-powered academic writing assistant. It’s trained on millions of published scholarly articles and over 20 years of STM experience. Paperpal Copilot helps authors write better and faster with:
- Real-time writing suggestions
- In-depth checks for language and grammar correction
- Paraphrasing to add variety, ensure academic tone, and trim text to meet journal limits
With Paperpal Copilot, create a research paper introduction effortlessly. In this step-by-step guide, we’ll walk you through how Paperpal transforms your initial ideas into a polished and publication-ready introduction.
How to use Paperpal to write the Introduction section
Step 1: Sign up on Paperpal and click on the Copilot feature, under this choose Outlines > Research Article > Introduction
Step 2: Add your unstructured notes or initial draft, whether in English or another language, to Paperpal, which is to be used as the base for your content.
Step 3: Fill in the specifics, such as your field of study, brief description or details you want to include, which will help the AI generate the outline for your Introduction.
Step 4: Use this outline and sentence suggestions to develop your content, adding citations where needed and modifying it to align with your specific research focus.
Step 5: Turn to Paperpal’s granular language checks to refine your content, tailor it to reflect your personal writing style, and ensure it effectively conveys your message.
You can use the same process to develop each section of your article, and finally your research paper in half the time and without any of the stress.
The purpose of the research paper introduction is to introduce the reader to the problem definition, justify the need for the study, and describe the main theme of the study. The aim is to gain the reader’s attention by providing them with necessary background information and establishing the main purpose and direction of the research.
The length of the research paper introduction can vary across journals and disciplines. While there are no strict word limits for writing the research paper introduction, an ideal length would be one page, with a maximum of 400 words over 1-4 paragraphs. Generally, it is one of the shorter sections of the paper as the reader is assumed to have at least a reasonable knowledge about the topic. 2 For example, for a study evaluating the role of building design in ensuring fire safety, there is no need to discuss definitions and nature of fire in the introduction; you could start by commenting upon the existing practices for fire safety and how your study will add to the existing knowledge and practice.
When deciding what to include in the research paper introduction, the rest of the paper should also be considered. The aim is to introduce the reader smoothly to the topic and facilitate an easy read without much dependency on external sources. 3 Below is a list of elements you can include to prepare a research paper introduction outline and follow it when you are writing the research paper introduction. Topic introduction: This can include key definitions and a brief history of the topic. Research context and background: Offer the readers some general information and then narrow it down to specific aspects. Details of the research you conducted: A brief literature review can be included to support your arguments or line of thought. Rationale for the study: This establishes the relevance of your study and establishes its importance. Importance of your research: The main contributions are highlighted to help establish the novelty of your study Research hypothesis: Introduce your research question and propose an expected outcome. Organization of the paper: Include a short paragraph of 3-4 sentences that highlights your plan for the entire paper
Cite only works that are most relevant to your topic; as a general rule, you can include one to three. Note that readers want to see evidence of original thinking. So it is better to avoid using too many references as it does not leave much room for your personal standpoint to shine through. Citations in your research paper introduction support the key points, and the number of citations depend on the subject matter and the point discussed. If the research paper introduction is too long or overflowing with citations, it is better to cite a few review articles rather than the individual articles summarized in the review. A good point to remember when citing research papers in the introduction section is to include at least one-third of the references in the introduction.
The literature review plays a significant role in the research paper introduction section. A good literature review accomplishes the following: Introduces the topic – Establishes the study’s significance – Provides an overview of the relevant literature – Provides context for the study using literature – Identifies knowledge gaps However, remember to avoid making the following mistakes when writing a research paper introduction: Do not use studies from the literature review to aggressively support your research Avoid direct quoting Do not allow literature review to be the focus of this section. Instead, the literature review should only aid in setting a foundation for the manuscript.
Remember the following key points for writing a good research paper introduction: 4
- Avoid stuffing too much general information: Avoid including what an average reader would know and include only that information related to the problem being addressed in the research paper introduction. For example, when describing a comparative study of non-traditional methods for mechanical design optimization, information related to the traditional methods and differences between traditional and non-traditional methods would not be relevant. In this case, the introduction for the research paper should begin with the state-of-the-art non-traditional methods and methods to evaluate the efficiency of newly developed algorithms.
- Avoid packing too many references: Cite only the required works in your research paper introduction. The other works can be included in the discussion section to strengthen your findings.
- Avoid extensive criticism of previous studies: Avoid being overly critical of earlier studies while setting the rationale for your study. A better place for this would be the Discussion section, where you can highlight the advantages of your method.
- Avoid describing conclusions of the study: When writing a research paper introduction remember not to include the findings of your study. The aim is to let the readers know what question is being answered. The actual answer should only be given in the Results and Discussion section.
To summarize, the research paper introduction section should be brief yet informative. It should convince the reader the need to conduct the study and motivate him to read further. If you’re feeling stuck or unsure, choose trusted AI academic writing assistants like Paperpal to effortlessly craft your research paper introduction and other sections of your research article.
1. Jawaid, S. A., & Jawaid, M. (2019). How to write introduction and discussion. Saudi Journal of Anaesthesia, 13(Suppl 1), S18.
2. Dewan, P., & Gupta, P. (2016). Writing the title, abstract and introduction: Looks matter!. Indian pediatrics, 53, 235-241.
3. Cetin, S., & Hackam, D. J. (2005). An approach to the writing of a scientific Manuscript1. Journal of Surgical Research, 128(2), 165-167.
4. Bavdekar, S. B. (2015). Writing introduction: Laying the foundations of a research paper. Journal of the Association of Physicians of India, 63(7), 44-6.
Paperpal is a comprehensive AI writing toolkit that helps students and researchers achieve 2x the writing in half the time. It leverages 21+ years of STM experience and insights from millions of research articles to provide in-depth academic writing, language editing, and submission readiness support to help you write better, faster.
Get accurate academic translations, rewriting support, grammar checks, vocabulary suggestions, and generative AI assistance that delivers human precision at machine speed. Try for free or upgrade to Paperpal Prime starting at US$19 a month to access premium features, including consistency, plagiarism, and 30+ submission readiness checks to help you succeed.
Experience the future of academic writing – Sign up to Paperpal and start writing for free!
Related Reads:
- Scientific Writing Style Guides Explained
- 5 Reasons for Rejection After Peer Review
- Ethical Research Practices For Research with Human Subjects
- 8 Most Effective Ways to Increase Motivation for Thesis Writing
Practice vs. Practise: Learn the Difference
Academic paraphrasing: why paperpal’s rewrite should be your first choice , you may also like, how to write a high-quality conference paper, academic editing: how to self-edit academic text with..., measuring academic success: definition & strategies for excellence, phd qualifying exam: tips for success , ai in education: it’s time to change the..., is it ethical to use ai-generated abstracts without..., what are journal guidelines on using generative ai..., quillbot review: features, pricing, and free alternatives, what is an academic paper types and elements , should you use ai tools like chatgpt for....
Expert Tips for Writing a Project Description With Free Templates
By Kate Eby | May 25, 2021
- Share on Facebook
- Share on LinkedIn
Link copied
A strong project description provides a roadmap for stakeholders and communicates the vision without getting bogged down in details. We’ve compiled expert tips and sample project descriptions to help you get started.
In this article, you’ll find a project description outline , steps for writing a project description , expert tips , and examples of project descriptions by industry .
What Is a Project Description?
A project description is a high-level overview of why you’re doing a project. The document explains a project’s objectives and its essential qualities. Think of it as the elevator pitch that focuses on what and why without delving into how.
You typically draft a project description early on, during the project initiation phase of the project management lifecycle.
The project manager often writes the project description. However, if you are working for an agency that seeks grant funding or writing a research proposal, you might need to learn how to write a project description in a project proposal.
The project description should include an overview of the following:
- Project goals and objectives
- Stakeholders and their roles
- Metrics for measuring success
- Estimated budget
The tricky part is figuring out what doesn’t belong in the project description. The description should focus on goals, objectives, and the overall approach, but you don’t need to include lists of tasks, an extensive background, or research analysis. In general, the project description is broad; you’ll include more detail in the project plan.
Project Management Guide
Your one-stop shop for everything project management

Ready to get more out of your project management efforts? Visit our comprehensive project management guide for tips, best practices, and free resources to manage your work more effectively.
View the guide
Project Description Outline
The parts of a project description will vary depending on the type of project. However, your project description should contain the following elements:
Parts of a Project Description Outline
- Project Title: Aim for a short, unambiguous, and memorable title.
- Overview: This is a high-level summary (no more than one or two paragraphs).
- Project Justification: Explain the problem or opportunity and why the project is necessary.
- Objectives: Set specific and measurable project goals.
- Phases of Work: Break down the project into phases that describe the desired outcome for each.
- Metrics for Evaluating and Monitoring: Include the metrics you’ll use to evaluate the project’s success.
- Timeline: Outline the timeline for each phase, including the basic tasks that you will accomplish, with start and end dates.
- Estimated Budget: Include the budget and projected costs.
How to Write a Project Description
Although writing a project description will vary somewhat depending on the type of project, the basic process is the same. The following 10 steps are key to writing a good project description.
- Summarize: Write a one- or two-paragraph explanation of what the project aims to accomplish. Avoid delving deep into background or past projects. A good project summary will not only serve as your elevator speech, but will also help you clarify larger issues with your plan.
- Define: Describe the problem or opportunity and how the project will address it.
- Specific: Answer who, what, when, where, and why.
- Measurable: Include metrics for defining success.
- Achievable: Set goals that are possible to accomplish with the available resources.
- Relevant: Goals should be aligned with your organization’s mission.
- Time-bound: Include intermediate and final deadlines for each goal.
- Explain: Briefly explain your methodology. Include any key technologies or project management techniques you’ll use and why they’re appropriate.
- Measure: Identify the project deliverables . How will you measure success and evaluate the project?
- Schedule: Include a general timeline, with project phases and milestones. Be sure to note any important deadlines.
- Budget: Include the total estimated cost of the project and how much you have budgeted. (Note that this shouldn’t be a line item budget.) Use a project budget template for a more detailed breakdown of budgeted and actual project expenses.
- Get feedback: Seek feedback from key stakeholders, customers, and anyone impacted by the project for feedback. Ask them to explain the project in their own words to get a sense of how clearly you’ve communicated the vision.
- Proofread: Have someone else proofread the project description. In addition to spelling and grammatical errors, ask them to look for missing details that are significant to the project.
- Revise: Update and revise the document as the project progresses. Treat the project description as a living document.
A 10-Step Checklist for Writing a Project Description
Now that you know how to write a project description, use this checklist to help you focus on the key details.
Types of Project Descriptions With Examples
In this section, you’ll find a variety of free, customizable project description templates. We’ve completed them with sample information so that you can get an idea of how to write a description that fits your needs. You can also download a free project documentation template to help you track its progress.
Architectural Project Description Template

Download Architectural Project Description Template
Microsoft Word | Adobe PDF | Google Docs
An architectural project description should start with a summary that explains the need for the project. Briefly identify the site, any key design features and aesthetic considerations, and a broad timeline. Keep it simple, and write for the general public. Here’s an example of an architectural project description summary for a downtown parking garage:
After you summarize the project, use the architectural project description template to create a customizable action plan. Include a breakdown of work by phases. Note any communications and approvals needed to ensure success.
Client Creative Project Brief Template

Download Client Creative Brief Template
Microsoft Excel | Smartsheet
Create a client creative project brief to ensure a project strategy aligns with client goals. Creative briefs are frequently used for projects involving graphic design, videography, or marketing campaigns. Start by briefly describing the project, objectives, and deadlines. The following client creative project brief provides an overview of a holiday marketing campaign.
The format will vary based on the type of project. In the client creative project template example above, you’ll find a number of kickoff questions about the campaign’s target audience, key components, and messaging. If this template doesn’t meet your needs, check out other Smartsheet client creative briefs and marketing project plan templates .
Grant Project Description Template

Download Grant Project Description Template
Microsoft Word | Adobe PDF
When you’re applying for grant funding or planning a grant-funded project, it’s essential to identify the target population and how they’ll benefit from project activities. Focus on why the project is necessary, rather than on the needs of your organization. The following example describes a grant project for a program seeking funding to combat childhood hunger:
This grant project description template breaks down the description into separate sections for the problem to be addressed, goals and objectives, target population, project activities, and key staff. It provides additional space for background information, measurable outcomes, and a timeline and budget, and it includes separate columns for income sources and expenses.
Interior Design Project Description Template

Download Interior Design Project Description Template
Microsoft Word | Google Docs
An interior design project description is similar to a client creative project brief. You’ll use the project overview to spell out a vision for the project that syncs with the client’s needs. The following interior design project description summarizes a residential kitchen remodel project.
Use the remainder of the interior design project description template to document the client’s likes and dislikes in greater detail. The template includes space to note the client’s preferences for general style, as well as colors, patterns, textiles, furnishings, and more. You’ll also find space to include measurements, a floor sketch, a project schedule, and a budget.
IT Project Description Template

Download IT Project Description Template
Microsoft Excel | Microsoft Word | Adobe PDF
An IT project description should start with a basic summary that condenses key background information and what the project entails. Keep it simple, and explain the project in lay terms. The following IT project description summary provides an overview of a plan to develop a mobile ordering app for a fast casual restaurant:
This IT project description template includes space for goals, assumptions, measurements of success, and risks. Additionally, the template includes space for a breakdown of the scope of work, including processes impacted by the project, milestones, costs, and resources.
Software Project Description Template

Download Software Project Description Template
Microsoft Word | Adobe PDF
A software project description should start with an overview that explains the type of software that will be developed, the problem it will solve, and the benefits to users and the business. The overview shouldn’t focus on the technical aspects of the project, but instead on the final product and its benefits. This software project description example gives an overview of a point-of-sale (POS) system under development for a brewery.
Once you’ve completed the overview, use this software project description template to explain purposes and goals in greater detail. The template includes sections for obstacles, risk factors, hardware compatibility, and software employed. Other features include a detailed breakdown of the project’s timeline and cost structure.
For other project description templates, please refer to our Free Project Description Templates article .
PMP Project Description
If you’re a project manager seeking the Project Management Professional certification, you’ll need either 36 or 60 months of professional experience leading projects, depending on your education level.
The Project Management Institute (PMI) requires you to submit each project as its own entry on the application and include the following:
- A one-sentence project objective.
- Your role in accomplishing project deliverables in each of the five phases of project management : initiating (IN), planning (PL), executing (EX), monitoring and controlling (MC), and closing (CL).
- A brief description of project outcome.
You can use this PMP application project description example for guidance:
- Objective: Redesign Company XYZ’s website to improve lead generation by 25 percent.
- Project Deliverables: I was the project manager for Company XYZ’s redesign. I drafted the project charter and recruited a team of four IT staffers to complete the project (IN). I created the work breakdown structure, timeline, and budget, and I met with stakeholders to assess project contingencies and risks (PL). I coordinated between departments, provided quality assurance, and managed the four-person team throughout the project (EX). I conducted risk audits and communicated results to stakeholders (MC). I obtained stakeholder feedback, archived project documents, and held multidepartment training once the redesign was completed (CL).
- Outcome: Company XYZ’s website redesign was completed $10,000 under budget and two weeks ahead of schedule. Lead generation increased by 30 percent within six months.
How to Write a Project Description in a CV or Resume
Writing a project description for successful past projects can give you an edge when you’re a job candidate or looking for new clients. When writing a project description for your CV, resume, or portfolio, clearly state the project objective, your role, and the outcome.
Continuing with the example above, here’s a project management project description sample to avoid in your resume because it’s vague. The second project description is a more effective example. It also highlights the most significant accomplishments and responsibilities first.
Project Description Before Example
IT Project Manager, Company XYZ Project: Website redesign
- Managed a highly successful redesign
- Provided leadership throughout the project
- Updated key stakeholders in a timely manner
- Coordinated communications and staff trainings
- Completed the project under budget and ahead of schedule, resulting in improved sales
Project Description After Example
IT Project Manager, Company XYZ Project: Website redesign with goal of increasing lead generation by 25%
- Managed website redesign that resulted in a 30% increase in lead generation
- Completed the project $10,000 under budget and two weeks ahead of schedule
- Recruited and managed a team of four IT staffers
- Created the work breakdown structure, timeline, and budget; assessed project contingencies and risks
- Communicated with key stakeholders throughout the project; trained staff across departments once the project was complete
Tips for Writing a Good Project Description
To write an effective project description, draft early in the process. Keep it high-level without going into too much detail or background. Use the description to generate interest among a broad audience. Keep it brief and free of jargon.
- Clear: Keep writing straight to the point and don’t include unnecessary jargon.
- Concise: Focus on the project itself, rather than on background information.
- Complete: This can be a challenge when you’re also aiming for concision. Regardless, the description should include the key points your audience needs to understand the project.
- Credible: Only cite authoritative sources and the most up-to-date information.
- Draft the Project Description Early in the Process: Gregory Carson, PMP, is a biomedical engineer, attorney, and patent agent with more than 20 years of project management experience and who owns Carson Patents . Carson suggests drafting the project description early, ideally as soon as the idea occurs to you or your team. The description will serve as the summary roadmap to refer back to throughout the project. “All of the other details have some direct relationship to the project description, so having the project description well drafted before you begin the execution planning can save you time and frustration, in particular as changes need to be included,” Carson says. At the end of the project, you’ll want to refer back to the document to show that the project fulfilled the goals and objectives.
- Make a Memorable First Impression: Alan Zucker, PMP, is a project manager with more than 25 years working with Fortune 100 companies and founder of the website Project Management Essentials . He says that a project description should motivate. The goal is for people to understand and support the project after reading the description. “When crafting your pitch, remember that most people will form their initial impressions about the project within the first 30 seconds. Lead with a strong statement and a powerful image of the project’s benefit,” Zucker says.
- Write for a Broad Audience: A common mistake when writing a project description is targeting too narrow of an audience. “There is usually no lack of attention on the stakeholders that are funding the project, and they are important audience members for the project description to focus on,” Carson says. “But particular attention focused on the stakeholders who will benefit from the project often leads to helpful insights for the project.” Getting feedback on the description from a broader audience is also helpful. Zucker suggests reviewing the description with key stakeholders, customers, and those impacted by the project. “After reading your description, see if they can restate it in their own words,” Zucker suggests. “Was the restatement what you intended? If not, then continue to revise the description based on the feedback.”
- Avoid Excessive Details, Especially Early On: Your project description should convey a vision, rather than provide a detailed implementation plan. Don’t worry too much about planning out details in the description phase — Zucker suggests that you simply make sure there’s a clear understanding of the project’s goals and why you want to proceed. “The description will evolve as we learn more about the project,” Zucker says. “Don’t worry about committing too early. Part of that evolutionary process is sharing the description and getting feedback on it.” Keeping a high-level focus will help generate buy-in for the project. Carson says it’s key to describe the project so that others “can understand and appreciate your marvel.” “You don’t want to pontificate to the point where people stop reading or get confused about any of the goals and objectives,” he says.
- Ask Someone to Proofread Your Project Description: Proofreading and editing are essential when you finalize your project description. But if you wrote the description, recruit someone else to edit it. “Too often as we write, we ‘remember’ what we were writing about and can miss little details, even spelling and grammar, that can impact the meaning and importance of a project and its description,” Carson says. Don’t be surprised if you need to revise and rewrite a few times. It’s all part of the process of crafting your message.
How to Write a Brief Description of a Project
Focus on the project and the problem it addresses. Avoid delving into background info or referencing other projects. Emphasize the what and why without excessive detail about the tasks it requires. This can be your pitch to sell the project.
What Is a Project Description in a Project Proposal?
A project description in a project proposal is a brief summary of the goals, the objectives, and the need for the project. It shouldn’t be more than one or two paragraphs. The project proposal will provide more detailed information.
What Is a Project Description in a Thesis?
A project description in a thesis outlines the research you’re undertaking, typically as part of graduate studies. It includes your working title, your research goals, basic methodology, and why the research is needed.
Effectively Track and Manage Your Projects with Real-Time Work Management in Smartsheet
From simple task management and project planning to complex resource and portfolio management, Smartsheet helps you improve collaboration and increase work velocity -- empowering you to get more done.
The Smartsheet platform makes it easy to plan, capture, manage, and report on work from anywhere, helping your team be more effective and get more done. Report on key metrics and get real-time visibility into work as it happens with roll-up reports, dashboards, and automated workflows built to keep your team connected and informed.
When teams have clarity into the work getting done, there’s no telling how much more they can accomplish in the same amount of time. Try Smartsheet for free, today.
Discover a better way to streamline workflows and eliminate silos for good.
How to Write an Assignment Introduction – 6 Best Tips
In essence, the writing tasks in academic tenure students are an integral part of any curriculum. Whether in high school, college, or university, they may also address the various issues and concerns with their friends and mentors about different academic writing assignments they receive.
The main purpose of all these assignments is to recognize how you can adequately express yourself through words and how much you understand a particular subject.
An introduction is a base of an assignment. It is challenging to prepare, and many students struggle to write an assignment.
Some students have doubts about how to write assignment introduction. The current educational system has neglected to teach this vitally necessary writing method.
The best thing about writing is that you can learn and grow all the time by practicing. In this blog, I will discover significant tips for assignment writing, which is the art of writing an assignment introduction.
If you are struggling with your assignment, then you can get top-notch assignment help online service from our experts who will help you with any type of assignment.
What Is The Introduction Section?
Table of Contents
An assignment introduction segment is a crucial piece of any task or article. It is the main area of your task. This area generally has not more than a few passages.
Why is an introduction section important?
It is a fact that your “ first impression is your last impression .” So, if you write a good introduction to your assignment, you catch your examiner’s eye and get good grades.
The primary purpose of the introductory paragraph is to give the readers a real understanding of the topic of your assignment. The introduction gives the subject a generalization until the author narrows the discussion.
It is just like your assignment guide. It also provides context information regarding the assignment topic and an outline of your view or claim.
You can understand it more deeply if you go through some introduction examples. It gives the reader an overview of your essay and what it’s all about.

What Are The Characteristics Of A Good Introduction?
- Ensure your writing is clear and precise, and there must be no language errors.
- The introduction section should be attention-grabbing to browse and attracts the reader to continue reading the rest of the assignment.
- The introduction should tell the reader what the full assignment is all concerning.
Still, Need help with your assignments writing? Click the banner above & get a free quote for your assignments.
Hope that you find this information useful. Happy learning, and best of luck with your assignment.
If you need any type of help regarding your assignments, contact us & get affordable assignment help .
Points To Remember Before Write Assignment Introduction
Before you searching the answer to your question about how to write an assignment introduction, you must keep these things in mind before writing it:
Proper introduction for a process documentation creates your experience a lot easier. It frees you from evaluating whether readers would be excited to continue your work. If you want to attract more readers, keep a few parameters before creating the introduction section It is a strong recommendation for the serious writers to take help from AI Content Detector Tools which are much efficient to secure your website ranking factor. You have a choice to check the best solution on Originality.AI in this regard.
1. Understand Your Readers
To present a valid assignment to your audience, you must use audience-centric language rather than writer-centric. Ask yourself what the audience needs to understand from your writing. Are your audience expected to have an emotional reply to your writing? What do you need the audience to act, think, or feel about it? No matter how well-educated, we all bear the challenge of getting into someone’s shoes. Audience information is one of the keys to efficient completion.
2. Think About The Good Ideas
The thesis statement is your essay’s most significant sentence. So you’ve got to work over and over to get it accurate. Get assured you explain the research question acutely while writing your thesis statement. In the sentence of the thesis statement, your point of view should be clear. Avoid a lengthy, wordy, and complex statement of the thesis.
3. Avoid Explanation
Don’t try to explain anything to make your argument in the introduction section. You should drop the information part to the principal body. Just mention the primary points of the argument you plan to make later in the assignment. This point is important while searching for how to write an assignment introduction, as the introduction must be written in brief only.
4. Volume Matters
There is no doubt that the duration of the introduction depends on the subject, the format of the assignment, and the research work. However, it will be written in one paragraph.
Remember that your introductory section should be more or less half a page long so that the audience can finish it one day. The introduction should be one-tenth of the entire assignment.
- The introduction must be 200-250 words when writing a 2000 words assignment.
- The introduction must be 350-400 words when writing a 3000 words assignment.
5. Don’t Act In The Dark
None of this comes as a surprise in academic writing. Academic writing is unlike writing fiction, where you can keep the audience in suspense. The entire assignment should be outlined in the introduction in academic literature, followed by a description in the central body. The following points will comprise an overview,
a. Related background data
b. A Map of Essay
c. A Sentence of Thesis
d. Your opinion.
Note: This is the rule for writing an introduction in the assignment. But there is no fast and robust rule for introduction writing. You need to be careful about the criteria you need to fulfill. Nevertheless, the above suggestions certainly will enable you to write a useful introduction.
6 Tips For How To Write An Assignment Introduction?
These are the following tips and tricks to write assignment introduction.

Tip 1:- Try to Find A Good Idea To Write An Assignments
Your whole assignment should often be based on the assignment question’s answer, and the introduction is the first step of your assignment. Your direct response to your question on the assignment is your idea statement that should be involved in your introduction. Your assignment problem often starts with a large view and narrows down to some topic field. You should follow assignmentguru.com for an identical pattern while writing the introduction. Begin with a broad picture to attract readers, then give the readers particular information to engage in more reading.
Tip 2:- Choose Specific And General Perspectives
Remember, the subject needs an effective ‘big opening.’ For instance, an opening sentence that explains, ‘Human beings are capable of learning more than any other entity on earth’ would not be appropriate for the subject of ‘work and study.’ In another instance, the opening statement does not provide a world perspective in an assignment focusing on the city or state. So when you think about how to write an assignment introduction, you must take care of the opening statement as the success of the assignment introduction depends on it.
Tip 3:- Try To Write Assignment Introduction At The Beginning
The best method to write assignment introduction is to write it at the beginning. The explanation for this is very clear when you write the introduction, you may have an indefinite view of the key points of the argument. Yet when you finish the material, you have good ideas about what you’ve written in your writing so far. When you follow all the rules, first write all of your proof and, finally, the introduction. Please ensure that your facts, conclusion, and introduction represent the claim you plan to bring forward.
Tip 4:- Use Creativity As An Opportunity
Don’t be scared to make and alter an experimental introduction in the first as you proceed with the subject. Writing an introduction is often the most challenging for any student since this is the first thing readers can search for. All you should do is write a normal introduction to get the work started. Complete the task, return to the introduction section again, and thoroughly review it. If rewriting is required, do not hesitate to do so.
Tip 5:- Give Earlier Attention To All Sentences
You may start with a quotation, short story, analogy, or even subject-related statistics. Create a strong impression on the audience by making that relevant information accessible. This is the point of thinking outside the box and using new skills. The reader won’t want to read the truth they already know. Uniquely, you need to find specific ways of expressing details or opinions. The students who want to know how to write an assignment introduction are searching for a unique way and methods to write it.
Tip 6:- Be Optimistic
Avoid phrases like “I will address about- in this article. Such sentences are of no concern to the reader’s mind. First of all, you need to leap in confidence in your story. Readers will find it hard to connect when you don’t believe in your content. So be sure of what you’re writing; only the readers will be involved in more reading.
- The purpose and objectives of your assignment .
- Why this assignment task is valuable?
- The scope of the assignment or what the assignment covers.
- A brief description of the organization of the assignment content.
All the above strategies help you in writing an effective and engaging introduction.
What Are The Most Common Strategies To Write Assignment Introduction?
These are the following most common strategies for writing assignment introductions.
- Start with a board idea about the topic. After that, narrow down the discussion to the area you focus on in your assignment. We also need to explain why this assignment is useful and important.
- Then briefly discuss the tasks to be tackled, which usually includes the objectives and purpose of an assignment.
- Finally, give the reader a brief preview of your homework, which you will include in subsequent sections.
What Are The Elements Important To Write Assignment Introduction?
Here the following elements are crucial to write an assignment introduction.
- The first and foremost most important element to writing the school or college assignment is the brief background of the study.
- Apart from this, you need to add the context of your assignment in the introduction.
- Also, the other major elements to writing an assignment introduction are adding the contention, major points to study, the definition of the topic, why you are writing on this topic only, giving an outline, etc.
Assignment Introduction Examples
These are the following assignment introduction examples;

Quick links
- How To Attach Assignment In Google Classroom
- How To Make An Assignment On MS Word With Easy Steps
Conclusion (Write Assignment Introduction)
From the above discussion, now you get the answer to your question, “how to write an assignment introduction.” All the above strategies and points help you in improving your writing. We hope that you find this information useful. Happy learning, and best of luck with your assignment.
If you need any help regarding your assignments, then you can contact CallTutors.
Frequently Asked Questions
What do you say in a quick introduction.
The personal introductions should include the name, expected graduation date, major career goals, experience in projects, internship, co-op, etc.
How To Start An Assignment Introduction?
Follow these steps to start a good assignment introduction :
1. Define the main purpose of writing 2. Discuss the problems and try to solve them 3. What will be the tone and style of writing?
How Long Should An Assignment Introduction Be?
The introduction for the assignment should be three to five sentences long or 50-80 words.
Similar Articles

13 Best Tips To Write An Assignment
Whenever the new semester starts, you will get a lot of assignment writing tasks. Now you enter the new academic…

How To Do Homework Fast – 11 Tips To Do Homework Fast
Homework is one of the most important parts that have to be done by students. It has been around for…
Leave a Comment Cancel Reply
Your email address will not be published. Required fields are marked *
This site uses Akismet to reduce spam. Learn how your comment data is processed .
Project Proposal
In this course, you will do research and write a report documenting your work and proposing your future work. At a high level, successful research this quarter should propose a research question and plan a methodology for answering that question . The exact progress you make on the execution of your research will depend on your prior knowledge and experience with the project, but the goal of this project is to help you write and think about the work that you are doing (or will do).
For information on how the project will be evaluated, see the individual rubrics under each assignment and the logistics page.
Here is a rough sense of the timeline from here on out (every week you will update your weekly log as you make progress on the below written assignments):
- Week 3: Research Milestone Plan and Related Work (Parts 1-3) due
- Week 4: Related Work (Part 4) due
- Week 5: Introduction due
- Week 8: Proposed Solution and Evaluation plan due
- Week 9: Draft proposal, Draft presentation due
- Week 10: Research Mentor Formal Feedback due
- Finals week: Final presentation, Final proposal, and milestone due
Set up Overleaf
Many CS research folks use Overleaf (shared editing à la Google Docs for LaTeX) because it is a useful platform for writing papers collaboratively. Stanford has an institutional subscription to Overleaf. Here's a tutorial to the LaTeX typesetting language, and here's a tutorial to using BibTeX with LaTeX to handle format citations via the \cite{} command. Finally, here's an official Stanford library resource for using Overleaf. We strongly suggest that you use Overleaf to write up all written assignments, as it will be way easier to copy over your work into your final paper (which will require Overleaf).
We provide an assignment template for each assignment that you complete on Overleaf.
- To import templates into a new Overleaf project, download the template below (do not open/extract these files). Then, on the Overleaf website (register with your stanford.edu account), go to "New Project" -> "Upload Project" and upload your downloaded zip file. Overleaf will then automatically extract this zip and create a new Overleaf project.
- To export a project from Overleaf, click the Download icon next to the Recompile button while editing a project. This generates and downloads a PDF that you can view on your local computer and upload to Canvas.
Research Milestone Plan
In order to help you focus your time doing research over the quarter, you and your mentor will decide on a set of research goals to complete by the end of the quarter. The milestone should be doable in under 30 hours of work total (following the 3-unit courseload guidelines) and could be:
- Preliminary work for your upcoming CURIS internship
- Completing a "vector" to reduce risk for your summer project (i.e., perform some experiment to test a critical hypothesis, etc.)
- Implementing a set of baselines related to your project
During the week 2 small groups, you will discuss with Minkai potential ideas for a doable set of deliverables, then write them up here. You and your research mentor will then discuss the deliverables in your week 3 one-on-one and by the end of week 3 it should be clear to both you and your mentor what you are expected to finish by the end of the quarter as a satisfactory amount of progress. For this proposal, the format is flexible but in general should contain a bullet point for deliverable/s that:
- Describes in 1-2 sentences the deliverable and
- 1-2 sentences why the deliverable is important for your CURIS project
- an estimate for how long you think you'll need to perform this deliverable (potentially broken into subgoals, if relevant)
This proposal will be a soft contract between you, your research mentor, and the CS197C teaching staff. It is expected that you complete your stated deliverables, but we also understand that research can and does morph throughout the course of a project. We will allow revisions to this plan, on the condition that your mentor signs off on the revisions. As a final note, there is a good chance your time estimates for the deliverables will be off, and that’s okay! Estimating time to completion for research deliverables is a skill, and one that you hone best through practice. If the time it takes to complete your deliverables changes (i.e.: you thought deliverable A would take 10 hours but it ends up taking you 20, leaving you less time to complete deliverable B which will take an estimated 20 hours as well), then as mentioned before revisions can be made with appropriate sign-off by your research mentors.
Submission and Grading
Please submit both a pdf containing your research milestone proposal and a URL to the web-hosted document containing your proposal . You can use whatever word processor you’d like, but we’d recommend using either overleaf or google docs, depending on yours and your mentor’s preferences.
This milestone proposal will be graded based on completeness: description of deliverables, why they are important for your project, and a time estimate for completing the deliverables.
- Related Work
Doing research means making a novel contribution. Novelty, as we discussed in class, is a litmus test for a research idea: a novel idea is new to the academic literature. To be able to argue for novelty, you need to know what ideas exist in the space. Then, you can articulate a bit flip relative to that prior work to motivate your own project. The point of a Related Works section is not to summarize past work, but to show readers how your work is novel in comparison.
This assignment takes your paper-reading skills from Assignment 1 and puts them to good use. You'll be doing targeted reading of a number of papers in order to synthesize the state of the literature and articulate your bit flip. The result will be a Related Work section that you can eventually adapt for your final paper.
Download Overleaf template : Assignment 2: Related Work . Make sure to upload the .zip file to Overleaf directly and not unzip it beforehand!
Proposed Timeline
You have 2 weeks to do this assignment, but a literature search takes time–both to read papers and to connect big ideas. In the first week, we suggest you set up Overleaf and read/skim/understand about 10 pieces of related work (i.e., Part 1 and part of Part 2 below). Put references into the Overleaf document (.bib file). Then, read/skim another 5 related pieces of work and make your affinity mapping.
In the second week, complete Part 4 to write your Related Work section.
Part 1: Read your nearest neighbor paper
Read the nearest neighbor paper (in-depth). Your research mentor has provided you with several papers for your project. Pick the nearest neighbor paper, which is the most adjacent piece of literature to the idea that you are pursuing. It's important that you understand it well. This might be the same paper you read for assignment 1, or it might be another related paper.
Read the nearest neighbor paper, and be able to state in your own words how your project is expanding on, or differing from, the nearest neighbor paper — and why that difference is an important one for researchers to pursue. It might be helpful to do a brief outline for the paper like you did in Assignment 1 .
Skim the nearest neighbor's related work. Next, pull out the five most relevant pieces of related work cited in that nearest neighbor paper. This can be a mix of foundational work that is less adjacent to your project but sets the stage, and incremental work that is highly adjacent to the work you want to do. Skim each of these papers. You’re not necessarily reading them for every detail; you’re trying to understand how they’re situated relative to the work you want to do. Based on the outline structure for reading papers as in Assignment 1 , if you can understand the Problem, the Assumption, and the Insight, you probably have it covered. A good way to skim papers is to read the abstract and introduction closesly, as well as to look at the figures.
Part 2: Expand your literature search
From here, follow citations in the papers you found, or in the nearest neighbor paper, to build out the local neighborhood. You can also look through additional papers listed in your project.
Use strategies that we discussed in class:
- Tracking the influential citations in the papers that you're reading
- Using Google Scholar's "Cited By" to find more recent papers that cited the one you're looking at
- Using Google Scholar's "Related articles" to find papers on similar topics, or searching for key keywords and phrases you've uncovered from the papers
- Using Semantic Scholar's "Highly Influenced" classification to find papers that draw heavily on the one you're looking at
- Skimming to understand each paper's high-level takeaways from the abstract, introduction, and related work sections.
To make your later writing easier, you may want to collect the BibTeX metadata for these papers into a shared Mendeley / Zotero library, or into a shared .bib file in Overleaf. You can typically find the BibTeX through a couple clicks on Google Scholar and on other sites that host papers.
You should get to the point that adding an additional paper is only telling you incrementally more information than you’ve already roughly assimilated. Most likely, you'll start hitting that asymptote after about fifteen papers: often, after this, the ideas will either be more of the same, or will start becoming more distant from your project. You may want to split up papers and tackle each a set of papers by topic.
Part 3: Perform an Affinity Mapping
At this point, you have all the raw materials that you need to write a Related Work section of a paper. In addition to being a useful exercise at this point in the project, you will be able to keep what you write for this assignment and adapt it for use in your final paper.
As a first step, perform an affinity mapping of the papers you've collected.
- Grab some large post-it notes, write each paper on a post-it note, then start placing the post-it notes on a large surface like a wall so that related papers are near each other.
- Once everything is up on the wall, take a second pass to re-organize, combine and split groups, looking for shared assumptions or approaches, until you have made sense of the related work.
- You can use Google Jamboard to create digital post-its.
Submission and Grading.
Submit a screenshot or photo of your affinity mapping on Canvas. Your affinity mapping is graded on completion; however, your grade for the next part will depend on the quality of your affinity mapping.
Part 4: Write the Related Work Section
Next, use this affinity mapping to organize your Related Work section.
- Each cluster, typically covering 5 ± 2 papers, should become one paragraph.
- In each paragraph, your goal is to summarize what the literature knows about the topic.
- Order the paragraphs so that they build on each other, typically starting with the high-level motivation of the area, then exploring different approaches or assumptions that have been taken with one paragraph each. You may use a subheading for each paragraph (the \subsection{} LaTeX command) if it's helpful.
- At the end of each paragraph, write your bit flip for that group of papers. What assumption did all of the literature in this section make, and how is your research going to flip the bit flip behind that assumption? You should lay out the bit that's being flipped as a summary of the work in this section, then articulate the flip itself.
If you're unsure exactly what the goal of your current project is (e.g., you're doing mainly exploratory work right now), ask your mentor what they suggest as a novel direction for the purposes of this assignment, and mention it to course staff in your small group meetings.
(1) In summary, researchers have pushed for formal validation as a solution to runtime errors in foobars. (2) This error checking typically involves a formal specification of expected behavior, and the use of a computational logic prover to establish the validity of the asserted behavior. (3) Instead of formal error checking proofs, which are often intractable for non-trivial programs, this research demonstrates that running multiple independent foobars in parallel, and then comparing their outputs, allows a system to catch errors with very high probability and far less programmer effort. (4) While formal proofs are still desirable for mission-critical systems, we argue that this approach scales to far more complex software where formal proofs are not currently feasible.
As a starting point, some genres of bit flip argument include "people have done this style of work with an existing method X before, but method X has drawbacks; our new method Y is better because Z", "everyone else's problem setup was slightly different, and our problem setup requires changing the solution entirely", and "similar solutions have been applied in other areas, but not to ours, and require an adaptation to solve our problem".
Finally, instead of a sentence or two at the end of each paragraph, another format for the bit flip is an entire paragraph at the end of the Related Works section, such as in this paper (pages 2 & 3). The first few paragraphs of each subsection survey the related work in a narrative way, and the last paragraph articulates the bit flip. You are welcome to do either format for your assignment, but we recommend having a mini bit-flip at the end of each paragraph, as it's often easier to articulate how your project differs from a smaller subsect of other research that all share a common thread.
Writing Heuristics
Apply the following writing heuristics when writing your Related Work section:
- Stylistic tip (optional): Avoid line breaks at the beginning of the citation by adding a tilde to the \cite{} command (e.g., This is a sentence~\cite{} ).
- The citations should be annotations, not proper nouns, in the sentence. In other words, you should be able to remove the citation from the sentence and it should still be readable. Avoid "[5] demonstrated that foobars can be optimized"; instead, "Foobars can be optimized [5]." In addition, it's often counternorm in computer science to name authors, except in CS theory papers. Instead of "Bernstein et al. demonstrated that foobars can be optimized", again focus on reporting the main claim and substantiate it with the citation instead: "Foobars can be optimized [5]."
- Avoid "various" phrases like "There are various approaches to optimizing foobars [1,2,3,4]." This is an empty calorie sentence that doesn't tell the reader anything. Instead, be slightly more detailed in your summary: "Optimizing foobars requires eating large volumes of tasty instant ramen [1, 3] or pulling all nighters [2, 4]."
- Your goal is not to bash the related work. It's to summarize (and even celebrate) what's been done, and then articulate how your work extends and differs from it. Keep in mind that, when you submit a paper for peer review, the people you're citing are likely going to be reviewing your paper! So keep the conversation productive.
Your Related Work section should target 600-700 words and have at least 15 citations (But citations doesn't means you have to discuss details about all of them).
Submit a PDF of your Overleaf Related Work project on Canvas.
Your related work will be graded on the following rubric:
- Completeness: does the related work cover all the most relevant ideas in the literature?
- Synthesis: does the related work combine the work and describe it in a narrative, rather than a paragraph-long list of each paper?
- Bit flip: does the bit flip successfully articulate the assumption in the related work, and this project's bit flip from that assumption?
- Clarity: is the writing overall clear and easy to follow for a technical expert in the field?
- Introduction
Now that you understand the literature and the bit flip that you're making, it's time to write up a project proposal in the form of an Introduction section for a paper. As researchers, we often write up a paper introduction like this as we embark on the project as a check that we can explain a clear vision of the project. If we can't explain the project clearly in writing, then we don't understand the project and its contribution well enough to move forward!
The result of this assignment will be an Introduction section that you can eventually adapt for your final proposal. Think of this Introduction as also serving the role of a project plan for this quarter and the summer, if applicable.
Download Overleaf template : Assignment 3: Introduction
Part 1: Outline your introduction
While there are many approaches to write an introduction, in Computer Science most of these approaches need to explain two things: What is the problem, and How are you solving it?
Michael Bernstein, an HCI faculty member in our department, tends to follow the following paragraph-by-paragraph outline for an Introduction (many of Minkai's papers follow a similar format):
Problem: What's the problem you're solving? Cite other work that helps motivate the problem. Make the reader feel the urgency of the problem, so that by the end of the paragraph they care a lot that someone finds a solution. Example topic sentence :
We all want to build IoT applications that are responsive to our behaviors — for example, coffee machines that make coffee for us after we wake up, or phones that know not to ring while we're in meetings — but we lack the data to endow our algorithms with this information about our patterns and behaviors.
Set up the bit: This paragraph usually answers the question, "Why isn't this problem solved yet?" by setting up the bit that you're going to flip. The topic sentence typically summarizes existing approaches to solving the problem by articulating the bit that they share, and points out why those approaches and the bit more broadly hasn't been able to solve the problem. So, it's a brief summary of the most important related work — but it's a summary, not a survey, meaning that its goal is to set up the bit, not to cover everything. Example topic sentence:
Existing solutions to this problem require manually authored rules (e.g., coffee is a morning drink, we drink morning drinks after we wake up), but the required manual effort results in incomplete data about human situations and behaviors.
Flip the bit: Here you introduce your insight by flipping the bit. The topic sentence of this paragraph is the thesis statement for the entire paper. It should lay out the big idea that you'll be pursuing. Spend this paragraph explaining your insight clearly, why it flips the bit that you set up, and what the implications of flipping that bit will be for the problem at hand. For the purposes of this assignment, it's fine to assume that your bit flip will work out — we all know that research is iterative and projects will evolve. Example topic sentence:
In this paper, we suggest that data mining a large dataset of modern fiction offers a promising alternative to manual annotation.
Instantiate that bit flip in a solution: At this point, the reader understands the idea that you're proposing, but it's still very high level. In this paragraph, map that idea onto a concrete instantiation. This is where you introduce the system you've built, the model you're creating, the study design, or whatever is the main artifact of your research, and how it instantiates that insight. Example topic sentence:
We introduce Augur, a knowledge base that relates human activities and the objects around them by mining 1.8 billion words of modern fiction from the online writing community Wattpad into a vector space model for predicting human activities.
Evaluate the solution: We haven't discussed evaluation yet in the class, but a good introduction summarizes the evaluation that you performed to demonstrate that flipping the bit has the effects that you suspect. For the purposes of this assignment, ask yourself: how would you prove to a critical reader that flipping the bit has the effect you promised in solving the problem? We expect you to articulate what you will be manipulating and measuring, but we don't require any actual results right now and we won't hold you to this evaluation strategy — especially since sometimes your evaluation strategy evolves as your project evolves.
Example topic sentence: To evaluate Augur's ability to predict human behaviors, we first compared Augur's predictions to human estimates of behaviors given the same inputs, and second performed a field deployment to test Augur's precision and recall in a realistic application.
Implications: If you're right about this bit flip being the right way for the field to go, what implications will there be for the field? Don't overplay your hand here by stating that all of computing will shift, but do be clear and forceful in pushing the case as hard as you feel that the case warrants.
Example topic sentence: This work demonstrates that fiction can provide deep insight into the minutiae of human behavior, and that modern NLP algorithms can structure those minutiae into useful hooks for IoT applications.
This outline will depend a bit on the kind of paper you're writing. For example, start by answering: are you an old problem / new solution paper, or a new problem / old solution paper? Old problem / new solution papers already have a warrant for the problem, so that part of the Introduction is easy, but they need to argue for the solution very carefully since there's no warrant there. Similarly, new problem / old solution papers need to be extra careful to argue the problem persuasively, but they can draw on existing warrants for the solution and only argue for how they're adapting it to the problem.
Start by creating the outline for your Introduction, using only the topic sentences that you will eventually expand into paragraphs. This is harder than it sounds! It means that you only have those six sentences to tell the entire story of your paper. So, you can't add any unnecessary detail or extra concepts, or those six sentences won't be possible for a reader to understand. Just like a pro swimmer makes no unnecessary motions as they focus all energy on executing a stroke, and just like a pro chess player makes no unnecessary moves as they focus their actions on enacting their strategy, your topic-sentence outline should introduce no unnecessary concepts or ideas as it focuses on explaining the project.
We highly suggest getting feedback from Minkai or Brando on your outline before moving forward.
Part 2: From Outline to Introduction
Now, to write the Introduction section itself! Each topic sentence becomes the anchor of a paragraph in your Introduction, and the rest of each paragraph should set out to prove the point made by that topic sentence. If you need to split a paragraph into multiple paragraphs to be clearer, do so — but keep the rough proportions of those original six paragraphs. (In other words, don't spend three paragraphs on the problem, then rush through everything else.)
Don't forget to cite any work you're referencing that motivates your problem, sets up the bit, or helps explain why the flip is a good idea.
Here are example introduction sections for different research fields, selected by previous CS197 CAs. Bear in mind that these papers will stray from the outline format above—which is fine, experienced writers play with the format—but we still feel that they represent strong examples of Introduction sections.
- AI: https://openreview.net/forum?id=Hyl5V0EYvB
- Systems: https://www.usenix.org/system/files/conference/atc18/atc18-yan-francis.pdf
- System: https://dl.acm.org/authorize?N658026
- Study: https://dl.acm.org/citation.cfm?id=2557052
Your Introduction should be 700-900 words. Include a References section with citations at the bottom; references are not included in the word count.
Submit a PDF with (1) your outline, and (2) your Introduction on Canvas. Your introduction will be graded on the following rubric:
- Outline: does your outline read as a clear and complete explanation of the project? (5pt)
- Problem and bit: does the set up of the project make sense and prepare the reader for the bit that will later be flipped? (5pt)
- Bit flip and description: does the bit flip follow through on the bit that was set up, and does the system description make clear how that bit flip gets instantiated in a system? (5pt)
- Clarity: is the writing overall clear and easy to follow for a technical expert in the field? (5pt)
Proposed Solution and Evaluation Plan
This assignment will center around articulating the details of your project. There are two parts: a proposed solution section and an evaluation plan.
Download Overleaf template : Assignment 4: Proposed Solution and Evaluation Plan
You have 1 week to do this assignment; compared to the previous assignments, we anticipate that Part 1 (which involves multi-paragraph writing) will take longer than Part 2. In the first part of this week, we suggest you write as many ideas down as possible for both sections; in the second part of this week, take more time to make your Part 1 cohesive and complete, finish up Part 2, and then return to Part 1 to address any missing details.
Part 1: Write Your Proposed Solution
At this point, you have written about your project idea in 1-2 paragraphs in your Introduction, but you have likely omitted many of the finer details. Many papers include this as a "Section 3" to their work (after Introduction and Related Work, usually a "Methods" section), and you will eventually do the same for your final proposal. However, all of you are at different points in your projects: some of you are already evaluating solutions, while others of you have just found your idea for the summer. The goal of you writing this section is therefore to describe the high-level and low-level details that a reader would need to understand your Evaluation Plan (Part 2 of this assignment). In particular, it is an opportunity to give further information about the thesis you write at the top of your Evaluation Plan. Think of it as a mini approach section so that a future researcher (or a future you) could understand and begin implementing/evaluating what you described. We expect that you will have about 400-600 words for this part, though feel free to write more as is necessary.
The exact content and structure of this section will vary based on the type of contribution you are making, as well as your project field. Note that the similarly scoped papers linked below go into much more detail than what is expected of you at this point, but you can refer to them to get a sense of what you need to describe.
- ML: Attention Is All You Need , Sections 3 and 4
- Supporting Visual Artists in Programming through Direct Inspection and Control of Program Execution , first 3 paragraphs of System Description, stopping at Numerical Inspection
- Comparing existing models/systems: Describe the models/systems. Pay particular detail to explain aspects that you will be evaluating in the next section.
- ML: ImageNet Large Scale Visual Recognition Challenge , Section 3
- ML: BLEU: A Method for Automatic Evaluation of Machine Translation
- Systems: Confused, Timid, and Unstable: Picking a Video Streaming Rate is Hard
It is okay if you find yourself largely summarizing prior work, but you should use your own words. Be clear about what is existing work (prior to you joining the project) and what you are adding/plan to add. If you are unclear on particular specifics of your proposed solution, ask your mentor to clarify where possible. We will also try our best to give feedback early in time for your next assignment. We encourage you to include your own figures or figures from previous work (with citation) as needed to explain your proposed solution! Figures are a great way to visually communicate a proposed system or idea. Use the \includegraphics{} command in LaTex to add one.
Part 2: Write Your Evaluation Plan
To convince people that your idea is correct, you'll need some way to convince an expert that you have evaluated it fairly and correctly. In this part of the assignment, you will develop an evaluation plan for your research project. Unlike Part 1, you will not be writing a multi-paragraph section. Instead, complete the three subparts and include as much detail as you are aware of so that you or another researcher could carry out your evaluation plan.
Part 2(a): Articulate your Thesis
As we discussed in class, the first step in planning an evaluation is to articulate the main thesis of your work. (Remember from Assignment 3, Project Introduction, that the main thesis of the work is likely embedded in the topic sentence of your bit flip paragraph.) Go back and reflect on that statement — tweak it if necessary based on what you've learned from your project so far.
Write out your thesis at the top of your submission.
Part 2(b): Derive Your Claim
We discussed in lecture how theses imply a claim. For example, "x > y"-type ("X is better than Y") theses imply a claim that x is in fact better/faster/more performant/more enjoyable than y, and "∃ x"-type ("there exists an X") theses imply a claim that whereas x could not exist before, that it does with your system. Discuss with your team the claim implied by your thesis.
Write down your claim.
Part 2(c): Design Your Evaluation
Now, you need to work from your claim to design a specific evaluation plan. How do you prove what you have claimed? This evaluation plan typically specifies:
- Dependent Variable (DV): what is your dependent variable? (This is the variable you measure as the outcome, such as accuracy on a test set.)
- Independent Variable (IV): what is your independent variable? (This is the variable you manipulate for comparison to create conditions, such as the algorithm or the interface used.)
- Task: what is the specific task that is being performed in order to measure the DV? (This might include executing a benchmark, a known ML classification task, or a specific sequence of behaviors that a user must perform.)
- Threats: what are the factors that might influence your outcome? For example, in what situations might your result hold or not hold? What biases might creep in that you need to make sure to account for?
You don't need to re-invent the wheel here. Often your nearest neighbor paper or other papers in your related work establish an evaluation paradigm that you can import to your paper. In fact, this is often preferred, since then you don't need to convince a reader that your approach is valid, since it's already in the literature. So, go review the evaluations used in your prior work and use those to develop a few possible models. Then, share those models with your team and work together to develop a variant that works well for your project.
Based on your project's setup, your model might look slightly different than what is laid out above. If you believe this to be the case, talk to us about it.
Next, run the following unit test on your proposed design: does it directly test the thesis you articulated above? Imagine a few possible outcomes from your evaluation. Depending on how it comes out, does it directly prove or disprove your thesis, or only obliquely shed light on whether your thesis is correct?
Write out the DV, IV, Task and Threats for your evaluation design. Summarize your explanation of why that design directly tests your thesis.
Submit a single PDF with (1) your Proposed Solution section (500-700 words or longer), and (2) the three sub-parts of your Evaluation Plan. Your work will be graded on the following rubric:
- Proposed Solution Description: Does the writeup clearly and correctly describe the proposed solution to an expert in the area?
- Proposed Solution Clarity: Is the writing overall clear and easy to follow for a technical expert in the field?
- Thesis and Claim: is the thesis a correct articulation of the project, and does your claim derive from the thesis?
- Evaluation design: does the design of the evaluation correctly evaluate the thesis and follow through on the claim?
- Questions: did you submit 2 potential questions for the panelists?
Draft Proposal
This assignment compiles together the parts you completed from previous weeks. You will also include a timeline for the rest of the quarter and for the summer, if applicable. Finally, you will have 1 week (until Tues, June 6 at 4:00pm) to peer review and give feedback on one of your classmates' submissions.
It is okay if your project has changed in scope since the beginning of the quarter, meaning that your older introduction/related work is inconsistent with your current project. The goal of this proposal really is to help you understand the scope of your project and your contributions so that you are ready for the summer.
If your project has changed significantly , we are expecting the following:
- Rewrite the bit flip and solution instantiation paragraphs in the introduction to fit your new project, prefixed with (\textbf{ changed })
- Rewrite portions of the proposed solution section as needed.
- Write the evaluation plan with respect to your new project.
- Write the implementation timeline or reflection (Part 2) with respect to your new project. If you are doing research over the summer, write an implementation timeline. If you did research this quarter and plan to stop over the summer, write a reflection on the work you've accomplished.
Download Overleaf template : Assignment 5: Draft Proposal
You will receive peer review feedback on your small group partner from your small group partner. Note that this draft is due in Week 9, whereas both the final in-class presentation and the final proposal are due finals week. Therefore, aim to have this draft be close to your final proposal in terms of structure and content. Part 1 of this assignment is writing-heavy and we will focus our feedback there; Part 2 is mainly for your own project planning or reflection purposes.
Part 1: Compile and revise prior submissions
Change the title of the document to your actual proposal title (instead of "Assignment 5: Draft Proposal").
Your Proposal will have several sections, in order:
- Proposed Solution
- Evaluation Plan
- Implementation Timeline or Reflection (new)
The first four sections are edited versions of what you submitted for previous assignments. Revise these four sections and compile them into the same Overleaf document. We will release feedback on your Introduction and RW by Saturday 5/25 EOD -- be sure to incorporate the feedback that the CS197 staff have specifically highlighted for these sections. Note that the first three sections should be cohesive paragraphs of content; the Evaluation Plan outline follows the guidelines of the previous assignment.
Note that if your project has changed significantly, we are expecting that you rewrite parts of some sections (see this assignment's overview for specifics) to fit your new project. You can rewrite more if you feel it will be useful for you to refer back to during the summer, but the above is what we'll be looking for.
Part 2: Brainstorm an implementation timeline OR reflection on this quarter
If you will be doing research over the summer:
Make a timeline (in as much detail as possible) for completing the work through the 10 weeks of the summer quarter. Unlike the Evaluation Plan in the previous assignment, this part is primarily for your own project planning purposes. Put another way, imagine that a reader who wants to do your research (i.e., you) will read through the previous sections of your proposal to understand the technical overview of the project. The reader, who has 10 weeks to work on this project, will then read this section to orient themselves to the current speed and direction of the project.
As mentioned in our vectoring and velocity lectures, it is very likely that you will deviate from this timeline and list of tasks! Nevertheless, it is worthwhile mapping out both the creative vectors and engineering vectors that you currently believe will need to happen. Also include estimates of how long it will take you to flesh out different aspects of your project. That way, you can return to this timeline throughout the summer and revise what aspects are important/not so important so that you can get where you want to be at the end of CURIS.
- While the CURIS program is officially 10 weeks long (Monday June 20 to Friday August 26), the Spring quarter ends Wednesday, June 8. Check with your mentor if you will be responsible for research during the two week gap between Spring quarter and Summer CURIS, and plan accordingly.
- Also check on your mentor's availability both in the two weeks before CURIS and throughout CURIS. If they are taking time off, note this in your timeline and plan accordingly.
- You will submit and present a poster at the end of the CURIS program (and again at the start of Autumn), meaning that the last week of your program may be preoccupied with poster prep.
- Periodic check-ins on velocity/re-vectoring: Plan multiple check-ins for you to assess your current velocity and re-adjust your next set of vectors. This could be every 2-3 weeks, or (less ideal) halfway through the program. Project presentation meetings (e.g., to your faculty advisor or a research group) are a good way to (1) motivate yourself and (2) receive valuable suggestions for next directions; include these into your timeline if you and your mentor have already worked out a schedule. Otherwise, write in check-in times for at least you and your mentor to periodically revisit the goals of the project.
A bulleted list or table is preferred for this section, though feel free to flesh out details in paragraphs as needed.
If you did research this quarter and will not be continuing over the summer:
Write a brief (200-300 word) reflection of how your time on research has gone so far this quarter. Some things to consider:
- How did your understanding of research change because of this experience? What did you learn, and how did you grow?
- What went well? What were you proud of?
- What would you change?
- How did this class compliment (or not) your research?
- What do you hope to accomplish by the end of the quarter?
- Do you see a future for yourself in research?
Submit a PDF with all five sections of your proposal. Your draft proposal will be traded with another individual for peer review after the deadline; this will most often be your small group partner, though it may not be. We, the staff, will also send feedback on this draft.
After the deadline, please submit your draft proposal to your research mentor for feedback -- we recommend going over the draft with your mentor during your weekly meeting and taking detailed notes on their feedback. Please submit your research mentor's feedback on Canvas by Tues, June 6th. You are expected to incorporate this feedback in the final proposal, due Sunday June 9, 11:00pm.
Your draft proposal will be graded on the following rubric:
- Completeness: does your draft proposal have reasonable content coverage for each of the sections of the outline?
- Feedback: does your draft proposal incorporate prior comments and feedback for the Introduction, Related Work sections?
- Timeline: is your timeline detailed and realistic to achieve in 10 weeks? Does your timeline account for re-vectoring/periodic check-ins on your current velocity?
- or Reflection: does your reflection demonstrate introspection?
Draft Presentation
You will give a practice presentation (5 min) of your proposal in your 30-min staff meeting. Please see below for presentation tips and format.
How to give good talks
As the first part of the assignment, please read through these slides on "Tips for Giving Clear Talks" by CS faculty Kayvon Fatahalian. Keep the suggestions in mind while designing your own talk; you will be graded on if you implement the tips. (E.g., one simple suggestion that everyone should follow, unless you have a strong reason not to, is having section headings.)
The timing means you won't be able to cover every detail of your project. The goal of your talk is to tell your audience what you have achieved this quarter . Think about what you really want to communicate. It likely draws heavily from your introduction and bit flip:
- What's the problem, briefly, and why does it matter?
- Why hasn't prior work been able to address the problem? Set up the bit.
- What's your big idea? Flip the bit.
- Explain enough technical detail for the listener to understand what you have done or plan to do.
- Conclude by zooming out to the potential impacts of your thesis---say, if you had 1--2 years to flesh out your idea.
Assume that the audience for your talk is a researcher in your broad area (e.g., HCI, systems, AI, security, etc.). So, you don't need to re-introduce the whole field of HCI. A sentence or two to situate your work in the field is good, but spend the rest of the time telling us what you did.
Submit your draft presentation slides (a link and a static PDF copy) on Canvas by 4pm on Thursday, June 6. In addition, please submit your research mentor feedback on your draft proposal as a PDF on Cavnas.
Your practice presentation will be graded on the following rubric:
- Structure: did the presentation organize its question, thesis, and evidence effectively?
- Clarity: did the presentation convey the details in a way that a general expert in the field could follow? Did you use tips from the "Tips for Giving Clear Talks" slides?
- Timeliness: did the presentation organize its time well, and stick to the 5-minute limit?
Research Mentor Feedback
Please go over your draft proposal with your research mentor at your weekly meeting and obtain their feedback. Please submit their feedback on each section of your draft proposal:
- Proposed solution
- Timeline (if applicable): is the timeline detailed and realistic to achieve in 10 weeks?
If your research mentor thinks a section looks good (no changes needed), you can write "LGTM" for that section.
Note: You are expected to incorporate this feedback in the final proposal (due Sunday June 9, 11:00pm).
Submit a PDF of feedback from your research mentor on Canvas. Please list the feedback you obtained for each of the sections above. This assignment will be graded on completion.
Final Presentation
Our final presentations will be on Friday June 7th 7:00-10:00pm, at STLC 115.. You are highly expected to be in attendance the whole time. If you cannot make it with a hard conflict, you may altenatively submit a video record. Each student will present for 5 minutes followed by 2 minutes of Q&A.
Presentation Format
Talks and presentations are one of the main mechanisms through which researchers communicate their ideas. As part of your final project, you'll be giving a talk on your research.
You have 5 minutes to present your research to the rest of the class, the staff, and the research mentors. To ensure a smooth flow between projects, we will be running everything off a shared Google Slides deck. So, create your slides using Google Slides, and insert them after the title card of your name. We will run the presentation in presenter mode, so you'll be able to see any presenter notes you leave.
- Google Slides deck
This presentation is worth a substantial amount of your grade, so it's worth practicing it. At 5 minutes long, you can practice it a half dozen times in an hour. It's also short enough that you might consider writing out what you want to say long-hand, make sure you convey information efficiently and effectively. Practice it enough times so that you have it basically memorized, but not so memorized that you get flustered if you skip a word or someone asks a question, or that it sounds robotic when you deliver it.
Finally, to encourage supporting your classmates, we will be giving participation points for asking questions. Please ask at least one question to another student during the final.
Submit your slides to the Google Slides deck before Sunday June 9, 11:00pm. Make sure your media sharing permissions are correct, especially if you include video. In addition, submit a PDF static copy of your slides on Canvas by Sunday June 9, 11:00pm.
Your presentation will be graded on the following rubric:
- Timeliness: did the presentation organize its time well, and stick to the 6-minute limit?
- Q&A: Did the student successfully address audience questions? Did the student ask at least one audience question to someone else?
Final Proposal
This is it! Finish and submit the research proposal that you've been working on this quarter. You have all the tools; now it's about finishing what you started. As a reminder, when you're done, this is a document for you. Feel free to share it with your mentors or refer to it when you are working on your CURIS project.
No Overleaf template : Build on your Draft Proposal project.
Integrate feedback
You probably don't have too many new discoveries since your draft proposal, but you now have feedback from your peers and from your CS197 mentor. Integrate these into your final submission. This feedback will likely involve minor or major revisions to your introduction, related work, approach, or other sections.
Include a brief changelog (no more than a few paragraphs) that details the major changes you made between your draft submission and final submission.
Submit your final proposal in the format specified by your section. Total word length should be at least 1900 words and no longer than 4000 words , not including references.
Submit a PDF to Canvas containing (1) your final proposal and (2) a link to your Overleaf document (either as a separate text file or at the beginning/end of your proposal).
Your final proposal will be graded on the following rubric (it may be useful to compare these to the draft proposal):
- Introduction: Does the introduction appropriately set up and flip the bit? Is there a clear research question and idea that makes a significant addition to your research area?
- Related work: Does the paper cover major points of related work, and explain how this research extends them? Did the paper cite real conference papers with DOIs instead of ArXiv?
- Proposed Evaluation: is the proposal for testing the thesis convincing?
- Methods/Proposed Execution: (If research in the spring) : Do the methods written up convey how the technical instatition of the project solves the research question? Are they clear? (If research in the summer) : Does the timeline and proposed methodology allow for thorough exploration of the thesis?
- Clarity: is the writing overall clear and easy to follow for a technical expert in the field? Does the writing avoid passive voice and overly long or complex sentences?
Research Milestone
Congrats on finishing your milestone! Please submit: 1) the deliverables in your research milestone proposal on Canvas (e.g., code, document, images), and 2) a PDF document (README) of what parts of the milestone you completed vs. not completed. The milestone will be graded based on completion.
Return to the home page here . Adapted from previous material by Michael Bernstein. For problems with this site, contact the course staff email .
Project Management Plan: Samples, Examples & Free Template
Learn how to create a project management plan that actually works and ensures you get your project over the line on time and on budget, with samples and examples
Table of Contents
What is a project management plan, what is a project management plan used for, what are the main elements of a project plan, how to write a project management plan, sample project management plan outline, using our project management plan template to build your project plan, project management plan: faq's.
A project management plan is a comprehensive document that outlines how a project will be executed, monitored, controlled and closed. For project managers and their teams, it's the ultimate toolkit for achieving their objectives while managing day-to-day pressures such as time, cost, scope, resourcing and risk. This guide outlines what a project management plan is used for, why it's important , and offers a step-by-step guide on how to make one that actually works.
Your project plan document is where you go deep on the ins, outs, overs, and unders of your project. It's where you break this vision down into the day-to-day execution of your project, covering everything you need to do to reach your project goals.
A detailed project plan will plot out everything from timelines to budget, resourcing to deliverables, and more, giving you a blueprint of what needs to be done (and when) that you can use to guide — and assess — your project.
The key components of a project management plan are:
Project Objectives
Scope Statement
Schedule Management
Cost Management
Resource Management
Communication Plan
Stakeholder Management
Procurement Management
Closure Criteria
Project Organization
Ready to get down to business? Here are 5 key things you need to do when writing a project plan.
1. Identify the baselines for your project
Before you begin writing a project plan, you need to make sure you have the basics down. Start by identifying the baselines for the project’s scope, schedule and cost, as the rest of your project planning will need to fit in around those constraints.
As mentioned above, these baselines should already be roughly outlined in your project charter — but here’s where you really start to map them out and create accurate estimates. And the more detailed, the better, because these are what you’ll be using for comparison to measure how your project performs.
2. Identify your project dependencies
Or in other words, ask yourself: what needs to happen before this other thing can happen? Identifying your project dependencies at the outset of your project means you can plan your timelines more efficiently, spot potential blockers, and ensure that you avoid unnecessary delays.
3. Identify project stakeholders
You’ll already have done the groundwork for this in your stakeholder analysis, but as you flesh out your project management plan and think through the phases of your project in more detail, you’ll likely start to find more project stakeholders at each phase.
Now is also a good time to go deeper on which stakeholders need to be informed and involved at which stages, for a more comprehensive stakeholder management plan you can use at each phase of your project.
4. Identify project milestones
What are the key markers of your project’s progress? It can be a concrete deliverable, the end of a phase in a stage-gate process — whatever milestones make sense to you, breaking your project down into manageable chunks, each with a defined goal, helps to keep the team motivated, allows you to celebrate each achievement, and signposts how the overall progress is coming along. Learn more about using Milestones here .

5. Identify who’s responsible for what
Once you start to get a big-picture understanding of the work that’s needed and the resources you have to complete it, you can start deciding who should do what. Giving each item an owner is essential to getting things done. No more “oh, was I supposed to do that?” — once you identify who’s responsible for what, you can ensure accountability and transparency.

The 5 Stages of Team Development
All teams develop according to some natural patterns and using that knowledge, you can offer some guidance to build the kind of team that communicates well and finds better ways to collaborate and achieve the goals you’ve established. Here’s what you need to know.
Now let's go through a sample project plan. In the below example, we highlight the main sections of the plan and what needs to be included in each one to set your project up for success.
Section 1: Executive summary
The executive summary offers a concise overview of the entire project. It includes key highlights such as the project's purpose, objectives, scope, timeline, budget, and major stakeholders. It's often the first section stakeholders read to get a high-level understanding of the project.
Section 2: Project introduction
This section sets the stage by providing context and background information about the project. It explains why the project is being undertaken and introduces the main objectives and scope of the project.
Section 3: Project objectives
Here, the project's specific goals and objectives are outlined in detail. Objectives should be SMART (Specific, Measurable, Achievable, Relevant, and Time-bound) to provide clarity and guidance.
Section 4: Project scope
The scope section defines what is included and excluded from the project. It helps prevent scope creep by establishing clear boundaries and also mentions any assumptions and constraints that may affect the project.
Section 5: Schedule management
This section details the project's timeline, including milestones and deadlines. It breaks down the project into tasks and identifies task dependencies. Often, visual representations like Gantt charts are used for clarity.
Section 6: Cost management
Here, the project budget is presented, including cost estimates for various project components. It may also outline cost control measures to ensure the project stays within budget.
Section 7: Quality management
This section focuses on the quality standards and objectives for the project. It describes quality control and assurance processes, as well as any inspection and testing procedures that will be implemented.
Project management template
Save time on setup without sacrificing attention to detail. With our project management template, you can quickly create project management plans that help you complete your project on time and on budget.
Section 8: Resource management
In this section, the project team is introduced, and roles and responsibilities are defined. It addresses resource allocation, scheduling, and, if applicable, procurement needs.
Section 9: Risk management
The risk management section identifies potential risks and uncertainties that could impact the project. It discusses risk assessment, prioritization, and mitigation strategies to reduce the impact of these risks.
Section 10: Communication plan
The communication plan outlines how project information will be shared with stakeholders and team members. It specifies communication methods, frequency, and reporting channels to ensure effective communication throughout the project.
Section 11: Stakeholder management
This section lists project stakeholders and analyzes their interests, influence, and expectations. It also outlines strategies for engaging and managing these stakeholders to ensure their needs are addressed.
Section 12: Procurement management
If procurement of goods or services is involved, this section explains the procurement strategy, vendor selection criteria, and how contracts will be managed.
Section 13: Change management
Change management procedures are detailed here, including how changes to the project scope, schedule, or other aspects will be requested, evaluated, approved, and communicated.
Section 14: Closure criteria
Criteria for determining when the project is complete and ready for closure are specified in this section. It may also include plans for project handover and post-project evaluation.
Section 15: Project organization
This section describes the project team's structure, roles, and responsibilities, ensuring everyone understands their positions and reporting lines. It may also mention external stakeholders and their roles if applicable.
Once you’ve documented your project management plan, bring it to life with a project management tool that will help you to stay on track, keep your team accountable, and promote transparency.
Here are 3 ways you can use Teamwork.com to supercharge your project management plan.
Add your supporting documentation to Teamwork Spaces

Use the Teamwork.com and Teamwork Spaces integration to link a project in Teamwork.com with a space in Teamwork Spaces, so your important project documents are only ever a click away.
Some documents you might want to add in addition to your project charter and project management plan include:
Scoping documents
Risk assessments
Change management plans
SOPs for important project processes
List of stakeholders and their roles
Outline of approval processes
Communications management plan
Any other best practices documentation or supporting info as necessary
You can even embed task lists into your pages and mark tasks as complete right from Teamwork Spaces, so you can keep work flowing without even needing to switch tabs.
Start adding your Milestones
Break down your work into Milestones and task lists that are going to help you reach them. With Teamwork.com, you can assign an owner to each Milestone, map out your Milestone due dates and see them represented in the project calendar, and even get a full change history for milestones so you can track any edits.
Visualize your task dependencies with a Gantt chart
Gantt chart-style views are a useful way to get a visual representation of your tasks and their dependencies, allowing for better scheduling and resourcing. In Teamwork.com, you can drag and drop to quickly rearrange your project schedule , without throwing everything out of order or straying off-plan.
Remember: software should support the way you work, not dictate it. So regardless of methodology or team type, create a project plan that works for you and your team — and find a tool that helps you put it into action.
Use our project plan template
Now that you know how to create a project management plan that actually works, you’re ready to implement using our team management software . To help you get up and running quickly, we’ve created a ready to use project plan template . Our project template will help you quickly create project plans that ensure all of your projects are completed on time and on budget
What is a project management plan template?
A project management plan template is a pre-designed framework that provides a structured format for creating a project management plan. It serves as a starting point for project managers and teams to develop their specific project plans, saving time and ensuring that key project management components are properly addressed.
How can a template help you build a great project management plan?
A template can help you build a great project management plan by saving time, ensuring comprehensive coverage of project management aspects, and incorporating industry best practices and visual aids for clarity. They also support collaboration, version control, and customization to fit the unique needs of each project, making them a valuable tool for project managers in achieving successful project outcomes.
What is the main purpose of a project management plan?
The main purpose of a project management plan is to provide a comprehensive and structured roadmap for successfully executing, monitoring, controlling, and closing a project. It serves as a central document that outlines project objectives, scope, schedule, budget, quality standards, resource allocation, risk management strategies, and communication approaches.
What tools do I need to help manage a project plan?
To effectively manage a project plan, you'll need a set of tools and software that cover various aspects of project management. These include project management software, communication and collaboration platforms, file and document management solutions, time and task tracking apps, and budgeting and financial management tools.
What steps are involved in the project planning process?
The steps involved in the project planning process include defining specific project objectives and scope, identifying deliverables and key milestones, budgets, risk assessment and quality control measures. It should also include a communication plan and stakeholder engagement strategies.
You may also like...

Get started with Teamwork.com
Start working together beautifully. See how Teamwork.com can help your team with our 30-day free trial.
- Contact sales
Start free trial
How to Write a Project Proposal (Examples & Template Included)
Table of Contents
What is a project proposal, types of project proposals, project proposal vs. project charter, project proposal vs. business case, project proposal vs. project plan, project proposal outline, how to write a project proposal, project proposal example, project proposal tips.
- ProjectManager & Project Proposals
A project proposal is a project management document that’s used to define the objectives and requirements of a project. It helps organizations and external project stakeholders agree on an initial project planning framework.
The main purpose of a project proposal is to get buy-in from decision-makers. That’s why a project proposal outlines your project’s core value proposition; it sells value to both internal and external project stakeholders. The intent of the proposal is to grab the attention of stakeholders and project sponsors. Then, the next step is getting them excited about the project summary.
Getting into the heads of the audience for which you’re writing the project proposal is vital: you need to think like the project’s stakeholders to deliver a proposal that meets their needs.
We’ve created a free project proposal template for Word to help structure documents, so you don’t have to remember the process each time.
Get your free
Project Proposal Template
Use this free Project Proposal Template for Word to manage your projects better.
In terms of types of project proposals, you can have one that’s formally solicited, informally solicited or a combination. There can also be renewal and supplemental proposals. Here’s a brief description of each of them.
- Solicited project proposal: This is sent as a response to a request for proposal (RFP) . Here, you’ll need to adhere to the RFP guidelines of the project owner.
- Unsolicited project proposal: You can send project proposals without having received a request for a proposal. This can happen in open bids for construction projects , where a project owner receives unsolicited project proposals from many contractors.
- Informal project proposal: This type of project proposal is created when a client asks for an informal proposal without an RFP.
- Renewal project proposal: You can use a renewal project proposal when you’re reaching out to past customers. The advantage is that you can highlight past positive results and future benefits.
- Continuation project proposal: A continuation project proposal is sent to investors and stakeholders to communicate project progress.
- Supplemental project proposal: This proposal is sent to investors to ask for additional resources during the project execution phase.
A project proposal is a detailed project document that’s used to convince the project sponsor that the project being proposed is worth the time, money and effort to deliver it. This is done by showing how the project will address a business problem or opportunity. It also outlines the work that will be done and how it will be done.
A project charter can seem like the same thing as a project proposal as it also defines the project in a document. It identifies the project objectives, scope, goals, stakeholders and team. But it’s done after the project has been agreed upon by all stakeholders and the project has been accepted. The project charter authorizes the project and documents its requirements to meet stakeholders’ needs.
A business case is used to explain why the proposed project is justified. It shows that the project is worth the investment of time and money. It’s more commonly used in larger companies in the decision-making process when prioritizing one project over another.
The business case answers the questions: what is the project, why should it be taken up, who will be involved and how much will it cost? It’s therefore related to a project proposal, but the project proposal comes before the business case and is usually part of the larger proposal.
Again, the project proposal and the project plan in this case are very similar documents. It’s understandable that there would be some confusion between these two project terms. They both show how the project will be run and what the results will be. However, they’re not the same.
The project proposal is a document that aims to get a project approved and funded. It’s used to convince stakeholders of the viability of the project and their investment. The project plan, on the other hand, is made during the planning phase of the project, once it’s been approved. It’s a detailed outline of how the project will be implemented, including schedule, budget, resources and more.
All the elements in the above project proposal outline are present in our template. This free project proposal template for Word will provide you with everything you need to write an excellent project proposal. It will help you with the executive summary, project process, deliverables, costs—even terms and conditions. Download your free template today.

There are several key operational and strategic questions to consider, including:
- Executive summary: This is the elevator pitch that outlines the project being proposed and why it makes business sense. While it also touches on the information that’ll follow in the project proposal, the executive summary should be brief and to the point.
- Project background: This is another short part of the proposal, usually only one page, which explains the problem you’ll solve or the opportunity you’re taking advantage of with the proposed project. Also, provide a short history of the business to put the company in context to the project and why it’s a good fit.
- Project vision & success criteria: State the goal of the project and how it aligns with the goals of the company. Be specific. Also, note the metrics used to measure the success of the project.
- Potential risks and mitigation strategies: There are always risks. Detail them here and what strategies you’ll employ to mitigate any negative impact as well as take advantage of any positive risk.
- Project scope & deliverables: Define the project scope, which is all the work that has to be done and how it will be done. Also, detail the various deliverables that the project will have.
- Set SMART goals: When setting goals, be SMART. That’s an acronym for specific, measurable, achievable, relevant and time-bound. All your goals would be defined by those five things.
- Project approach: Define the approach you’ll use for the contract. There are several different types of contracts used in construction , for example, such as lump sum, cost plus, time and materials, etc. This is also a good place to describe the delivery method you’ll use.
- Expected benefits: Outline the benefits that will come from the successful completion of the project.
- Project resource requirements: List the resources, such as labor, materials, equipment, etc., that you’ll need to execute the project if approved.
- Project costs & budget: Detail all the costs, including resources, that’ll be required to complete the project and set up a budget to show how those costs will be spent over the course of the project.
- Project timeline: Lay out the project timeline , which shows the project from start to finish, including the duration of each phase and the tasks within it, milestones, etc.
In addition to these elements, it’s advisable to use a cover letter, which is a one-page document that helps you introduce your project proposal and grab the attention of potential clients and stakeholders.
To make the best proposal possible, you’ll want to be thorough and hit on all the points we’ve listed above. Here’s a step-by-step guide to writing a persuasive priority proposal.
1. Write an Executive Summary
The executive summary provides a quick overview of the main elements of your project proposal, such as your project background, project objectives and project deliverables, among other things. The goal is to capture the attention of your audience and get them excited about the project you’re proposing. It’s essentially the “elevator pitch” for the project life cycle. It should be short and to the point.
The executive summary should be descriptive and paint a picture of what project success looks like for the client. Most importantly, it should motivate the project client; after all, the goal is getting them to sign on the dotted line to get the project moving!
2. Provide a Project Background
The project background is a one-page section of your project proposal that explains the problem that your project will solve. You should explain when this issue started, its current state and how your project will be the ideal solution.
- Historic data: The history section outlines previously successful projects and those that could have run more smoothly. By doing so, this section establishes precedents and how the next project can be more effective using information from previous projects.
- Solution: The solution section addresses how your project will solve the client’s problem. Accordingly, this section includes any project management techniques , skills and procedures your team will use to work efficiently.
3. Establish a Project Vision & Success Criteria
You’ll need to define your project vision. This is best done with a vision statement, which acts as the north star for your project. It’s not specific as much as it’s a way to describe the impact your company plans to make with the project.
It’s also important to set up success criteria to show that the project is in fact doing what it’s proposed to do. Three obvious project success criteria are the triple constraint of cost, scope and time. But you’ll need to set up a way to measure these metrics and respond to them if they’re not meeting your plan.
4. Identify Potential Risks and Mitigation Strategies
To reduce the impact of risk in your project, you need to identify what those risks might be and develop a plan to mitigate them . List all the risks, prioritize them, describe what you’ll do to mitigate or take advantage of them and who on the team is responsible for keeping an eye out for them and resolving them.
5. Define Your Project Scope and Project Deliverables
The project scope refers to all the work that’ll be executed. It defines the work items, work packages and deliverables that’ll be delivered during the execution phase of your project life cycle. It’s important to use a work breakdown structure (WBS) to define your tasks and subtasks and prioritize them.
6. Set SMART Goals for Your Project Proposal
The best mindset when developing goals and objectives for your project proposal is to use the SMART system :
- Specific – Make sure your goals and objectives are clear, concise and specific to the task at hand.
- Measurable – Ensure your goals and objectives are measurable so it’s obvious to see when things are on track and going well, and conversely, when things are off track and issues need to be addressed. Measurable goals make it easy to develop the milestones you’ll use to track the progress of the project and identify a reasonable date for completion and/or closure.
- Attainable – It’s important every project has a “reach” goal. Hitting this goal would mean an outstanding project that extends above and beyond expectations. However, it’s important that the project’s core goal is attainable, so morale stays high and the job gets done with time and resources to spare.
- Relevant – Make sure all of your goals are directly relevant to the project and address the scope within which you’re working.
- Time-Based – Timelines and specific dates should be at the core of all goals and objectives. This helps keep the project on track and ensures all project team members can manage the work that’s ahead of them.
7. Explain What’s Your Project Approach
Your project approach defines the project management methodology , tools and governance for your project. In simple terms, it allows project managers to explain to stakeholders how the project will be planned, executed and controlled successfully.
8. Outline The Expected Benefits of Your Project Proposal
If you want to convince internal stakeholders and external investors, you’ll need to show them the financial benefits that your project could bring to their organization. You can use cost-benefit analysis and projected financial statements to demonstrate why your project is profitable.
9. Identify Project Resource Requirements
Project resources are critical for the execution of your project. The project proposal briefly describes what resources are needed and how they’ll be used. Later, during the planning phase, you’ll need to create a resource management plan that’ll be an important element of your project plan. Project requirements are the items, materials and resources needed for the project. This section should cover both internal and external needs.
10. Estimate Project Costs and Project Budget
All the resources that you’ll need for your project have a price tag. That’s why you need to estimate those costs and create a project budget . The project budget needs to cover all your project expenses, and as a project manager, you’ll need to make sure that you adhere to the budget.
11. Define a Project Timeline
Once you’ve defined your project scope, you’ll need to estimate the duration of each task to create a project timeline. Later during the project planning phase , you’ll need to create a schedule baseline, which estimates the total length of your project. Once the project starts, you’ll compare your actual project schedule to the schedule baseline to monitor progress.
Now let’s explore some project proposal examples to get a better understanding of how a project proposal would work in the real world. For this example, let’s imagine a city that’s about to build a rapid transit system. The city government has the funds to invest but lacks the technical expertise and resources that are needed to build it, so it issues a request for proposal (RFP) document and sends it to potential builders.
Then, the construction companies that are interested in executing this rapid transit project will prepare a project proposal for the city government. Here are some of the key elements they should include.
- Project background: The construction firm will provide an explanation of the challenges that the project presents from a technical perspective, along with historical data from similar projects that have been completed successfully by the company.
- Project vision & success criteria: Write a vision statement and explain how you’ll track the triple constraint to ensure the successful delivery of the project.
- Potential risks and mitigation strategies: List all risks and how they’ll be mitigated, and be sure to prioritize them.
- Project scope & deliverables: The work that’ll be done is outlined in the scope, including all the deliverables that’ll be completed over the life cycle of the project.
- Set SMART goals: Use the SMART technique to define your project goals by whether they’re specific, measurable, achievable, relevant and time-bound.
- Project approach: Define the methodology that the project manager will employ to manage the project. Also, figure out what type of contract will be used to define the project.
- Expected benefits: Show how the project will deliver advantages to the company and define what these benefits are in a quantifiable way.
- Project resource requirements: List all the resources, such as labor, materials, equipment, etc., needed to execute the project.
- Project costs & budget: Estimate the cost of the project and lay that out in a project budget that covers everything from start to finish.
- Project timeline: Outline the project schedule, including phases, milestones and task duration on a visual timeline.
Whatever project proposal you’re working on, there are a few tips that apply as best practices for all. While above we suggested a project proposal template that would have a table of contents, meaning it would be many pages long, the best-case scenario is keeping the proposal to one or two pages max. Remember, you’re trying to win over stakeholders, not bore them.
Speaking of project stakeholders , do the research. You want to address the right ones. There’s no point in doing all the work necessary to write a great proposal only to have it directed to the wrong target audience. Whoever is going to read it, though, should be able to comprehend the proposal. Keep the language simple and direct.
When it comes to writing, get a professional. Even a business document like a project proposal, business case or executive summary will suffer if it’s poorly constructed or has typos. If you don’t want to hire a professional business writer, make sure you get someone on your project team to copy, edit and proof the document. The more eyes on it, the less likely mistakes will make it to the final edition.
While you want to keep the proposal short and sweet, it helps to sweeten the pot by adding customer testimonials to the attachments. Nothing sells a project plan better than a customer base looking for your product or service.
ProjectManager & Project Proposals
ProjectManager allows you to plan proposals within our software. You can update tasks for the project proposal to signify where things stand and what’s left to be done. The columns allow you to organize your proposal by section, creating a work breakdown structure (WBS) of sorts.
When building a project proposal, it’s vital to remember your target audience. Your audience includes those who are excited about the project, and see completion as a gain for their organization. Conversely, others in your audience will see the project as a pain and something to which they aren’t looking forward. To keep both parties satisfied, it’s essential to keep language factual and concise.
Our online kanban boards help you think through that language and collaborate on it effectively with other team members, if necessary. Each card shows the percentage completed so everyone in the project management team is aware of the work done and what’s left to be done.

As you can see from the kanban board above, work has begun on tasks such as product documentation and design. Tasks regarding stakeholder feedback, ideation, market research and more have been completed, and there’s a good start on the engineering drawings, 3D rendering, supply chain sourcing and translation services.
A PDF is then attached to the card, and everyone added to the task receives an email notifying them of the change. This same process can be used throughout the life-cycle of the project to keep the team updated, collaborating, and producing a first-class project proposal. In addition to kanban boards, you can also use other project management tools such as Gantt charts , project dashboards, task lists and project calendars to plan, schedule and track your projects.
Project proposals are just the first step in the project planning process. Once your project is approved, you’ll have to solidify the plan, allocate and manage resources, monitor the project, and finally hand in your deliverables. This process requires a flexible, dynamic and robust project management software package. ProjectManager is online project management software that helps all your team members collaborate and manage this process in real-time. Try our award-winning software with this free 30-day trial .

Deliver your projects on time and on budget
Start planning your projects.
We use essential cookies to make Venngage work. By clicking “Accept All Cookies”, you agree to the storing of cookies on your device to enhance site navigation, analyze site usage, and assist in our marketing efforts.
Manage Cookies
Cookies and similar technologies collect certain information about how you’re using our website. Some of them are essential, and without them you wouldn’t be able to use Venngage. But others are optional, and you get to choose whether we use them or not.
Strictly Necessary Cookies
These cookies are always on, as they’re essential for making Venngage work, and making it safe. Without these cookies, services you’ve asked for can’t be provided.
Show cookie providers
- Google Login
Functionality Cookies
These cookies help us provide enhanced functionality and personalisation, and remember your settings. They may be set by us or by third party providers.
Performance Cookies
These cookies help us analyze how many people are using Venngage, where they come from and how they're using it. If you opt out of these cookies, we can’t get feedback to make Venngage better for you and all our users.
- Google Analytics
Targeting Cookies
These cookies are set by our advertising partners to track your activity and show you relevant Venngage ads on other sites as you browse the internet.
- Google Tag Manager
- Infographics
- Daily Infographics
- Popular Templates
- Accessibility
- Graphic Design
- Graphs and Charts
- Data Visualization
- Human Resources
- Beginner Guides
Blog Marketing What is a Project Management Plan and How to Create One
What is a Project Management Plan and How to Create One
Written by: Midori Nediger Dec 11, 2023

Have you ever been part of a project that didn’t go as planned?
It doesn’t feel good.
Wasted time, wasted resources. It’s pretty frustrating for everyone involved.
That’s why it’s so important to create a comprehensive project management plan before your project gets off the ground.
In this guide, we’ll explore how to create and design a successful project management plan.
We’ll also showcase easy-to-customize project plan templates you can create today with our user-friendly drag-and-drop editor. Let’s get started!
Click to jump ahead:
What is a project management plan?
5 things you need to know before creating a project management plan, what should a project management plan include, how do you write a project plan, project plan best practices, project management plan templates and examples, common mistakes to avoid when creating a project management plan.
A project management plan is a formal document that defines how a project is going to be carried out by outlining the scope, goals, budget, timeline and deliverables of a project. Its crucial role lies in ensuring the project stays on course.
You write a project plan during the project planning stage of the project life cycle , and it must be approved by stakeholders before a project can move on the execution stage.
If some of these terms are new to you, you can get up to speed with this post on project management terms .
This means your project plan must be engaging, organized, and thorough enough to gain the support of your stakeholders.

Further Reading : New to project management? Read our blog post on the 4 stages of the project life cycle .
The importance of a project management plan
A well-developed project management plan sets the foundation for a successful project by providing a roadmap that guides the project team toward successful project completion. A good project management plan can ensure that:
- Project objectives and goals are clearly defined and understood
- Project scope is effectively managed
- Resources are allocated efficiently to maximize productivity and minimize waste
- Risks are identified, assessed and mitigated
- Project tasks and activities are well-organized and executed in a timely manner.
- Communication among team members , stakeholders and project sponsors is effective and transparent
- Changes to the project are properly evaluated, approved and implemented
- Lessons learned and best practices are documented for future reference and improvement
- Stakeholders are engaged and satisfied with the project outcomes
- The project is delivered within the specified timeline, budget and quality standards
Before diving into creating a project management plan, it is crucial to have a clear understanding of the project objectives and the expectations of stakeholders involved.
Without a firm grasp of these fundamental elements, your project may face significant challenges or fail to deliver the desired outcomes.
Here are key points to consider when creating a project management plan:
- Project Objectives: Clearly understand the project objectives and what you want to achieve. Identify the desired outcomes, deliverables and the purpose of the project.
- Scope of the Project: Determine the boundaries and extent of the project. Define what is included and excluded to ensure clarity and prevent scope creep .
- Stakeholders: Identify all stakeholders who will be impacted by or have an interest in the project. Understand their needs, expectations and level of involvement.
- Resources: Assess the resources required to execute the project successfully. This includes human resources, budget, equipment and materials. Determine their availability and allocation.
- Risks and Constraints: Identify potential risks, uncertainties and constraints that may affect the project. Understand the challenges, limitations and potential obstacles that need to be addressed.
Now that you have these key areas identified, let’s get started with creating your project plan.
Before you start assembling your own plan, you should be familiar with the main components of a typical project plan .
A project management plan should include the following sections:
- Executive summary: A short description of the contents of the report
- Project scope & deliverables: An outline of the boundaries of the project, and a description of how the project will be broken down into measurable deliverables
- Project schedule: A high-level view of project tasks and milestones ( Gantt charts are handy for this)
- Project resources: The budget, personnel, and other resources required to meet project goals
- Risk and issue management plan: A list of factors that could derail the project and a plan for how issues will be identified, addressed, and controlled
- Communication management plan: A plan for how team and stakeholder communication will be handled over the course of the project
- Cost and quality management plan: This section encompasses the project’s budget, cost estimation,and cost control mechanisms. It also includes quality assurance and control measures as well as any testing or verification activities to be performed.
Basically, a project plan should tell stakeholders what needs to get done, how it will get done, and when it will get done.
That said, one size doesn’t fit all. Every project management plan must be tailored to the specific industry and circumstances of the project. You can use a project management app for smoother project planning.
For example, this marketing plan looks client facing. It is tailored to sell the client on the agency:

Whereas this commercial development plan focuses on specific objectives and a detailed timeline:

With those basics out of the way, let’s get into how to write a project management plan that’s as engaging as it is professional.
Further Reading : If you’re looking to create a proposal, read our in-depth business proposal guide. Then try our job proposal templates or business proposal templates .
To write a successful project plan, follow these 5 steps below to create an effective project plan that serves as a valuable tool for project management:
1. Highlight the key elements of your project plan in an executive summary
An executive summary is a brief description of the key contents of a project plan .
I t’s usually the first thing stakeholders will read, and it should act like a Cliff’s-notes version of the whole plan.
It might touch on a project’s value proposition, goals, deliverables, and important milestones, but it has to be concise (it is a summary, after all). First, make sure you develop a proof of concept .
In this example, an executive summary can be broken into columns to contrast the existing problem with the project solution:

The two-column format with clear headers helps break up the information, making it extremely easy to read at a glance.
Here’s another example of a project management plan executive summary. This one visually highlights key takeaways with big fonts and helpful icons:

In this case, the highlighted facts and figures are particularly easy to scan (which is sure to make your stakeholders happy).
But your executive summary won’t always be so simple.
For larger projects, your executive summary will be longer and more detailed.
This project management plan template has a text-heavy executive summary, though the bold headers and different background colors keep it from looking overwhelming:

It’s also a good idea to divide it up into sections, with a dedicated header for each section:

Regardless of how you organize your executive summary, it should give your stakeholders a preview of what’s to come in the rest of the project management plan.
2. Plot your project schedule visually with a Gantt chart
A carefully planned project schedule is key to the success of any project. Without one, your project will likely crumble into a mess of missed deadlines, poor team management, and scope creep.
Luckily, project planning tools like Gantt charts and project timelines make creating your project schedule easy. You can visually plot each project task, add major milestones, then look for any dependencies or conflicts that you haven’t accounted for.
For example, this Gantt chart template outlines high-level project activities over the course of an entire quarter, with tasks color-coded by team:

A high-level roadmap like the one above is probably sufficient for your project management plan. Every team will be able to refer back to this timeline throughout the project to make sure they’re on track.
But before project kickoff, you’ll need to dig in and break down project responsibilities by individual team member, like in this Gantt chart example:

In the later execution and monitoring phases of the project, you’ll thank yourself for creating a detailed visual roadmap that you can track and adjust as things change.
You can also use a project management tool to keep your team organized.
Further Reading: Our post featuring Gantt chart examples and more tips on how to use them for project management.
3. Clarify the structure of your project team with a team org chart
One of the hardest aspects of project planning is assembling a team and aligning them to the project vision.
And aligning your team is all about communication–communicating the project goals, communicating stakeholder requests, communicating the rationale behind big decisions…the list goes on.
This is where good project documentation is crucial! You need to create documents that your team and your stakeholders can access when they have questions or need guidance.
One easy thing to document visually is the structure of your team, with an organizational chart like this one:

In an organizational chart you should include some basic information like team hierarchy and team member contact information. That way your stakeholders have all of the information they need at their fingertips.
But in addition to that, you can indicate the high-level responsibilities of each team member and the channels of communication within the team (so your team knows exactly what they’re accountable for).
Here’s another simple organizational structure template that you can use as a starting point:

Create an organizational chart with our organizational chart maker .
4. Organize project risk factors in a risk breakdown structure
A big part of project planning is identifying the factors that are likely to derail your project, and coming up with plans and process to deal with those factors. This is generally referred to as risk management .
The first step in coming up with a risk management plan is to list all of the factors at play, which is where a risk breakdown structure comes in handy. A risk breakdown structure is a hierarchical representation of project risks, organized by category.
This risk breakdown structure template, for example, shows project risk broken down into technical risk, management risk, and external risk:

Once you’ve constructed your risk breakdown structure, you’ll be ready to do a deep dive into each risk (to assess and plan for any triggers and outcomes).
Streamline your workflow with business process management software .
5. Plan ahead: create project status reports to communicate progress to stakeholders
As I mentioned earlier, communication is fundamental in any project.
But even so, something that’s often overlooked by project managers is a communication management plan–a plan for how the project team is going to communicate with project stakeholders . Too often, project communication defaults to ad-hoc emails or last-minute meetings.
You can avoid this by planning ahead. Start with a project kickoff meeting and include a project status report template as part of your communication plan.
Here’s an example of a simple project status report that you might send to stakeholders on a weekly basis:

This type of report is invaluable for communicating updates on project progress. It shows what you’ve accomplished in a clear, consistent format, which can help flag issues before they arise, build trust with your stakeholders , and makes it easy to reflect on project performance once you’ve reached your goals.
You might also want to include a broader status report for bigger updates on a monthly or quarterly basis, like this one:

The above template allows you to inform stakeholders of more major updates like new budget requirements, revised completion dates, and project performance ratings.
You can even include visualization of up-to-date project milestones, like this example below:

Want more tips on creating visuals to enhance your communications? Read our visual communication guide for businesses .
Before you dive in, remember: a clear and adaptable plan is crucial for project success. Here are some best practices to keep your project plan on track:
- Use headers, columns and highlights to make your executive summary easy to read
- Plot your project schedule with a Gantt chart (with tasks color-coded by department or team member)
- Use visuals like organizational charts and risk breakdown structures to communicate across your team and with stakeholders
- Pick a flexible template that you can update to align with stakeholder requests
A project management plan is probably the most important deliverable your stakeholders will receive from you (besides the project itself).
It holds all of the information that stakeholders will use to determine whether your project moves forward or gets kicked to the curb.
That’s why it’s a good idea to start with a project management plan template. Using a template can help you organize your information logically and ensure it’s engaging enough to hold your stakeholders’ attention.
Construction project management plan template
Time is money, especially with construction projects. Having a construction plan template brings order to the chaos.
Instead of staring at a messy pile of construction stuff, you’ve got a plan that breaks everything down into bite-sized pieces.
And let’s not forget the paperwork. Construction projects have rules and regulations to follow. Your project plan helps you stay on the right side of the law with all the necessary documentation and compliance measures.
Start with a meticulous project overview, like in the second page of this template:

Though you may think this project will be similar to others you’ve done in the past, it’s important to nail the details.
This will also help you understand the scope of work so you can estimate costs properly and arrive at a quote that’s neither too high or low. Ontario Construction News has great advice on this process.
Simple project management plan template
This simple project management plan template that clearly lays out all of the information your stakeholders will need:

Simple project management communication plan template
A key part of project management is making sure everyone’s in the loop. A project communication plan ensures everyone knows how, where, who and when the team will communicate during the course of the project. Also construction scheduling is a critical aspect of the project management plan as it helps to ensure that all necessary tasks are completed within the allocated time frame and budget.
The key is to figure out what kind of communications is valuable to stakeholders and what is simply overwhelming and won’t lead to better decisions.
This template clearly outlines all of these factors to help manage expectations and eliminate confusion about what will get communicated and when:

Commercial development project plan template
The below project management plan template is simple and minimal, but still uses a unique layout and simple visuals to create an easy-to-read, scannable project overview.
This template is perfect for building or construction management , or any technical projects:

When picking a project plan template, look for one that’s flexible enough to accommodate any changes your stakeholders might request before they’ll approve the project. You never know what might change in the early planning stages of the project! You can also use project management tools to help you with your planning !
Creating a solid project management plan is crucial for setting your project up for success. Here are some common mistakes to avoid:
- Lack of clear goals: Don’t just have a vague idea of what you want to achieve. Define clear, SMART goals (Specific, Measurable, Achievable, Relevant and Time-bound) for your project. That way, everyone will be on the same page and it’ll be easier to measure progress effectively.
- Unrealistic timelines: Be optimistic, but also realistic. Don’t underestimate the time required for tasks. Factor in potential delays and buffer time when creating your project schedule.
- Scope creep: New requirements mid-project can affect deadlines and budgets. Plan the project clearly upfront, and take into consideration any changes that might come up.
- Poor communication: Communication is key throughout the project lifecycle. Regularly update stakeholders, team members and clients on progress, roadblocks and changes.
- Ignoring risks: Things don’t always go according to plan. Identify potential risks upfront and have a mitigation strategy in place for each one.
- Not involving stakeholders: Get key stakeholders involved early on. This helps manage everyone’s expectations and that you have the buy-in you need for success.
- Neglecting resource constraints: Don’t overload your team or underestimate the resources needed. Carefully consider the skills, time and budget available when planning your project.
- Micromanaging: Trust your team! Delegate tasks effectively and give them the autonomy they need to do their jobs.
- Failing to document: Keep good records. Document project decisions, plans and communication. This helps maintain transparency and ensures everyone has access to the latest information.
- Not adapting to change: Be prepared to adapt your plan as needed. Projects are rarely static, so be flexible and willing to adjust your approach based on new information or developments.
So, that’s the scoop on project management plans! I hope this piece will help you to avoid confusion, keep expectations in check and be ready to tackle any bumps for your upcoming projects.
If you ever need a revision, just follow the steps we talked about, use those best practices and you’ll have a plan that sets your project up for a win. Just remember, even the best plans need some tweaking sometimes. Be flexible and adjust as needed and you’re good to go!
Discover popular designs

Infographic maker

Brochure maker

White paper online

Newsletter creator

Flyer maker

Timeline maker

Letterhead maker

Mind map maker

Ebook maker

- school Campus Bookshelves
- menu_book Bookshelves
- perm_media Learning Objects
- login Login
- how_to_reg Request Instructor Account
- hub Instructor Commons
Margin Size
- Download Page (PDF)
- Download Full Book (PDF)
- Periodic Table
- Physics Constants
- Scientific Calculator
- Reference & Cite
- Tools expand_more
- Readability
selected template will load here
This action is not available.
Project Introduction Assignment
- Last updated
- Save as PDF
- Page ID 122340

- Contributor
- Analytical Sciences Digital Library
\( \newcommand{\vecs}[1]{\overset { \scriptstyle \rightharpoonup} {\mathbf{#1}} } \)
\( \newcommand{\vecd}[1]{\overset{-\!-\!\rightharpoonup}{\vphantom{a}\smash {#1}}} \)
\( \newcommand{\id}{\mathrm{id}}\) \( \newcommand{\Span}{\mathrm{span}}\)
( \newcommand{\kernel}{\mathrm{null}\,}\) \( \newcommand{\range}{\mathrm{range}\,}\)
\( \newcommand{\RealPart}{\mathrm{Re}}\) \( \newcommand{\ImaginaryPart}{\mathrm{Im}}\)
\( \newcommand{\Argument}{\mathrm{Arg}}\) \( \newcommand{\norm}[1]{\| #1 \|}\)
\( \newcommand{\inner}[2]{\langle #1, #2 \rangle}\)
\( \newcommand{\Span}{\mathrm{span}}\)
\( \newcommand{\id}{\mathrm{id}}\)
\( \newcommand{\kernel}{\mathrm{null}\,}\)
\( \newcommand{\range}{\mathrm{range}\,}\)
\( \newcommand{\RealPart}{\mathrm{Re}}\)
\( \newcommand{\ImaginaryPart}{\mathrm{Im}}\)
\( \newcommand{\Argument}{\mathrm{Arg}}\)
\( \newcommand{\norm}[1]{\| #1 \|}\)
\( \newcommand{\Span}{\mathrm{span}}\) \( \newcommand{\AA}{\unicode[.8,0]{x212B}}\)
\( \newcommand{\vectorA}[1]{\vec{#1}} % arrow\)
\( \newcommand{\vectorAt}[1]{\vec{\text{#1}}} % arrow\)
\( \newcommand{\vectorB}[1]{\overset { \scriptstyle \rightharpoonup} {\mathbf{#1}} } \)
\( \newcommand{\vectorC}[1]{\textbf{#1}} \)
\( \newcommand{\vectorD}[1]{\overrightarrow{#1}} \)
\( \newcommand{\vectorDt}[1]{\overrightarrow{\text{#1}}} \)
\( \newcommand{\vectE}[1]{\overset{-\!-\!\rightharpoonup}{\vphantom{a}\smash{\mathbf {#1}}}} \)
Acid Mine Drainage Project Experiment Getting Started
The first day of the Project Lab will be devoted to planning. You will need to plan not only what you will do, but also how you will divide the work for maximum productivity and efficiency. At the end of the first day, you will submit a design proposal. In your proposal, you will need to specify the variable you will investigate and detail the procedures you will use. You may also wish to identify which group members will take the lead role in various aspects of the project. Who is the best at experimental design? Who is the best at theoretical modeling? Who is the best communicator? Who is the best writer that will maintain the primary documentation of the group’s work? These people will not have exclusive responsibility for a particular part of the project; rather they can act as the leader for that aspect. All group members are expected be productive, contribute significantly, and understand all parts of the project.
Your design proposal is the starting point for your experiments. Once your experiments are underway, you will likely need to adjust and refine your procedures. Experiments rarely work the first time exactly as planned! Problems occur and new questions arise. You will modify your experiments to solve the problems and/or answer the questions that arise. This process will be repeated multiple times over the course of the project.
Design Proposal
You will be given ~1.5 g of the mineral arsenopyrite with which to conduct your experiments. Keep in mind that you will conduct multiple dissolution reactions during the project. You will take aliquots from your reaction vessels over the course of a week. Initially you will be measuring the iron concentration in these aliquots using spectrophotometry. Later you will also analyze for arsenic and sulfur concentrations. Many of the issues you need to consider while planning your experiments are discussed in the introductory project handout (especially the Project Description section). Below are some additional issues that you should consider.
- Your initial sample will not be clean. Metal oxides and elemental sulfur have formed on the surface. You’ll need to clean the mineral. How will you do it?
- Define the conditions in your reaction vessel. That is, consider the amount of sample, the desired pH, and what reagents you need including volumes and concentrations. Take care that any chemicals you add to the vessel do not contain sulfur, since that will most likely swamp out the subtle changes of sulfur concentration that evolve due to the dissolution of the mineral.
- Define your sampling method including frequency, aliquot size, and how you will store them.
- You should estimate the concentration of iron you expect to obtain in the reaction vessel. (You did a similar calculation in HW#2 for pyrite.) The results of your calculation will be different depending on the reaction volume you choose and your sample size. Assume a particle size of 50 μm. Consult the research literature to find the density and dissolution rate of arsenopyrite. Will your procedures above give you a measurable amount of Fe in solution? If not, you will need to revise the details in (2) and (3) above.
- The spectrophotometric measurement of Fe concentration is a separate experiment that you need to define. The details of this experiment should be spelled out similarly to those in the Spec. Fe lab you have already done. But the details are DIFFERENT! You should consider using phenanthroline as the complexing agent. Your concentration ranges will be different and the optimum pH will depend on the complexing agent. Again, you may need to revise the details in (2) and (3) so that you have a measurable amount of iron in solution.
Points will be deducted for unclear or missing procedural components. Your proposal should be terse (1-2 pages), yet with enough detail that someone else could set up your experiment without asking a lot of questions.
Starting Your Experiments
When your proposal is complete you can begin your actual experiments! You should start your first reaction for the dissolution of the mineral. If it is necessary to leave the reaction vessels under a hood or someplace OTHER than your lab drawers, be sure to clearly mark the flasks and experimental area with your names, an email address a phone number, and your TA’s name just in case there is an issue you need to be alerted to. Cover your samples with parafilm to minimize evaporation and prevent dust and other contaminants from settling into the solutions.
Once the reaction is underway, you can begin testing and refining your procedure for the spectrophotometric measurement of iron for the specific conditions defined by your procedure. You’ve already used a positive control in two experiments this semester. A positive control is a sample similar in quantity, matrix, and concentration to the actual unknown you’ll be measuring. A positive control has a known concentration, and is used to test the accuracy and precision of the experimental method. Your group should verify the experimental design you’ve developed with an experimental control.
Why do you need to do this? Even though the TECHNIQUE you’ll use is similar to the Spec. Fe Lab, the samples will be significantly different in volume, pH, and speciation. In general, your samples will be much smaller; on the order of a few mL vs. the 25 mL you pipette from the flask in the Spec. Fe Lab. They will be much more acidic too, since the samples you analyzed previously were simply dissolved in water and not initially buffered in any way. Finally, the solution will have a mixture of Fe 2+ and Fe 3+ . Your group should consider ways to either oxidize or reduce the sample such that the final analysis is for only one oxidation state of the iron, depending on the complexing agent you decide to use to create the colored complex.
For your design proposal you predicted the concentration of iron that should evolve in the reaction vessel based on a literature value for the rate of oxidative dissolution of arsenopyrite. Use this prediction as a starting point for making a control. You can use any iron salt, such as ferric chloride or ferrous chloride, to make a stock solution of iron. Then from this stock solution, you can use aliquots to add to a buffered matrix, similar in composition to the solution covering the arsenopyrite samples. Make sure your final solution is approximately the same pH and similar in concentration to that which you predicted in your design proposal. Using the same sample volumes you plan to use for the real analysis, try to develop good color as you complex the control sample with the complexing agent. If you use phenanthroline, make sure you let the complex “age” for about 20 minutes before taking a transmittance measurement. If you don’t see color when you develop the complex for the control, consider the following:
- Is the final pH correctly chosen for the complexing agent?
- Was the concentration of Fe calculated correctly? (Some students forget to convert to moles or ppm of Fe vs. of reagent).
- Are you using the correct units?
- Did you add enough complexing agent to form the complex? (It should be present in excess in solution.)
- Could there be an interfering anion that is tying up iron, preventing it from complexing with the intended agent in solution?
Be sure to keep good records on the development of the experimental control and how it was used to verify the experimental procedure. In the next progress report, your group will be asked to include the analysis of your control along with a calibration plot and preliminary results from your samples.
IMAGES
VIDEO
COMMENTS
Here are the steps you can follow to write an effective project introduction: 1. Write the project introduction last. Because a project introduction discusses the main points from your research or proposal, you should write it once your project is complete. This way, the introduction contains accurate, relevant information.
A good introduction to an assignment example is always one that gives a clear idea to the readers about what your assignment topic is or what are you going to talk about in the rest of the copy. An old trick is to talk about general ideas about the topic and narrow down your discussion to the specific problem or aspect of the topic you are ...
On average, the length of the introduction should be at most twenty per cent of the entire project and not less than ten per cent of the total count of words in the project. E.g. a project of 3000 words, will have an introduction between 300 (10%) and 600 (20%) words.
1. Background. The first thing you have to write in an introduction is a brief background of the study. You have to give an overview of your assignment, what your assignment is about, its impact, and its area of study. 2. Context in brief. You have to include a gist of the context of your assignment.
Here are the key takeaways for how to write essay introduction: 3. Hook the Reader: Start with an engaging hook to grab the reader's attention. This could be a compelling question, a surprising fact, a relevant quote, or an anecdote. Provide Background: Give a brief overview of the topic, setting the context and stage for the discussion.
Table of contents. Step 1: Introduce your topic. Step 2: Describe the background. Step 3: Establish your research problem. Step 4: Specify your objective (s) Step 5: Map out your paper. Research paper introduction examples. Frequently asked questions about the research paper introduction.
Table of contents. Step 1: Hook your reader. Step 2: Give background information. Step 3: Present your thesis statement. Step 4: Map your essay's structure. Step 5: Check and revise. More examples of essay introductions. Other interesting articles. Frequently asked questions about the essay introduction.
How to use Paperpal to write the Introduction section. Step 1: Sign up on Paperpal and click on the Copilot feature, under this choose Outlines > Research Article > Introduction Step 2: Add your unstructured notes or initial draft, whether in English or another language, to Paperpal, which is to be used as the base for your content. Step 3: Fill in the specifics, such as your field of study ...
Project management software for planning. Project planning software helps you track and manage your project from start to finish. It can help you plan your project, assign tasks, track progress, and more. Project software has become more sophisticated and using cloud technology enables anyone to access the project data anywhere.
A project description is a high-level overview of why you're doing a project. The document explains a project's objectives and its essential qualities. Think of it as the elevator pitch that focuses on what and why without delving into how. You typically draft a project description early on, during the project initiation phase of the ...
Step 4: Define the Project Deliverables. Defining your project deliverables is a crucial step during the project proposal process. Stakeholders want to know just what it is you're going to be delivering to them at the end of the project. This could be a product, a program, an upgrade in technology or something similar.
Avoid a lengthy, wordy, and complex statement of the thesis. 3. Avoid Explanation. Don't try to explain anything to make your argument in the introduction section. You should drop the information part to the principal body. Just mention the primary points of the argument you plan to make later in the assignment.
The result of this assignment will be an Introduction section that you can eventually adapt for your final proposal. Think of this Introduction as also serving the role of a project plan for this quarter and the summer, if applicable. Download Overleaf template: Assignment 3: Introduction. Part 1: Outline your introduction
Task 1: Project Introduction. Your first assignment is mostly an exercise in following instructions. We'll ask you to modify an existing program so that, when run, the program prints "Hello world!". Warning. In order to complete this assignment there are a few things that you will need to have already completed!
A project management plan template is a pre-designed framework that provides a structured format for creating a project management plan. It serves as a starting point for project managers and teams to develop their specific project plans, saving time and ensuring that key project management components are properly addressed.
This free project proposal template for Word will provide you with everything you need to write an excellent project proposal. It will help you with the executive summary, project process, deliverables, costs—even terms and conditions. Download your free template today. ProjectManager's project proposal template.
Introduction. The first part of your proposal is the initial pitch for your project. Make sure it succinctly explains what you want to do and why. Your introduction should: Introduce your topic; Give necessary background and context; Outline your problem statement and research questions; To guide your introduction, include information about:
This module is designed to introduce you to project management, and how project managers support projects. In this course, you'll learn what project management is, the benefits that organizations recognize using project management, and the constraints that project managers need to consider. You'll learn about how project managers control ...
Central to the success of any project is organisation. An effective project manager can ensure that goals are clearly defined, objectives are set, budgets are adhered to, and projects are delivered on time. Even with the essentials of project management, you can learn to identify the strengths and weaknesses of your project plans.
To write a successful project plan, follow these 5 steps below to create an effective project plan that serves as a valuable tool for project management: 1. Highlight the key elements of your project plan in an executive summary. An executive summary is a brief description of the key contents of a project plan.
The first day of the Project Lab will be devoted to planning. You will need to plan not only what you will do, but also how you will divide the work for maximum productivity and efficiency. At the end of the first day, you will submit a design proposal. In your proposal, you will need to specify the variable you will investigate and detail the ...
Task 1: Project Introduction. Your first assignment is mostly an exercise in following instructions. We'll ask you to modify an existing Google Sheet so that, when updated, will return a specific value within the given cell. Warning. In order to complete this assignment you will need to have created a Google account!
1-2 project preparation running head: module one kristyn williams southern new hampshire university global health and diversity february 2023 module one ... 12 Project Preparation Introduction. 1-2 project preparation. Course. Global Health and Diversity (IHP501) 193 Documents. ... IHP-501 Week 2 Assignment Letter to the Editor; Week 2- Letter ...