

How to View Notes in PowerPoint While Presenting With One Monitor

Presenting a PowerPoint is a great way to engage and inform an audience, but it can be challenging to keep track of your notes while you’re presenting. Fortunately, PowerPoint includes a feature that allows you to view your speaker notes on one monitor while your audience sees the presentation on another. This makes it much easier to stay on track and deliver your message effectively. In this guide, we’ll take a detailed look at how to view notes in PowerPoint while presenting with one monitor, as well as some tips for getting the most out of this feature.
Table of Contents
Why Viewing Notes While Presenting is Important
When giving a presentation, it’s important to have access to your notes to stay on track and avoid missing important points. Viewing your notes while presenting can also help you remember key details and ensure that you’re delivering the information in an organized and effective manner. This can be especially important if you’re presenting complex or technical information. By having access to your notes, you can make sure you’re covering all the necessary points and answering any questions that might come up.
Another benefit of viewing your notes while presenting is that it can help you feel more confident and prepared. Knowing that you have your notes to refer to can alleviate any anxiety or nervousness you may feel about presenting. It can also give you a sense of security, knowing that you have all the information you need at your fingertips. By feeling more confident and prepared, you’re more likely to deliver a successful presentation that engages your audience and effectively conveys your message.
Understanding the Need for One Monitor
Using Presenter View in PowerPoint allows you to view your notes on your laptop or primary monitor while the audience sees only the presentation on the projected screen, even if you only have one monitor. This feature is particularly useful when you don’t have a dual-monitor setup. Presenter View provides a separate interface for the presenter that includes the current slide, speaker notes, and upcoming slides, ensuring that you can deliver your presentation smoothly without revealing your notes to the audience.
How to Access Notes in PowerPoint
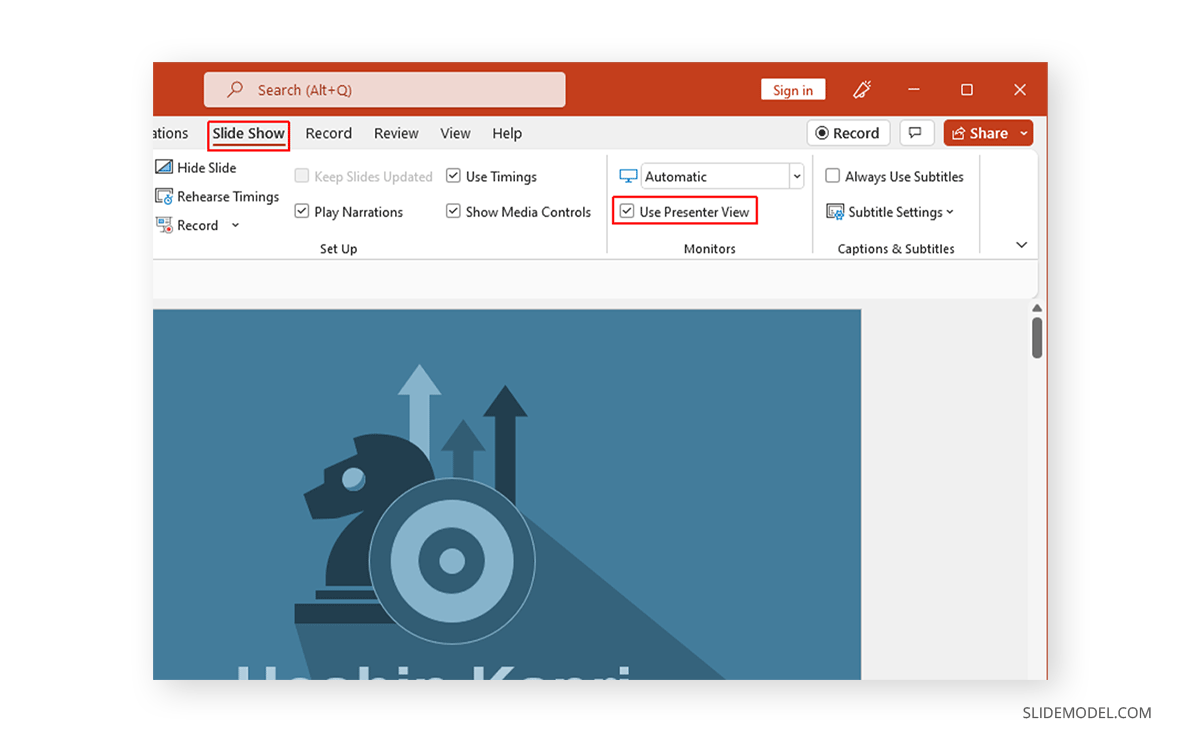
Accessing your notes in PowerPoint while presenting on a single monitor is straightforward with Presenter View. To use Presenter View, start your PowerPoint presentation and go to the “Slide Show” tab in the ribbon menu. Then, check the “Use Presenter View” box. When you start the slideshow, your presentation will appear on the projected screen, while your notes and controls appear on your primary monitor. This allows you to reference your notes discreetly during the presentation.
Step-by-Step Guide to Viewing Notes in PowerPoint
Here’s a step-by-step guide to viewing your notes in PowerPoint using Presenter View:
- Open your PowerPoint presentation.
- Navigate to the slide on which you wish to start presenting.
- Select the “Slide Show” tab in the ribbon menu.
- Check the “Use Presenter View” box.
- Start your presentation by clicking on “From Beginning” or “From Current Slide.”
- Your notes will appear on your primary monitor, while the audience will see only the slides on the presentation screen.
Remember, your audience will not see your notes, allowing you to discreetly reference them during your presentation.
Tips for Presenting With One Monitor
Here are some tips for presenting with one monitor:
- Practice your presentation beforehand to make sure you’re comfortable with the software and know how to access Presenter View.
- Use the Presenter View to keep track of key points and ensure that you’re covering all the necessary information.
- Put your notes in bullet-point format to make them easy to follow and read while presenting.
- Use concise language and avoid excessive text on your slides.
- Maintain eye contact with your audience as much as possible, even when referencing your notes.
How to Customize Your Notes View in PowerPoint
PowerPoint allows you to customize your notes view to suit your preferences. To do so, enter Presenter View and hover over the notes section. You can then adjust the font size and formatting to make your notes easier to read. Additionally, you can rearrange the on-screen elements in Presenter View to suit your presenting style.
Shortcut Keys for Easy Navigation Through Notes
PowerPoint includes a number of keyboard shortcuts that can help you navigate through your presentation easily. Here are some of the most useful ones:
- Use the “N” key or the right arrow to move forward one slide at a time.
- Use the “P” key or the left arrow to move backward one slide at a time.
- Press “Ctrl” + “S” to access the “All Slides” view, where you can select a specific slide to jump to.
Troubleshooting Common Issues When Viewing Notes
If you’re having trouble viewing your notes in PowerPoint using Presenter View, ensure that Presenter View is enabled in the “Slide Show” tab. If the notes are not appearing, try restarting PowerPoint or your computer to resolve any temporary glitches. Additionally, check that your screen resolution and display settings are correctly configured to support Presenter View.
Alternative Methods for Viewing Notes While Presenting
If you prefer not to use Presenter View or encounter difficulties, you can print out your notes and refer to them as needed. Another option is to split your screen, displaying the presentation in a window on one half and a document with your notes on the other half. This method requires you to manually scroll your notes, but it can be a useful alternative.
Best Practices for Using Notes During a Presentation
Here are some best practices for using notes during a presentation:
- Don’t rely too heavily on your notes–practice your presentation beforehand and aim to deliver your message in a natural, conversational tone.
- Use your notes as a guide rather than a script.
- Keep your notes organized and easy to follow.
- Make sure to address any questions or concerns that come up during the presentation.
- Try to engage with your audience and create a rapport with them.
Benefits of Using One Monitor While Presenting
Using one monitor while presenting with Presenter View has several benefits. It allows you to reference your notes discreetly, helps you stay organized and on track, and enables you to maintain better eye contact with your audience. This setup can also simplify your presentation space and reduce the risk of technical issues.
Advanced Techniques for Managing Your Presentation and Notes on One Monitor
As you become more comfortable with Presenter View, you can explore additional features such as the thumbnail strip to preview upcoming slides, the timer to keep track of your speaking duration, and the ability to zoom into a particular slide detail during your presentation.
How to Switch Between Different Views During Presentation Mode
To switch between different views during presentation mode, you can use the following methods:
- To access Presenter View, start your slideshow and press the “Alt” + “F5” keys.
- To exit Presenter View and return to the normal view, press the “Esc” key.
- To black out the screen during the presentation, press the “B” or period key.
How to Control Slides, Animations and Media During the Presentation with One Monitor
During your presentation, you can control slides, animations, and media with the following actions:
- To advance to the next slide or animation, press the right arrow key or click the left mouse button.
- To return to the previous slide or animation, press the left arrow key.
- To play a video or audio file, click on it directly or use the media controls in Presenter View.
- To pause or stop the media, use the media controls in Presenter View.
With these tips and techniques in mind, you should now be well-equipped to view your notes in PowerPoint while presenting with one monitor. Remember to practice beforehand and experiment with different techniques to find the ones that work best for you. With a little bit of preparation and practice, you can deliver a confident and effective presentation that engages and informs your audience.
By humans, for humans - Best rated articles:
Excel report templates: build better reports faster, top 9 power bi dashboard examples, excel waterfall charts: how to create one that doesn't suck, beyond ai - discover our handpicked bi resources.
Explore Zebra BI's expert-selected resources combining technology and insight for practical, in-depth BI strategies.

We’ve been experimenting with AI-generated content, and sometimes it gets carried away. Give us a feedback and help us learn and improve! 🤍
Note: This is an experimental AI-generated article. Your help is welcome. Share your feedback with us and help us improve.

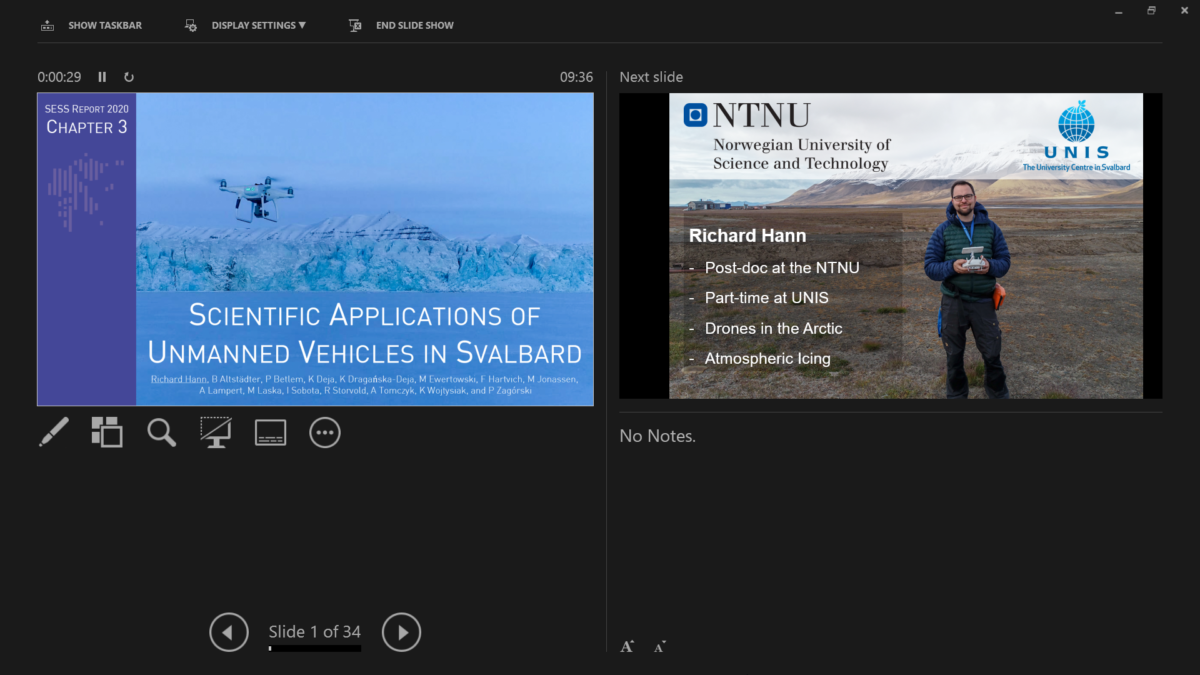
Life hack: Presentations using presenter view with a single screen in Microsoft Teams and Zoom
Recently, I learnt something I wish I knew a long time ago. How to give a presentation on Zoom and Teams using the presenter view on a computer with only one screen . Given how many presentations I give in my job and that I often travel with my laptop, this is a very useful hack for me. Here is how it works.
Microsoft Teams
- In Powerpoint, start your presentation by pressing ALT+F5. This starts the presentation in presenter mode. This also opens a window in the background where the fullscreen presentation is located.
- Press ALT+TAB to navigate back to Teams.
- Share your screen, using the “Share Window” function. Choose the window that shows the fullscreen presentation.
- Press ALT+TAB to navigate back to the presenter view in Powerpoint.
- Go through your presentation in presenter view. The audience will see the fullscreen presentation.

- Press ALT+TAB to navigate back to Zoom.
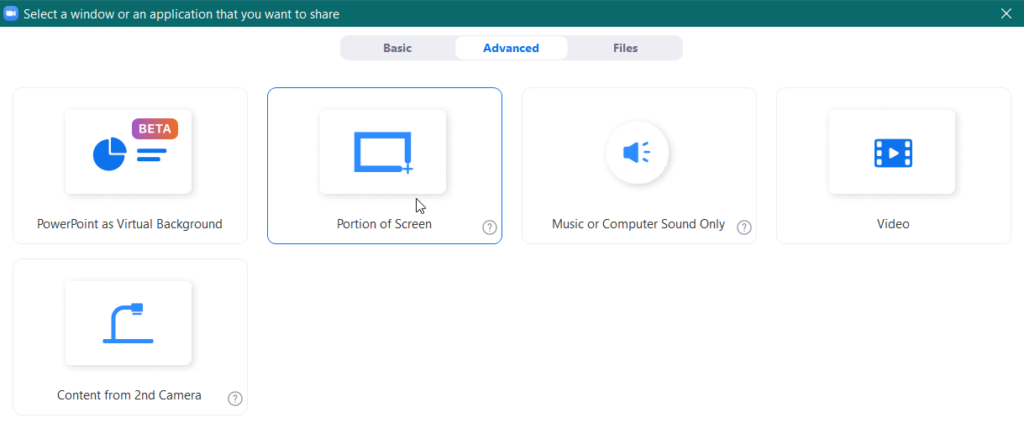
- Click on Share Screen and navigate in the Advanced tab to the option of Portion of Screen sharing.
- Adjust the green window to show the current presentation slide.
Related Posts

Monitoring the snow cornices for avalanche risks

Are unmanned aircraft more sensitive to icing compared to manned aircraft?

Writing tips
Leave a reply cancel reply.
Save my name, email, and website in this browser for the next time I comment.
Recent Posts
- Explore Svalbard Glaciers in 3D
- How to simulate icing on UAVs
- Trappers Trail
- Atmospheric Pollution
- Meteorology
- No category
- Photography
- Wind Tunnel
- Wind tunnel
Home Blog PowerPoint Tutorials How to Work with Presenter View in PowerPoint
How to Work with Presenter View in PowerPoint
Not all presenters have excellent memory recall or the ability to speak flawlessly to the audience without any cues. However, many of them are good at hiding it by using Presenter View in PowerPoint. It is a presentation mode that enables the presenter to hide speaker notes and presentation controls from the audience while leveraging the various handy features offered by PowerPoint.
How to Use Presenter View in PowerPoint
To start using Presenter View, ensure it’s enabled before you begin your slideshow. If you are new to this feature, we recommend using this option to familiarize yourself with the various navigation options for this presentation mode. This might also be helpful if the PowerPoint templates you are accustomed to using might have animations that you might want to preview in this mode to understand when to give the next visual cue.
How to Enable Presenter View in PowerPoint
To enable PowerPoint presenter view, go to the SlideShow tab and make sure the Use Presenter View option is enabled. This will ensure that you can access Presenter View when you switch your slides to SlideShow mode.
Adjust Display Settings
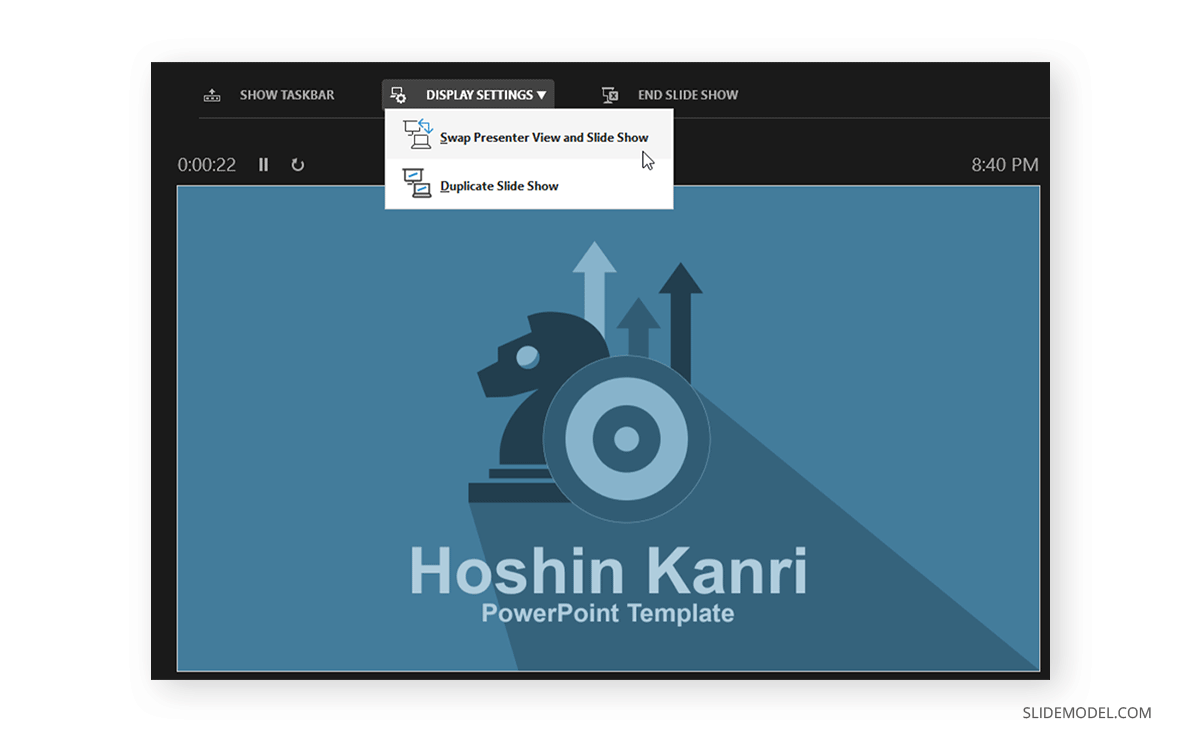
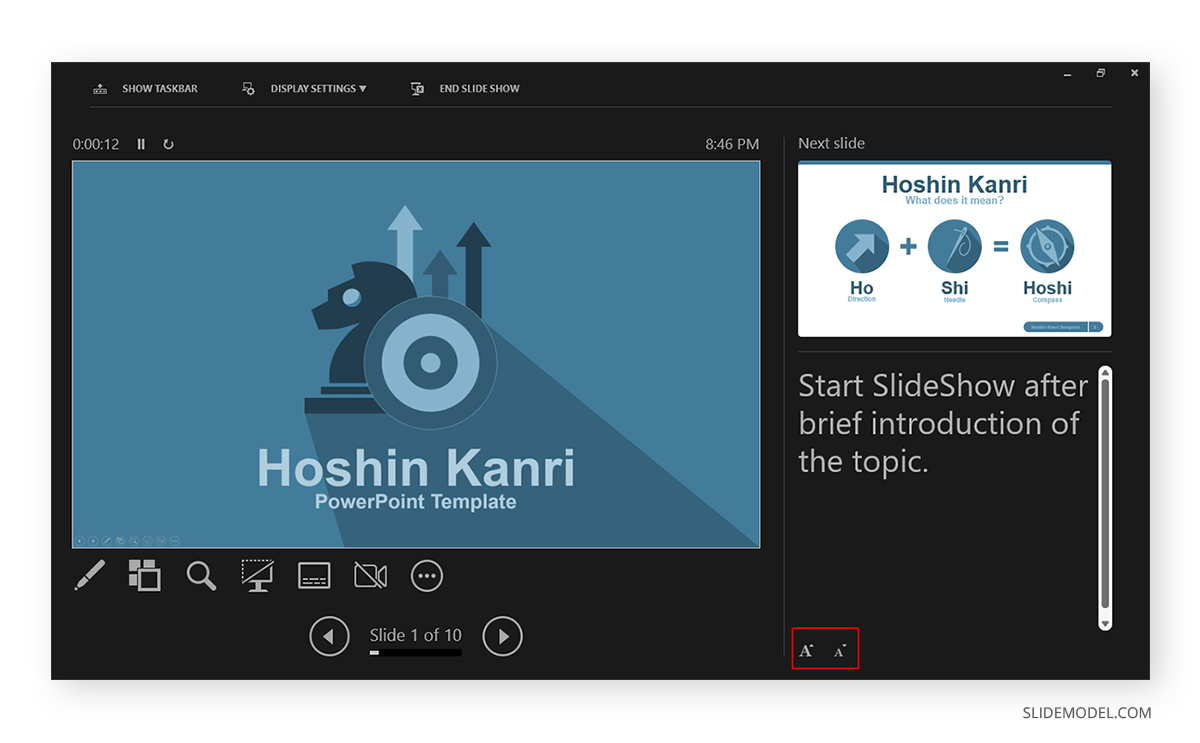
You can swap between the presenter view and slideshow mode or duplicate the slideshow to exit the Presenter View from the Display Settings menu from the top toolbar.
Navigate Slides in Presenter View
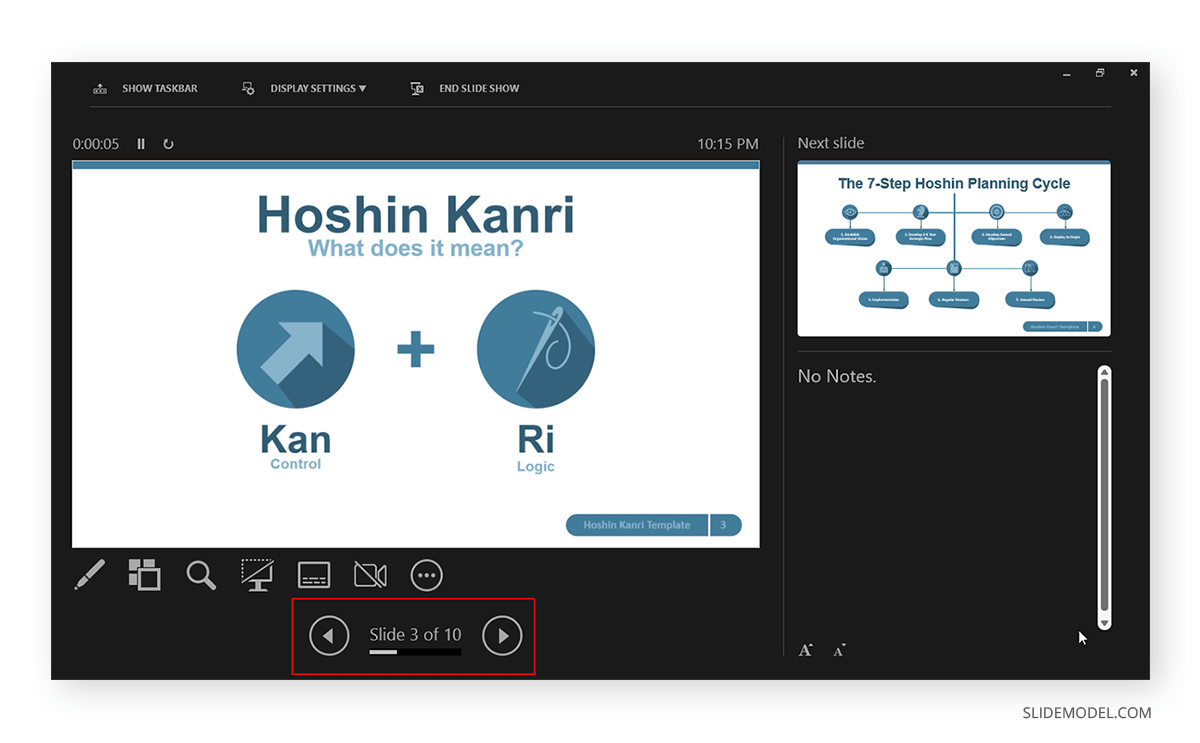
Like any standard PowerPoint presentation in SlideShow mode, you can navigate between slides by using the arrow keys or with a presentation remote. Presenter View also provides slide navigation buttons to move the slides back and forth.
View Taskbar in Presenter View
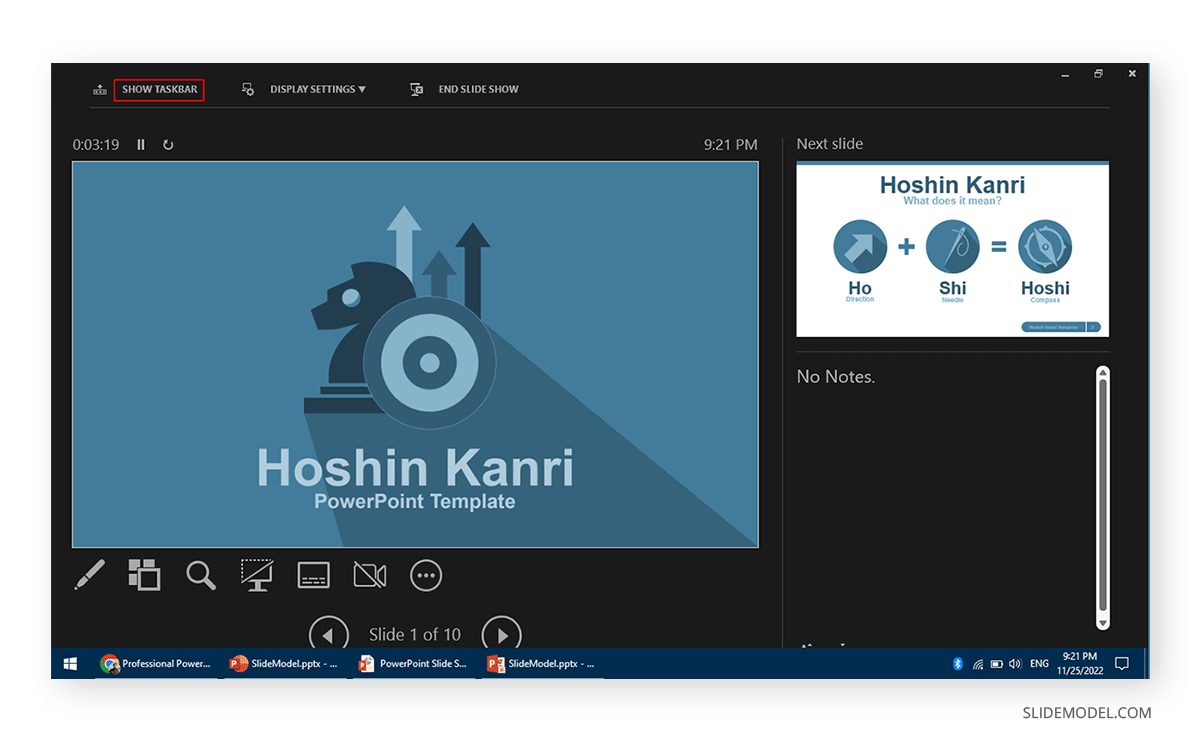
The Show Taskbar option at the top enables viewing the taskbar. This can be helpful if you require using the taskbar, such as to view your battery charge, see the time, enable or disable another app from the taskbar menu, etc.
Reset or Pause the Timer
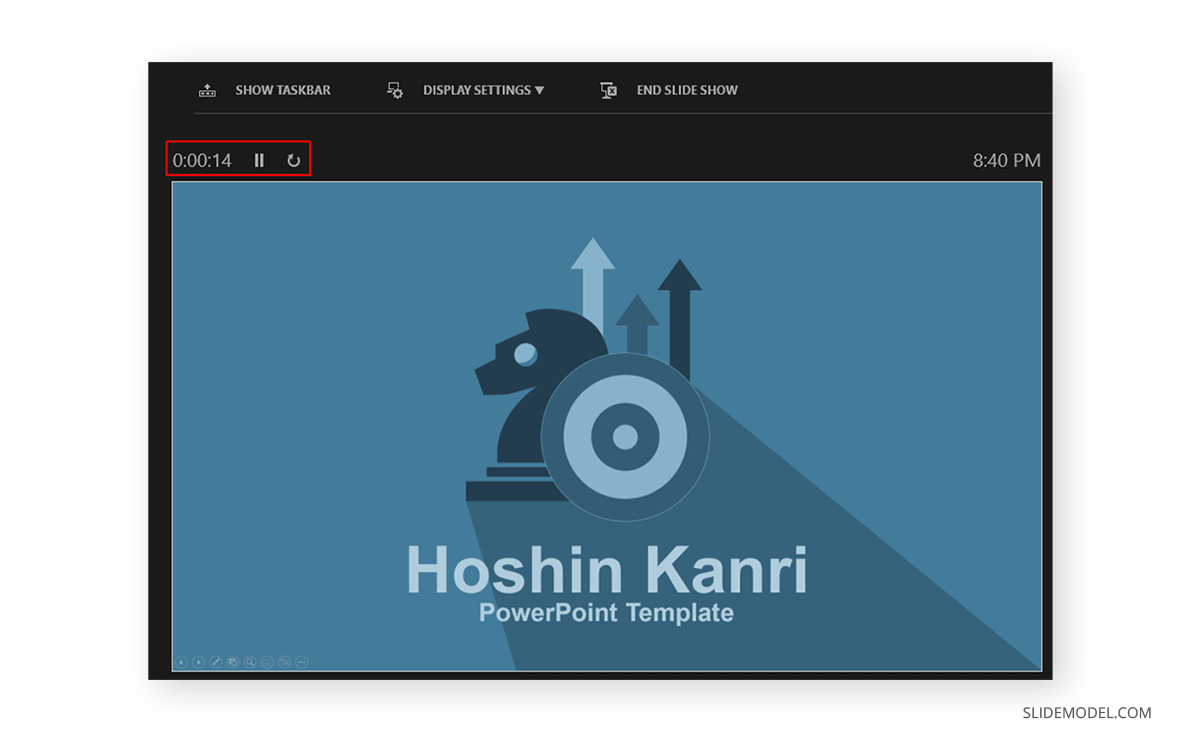
Once you start your presentation in Presenter View, a timer starts showing how much time you have spent in slideshow mode. This is an excellent way to understand how much time you have consumed for your session and to keep an eye out for good timekeeping. You can also hit Pause or reset the timer anytime.
Change the Size of the Speaker Notes
How to view notes in PowerPoint while presenting? If you have any speaker notes added to your slides, they will appear in Presenter View on your screen. You can increase or reduce the size of the text via the two options at the bottom of the speaker notes pane.
Using Annotation Tools in Presenter View
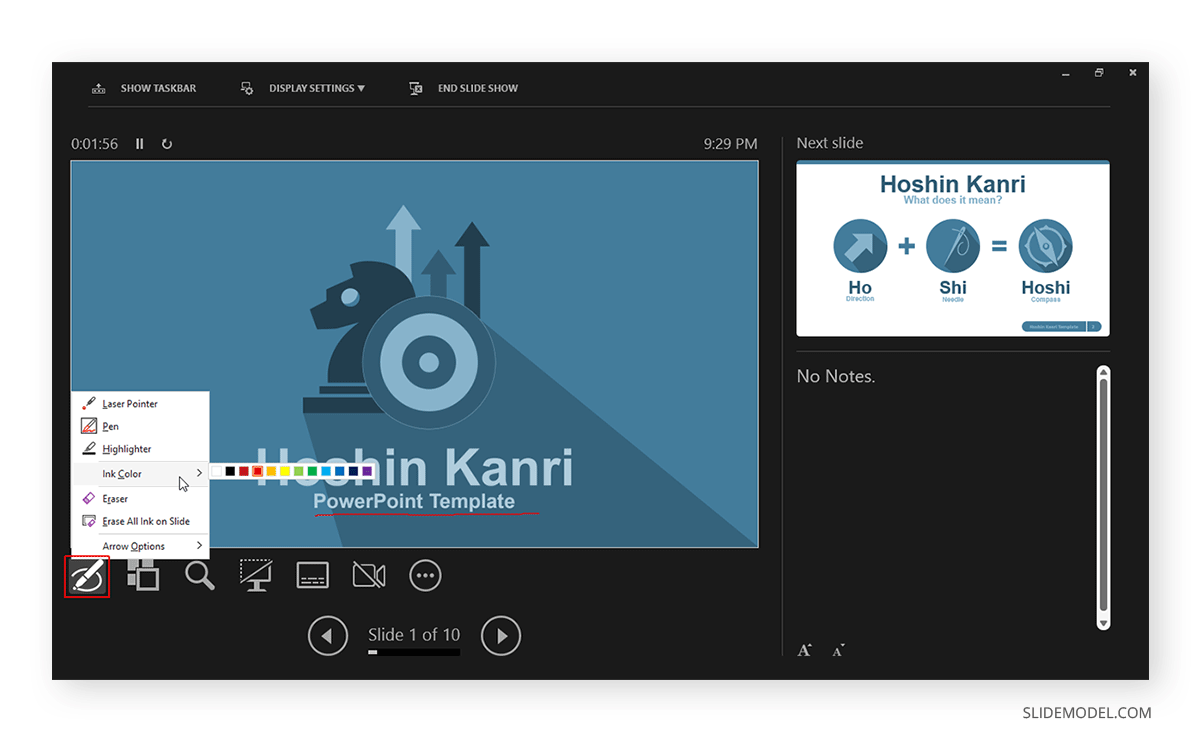
PowerPoint annotation tools can be accessed from the bottom toolbar in Presenter View. The Pen and Laser Pointer Tools button gives you access to the pen, ink colors, laser pointer, and eraser and also allows you to show or hide the mouse pointer via Arrow Options .
View All Slides in Presenter View
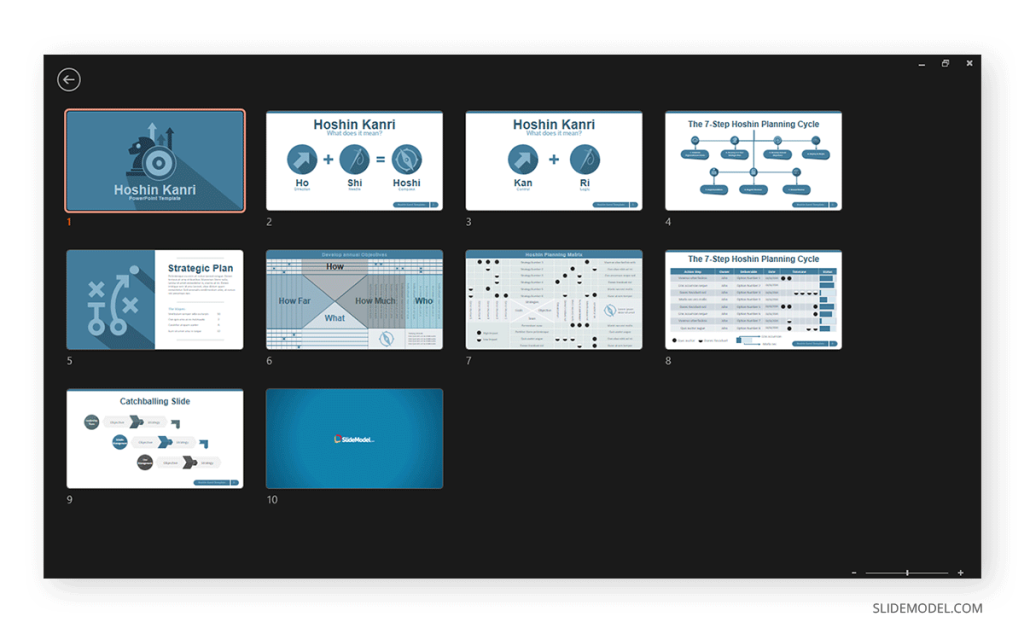
If you need to go back and forth to find a relevant slide for an ongoing discussion or query during your presentation, you can view all slides in Presenter View via the See all slides option.
Zoom Slides using Presenter View
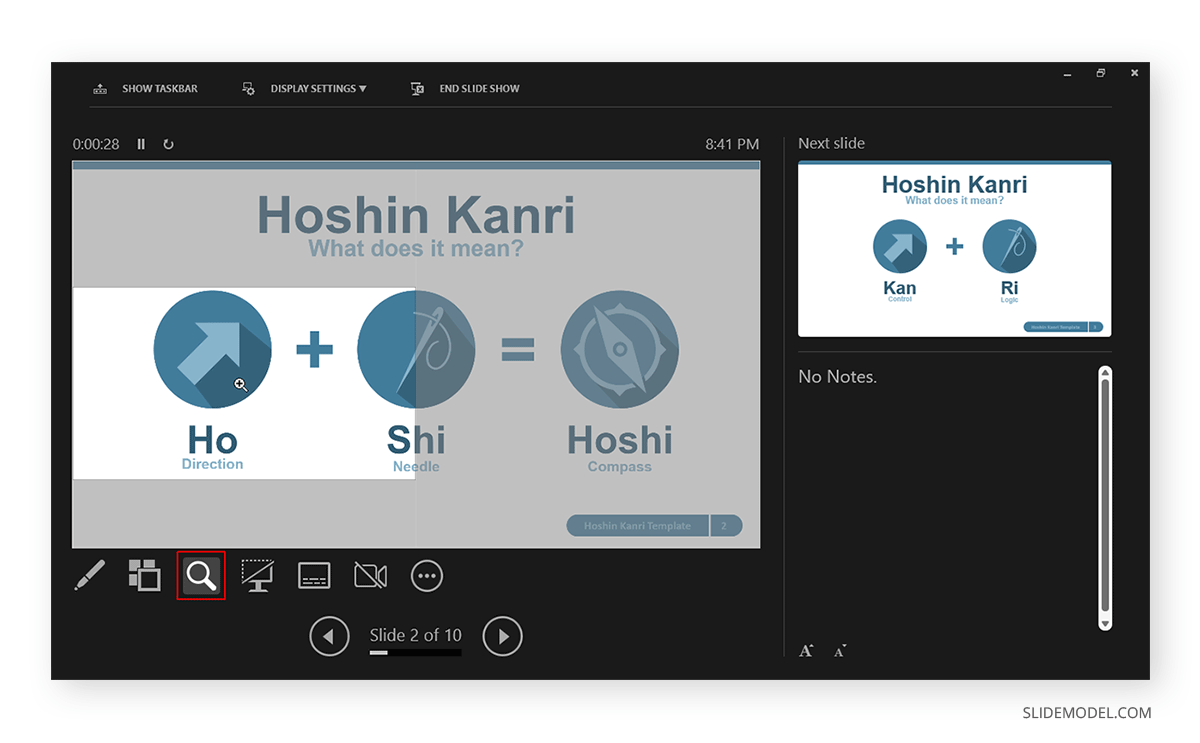
PowerPoint’s Zoom feature lets presenters quickly pick a portion of the slide to zoom into. Presenter View allows you to leverage this feature by instantly selecting a portion of the slide to enlarge it after selecting Zoom into the slide option. To exit the Zoom mode or hit the Esc key.
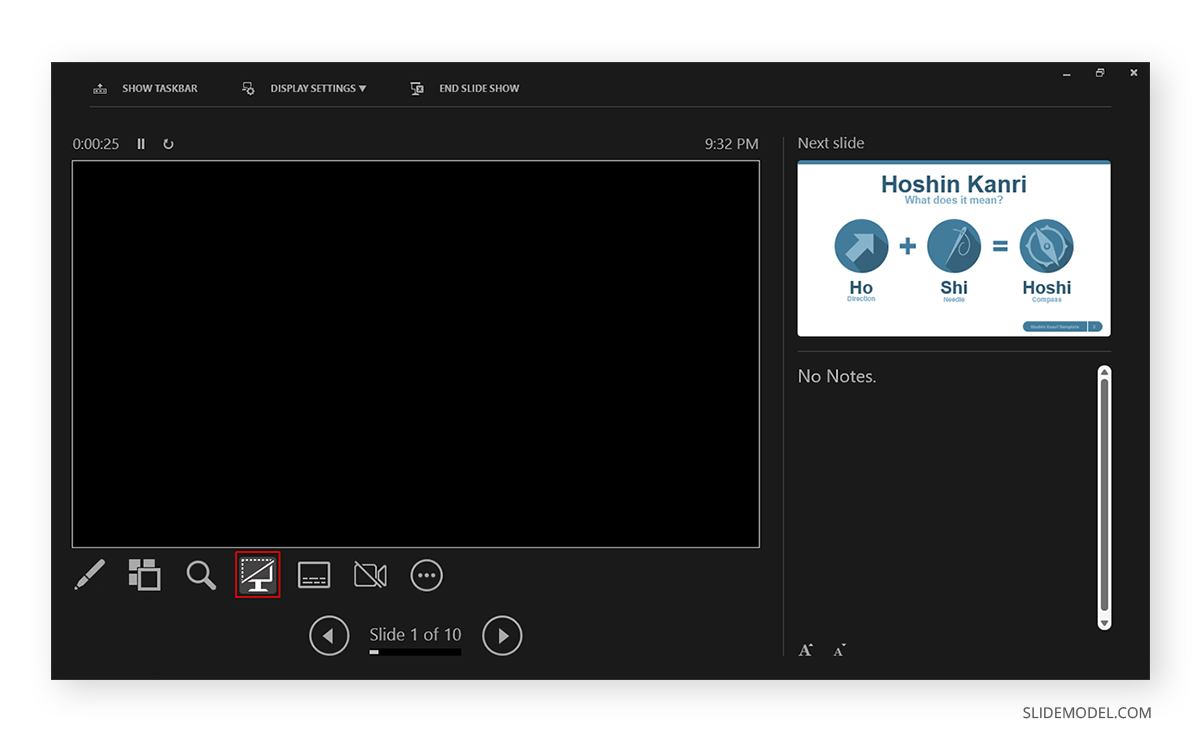
Black or Unblack SlideShow
Sometimes, you might want to turn the screen blank for a while, such as during a mid-presentation break. The Black or Unblack SlideShow option blanks the slides for your audience while continuing to show you all navigation options via Presenter View.
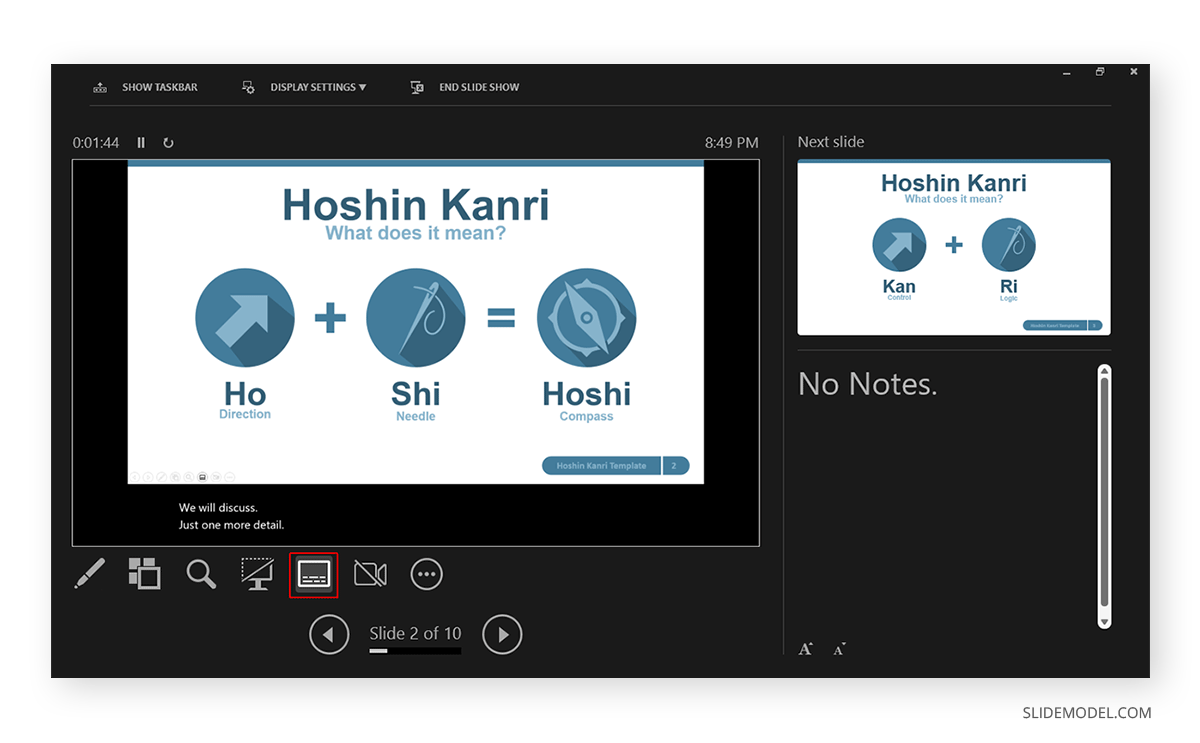
Toggle Subtitles in Presenter View
One of the most revolutionary features introduced by Microsoft for PowerPoint over the past decade has been Live captions. This feature enables subtitles by converting speech to text as you present. You can toggle Live subtitles on or off while in presenter view to help your audience read what you speak.
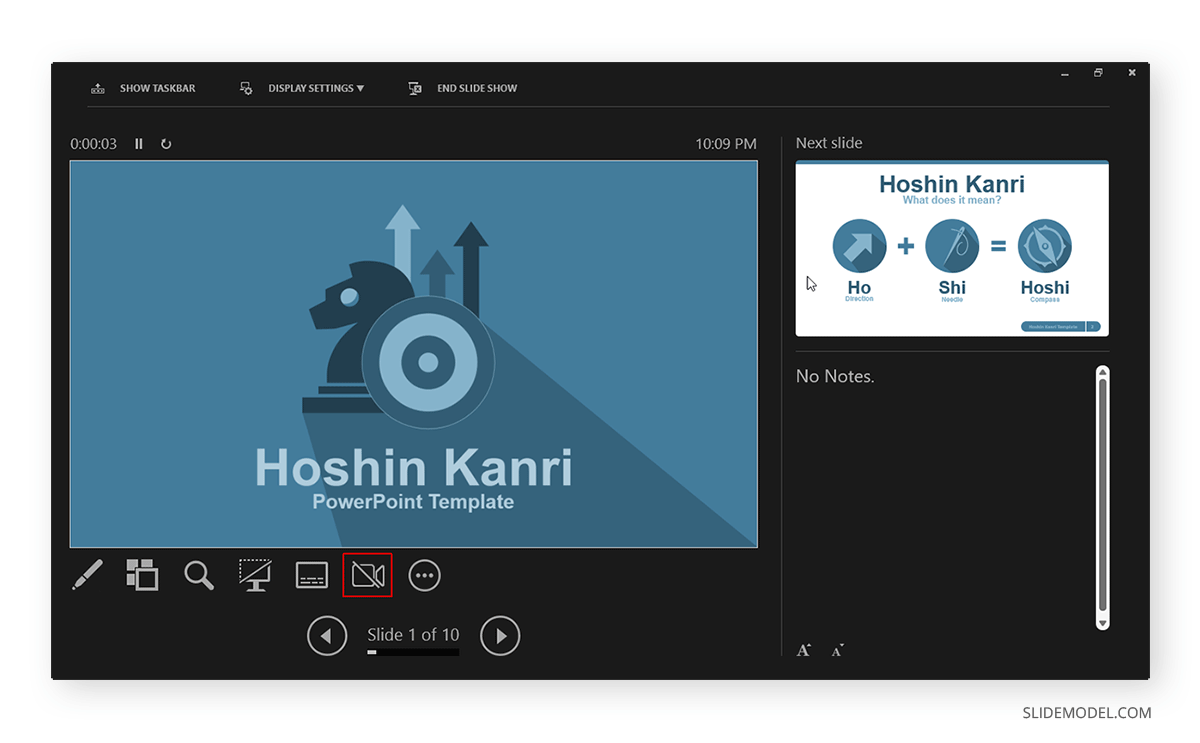
Toggle Camera in Presenter View
Like subtitles, you can also toggle the camera on or off in Presenter View.
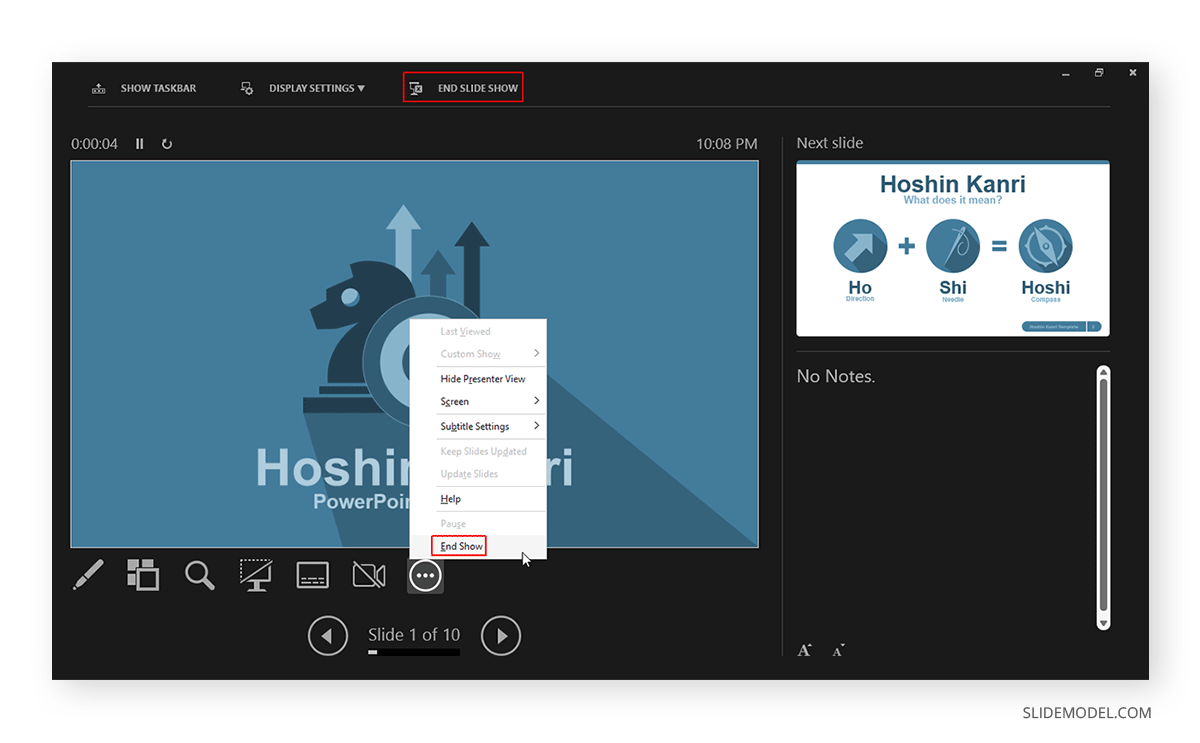
End Slideshow in Presenter View
There are different ways to end or exit a SlideShow from Presenter View. You can hit the Esc key or click End Slide Show . Similarly, you can click the three dots at the bottom and select End Show .

More Slideshow Options
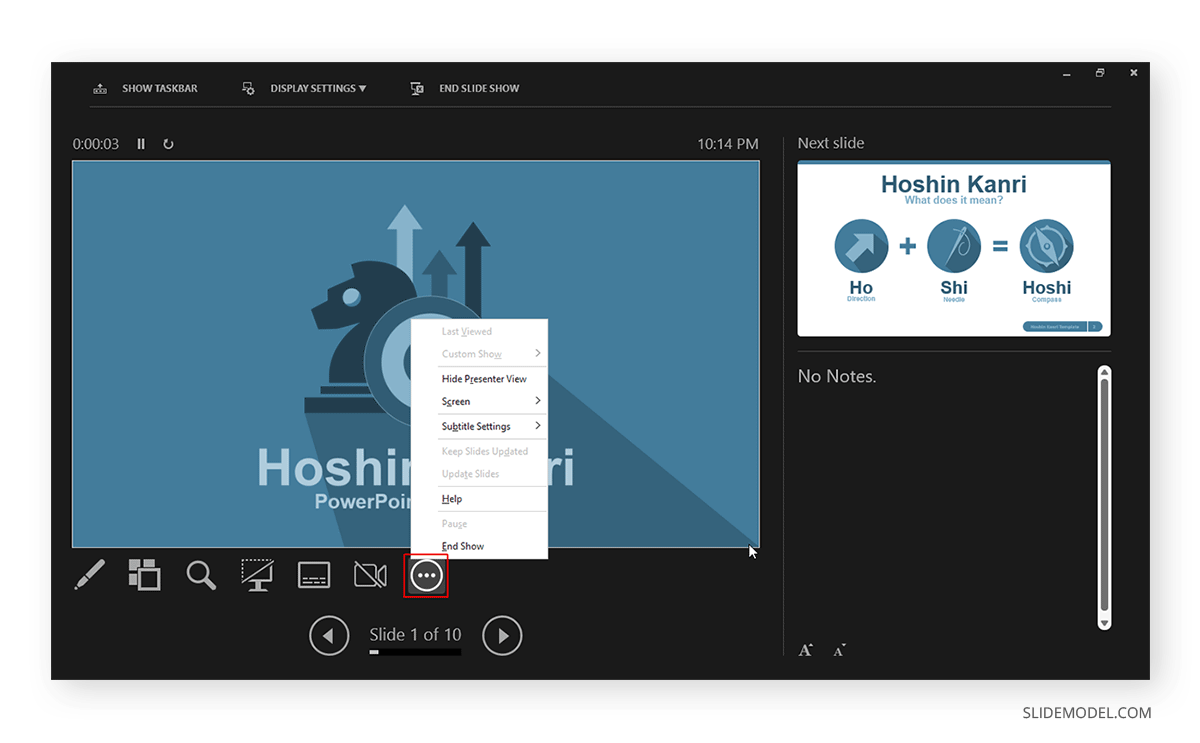
Other than the various visibility prominent menus available to navigate, annotate, and present your slides, you can also find a few additional options via More slideshow options , which are accessible via the three dots at the bottom toolbar. These include adjusting the position of the subtitles, turning your screen white or black, ending the slideshow, etc.
How to Use Presenter View on a Single Screen
While Presenter View can be enabled to work with dual monitors, you can also use Presenter View on a single monitor with remote meeting apps like Zoom. A simple method for switching to Presenter View on a single monitor is to click the three dots ( More slideshow options ) at the bottom in SlideShow mode and select Show Presenter View .
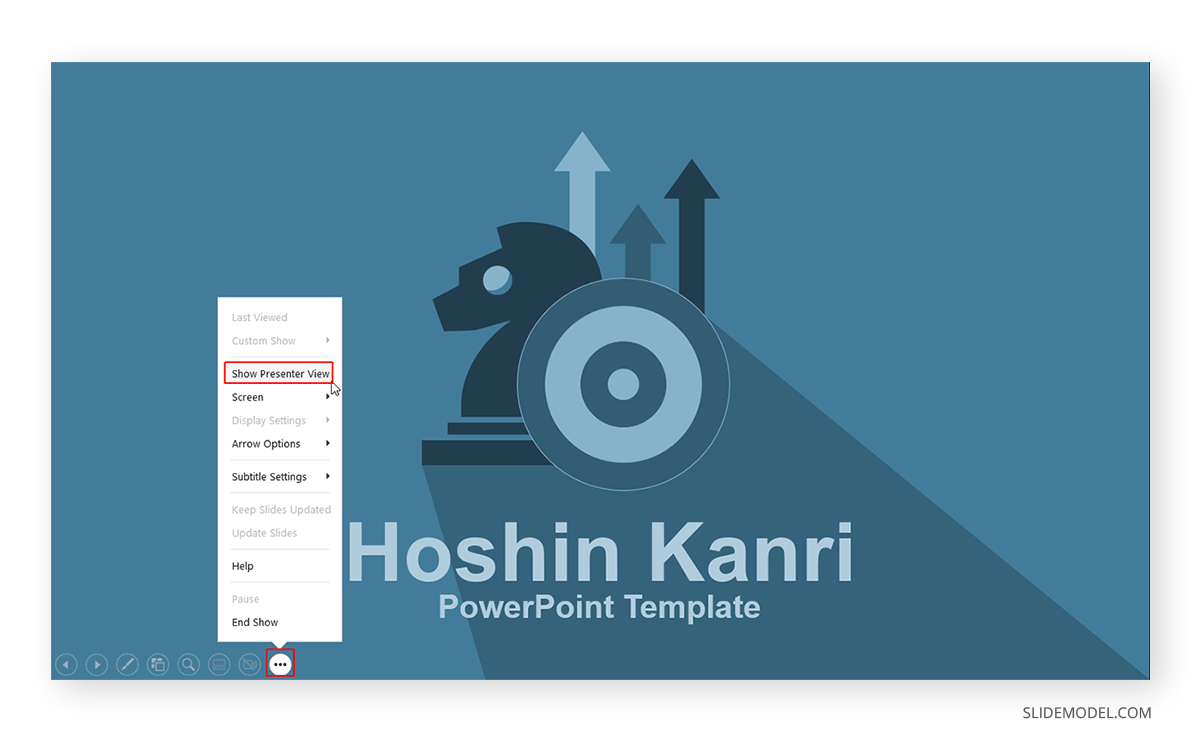
You can also switch to Presenter View on a single monitor anytime using the ALT+F5 hotkey.
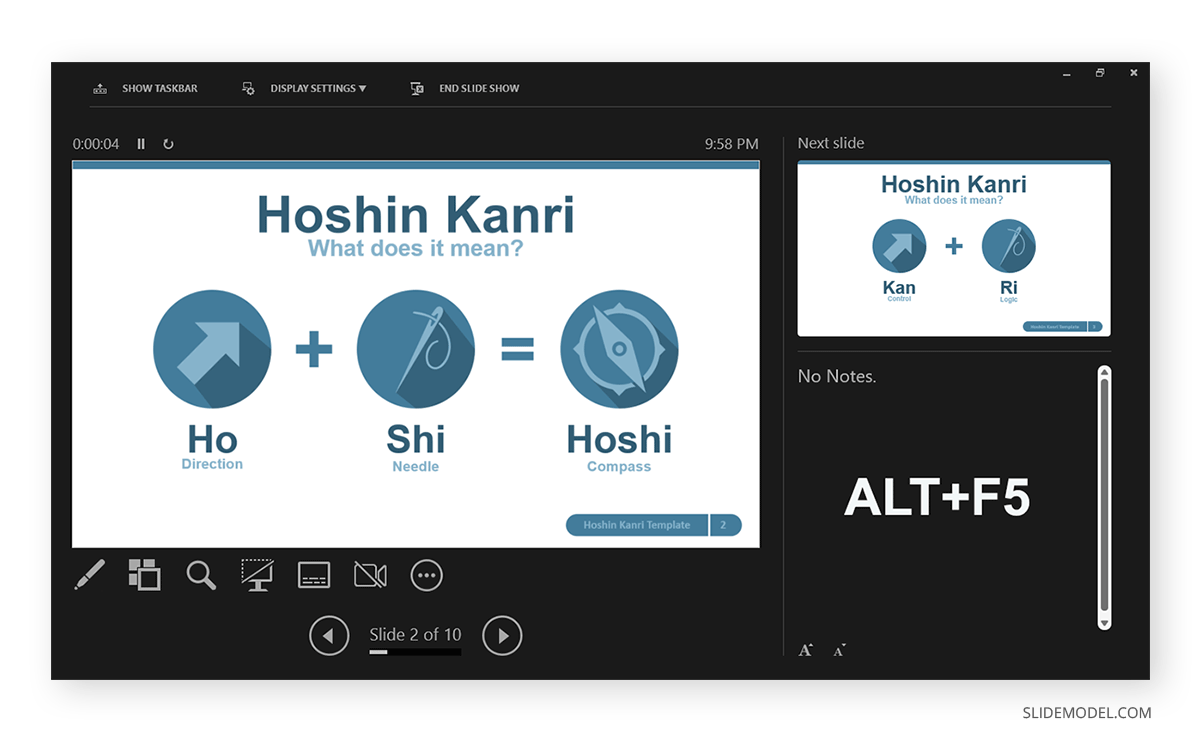
The presenter can easily manage a PPT in presentation mode, with the utility to view speaker notes, annotate or zoom slides, toggle subtitles or camera on or off, and keep your audience engaged via better slideshow management. However, if you’re new to this presentation mode, a bit of practice might help you avoid confusion when presenting before an audience in Presenter View for the first few times.
Like this article? Please share
PowerPoint Tools, Presentation Skills Filed under PowerPoint Tutorials
Related Articles
Filed under Google Slides Tutorials • May 22nd, 2024
How to Translate Google Slides
Whereas Google Slides doesn’t allow to natively translate slides, such process is possible thanks to third-party add-ons. Learn how to translate Google Slides with this guide!
Filed under PowerPoint Tutorials • May 17th, 2024
How to Track Changes in PowerPoint
Just like with Google Slides, you can check who made adjustments to your files in collaborative work. Learn how to track changes in PowerPoint here!
Filed under Google Slides Tutorials • May 17th, 2024
How to Make Google Slides Vertical
Power up your presentation skills by learning how to make google slides go vertical. Step-by-step instructions with examples.
Leave a Reply
Technology for Academics
Finding new technology so you don't have to
PowerPoint presenter view in Zoom—with one monitor
Are you teaching remotely using Zoom? And you only have one monitor? Do you miss using PowerPoint presenter view in your classroom?
PowerPoint presenter view
This is what presenter view looks like. When you have a computer screen and a projector (or a second monitor), this is the view on your computer screen, and the slide alone shows on the projector (or second monitor). In this presenter view screen, you can see your next slide on the right, and right below that are any notes you’ve entered for the slide your audience is currently viewing. Under the currently-viewing slide are a few tools: pen/pointer, see all of the slides in your presentation (handy for jumping around your slides), magnifying glass for zooming in on a part of your slide, and black out the slide you are showing. Click the 3-dot icon for a few more options.
While you have all of those nifty tools at your disposable, this is what your audience sees projected on the screen.
To get presenter view, edit your PowerPoint, click the Slide Show tab, then check the “Use Presenter View” box.
If you have one monitor, however, and run your slide show, you will just see the slide like your audience would. To get the presenter view, right-click on the slide and select presenter view.
Using single-monitor PowerPoint presenter view with Zoom
To use presenter view with Zoom, it’s easy with two monitors. All you need to do is share the screen with the slide on it.
However, if you only have one monitor, you probably don’t want to share your entire presenter view screen. Good news. You don’t have to. You can choose to share only the slide portion of your presenter view screen.
In Zoom, click on Share Screen, then select the Advanced tab.
Then click Portion of Screen, and click the Share button.
A green box will appear. Whatever is in the green box is what your Zoom audience will see. Click and drag the bar at the top of the box to move it. Click and drag the sides/bottom/corners to resize it.
Zoom will remember the box size and location from session to session.
Before closing your PowerPoint presentation, stop sharing. If you don’t, when you close your PowerPoint, whatever is inside that green box will appear to your Zoom audience. When I closed my PowerPoint just now without stopping my Zoom screen share, my email was inside the green box – viewable to everyone who was in my Zoom room. Fortunately, I was the only one in my Zoom room, so no harm done. When you are done sharing, always stop sharing before doing anything else. As an added precaution, close all programs you are not going to be using before starting your Zoom session.

- Click to share on Facebook (Opens in new window)
- Click to share on Twitter (Opens in new window)
- Click to share on LinkedIn (Opens in new window)
- Click to print (Opens in new window)
- Click to email a link to a friend (Opens in new window)
1 thought on “ PowerPoint presenter view in Zoom—with one monitor ”
Perfect timing, Sue. I was JUST struggling with this trying to manage my single screen (eg, propping my cell on a soup can to record ppt on my monitor) and your step-by-step instructions streamlined the process. Thanks!
Comments are closed.

Microsoft Learn Q&A needs your feedback! Learn More
May 20, 2024
Microsoft Learn Q&A needs your feedback!
Want to earn $25 for telling us how you feel about the current Microsoft Learn Q&A thread experience? Help our research team understand how to make Q&A great for you.
Find out more!
Contribute to the Microsoft 365 and Office forum! Click here to learn more 💡
April 9, 2024
Contribute to the Microsoft 365 and Office forum!
Click here to learn more 💡
PowerPoint Forum Top Contributors: Steve Rindsberg - John Korchok - Bob Jones AKA: CyberTaz ✅
May 10, 2024
PowerPoint Forum Top Contributors:
Steve Rindsberg - John Korchok - Bob Jones AKA: CyberTaz ✅
- Search the community and support articles
- Microsoft 365 and Office
- Search Community member
Ask a new question
Setting the Monitor for the powerpoint presenter view
I am trying to get the presenter view to the third monitor (windows pc) when starting the presentation mode. Sadly no luck so far. Can someone tell me if it is possible and if so, how to do that? Thanks in advance Timothy
Report abuse
Reported content has been submitted
Replies (4)
Hello Mate,
Does the presentation only appear on two monitors and the third one will only be a black screen?
Anyhow, here are some few things that you can try:
Connect the primary PC and the second and third PCs to the same network or use Ethernet cross-over cables to manually connect.
Open the browser on your primary computer and go to the MaxiVista website to download a free demo version of MaxiVista.
Click “Download Now.”
Click “Open” in the dialog box which opens.
Click “Run” to start the set-up and follow the set-up wizard's instructions.
Repeat the download and set-up process on the other two computers by repeating the primary computer set-up procedures.
Right-click the MaxiVista icon on the desktop of the second computer and click “Enable Secondary Display.”
Right-click the MaxiVista icon on the desktop of the third computer and click “Enable Secondary Display.” Your computer is now set-up and ready to run multiple monitors.
Open PowerPoint presentation.
Click “Slide Show.”
Click “Set Up Show.”
Check the box “Show Presenter View” in the dialog box which opens. This opens a navigation panel on the presenter’s monitor which allows the presenter to easily manage the multiple screens.
Click the monitor you want the slide show presentation to appear on under the “Display Slide Show” list.
Click “OK” to start the presentation.
Let me know how it goes. Cheers.
11 people found this reply helpful
Was this reply helpful? Yes No
Sorry this didn't help.
Great! Thanks for your feedback.
How satisfied are you with this reply?
Thanks for your feedback, it helps us improve the site.
Thanks for your feedback.
Hello,
I don't quite understand want you try to say with the 1. proposed solution. (i only have one Computer)
I can move the powerpoint output. thats no problem what I want to redirect is the presenter view, you know the one where you see the actual slide, the next slide your notes and so on. For the presenting person.
Maybe it is a little bit more clear what i try to achieve.
Thanks again for your help
- Microsoft Agent |
Hi Timothy,
Using PowerPoint Presenter view, you can see your notes as you present, while the audience sees only your slides. For us to help you with this concern, we suggest that you check this article: Start the presentation and see your notes in Presenter view. It has a video and a walkthrough on how to use the presenter view and also the controls that you can use. We also recommend that you check this article: Present on multiple monitors (and view speaker notes privately) for more details using multiple monitors on Presenter view.
Kindly get back to us with the results.
Hello, Thanks for your help, I appreciate it.
I think i need to give a little more background on what i am trying to do. In the current setup we have currently duplicated the monitor at the speaker table with the one back at the technician workplace to allow our presenters to use their powerpoint presentations while staying in controll. The presentation goes to the Beamer as it should and always did. This works but comes with a price, wen someone is presenting, our technician workplace ist beeing occupied by the presenter view and blocking some advanced setting we would like to be able to utilize as well as simply prepairing the next steps ( whitch we can not do at the moment since it would desturb the presenting person)
I would like to be able to specify on which monitor the PowerPoint Presenter view shall be displayed on, to get it away from the technician workplace monitor. But that seams to be impossible so far :( Thanks again for your help
10 people found this reply helpful
Question Info
- Norsk Bokmål
- Ελληνικά
- Русский
- עברית
- العربية
- ไทย
- 한국어
- 中文(简体)
- 中文(繁體)
- 日本語
Create video presentations that keep classrooms engaged.
Learn how to craft teaching sessions or class projects that keep eyeballs on the screen with compelling video presentations.

Spice up learning with a video presentation.
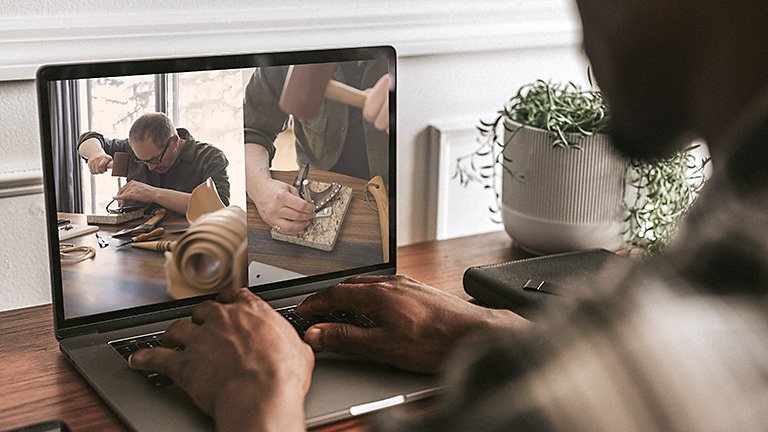
As the world shifts toward the virtual classroom, teaching and education tools are moving into digital spaces, as well. With video presentations, students and educators alike have a powerful resource to make learning exciting and fun.
For educators, a video presentation can help introduce topics visually and hold the attention of a class longer. For students, video presentation projects draw on creative and analytical skills that they’ll use throughout their lives.
Go beyond simple PowerPoint slides and explore how Adobe Premiere Pro can help any video presentation maker create their own videos and live presentations that compel audiences with video, animation effects, and more.
Limitless video presentation ideas for any creative occasion.
In a virtual learning environment, students are exposed to limitless knowledge with the drop of a link. Videos offer digestible amounts of information that students can rewatch later to help retain new knowledge.
For teachers, video presentations add variety to teaching materials, which can help keep eyes on the lecture screen instead of the phone screen. Making video presentations can help both students and teachers express themselves, share ideas, and make meaningful learning progress.
Expand the possibilities of virtual learning for students.
Some subject matters lend themselves better to a video presentation than other teaching formats. For example:
- Real-world events and experiences: Watch a video tour of the Parthenon ruins in Greece or experience rare green mambas hatching from their eggs in West Africa.
- Art, creativity, and visual skills: Learn about painting, drawing, geometry, and more with visual aids to help better understand the topic.
- Complex or technical topics: Get a 3D view of the human skeleton to help learn about anatomy, or show all of the elements of the periodic table in action.
Make teaching more accessible and engaging.
Keeping students interested can be a challenge, especially in a virtual classroom setting. Try using videos to change up your course content — and give you a break from lecturing. But, entertaining as videos may be, there are lots of other good reasons to use them in the classroom:
- Inclusivity: Online video presentations with subtitles can accommodate all audiences, including students with hearing impairment. Subtitles can also help students who are learning a new language better understand their teachers.
- Information retention: Smaller chunks of information tend to be easier for learners to remember. Engaging visuals can help overcome learning curves so students can grasp concepts more easily.
- Time efficiency: A brief explainer video or short clip can save you time with lesson planning and help share information from experts in their fields.
- Effortless studying: Students can revisit and rewatch videos outside of the classroom and have time to reprocess the course material.
Types of video presentations.
There’s no limit to what you can create with your video presentation, from a video of you dancing the cha-cha to an animated infographic, or even funny GIFs for a dose of comic relief. Here are a few types of videos you can make yourself — or find online — to use in the classroom:
- Personal narratives: As a class assignment, a personal narrative video can help students learn about themselves and each other. Or, share a personal narrative of people related to the subject you’re teaching.
- Instructional videos: Step-by-step tutorials are a versatile way to break down complicated topics. Try making a how-to video on linear algebra, novel writing, or even a DIY art project.
- YouTube videos: Try using a YouTube video in your presentation slides to connect with younger students in their own language. Many YouTube stars cover educational topics . Or, within a larger video presentation, pop in a short video or two from credible YouTubers to help students stay attentive.
The makings of an engaging video lesson.
Whether you're a student with a video project assignment or a teacher looking to change up your lesson plan, a solid outline will help you or your students create a cohesive video presentation. Start by writing an outline that includes the following:
1. Introduction of your topic:
Hook your audience with an exciting story, fact, or anecdote about your topic.
2. Agenda or overview:
Provide a slide of the talking points you will be sharing with your audience so they can see the full breadth of the presentation.
3. Explain your topic or subject:
Tell the audience about the most important aspects of your topic as you work your way through the sections you presented in your overview.
4. Examples and discussion points:
Get practical on your topic and dive into detail to get the conversation going.
5. Conclusion:
Wrap up your presentation with any last remarks or touch back on the theme of your presentation.
Use Adobe Premiere Pro to create your presentation.
You don’t need a vast knowledge of video editing software to craft a quality video presentation. Adobe Premiere Pro features many video and presentation tools that you can use to customize and finalize your video. Choose from several themed video and presentation templates, slide transitions, and features that let you add subtitles , music, and much more.
Polish off your video by adding some creative components.
Take your video presentation to the next level with these creative tips:

Editing ideas:
- Select short clips : Pick a quick video clip to add variety as a visual aid, but keep it bite-sized so it’s easier for your audience to grasp. You can add video files and clips easily in Premiere Pro and use video templates to speed up that work.
- Add transitions : Premiere Pro features many fun transitions and animated effects you can use within your presentations to keep your audience’s attention.
- Throw in some music: Sometimes a little background music can make a presentation more engaging. Keep the tempo up by adding a tune.
Add the final touches:
- Choose a color scheme or overall design: Slideshow and presentation templates can help you unify the color and theme of your presentations to ensure nothing distracts the viewer. Customization controls can help you update those color schemes too.
- Use stock images: Select a few stock images as visual aids to place throughout your presentation to add high-quality visuals to your piece.
Read more about Premiere Pro tutorials so you can hone your video editing skills and start putting together an engaging video presentation for your next lesson plan or class assignment.
Explore related creative projects and topics…
Share your smarts with educational videos.
Introduction to video editing.
Create a polished school letterhead for your institution.
Get noticed with a stellar college resume.

Shaping the future. One student at a time.
Adobe Ambassadors and campus clubs make it easier to get started with Creative Cloud.
Find out more .
More great benefits.

Get the apps on all your devices.

Learn at your own pace.

Access the latest version of all the apps.
Questions? Ask away
Students get all apps for the price of a single app.
Creative cloud for students and teachers .
Get 20+ apps, including Photoshop, Illustrator, and lnDesign. Save over 60%.
US$19.99/tháng * US$57.99/tháng For the first year, then after that. Check eligibility
stickypromobar
Students save over 60% on Creative Cloud.
Student eligibility
Top Questions
No, the desktop applications in Creative Cloud, such as Photoshop and Illustrator, are installed directly on your computer, so you don't need an ongoing Internet connection to use them.
An Internet connection is required the first time you install and license your apps, but you can use the apps in offline mode with a valid software license. The desktop apps will attempt to validate your software licenses every 30 days.
Annual members can use the apps for up to 99 days in offline mode. Month-to-month members can use the software for up to 30 days in offline mode.
Your Creative Cloud files are stored on your desktop as well as on the Creative Cloud servers. If you cancel or downgrade your paid membership, you will still have access to all of the files in the Creative Cloud folder on your computer and via the Creative Cloud website.
Your account will be downgraded to a free membership, which includes 2GB of storage. If you’re using more than 2GB of storage, you will not be able to upload any new files to the cloud until the amount of online space used in your account drops below your allotted amount.
If you are over your storage limit, you have 90 days to reduce your online usage or you may lose access to some or all of your files saved on the Creative Cloud servers.
No, you can continue using your current version of the product as long as you have an active membership. You have flexibility on when and if you install a new release.
Students and teachers can purchase Creative Cloud at a discounted price. See the Students and Teachers plans page .
Learn the Basics
Get up and running with these great tutorials. Start now ›
Ask the Community
Post, discuss, and be a part of our community. Join now ›
Customer Care
We're here to help. Get support ›
Language Navigation

Use keyboard shortcuts to deliver PowerPoint presentations
Many users find that using an external keyboard with keyboard shortcuts for PowerPoint helps them work more efficiently. For users with mobility or vision disabilities, keyboard shortcuts can be easier than using the touchscreen and are an essential alternative to using a mouse.
For a separate list of shortcuts to use while creating your presentation, go to Use keyboard shortcuts to create PowerPoint presentations .
The shortcuts in this topic refer to the US keyboard layout. Keys for other layouts might not correspond exactly to the keys on a US keyboard.
A plus sign (+) in a shortcut means that you need to press multiple keys at the same time.
A comma sign (,) in a shortcut means that you need to press multiple keys in order.
This article describes the keyboard shortcuts and some other common shortcut keys that apply while you're delivering your presentation with PowerPoint for Windows.
To quickly find a shortcut in this article, you can use Search. Press Ctrl+F, and then type your search words.
If an action that you use often does not have a shortcut key, you can record a macro. For step-by-step instructions to record a macro, refer to the section “Record a macro” in Automate tasks with the Macro Recorder to create one.
During the presentation, to open a list of shortcuts, press F1. Use the arrow keys to move between the tabs in the Slide Show Help dialog box.
Get the PowerPoint 2016 keyboard shortcuts in a Word document at this link: PowerPoint 2016 for Windows keyboard shortcuts .
In this topic
Frequently used shortcuts, control the slide show, control media in the slide show, pointer and annotations in the slide show, rehearse the presentation, maneuver in presenter view.
This table lists the most frequently used shortcuts in PowerPoint for Windows.
Top of Page
You can use the following keyboard shortcuts while you’re delivering your presentation in Slide Show (full-screen) mode, with or without Presenter View .
Control media in the slide show
These keyboard shortcuts work with video files imported from your computer or other device. They don't work with online video files.
Use the following keyboard shortcuts to control the pointer and to use it to create annotations during your presentation.
You can use these keyboard shortcuts when you are rehearsing your presentation.
You can use the following keyboard shortcuts while you’re delivering your presentation using Presenter View in PowerPoint 2013 and newer. Presenter View lets you look at your presentation with your speaker notes on one screen (your laptop, for example), while the audience views the notes-free presentation on a different screen.
When you are connected to a second display, Presenter View is shown automatically when you start the slide show. To start a presentation in Presenter View even if you have only a single display, press Alt+F5.
Tip: If Presenter View does not start automatically with two displays, go the Slide Show tab, select the Use Presenter View checkbox, and select the preferred monitor.
PowerPoint help & learning
Screen reader support for PowerPoint
Use keyboard shortcuts to create PowerPoint presentations
Basic tasks to create a presentation in PowerPoint with a screen reader
Use a screen reader to explore and navigate PowerPoint
This article describes the keyboard shortcuts and some other common shortcut keys that apply while you're delivering your presentation with PowerPoint for macOS.
The settings in some versions of the Mac operating system (OS) and some utility applications might conflict with keyboard shortcuts in Microsoft 365 for Mac. For information about changing the key assignment for a keyboard shortcut, refer to Mac Help for your version of macOS or your utility application.
If you don't find a keyboard shortcut here that meets your needs, you can create a custom keyboard shortcut. For instructions, go to Create a custom keyboard shortcut for Office for Mac .
Many of the shortcuts that use the Ctrl key on a Windows keyboard also work with the Control key in PowerPoint for macOS. However, not all do.
To quickly find a shortcut in this article, you can use the Search. Press Command+F, and then type your search words.
During the presentation, to open a list of shortcuts, press forward slash (/).
Pointer and annotations in the slide show
Navigate the presenter view on macos 10.15 (catalina) and later.
This table lists the most frequently used shortcuts in PowerPoint for macOS.
You can use the following keyboard shortcuts while you’re delivering your presentation in Slide Show (full-screen) mode, with or without the Presenter View .
Use the following keyboard shortcuts to control media during a presentation.
You can use the following keyboard shortcuts while you’re delivering your presentation using the Presenter View on macOS 10.15 (Catalina) and later, and when the keyboard control navigation is turned on. For instructions, refer to Turn on the keyboard control navigation .
Use the shortcuts in the table below to move in the Presenter View in PowerPoint for macOS.
Skip ahead in your presentation
You can use your keyboard to skip ahead several slides without the audience seeing the slides as you transition to the new slide.
Press the Tab key until you reach the Slide Navigator control (filmstrip).
Press and hold down the Option key and press the Left or Right arrow key repeatedly until you find the slide you want to skip to.
Release the Option key to move to the slide you want to skip to.
Turn on the keyboard control navigation
To use your keyboard to move between and activate controls on your Mac, turn on the keyboard control navigation.
If you're not using VoiceOver, on your computer, select System Preferences > Keyboard > Shortcuts , and select the Use keyboard navigation to move focus between controls checkbox.
If you're using VoiceOver, the control navigation should be on by default. To check the setting, do the following:
On your computer, press Control+Option+M to access the Apple menu bar item. To open the Apple menu, press Control+Option+Spacebar.
Press Control+Option+Down arrow key until you hear "System preferences ellipses," and then press Control+Option+Spacebar.
The System Preferences window opens. The focus is in the Search text box.
Type Keyboard , and then press Return. The Keyboard dialog box opens.
Press Control+Option+Right arrow key until you hear "Shortcuts tab," and then press Control+Option+Spacebar.
Press Control+Option+Right arrow key until you hear: "Use keyboard navigation to move focus between controls." VoiceOver also announces if the option is selected or unselected. To toggle the option on or off, press Control+Option+Spacebar.
To close the Keyboard dialog box, press Command+W.
This article describes the keyboard shortcuts that apply while you're delivering your presentation with PowerPoint for the web.
If you use Narrator with the Windows 10 Fall Creators Update, you have to turn off scan mode in order to edit documents, spreadsheets, or presentations with Microsoft 365 for the web. For more information, refer to Turn off virtual or browse mode in screen readers in Windows 10 Fall Creators Update .
When you use PowerPoint for the web, we recommend that you use Microsoft Edge as your web browser. Because PowerPoint for the web runs in your web browser, the keyboard shortcuts are different from those in the desktop program. For example, you’ll use Ctrl+F6 instead of F6 for jumping in and out of the commands. Also, common shortcuts like F1 (Help) and Ctrl+O (Open) apply to the web browser – not PowerPoint for the web.
This table lists the keyboard shortcuts you can use to control the slide show.
Technical support for customers with disabilities
Microsoft wants to provide the best possible experience for all our customers. If you have a disability or questions related to accessibility, please contact the Microsoft Disability Answer Desk for technical assistance. The Disability Answer Desk support team is trained in using many popular assistive technologies and can offer assistance in English, Spanish, French, and American Sign Language. Please go to the Microsoft Disability Answer Desk site to find out the contact details for your region.
If you are a government, commercial, or enterprise user, please contact the enterprise Disability Answer Desk .

Need more help?
Want more options.
Explore subscription benefits, browse training courses, learn how to secure your device, and more.

Microsoft 365 subscription benefits

Microsoft 365 training

Microsoft security

Accessibility center
Communities help you ask and answer questions, give feedback, and hear from experts with rich knowledge.

Ask the Microsoft Community

Microsoft Tech Community

Windows Insiders
Microsoft 365 Insiders
Find solutions to common problems or get help from a support agent.

Online support
Was this information helpful?
Thank you for your feedback.

IMAGES
VIDEO
COMMENTS
A few years ago PowerPoint introduced Presenter View Preview. This mode allows you to see Presenter View even if you only have one screen. It is a way to practice your presentation without having to connect to a projector. Using this mode can be helpful depending on the meeting platform you use.
Now, if you are working with PowerPoint on a single monitor and you want to display Presenter view, in Slide Show view, on the control bar at the bottom left, select , and then Show Presenter View. Use the controls in Presenter view. To move to the previous or next slide, select Previous or Next.
Select the Use Presenter View checkbox. Select which monitor to display Presenter View on. Select From Beginning or press F5. In Presenter View, you can: See your current slide, next slide, and speaker notes. Select the arrows next to the slide number to go between slides. Select the pause button or reset button to pause or reset the slide ...
Navigate to the slide on which you wish to start presenting. Select the "Slide Show" tab in the ribbon menu. Check the "Use Presenter View" box. Start your presentation by clicking on "From Beginning" or "From Current Slide.". Your notes will appear on your primary monitor, while the audience will see only the slides on the ...
If you have only a single screen and want to use Presenter View in PowerPoint to see your speaking notes on your screen but show your slides in a Zoom meetin...
PowerPoint's Presenter View is a useful feature that allows you to view your presentation notes, control the slide progression, and access various presentati...
View your speaker notes as you deliver your slide show. Draw on or highlight slides during a presentation. Turn your mouse into a laser pointer. Add speaker notes to each slide in a presentation. Training: Presenter view is like a dashboard that contains in one window everything you need to run your slide show. You control the show on a ...
Turn On PowerPoint Presenter View. In PowerPoint for macOS, simply click on Presenter View on the Slide Show tab to kick off the presentation in Presenter view. Turn on Presenter View by clicking on Presenter View on the Slide Show tab. You'll see the Presenter View interface on one screen.
In Powerpoint, start your presentation by pressing ALT+F5. This starts the presentation in presenter mode. This also opens a window in the background where the fullscreen presentation is located. Press ALT+TAB to navigate back to Zoom. Click on Share Screen and navigate in the Advanced tab to the option of Portion of Screen sharing.
A simple method for switching to Presenter View on a single monitor is to click the three dots ( More slideshow options) at the bottom in SlideShow mode and select Show Presenter View. You can also switch to Presenter View on a single monitor anytime using the ALT+F5 hotkey. The presenter can easily manage a PPT in presentation mode, with the ...
In Zoom, click on Share Screen, then select the Advanced tab. Then click Portion of Screen, and click the Share button. A green box will appear. Whatever is in the green box is what your Zoom audience will see. Click and drag the bar at the top of the box to move it. Click and drag the sides/bottom/corners to resize it.
Click "Slide Show.". Click "Set Up Show.". Check the box "Show Presenter View" in the dialog box which opens. This opens a navigation panel on the presenter's monitor which allows the presenter to easily manage the multiple screens. Click the monitor you want the slide show presentation to appear on under the "Display Slide Show ...
Start Presenter View. Start your presentation in Slide Show mode using Presenter View. You should see Presenter View fill your laptop screen. Use the full screen/windowed button to switch to the windowed mode and reduce the size of the Presenter View window so you can see the Teams meeting controls.
Slide Show view occupies the full computer screen, exactly the way your presentation will look on a big screen when your audience sees it. Presenter view. To get to Presenter view, in Slide Show view, in the lower left corner of the screen, click , and then click Show Presenter View (as shown below).
In any case, the ALT+F5 trick is just so you can *practice* using presenter view with only one screen, not as a way of actually presenting anything. It works the same with the projector being the "Second screen". Just check the Slide Show > Monitor settings.
Watch this video to find out how. Set up your presentation. First, go to the SLIDE SHOW tab and make sure Use Presenter View is selected. For rehearsal, you can press ALT+F5 to display the Presenter view on a single screen. Rehearsing this way will help you get comfortable with your slides, and give you practice using the Presenter view.
Once back in the Engageli classroom, to share your screen, click the Present button at the bottom of the screen. Under Classroom activities, click Screen Share. Select Window. Select the PowerPoint slide show. Once highlighted, the Share button will become enabled. Click Share. Your display will shift to your presentation.
For students, video presentation projects draw on creative and analytical skills that they'll use throughout their lives. Go beyond simple PowerPoint slides and explore how Adobe Premiere Pro can help any video presentation maker create their own videos and live presentations that compel audiences with video, animation effects, and more.
Deliver your presentation on two monitors. On the Slide Show tab, in the Set Up group, click Set Up Slide Show. In the Set Up Show dialog box, choose the options that you want, and then click OK. If you choose Automatic, PowerPoint will display speaker notes on the laptop monitor, if available. Otherwise, PowerPoint will display speaker notes ...
To do this. Press. Start a presentation from the beginning. F5. Start a presentation from the current slide. Shift+F5. Start the presentation in Presenter View. Alt+F5. Perform the next animation or advance to the next slide.