Technical How-tos, Tips, and Tricks
Zerotier: configure this secure vpn to connect computers remotely.
March 10, 2021 Matt Mills How to , Software 0
ZeroTier is a software company that will allow us to create and manage SDN (Software Defined Networks) to intercommunicate different computers in a virtual private network ( VPN ) easily and quickly. ZeroTier is one of the easiest ways to communicate with computers on the Internet, without having to create our own VPN tunnels, so we will leave behind the complexity of configuring it ourselves. This tool will serve us both in the home and in the professional sphere, since we have the possibility of interconnecting up to 50 devices in the same network completely free of charge, if you need to connect more devices, then you will have to purchase the premium version.

What is ZeroTier and what is it for?
ZeroTier is one of the leading companies in SDN (Software Defined Networks), and it will provide us with the possibility of interconnecting multiple devices over the Internet, without the need to open ports in any of them. Thanks to its ZeroTier One, the company offers us a client program that allows PCs, servers, smartphones and other devices to communicate with each other through a virtual private network (VPN), and all this completely free and secure , since all the traffic in the ZeroTier network is encrypted.

Thanks to SDN technology, we will allow users to create secure networks that are very easy to configure, in addition, all devices will be on the same subnet so that there can be communication between them, as if they were in the same physical location. ZeroTier provides a web interface to configure this virtual private network in detail, where we can configure the subnet used, the clients that can be connected to it, what routes we have to give to the different clients so that they arrive correctly at their destination, and much more. , since it will also allow us to configure a firewall in detail to allow or deny certain traffic.
A very important feature of ZeroTier is that communications are point-to-point. Unlike traditional VPNs where we will have a central server or router, in this case the messages are sent directly from computer to computer, without the need to go through the central node. This gives us a minimum efficiency and latency, ideal to have the best user experience.
Regarding the security of communications with ZeroTier, we have an asymmetric public key based on Curve25519 and Ed25519 for signing, it also uses Chacha20-Poly1305 for symmetric data encryption and for message authentication. Thanks to this encryption suite that is very similar to the one used by WireGuard , all our communications between computers will be encrypted. According to the creators of ZeroTier, in the next version 2.0 that is to come, they plan to incorporate AES-GCM, so that computers with AES-NI hardware encryption acceleration take advantage of this possibility, and have the best possible performance. We recommend that you read everything about ZeroTier’s cryptography on his blog .
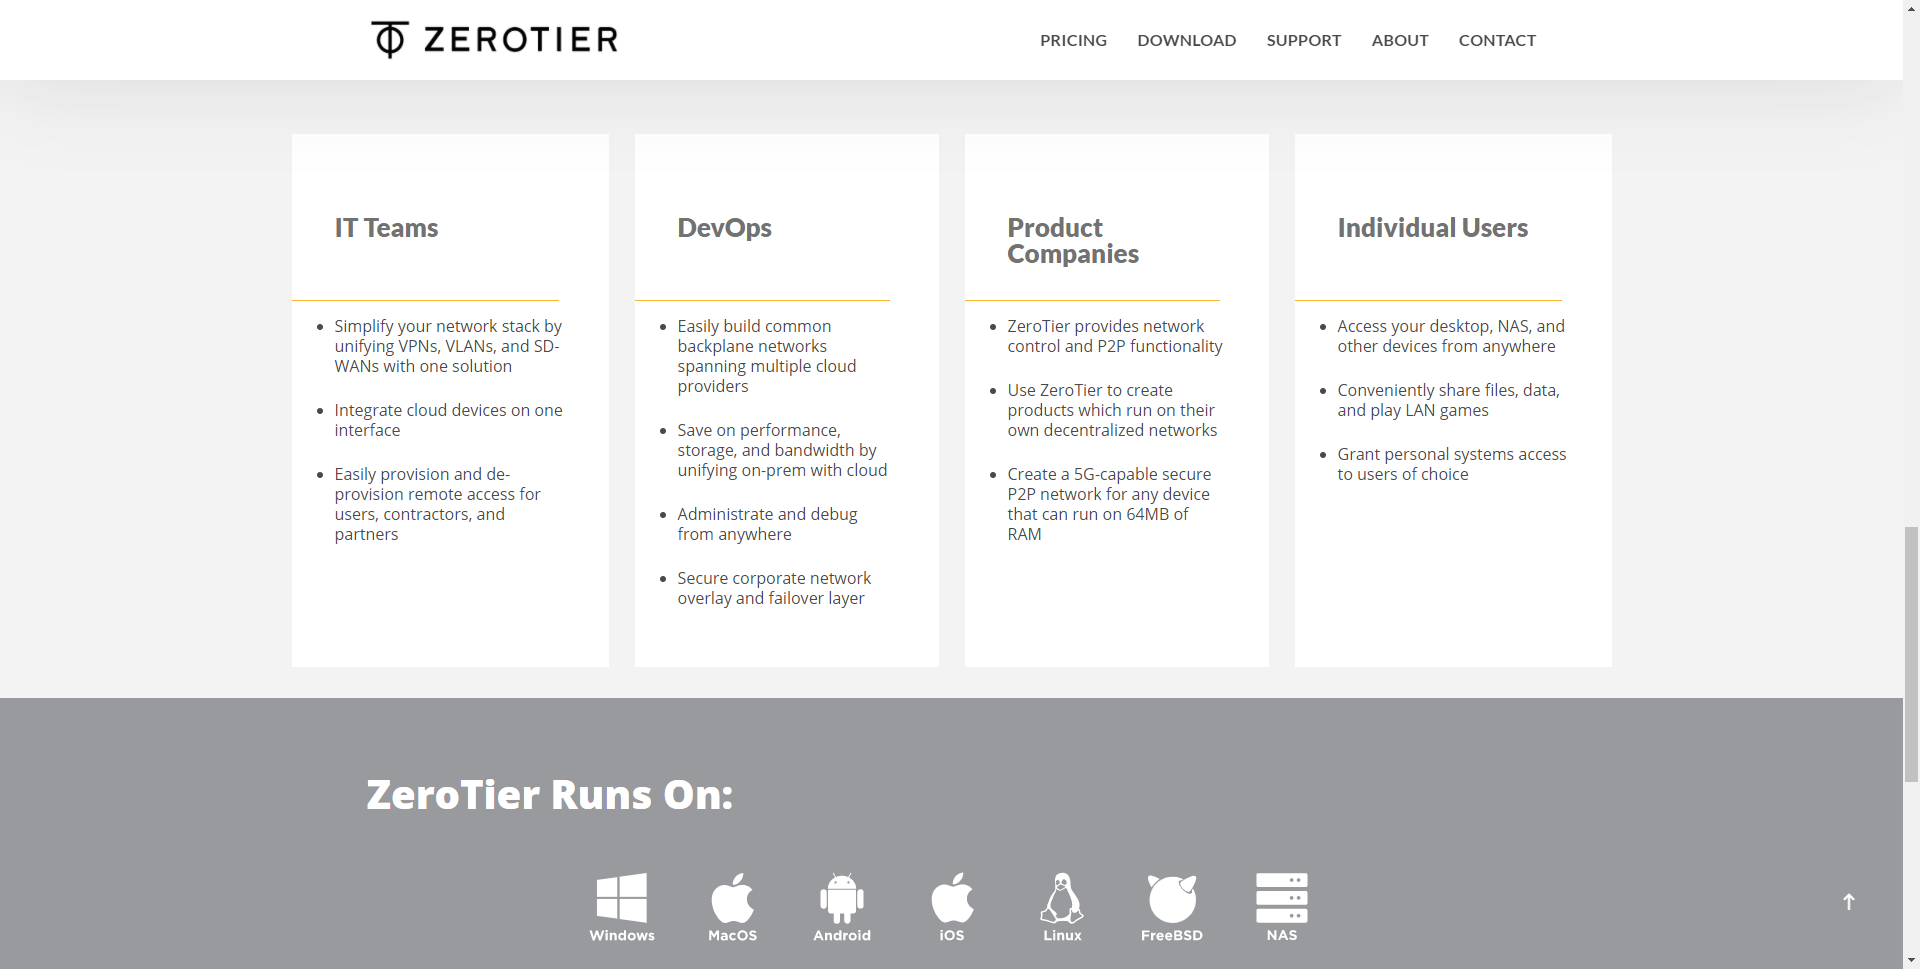
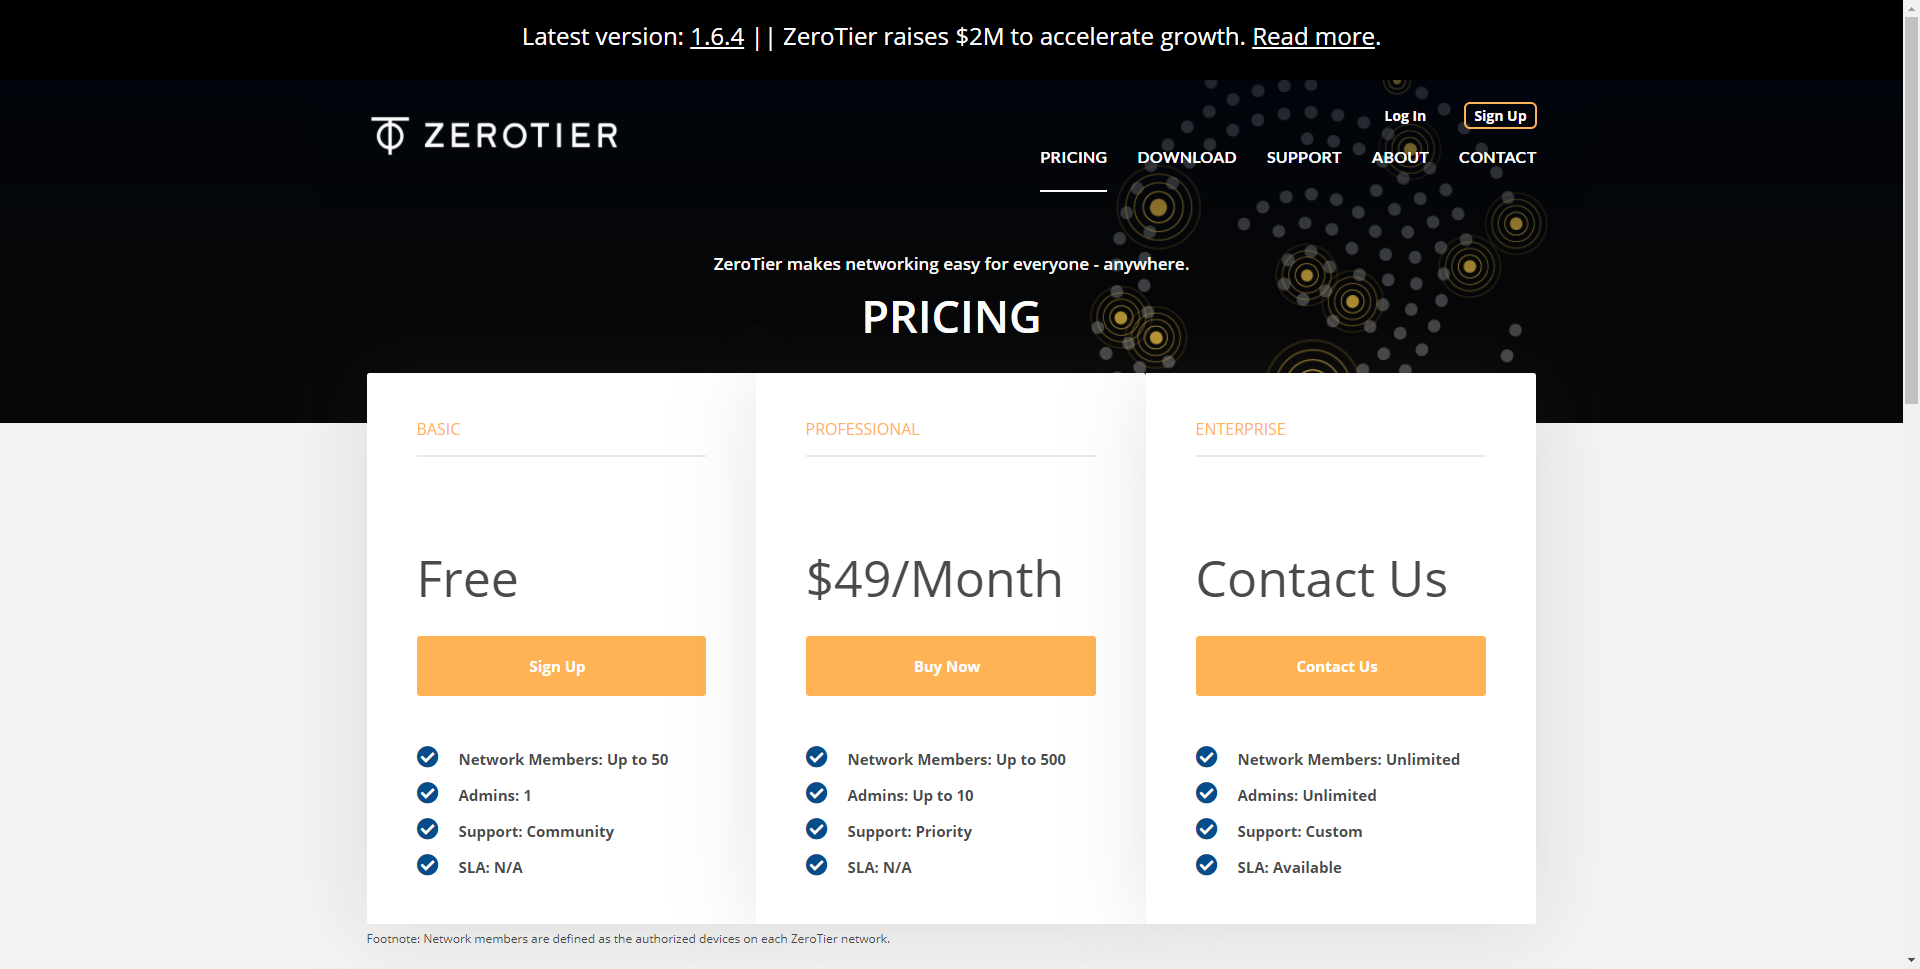
Lastly, ZeroTier is compatible with Windows , Linux , macOS, FreeBSD, Android , iOS operating systems and also some NAS servers (Synology, QNAP and others). We must also take into account the limitations of the free version, because you may have to purchase the professional version if you have many devices to interconnect:
- Free: up to 50 devices, one administrator and with community support.
- Professional: up to 500 devices, up to 10 administrators, priority support and only $ 49 per month.
Today in this article we are going to offer you a complete tutorial where you can see how to configure an SDN network to interconnect two Windows computers, and both computers will be connected to the Internet with different connections, one via FTTH and the other via 4G.
Registration and commissioning of the SDN network
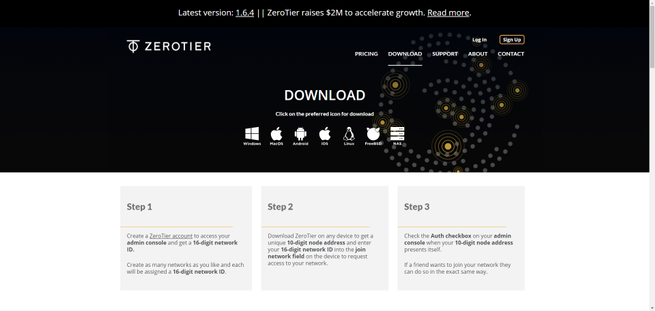
The first thing we have to do is register in ZeroTier, because we will necessarily need a network ID to start configuring the SDN network and integrate the different equipment into it. If we go to the official website and click on «Download», a message will appear directly telling us to register, click on «Start Here» to proceed with the registration.
To register we will only need to put the name and surname, and an email with the corresponding password. Once we have registered, we proceed to confirm the email that they have sent us, and we will be ready to start a web session in ZeroTier.

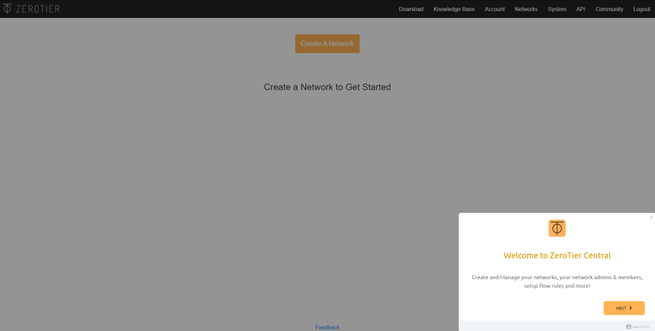
The first thing that we will see when entering the SDN platform for the first time via ZeroTier’s web, is a small step-by-step configuration wizard that will explain the different menus. This wizard will be in charge of registering a new “ Network ” automatically, without us having to do anything at all.
On the first screen we will be welcomed to ZeroTier Central, which is where we can create and manage the different networks, the administrators of said networks and also the different members, configure advanced rules in the firewall to allow or deny traffic, and much more . In the second menu we must choose “I want to connect my devices to a Friend or colleague’s devices”, that is, the option on the right.
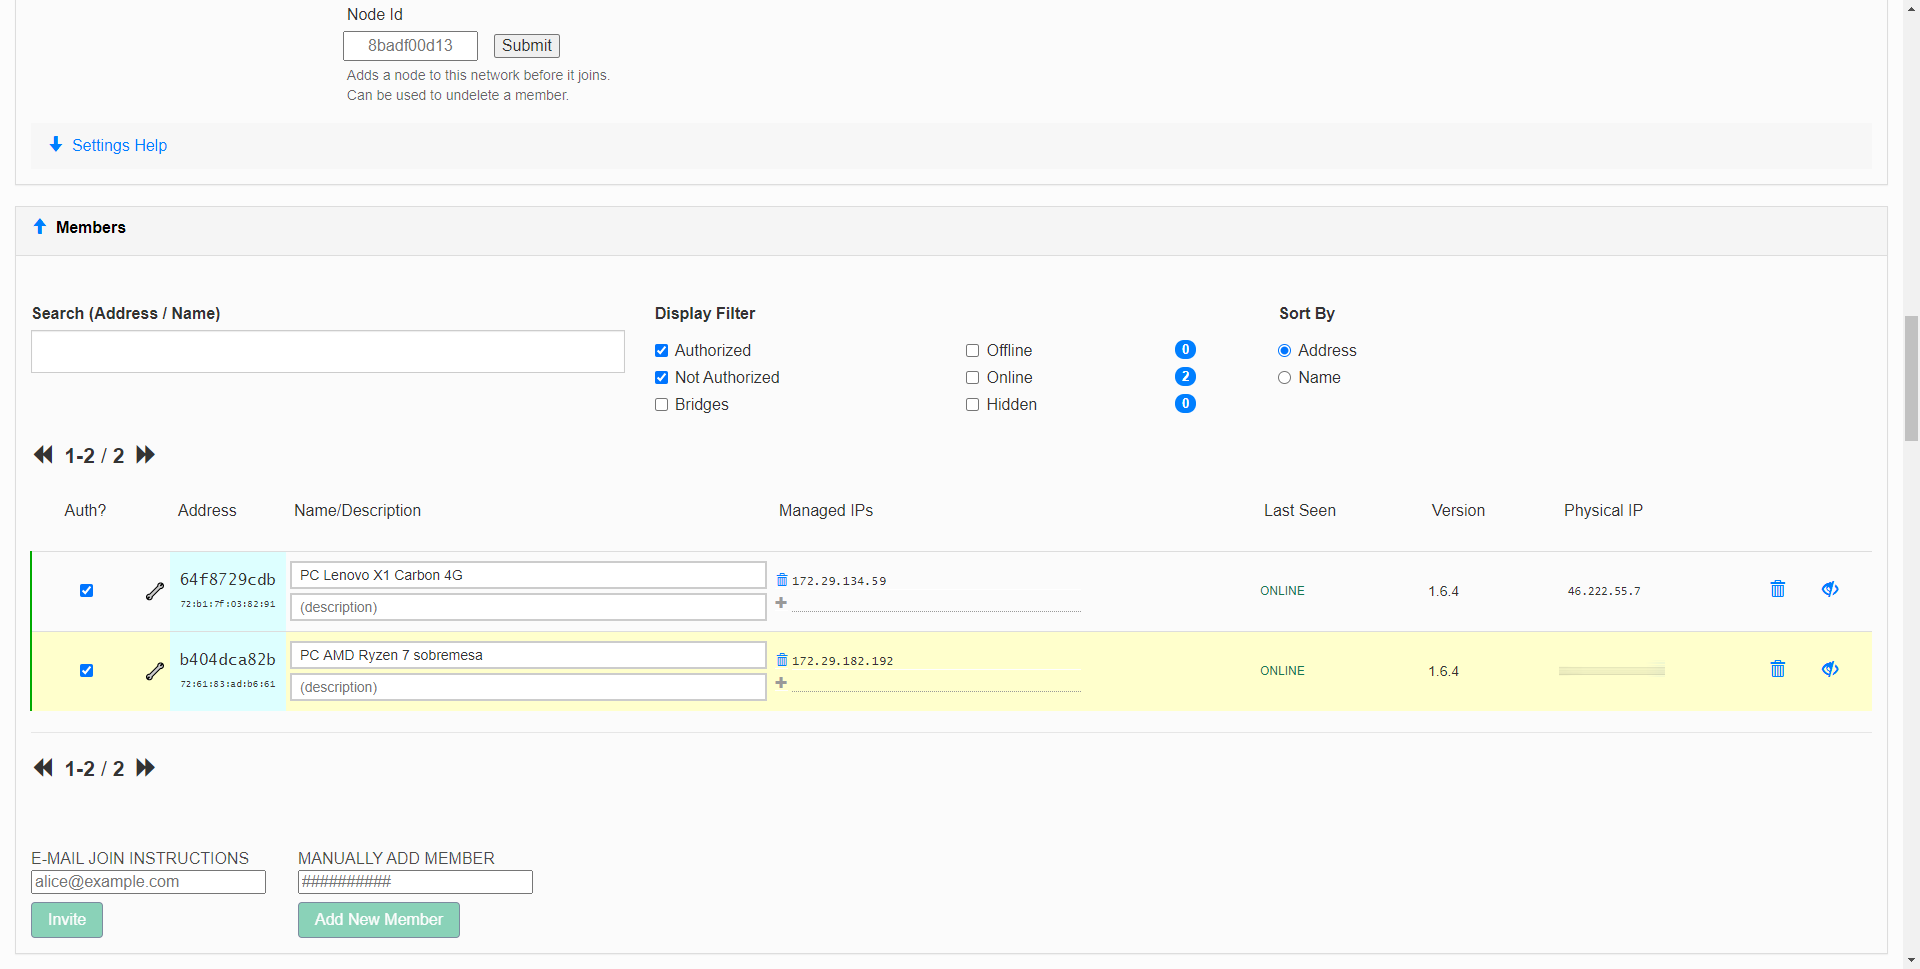
Next, it will tell us that we must start creating a network, clicking on “Create a Network”. Once created, we will have to share the Network ID with friends or family, so that they automatically connect to the newly created SDN network. Once we have created the network, it will tell us that we must download the ZeroTier client on the different devices, so that later they connect to the SDN network. When the different members join, we must authorize them manually, in the “Members” section, otherwise, they will not have communication with any team on the network. Finally, in the paid version we can configure different administrators.
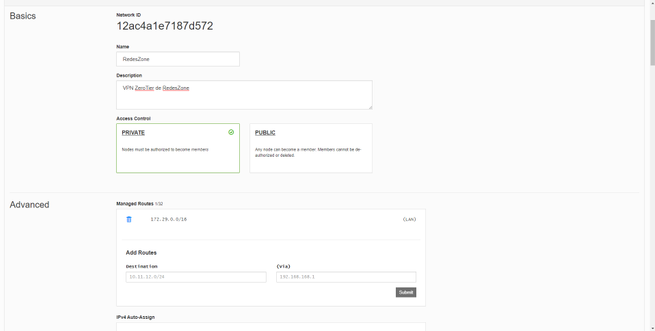
In the main menu of the network, we will always have to copy and take into account the «Network ID» that is generated automatically, this ID is necessary in each and every one of the clients to connect to the SDN network. We can also give it a name, and even a description. In “Access control” we must always put “Private”, in this way, the nodes must be authorized by us manually before becoming members.
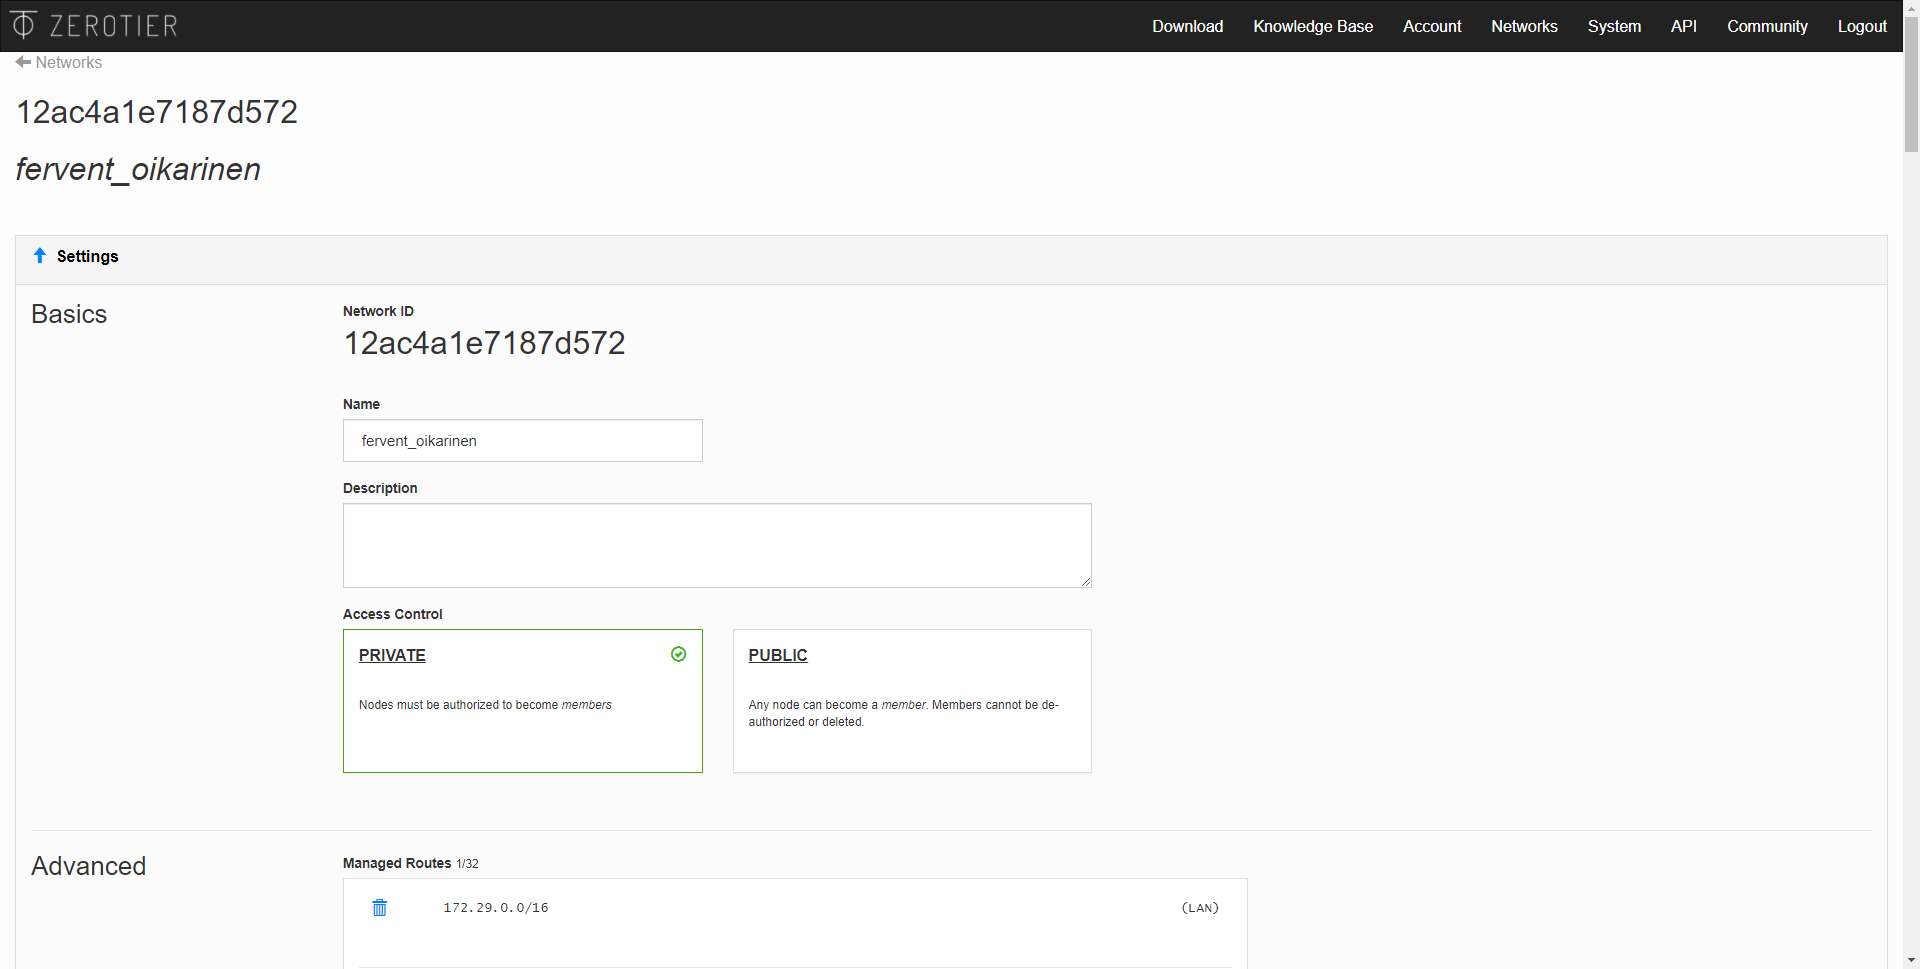
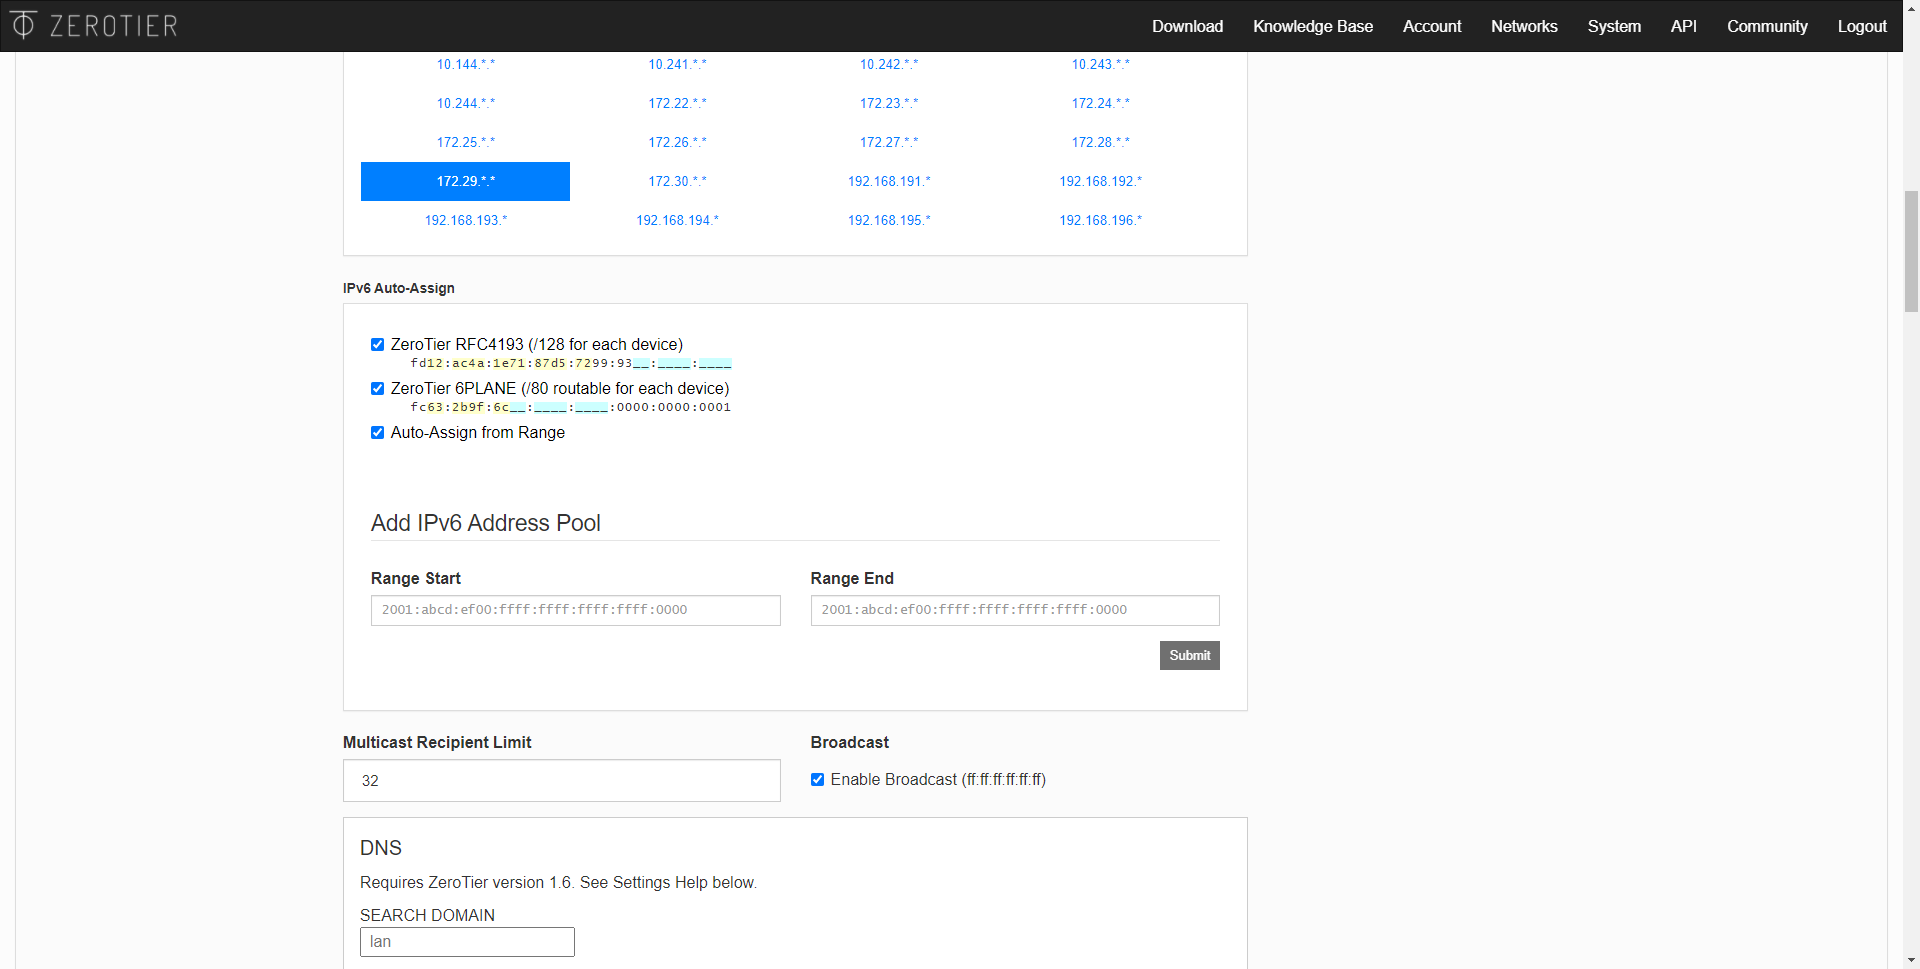
In the “Managed routes” section is where we can configure different subnets for the members, we will have a list of subnets that we can configure in the “Easy” section, as you can see. However, we can also click on “Advanced” and use a somewhat more advanced configuration. A very important feature is that we can manually define static routes, in this way, all members within the SDN network will obtain these routes to reach other networks.
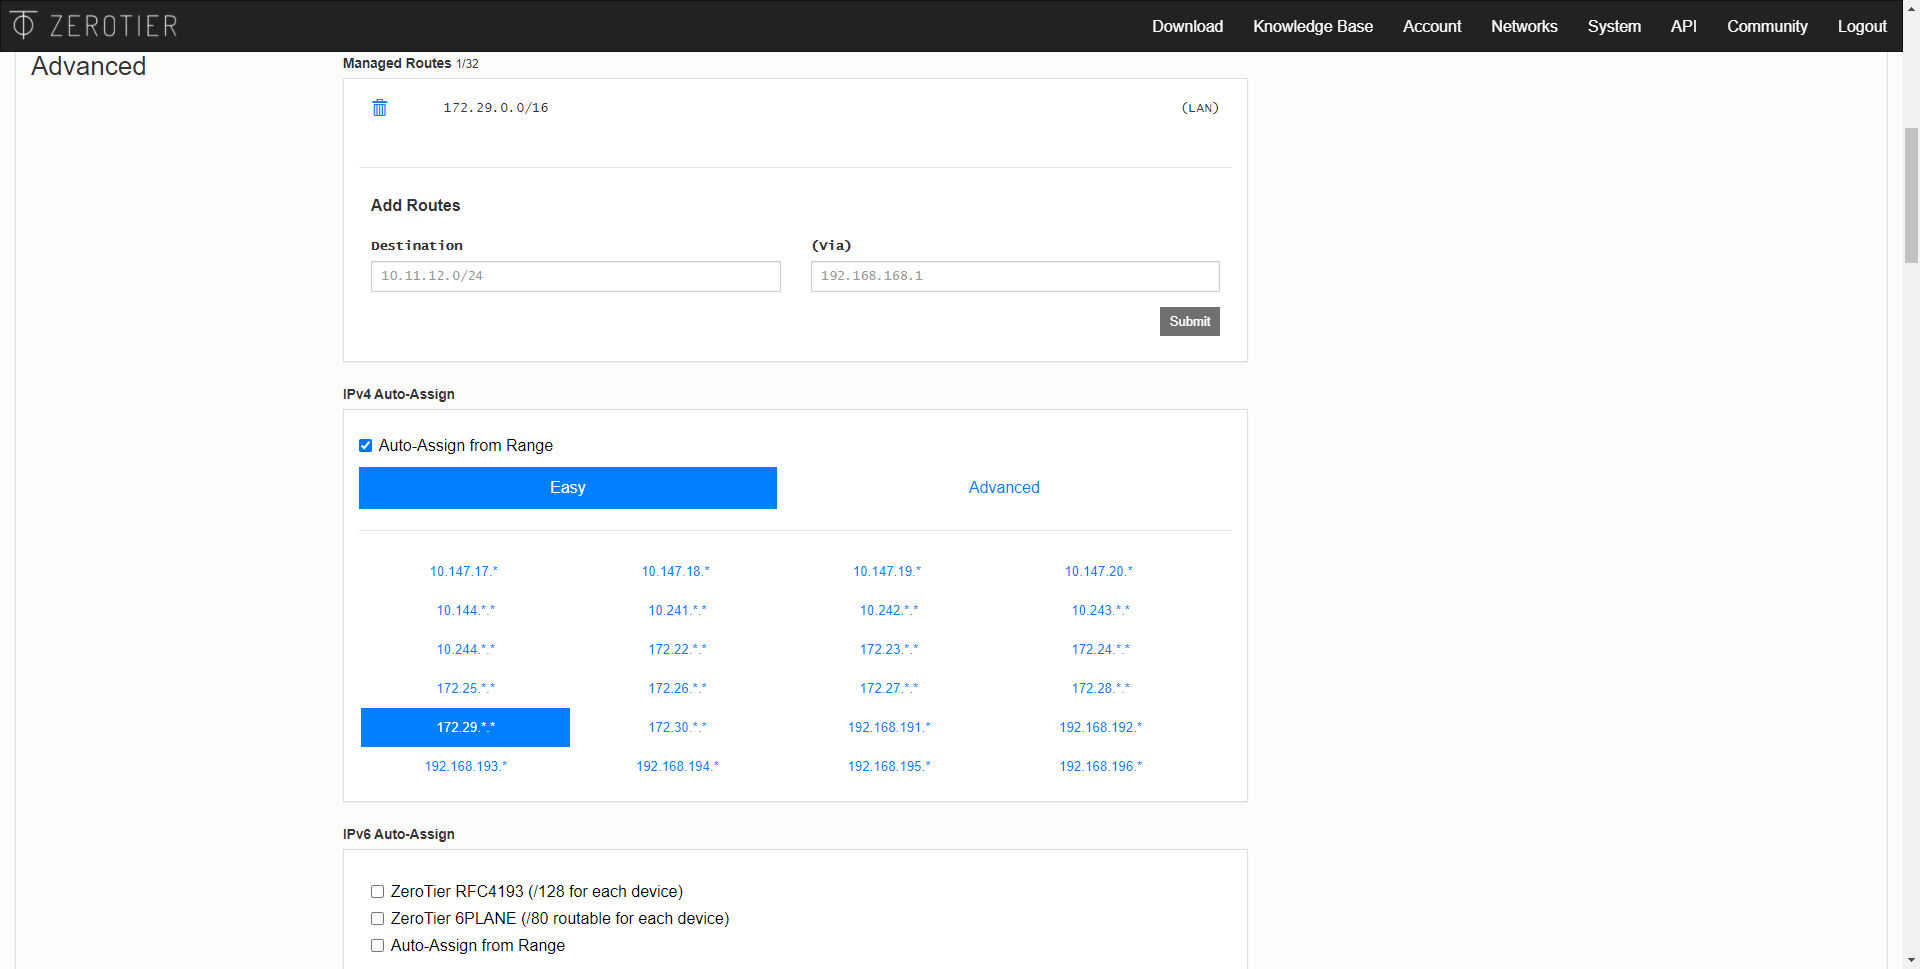
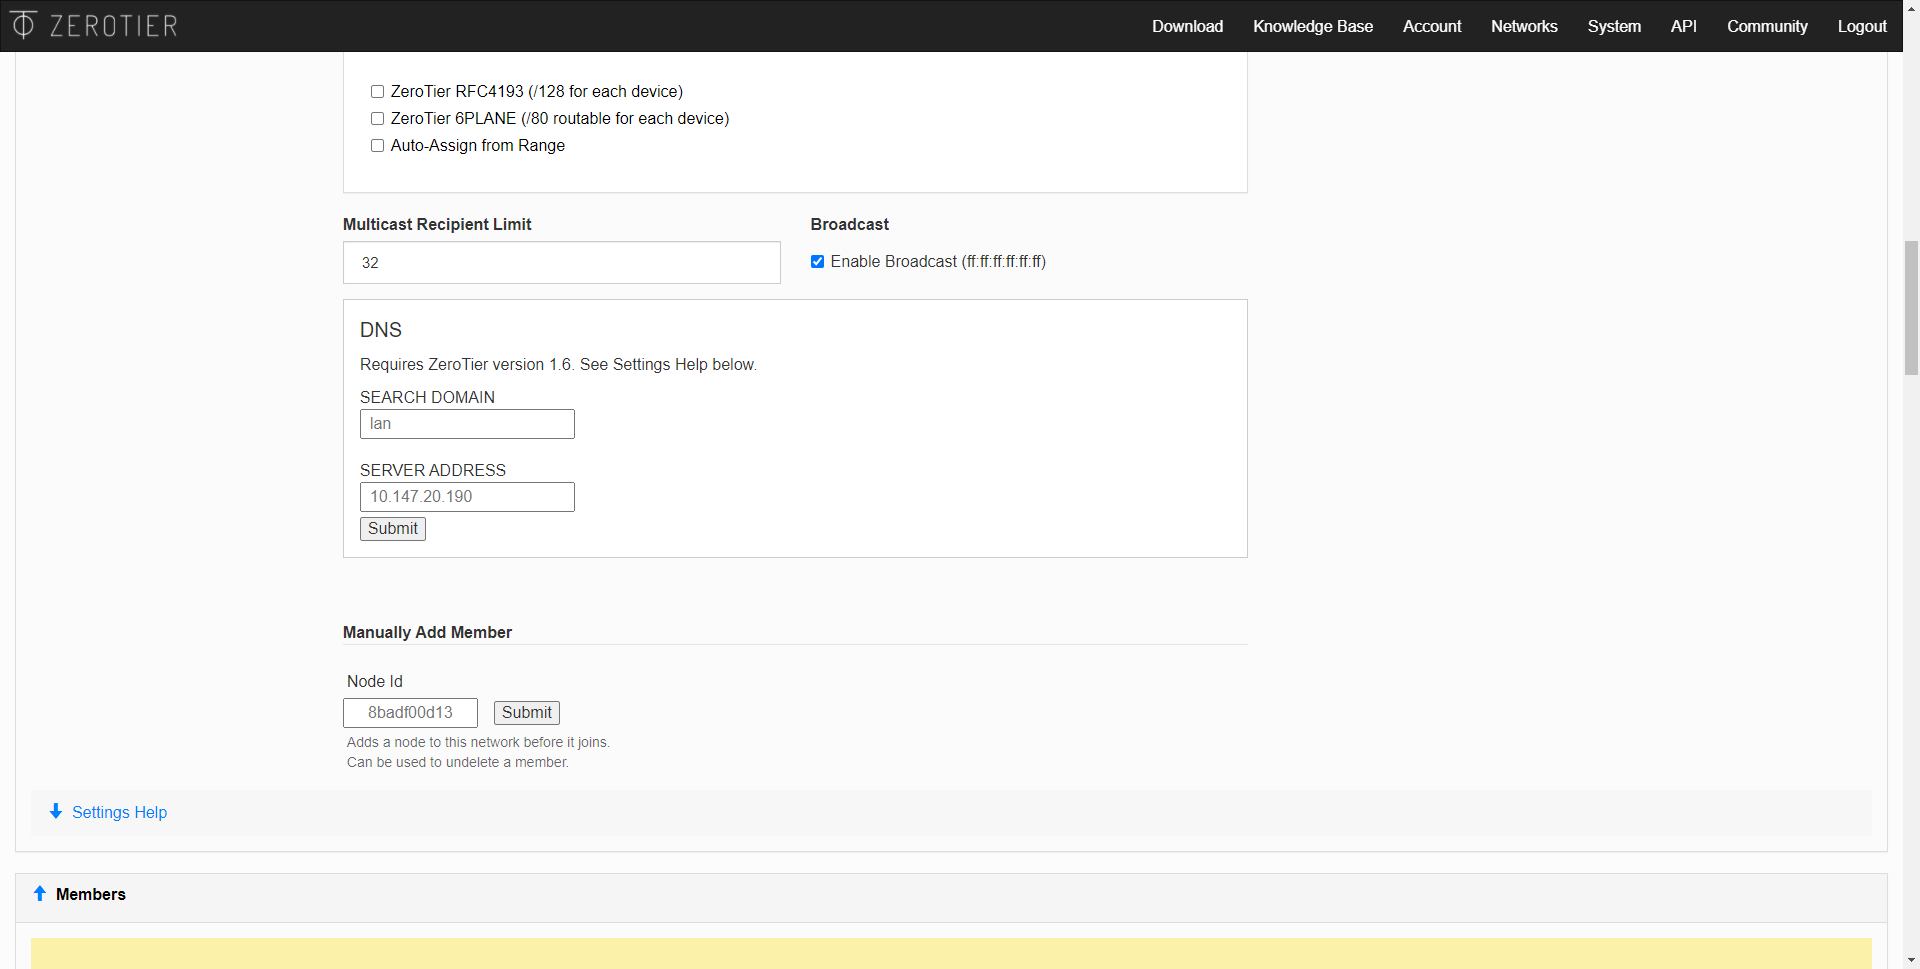
ZeroTier is compatible with IPv6 networks, in fact, we can obtain both an IPv4 for the SDN network and also IPv6, but this is optional. The same happens with the issue of DNS servers, we can manually configure the DNS we want.
If we have not configured the Network ID on any computer, then we will see the empty “Members” section, and it will indicate that no device has joined the network, and that we must use ZeroTier One with the corresponding Network ID so that they appear here. .
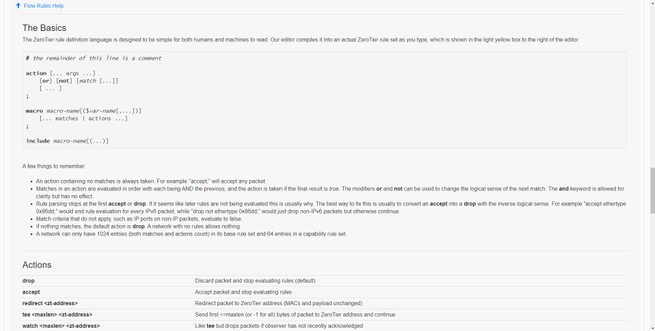
Just below we will have the advanced options of ZeroTier, and that is that we will be able to configure «Flow rules», to allow or deny the traffic between the different devices. In principle, both IPv4 and IPv6 traffic and communication between the different members are accepted by default, but from here we can configure these parameters in detail.
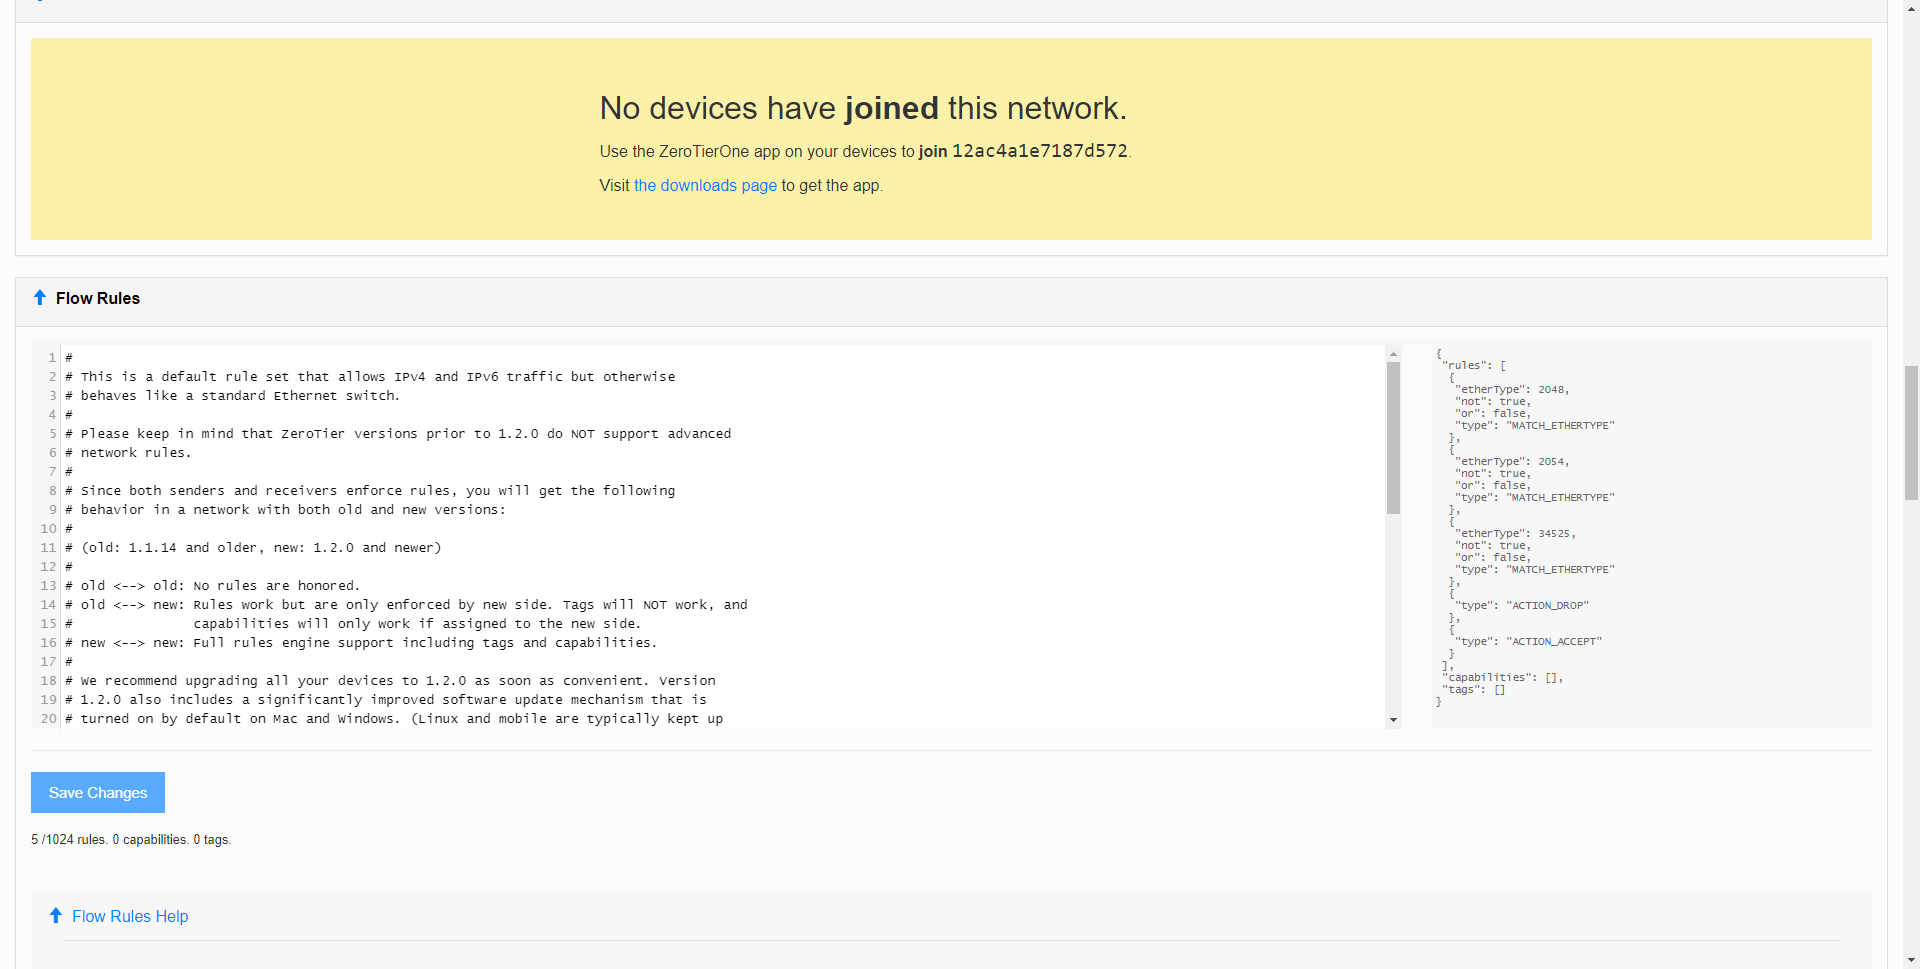
If we go further down the menu, we can see a basic syntax of how these “Flow Rules” work, and even what actions we can perform, as you can see, ZeroTier’s advanced configuration possibilities are really interesting and very advanced. Finally, it will indicate that we can only configure an administrator, but we have the menu to add more if we pay for the professional version, we must remember that we are using the “Free” version of ZeroTier, and we can also eliminate this network that we have just created. If we delete a network and create another, it will have a different Network ID.
Once we have seen ZeroTier Central where we will have access to the administration of the SDN network, now we are going to install ZeroTier on end devices.
ZeroTier installation on end devices (PC, smartphone etc)
The installation of ZeroTier on end devices has no mystery, we must download the software from the official ZeroTier website, and then install it on the PC or Mac , and even on mobile devices. Once we have the program installed, we will have to perform two actions:
- Enter the Network ID in ZeroTier One
- Accept the newly added member from the administration panel.
Once we have seen how ZeroTier One is installed on Windows 10 computers, we will see how to register the PCs and devices on the ZeroTier network.
Register the PCs and devices in the ZeroTier network
In ZeroTier’s main menu we can see both the Network ID, as well as the configuration of the private subnet that is going to be assigned, we must remember that we can select the subnet that we want, although we can also go to the “Advanced” section and configure the network more in detail, the DHCP server and more.
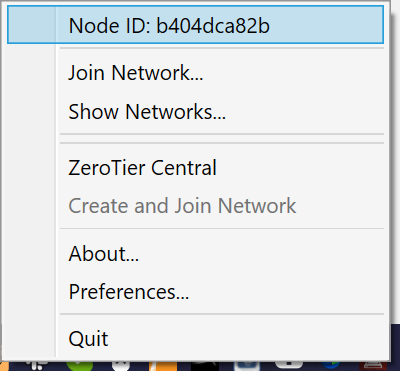
In the ZeroTier One client, we can see the “Node ID” which is the identifier of the node where we have installed it. Each computer where we install it will have a different “Node ID”. In order to join the ZeroTier network that we have just created, we must click on «Join Network», in the «Show Networks» section we will be able to see which network or networks this node is connected to.
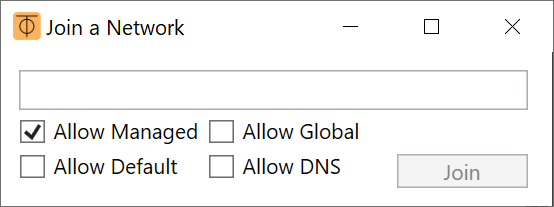
In the «Join a Network» menu is where we will have to put the «Network ID» of the network, the options that appear below are used for the following:
- Allow Managed – If checked, ZeroTier managed private IP addresses and routes are assigned.
- Allow Global – If checked, ZeroTier managed private IP addresses and routes are assigned, but can overlap with public IP space.
- Allow Default : the program can override the default path of the operating system, and forward all traffic through the tunnel.
- Allow DNS : DNS retrieval is allowed through the ZeroTier managed network.
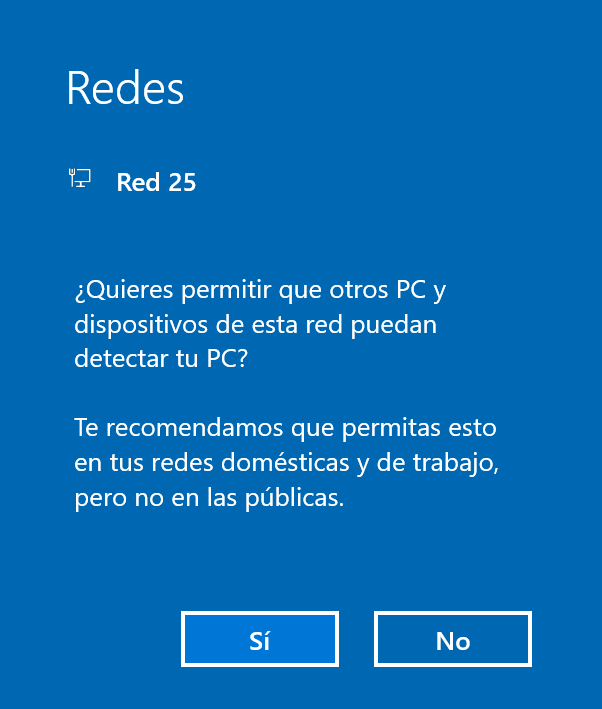
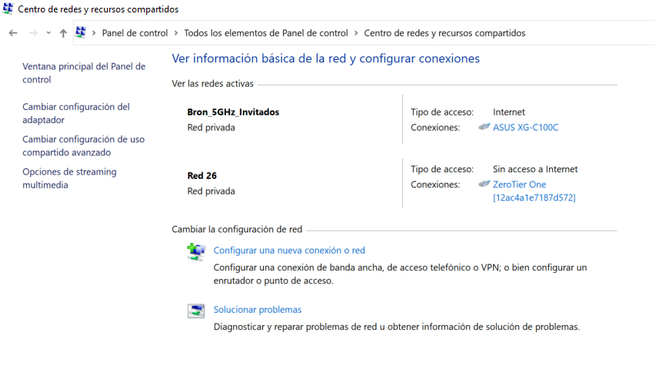
Once we click on «Join», Windows 10 will tell us that, if we want to allow other PCs and devices on the network to which we have joined to detect our PC, it is basically to configure in «Private network» or «Public network ». The normal thing is to put it in «Private network» so that we can communicate with each other without problems.
If we click on «Show Networks» of the ZeroTier One client on our PC, we will be able to see the status of the network, the type of network, and the characteristics of whether we have the «Allow» of which we have spoken before, at any time we can allow or not these features. The most important thing about this is the “Status: ACCESS_DENIED”, and it is that, although we have successfully connected to the ZeroTier network, we will not have full access until we authorize it manually.

If we go back into the ZeroTier Central administration panel, we will be able to see the team or teams that have connected, and are waiting to be authenticated. All we have to do is click on the box « Auth? »To allow them access. Then we can put a name, a description and even the IP address that we want. It will also show us if you are currently connected, the last connection date, the version of the client you are using, and even the public IP address from where you are connecting.
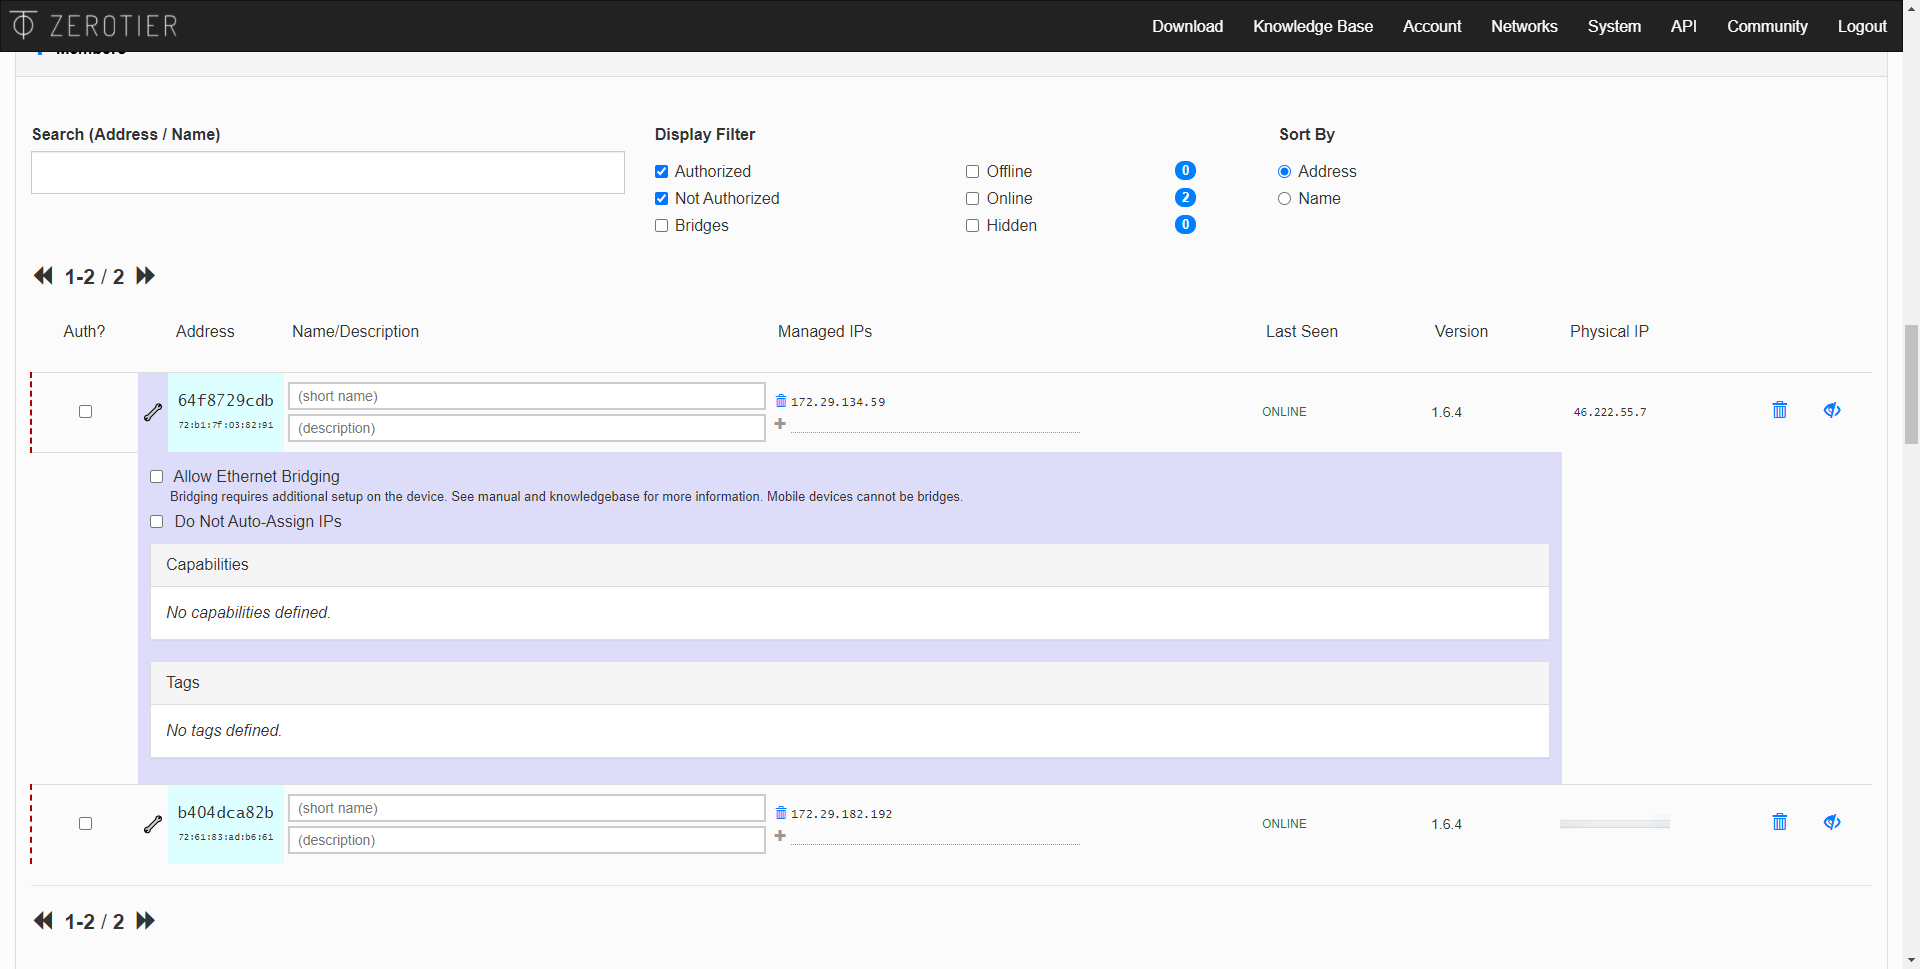
Once we have authorized it, after a few seconds, “Status: OK” will appear, therefore, it will already be perfectly connected to the SDN network.

In the Windows networks section we can see a new adapter, which Network ID we are connected to, and also what private IP address it currently has.
At any time we can modify the members, we must bear in mind that in the “Free” version we can add up to 50 members to the SDN network, if we go over we will not be able to add more.
We must not forget that we can also obtain an IPv6 address, we can not only create an IPv4 network as you have seen previously.
In our case, we have connected two computers with Windows 10 as follows:
- AMD Ryzen 7 PC via cable to a symmetric 600Mbps FTTH Pepephone fiber connection.
- Lenovo X1 Carbon PC connected via 4G to Yoigo’s network.
When creating the network, although the computers are behind a NAT, and in the case of the Lenovo X1 Carbon we have a CG-NAT, they will be able to communicate without any problem, making use of the private addressing that has been provided. Below, you can see how from the laptop we can communicate with the desktop PC without any problem.
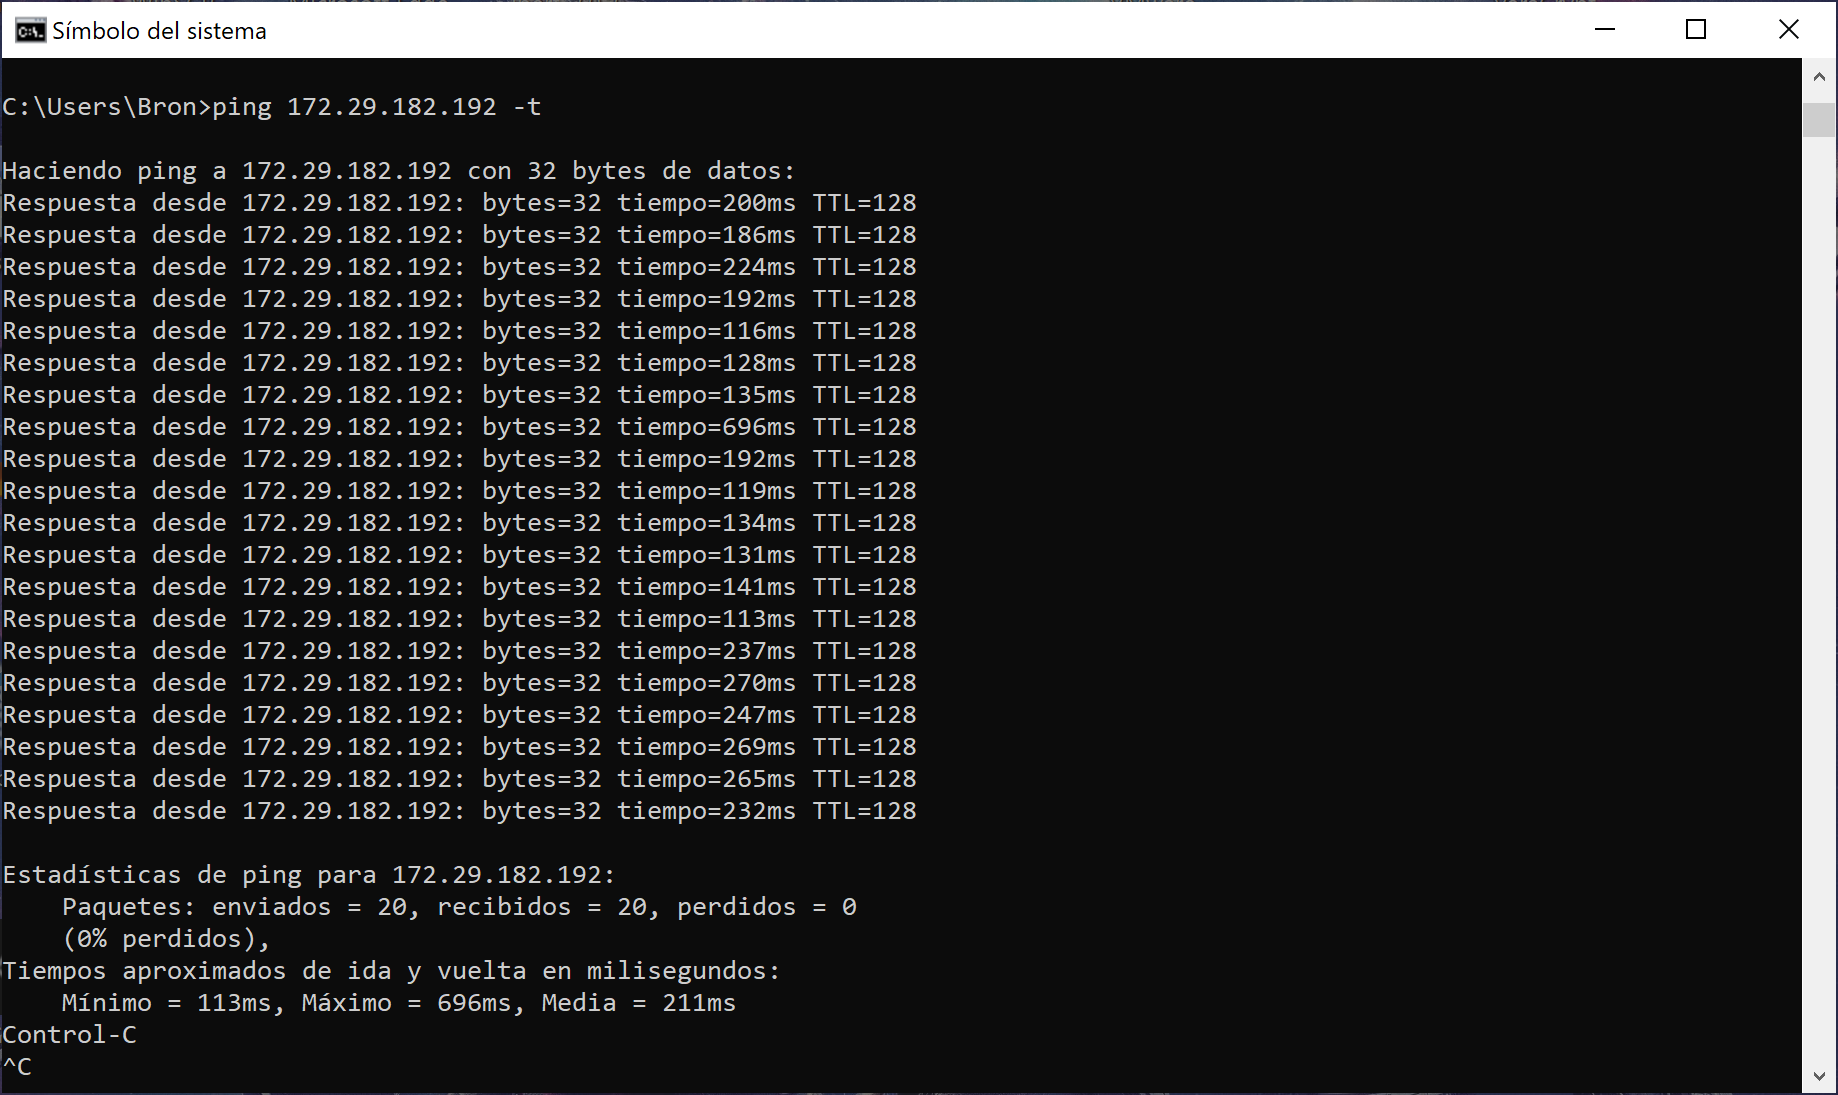
As you have seen, there is communication, the only problem is the latency of the connection, this will depend on the operator or operators and the form of connection you are using.
Official ZeroTier Documentation and Help Forums
One of the things we like the most about ZeroTier is the great community it has in its forums, and also the large number of tutorials and wikis to know everything about this tool, and all its possibilities. For example, we can add a node and have all the Internet traffic of the entire network flow through it, creating a default route in ZeroTier Central itself.
We recommend you visit the official ZeroTier manual where you will find answers to all your questions, you can also access the Wiki where you will find a lot of information about this great tool.
Copyright © 2024 ITIGIC | Privacy Policy | Contact Us | Advertise

- Virtual Private Networking »
- Zerotier Configuration
Zerotier Configuration ¶
It is strongly recommended that the reader familiarise themselves with the Zerotier Manual , in order to further understand the concepts behind this plugin.
Prerequisites ¶
Firstly, it is important that you have signed up to Zerotier at the Zerotier Portal . Second, you will need to create at least one network on the portal in order to obtain a Network Id that this plugin uses to join this node to the created Zerotier network. This network will become your private network that by default is visible only to your nodes - in other words, other nodes that are on that network can talk to each other, but nothing else can talk to them - they are completely transparent to the internet in general. In effect you are layering a private network over the public internet and all intra-node communication is encrypted and private between them. This is further hinted at by the fact that the assigned IP addresses are normally RFC1918 addresses, i.e., non-routable across the internet.
Finally, in order to have a fully functioning private VPN between Zerotier nodes, a combination of this plugin plus some configuration on the portal will be required.
Installation ¶
From the Plugins view under System...Firmware , install the os-zerotier package. Once the new plugin has been installed, perform a page reload and a new menu item should appear under VPN called Zerotier.

Clicking on the Zerotier menu item will reveal two further sub-menu items - namely Settings and Overview. Clicking on “Settings” will present a new view with two named tabs. The first tab is called Settings and the second tab is called Networks. These are further described below.

This tab controls the overall operation of Zerotier. Anything changed here is applied globally to all defined networks and to the Zerotier service itself.
Controls if the service should be running. If it is disabled, then access to the Networks tab will be disabled. If it is enabled, access to the Networks tab will be enabled and the service will also start at boot time.
This optional entry is for future use and further development of the Zerotier plugin. The API access token can be generated by logging into your portal and creating a new API Access Token. When the token has been generated, copy the value into this input box.
As described in the Zerotier Manual, a local.conf can be created to enable or disable custom node-specific configuration overrides. Further details of permitted options can be found on the ZeroTier Manual . Please note that the local.conf must be a valid JSON document otherwise the service will fail to start.
This table allows for the creation, modification and deletion of Zerotier networks. Adding a Network here will join your OPNsense installation to the specified Zerotier network.
Remember, you will have to log into the Zerotier portal , select the network and authorise the node before it can be assigned an IP address (or indeed, talk to other nodes on that network).

Adding a network is quite straight-forward. Simply click on the + symbol key in the following:
This is the 64-bit (16 character hex) address that is generated on the portal when creating a Zerotier network.
You may key in a description here that will help you remember what the network is for. Please note that this field is not the same as the name/description of the Zerotier network - it’s simply an aide-mémoire to help you remember what the network is for.
Adding a network does not automatically cause your OPNsense installation to join that network. In order to join that network it must be Enabled first. Likewise, to remove your OPNsense node from the configured network simply deselect Enabled , thus disabling the network.
Once a network has been added and enabled the node must be authorised to join the network on the portal. Simply enabling the network on your OPNsense installation marks that node as a member of that network. It now has to request permission to talk to the other nodes on that network. To achieve this, you log into the portal, select the network, find the node address (this can found on the OPNsense Zerotier Overview menu item, under the Information tab) and authorise it by clicking on the “Auth?” check box beside the node. It should go from “red” to “green” to indicate that it has been authorised.
Some final “Network” operations:
If you wish to completely remove the network, simply select the network and click on the Bin icon.
If you wish to edit the network, click on the Pencil icon.
To “clone” the network entry, click on the Copy icon. Please ensure you change the Network Id, as having two networks with the same id is an invalid configuration.
For a very quick overview of the Zerotier network information, click on the Information icon. A more detailed view of the network can be found under the Overview...Networks menu item.
ZeroTier Overview ¶
The following 3 tabs reveal Global, Network and Peer information. They can only be viewed if the Zerotier plugin is enabled, so please ensure that the service is enabled first. For information on the terminology used, please refer to the Zerotier Manual .

Information Overview ¶
This tab shows “Global” information concerning the overall health of the Zerotier service.
Networks Overview ¶
This tab shows each configured and enabled network that this OPNsense installation has joined. If no networks are enabled, no information is shown.
Peers Overview ¶
This tab shows the peers (leaf, planets and moons - Zerotier terminology) known by this node.
Interface Assignment ¶
It is highly recommended that the interface have auto-assignment of IP addresses turned off for this particular node only . You want to give the interface a statically assigned, stable IP address (from the Zerotier network IP range) and not have the Zerotier service auto-assign an IP address. Auto-assignment of IP addresses for nodes is controlled on the Zerotier Portal
After joining a Zerotier network (and authorising it on the portal) you may now wish to assign the Zerotier virtual interface on OPNsense in order to avail of OPNsense functionality such as firewalling and routing (using OSPF for example).

To achieve this:
Click on the Interfaces menu item, then click on Assignments . There you should discover a new interface currently unassigned that begins with the letters zt . Next, click on the + symbol to assign it. In this example it creates a new interface called OPT1 . Clicking on OPT1 shows the Enable and Lock options. Check both options.
It is very important that Lock (i.e., Prevent interface removal) is enabled. This is because Zerotier is a software interface and not guaranteed to be brought “up” whilst the system is booting. It could happen shortly afterwards, hence locking the interface tells OPNsense not to remove it, thinking it’s gone bad.
Once the new interface has been enabled, it is recommended to change the Description away from OPT1 to something more descriptive for your needs.
For IPv4 Configuration Type , choose Static IPv4 then in the appropriate input boxes, key in the IPv4 address that you have assigned to this node via the Zerotier portal. Keep the IPv4 Upstream Gateway set to None.

You may choose to do the same for IPv6 Configuration Type .
Once the interface has been assigned with an IP, it show now also show up on Firewall Rules etc…plus any other operations that be done on a interfaces can also be applied to your assigned interface.
Navigation Menu
Search code, repositories, users, issues, pull requests..., provide feedback.
We read every piece of feedback, and take your input very seriously.
Saved searches
Use saved searches to filter your results more quickly.
To see all available qualifiers, see our documentation .
- Notifications
Have a question about this project? Sign up for a free GitHub account to open an issue and contact its maintainers and the community.
By clicking “Sign up for GitHub”, you agree to our terms of service and privacy statement . We’ll occasionally send you account related emails.
Already on GitHub? Sign in to your account
Expose allowGlobal in UI #410
ghost commented Nov 20, 2016
glimberg commented Nov 21, 2016
Sorry, something went wrong.
ghost commented Nov 21, 2016
No branches or pull requests
The Protocol
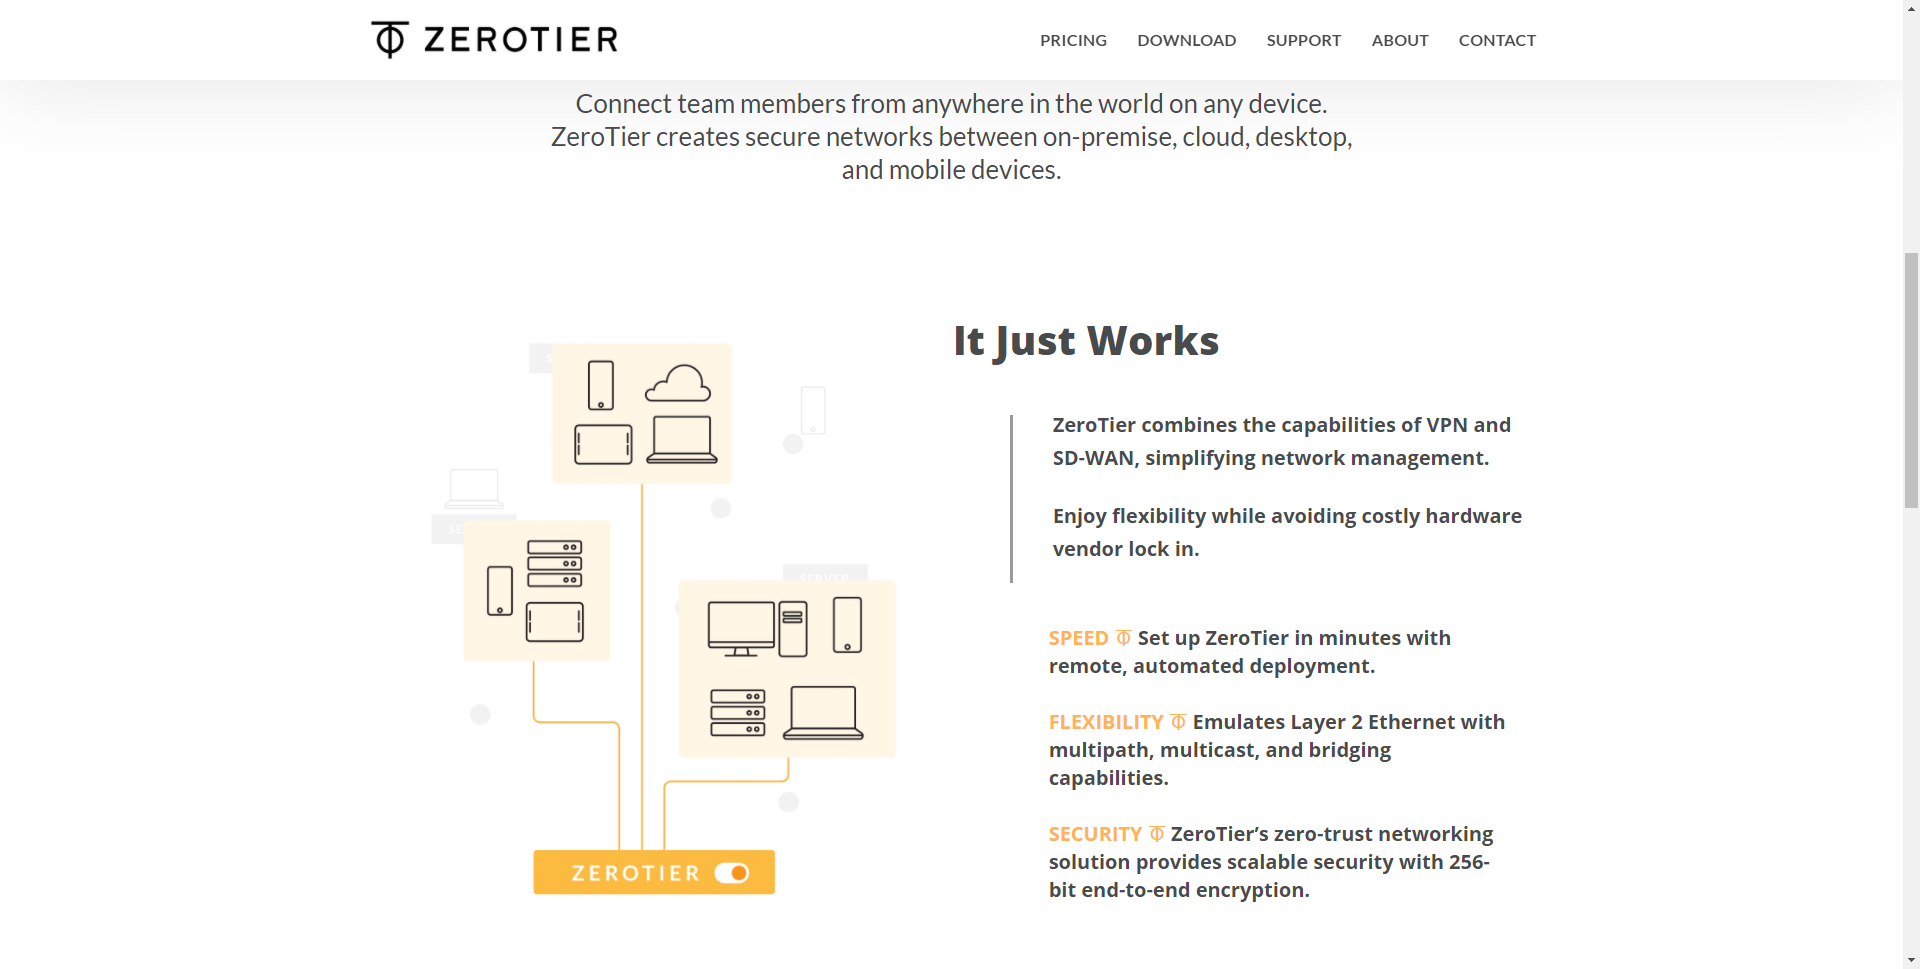
ZeroTier is a smart programmable Ethernet switch for planet Earth. It allows all networked devices, VMs, containers, and applications to communicate as if they all reside in the same physical data center or cloud region.
ZeroTier is a distributed network hypervisor built atop a cryptographically secure global peer to peer network. It provides advanced network virtualization and management capabilities on par with an enterprise SDN switch, but across both local and wide area networks and connecting almost any kind of app or device.
This is accomplished by combining a cryptographically addressed and secure peer to peer network (termed VL1) with an Ethernet emulation layer somewhat similar to VXLAN (termed VL2). Our VL2 Ethernet virtualization layer includes advanced enterprise SDN features like fine grained access control rules for network micro-segmentation and security monitoring.
All ZeroTier traffic is encrypted end-to-end using secret keys that only you control. Most traffic flows peer to peer, though we offer free (but slow) relaying for users who cannot establish peer to peer connections.
Everything in the ZeroTier world is controlled by two types of identifier: 40-bit/10-digit ZeroTier addresses and 64-bit/16-digit network IDs . These identifiers are easily distinguished by their length. A ZeroTier address identifies a node or "device" (laptop, phone, server, VM, app, etc.) while a network ID identifies a virtual Ethernet network that can be joined by devices.
ZeroTier addresses can be thought of as port numbers on an enormous planet-wide enterprise Ethernet smart switch supporting VLANs. Network IDs are VLAN IDs to which these ports may be assigned. A single port can be assigned to more than one VLAN.
A ZeroTier address looks like 8056c2e21c and a network ID looks like 8056c2e21c000001 . Network IDs are composed of the ZeroTier address of that network's primary controller and an arbitrary 24-bit ID that identifies the network on this controller. Network controllers are roughly analogous to SDN controllers in SDN protocols like OpenFlow , though as with the analogy between VXLAN and VL2 this should not be read to imply that the protocols or design are the same. You can use our convenient and inexpensive SaaS hosted controllers at my.zerotier.com or run your own controller if you don't mind messing around with JSON configuration files or writing scripts to do so.
Visit ZeroTier's site for more information and pre-built binary packages . Apps for Android and iOS are available for free in the Google Play and Apple app stores.
Origin and Design Philosophy
The goals and design principles of ZeroTier are inspired by among other things the original Google BeyondCorp paper and the Jericho Forum with its notion of "deperimeterization."
Network Hypervisor
The ZeroTier network hypervisor (currently found in the node/ subfolder of the ZeroTierOne git repository) is a self-contained network virtualization engine that implements an Ethernet virtualization layer similar to VXLAN on top of a global encrypted peer to peer network.
The ZeroTier protocol is original, though aspects of it are similar to VXLAN and IPSec. It has two conceptually separate but closely coupled layers in the OSI model sense: VL1 and VL2 . VL1 is the underlying peer to peer transport layer, the "virtual wire," while VL2 is an emulated Ethernet layer that provides operating systems and apps with a familiar communication medium.
The ZeroTier Peer to Peer Network (VL1)
A global data center requires a global wire closet.
In conventional networks L1 (OSI layer 1) refers to the actual CAT5/CAT6 cables or wireless radio channels over which data is carried and the physical transceiver chips that modulate and demodulate it. VL1 is a peer to peer network that does the same thing by using encryption, authentication, and a lot of networking tricks to create virtual wires on a dynamic as-needed basis.
Network Topology and Peer Discovery
VL1 is designed to be zero-configuration. A user can start a new ZeroTier node without having to write configuration files or provide the IP addresses of other nodes. It's also designed to be fast. Any two devices in the world should be able to locate each other and communicate almost instantly.
To achieve this VL1 is organized like DNS. At the base of the network is a collection of always-present root servers whose role is similar to that of DNS root name servers . Roots run the same software as regular endpoints but reside at fast stable locations on the network and are designated as such by a world definition . World definitions come in two forms: the planet and one or more moons . The protocol includes a secure mechanism allowing world definitions to be updated in-band if root servers' IP addresses or ZeroTier addresses change.
There is only one planet. Earth's root servers are operated by ZeroTier, Inc. as a free service. There are currently four root servers distributed across the globe and multiple network providers. Almost everyone in the world has one within less than 100ms network latency from their location.
A node can "orbit" any number of moons. A moon is just a convenient way to add user-defined root servers to the pool. Users can create moons to reduce dependency on ZeroTier, Inc. infrastructure or to locate root servers closer for better performance. For on-premise SDN use a cluster of root servers can be located inside a building or data center so that ZeroTier can continue to operate normally if Internet connectivity is lost.
Nodes start with no direct links to one another, only upstream to roots (planet and moons). Every peer on VL1 possesses a globally unique 40-bit (10 hex digit) ZeroTier address , but unlike IP addresses these are opaque cryptographic identifiers that encode no routing information. To communicate peers first send packets "up" the tree, and as these packets traverse the network they trigger the opportunistic creation of direct links along the way. The tree is constantly trying to "collapse itself" to optimize itself to the pattern of traffic it is carrying.
Peer to peer connection setup goes like this:
- A wants to send a packet to B, but since it has no direct path it sends it upstream to R (a root).
- If R has a direct link to B, it forwards the packet there. Otherwise it sends the packet upstream until planetary roots are reached. Planetary roots know about all nodes, so eventually the packet will reach B if B is online.
- R also sends a message called rendezvous to A containing hints about how it might reach B. Meanwhile the root that forwards the packet to B sends rendezvous informing B how it might reach A.
- A and B get their rendezvous messages and attempt to send test messages to each other, possibly accomplishing hole punching of any NATs or stateful firewalls that happen to be in the way. If this works a direct link is established and packets no longer need to take the scenic route.
Since roots forward packets, A and B can reach each other instantly. A and B then begin attempting to make a direct peer to peer connection. If this succeeds it results in a faster lower latency link. We call this transport triggered link provisioning since it's the forwarding of the packet itself that triggers the peer to peer network to attempt direct connection.
VL1 never gives up. If a direct path can't be established, communication can continue through (slower) relaying. Direct connection attempts continue forever on a periodic basis. VL1 also has other features for establishing direct connectivity including LAN peer discovery, port prediction for traversal of symmetric IPv4 NATs, and explicit port mapping using uPnP and/or NAT-PMP if these are available on the local physical LAN.
A blog post from 2014 by ZeroTier's original author explains some of the reasoning behind VL1's design.
Addressing
Every node is uniquely identified on VL1 by a 40-bit (10 hex digit) ZeroTier address . This address is computed from the public portion of a public/private key pair. A node's address, public key, and private key together form its identity .
On devices running ZeroTier One the node identity is stored in identity.public and identity.secret in the service's home directory.
When ZeroTier starts for the first time it generates a new identity. It then attempts to advertise it upstream to the network. In the very unlikely event that the identity's 40-bit unique address is taken, it discards it and generates another.
Identities are claimed on a first come first serve basis and currently expire from planetary roots after 60 days of inactivity. If a long-dormant device returns it may re-claim its identity unless its address has been taken in the meantime (again, highly unlikely).
The address derivation algorithm used to compute addresses from public keys imposes a computational cost barrier against the intentional generation of a collision. Currently it would take approximately 10,000 CPU-years to do so (assuming e.g. a 3ghz Intel core). This is expensive but not impossible, but it's only the first line of defense. After generating a collision an attacker would then have to compromise all upstream nodes, network controllers, and anything else that has recently communicated with the target node and replace their cached identities.
ZeroTier addresses are, once advertised and claimed, a very secure method of unique identification.
When a node attempts to send a message to another node whose identity is not cached, it sends a whois query upstream to a root. Roots provide an authoritative identity cache.
Cryptography
If you don't know much about cryptography you can safely skip this section. TL;DR: packets are end-to-end encrypted and can't be read by roots or anyone else, and we use modern 256-bit crypto in ways recommended by the professional cryptographers that created it.
Asymmetric public key encryption is Curve25519/Ed25519 , a 256-bit elliptic curve variant.
Every VL1 packet is encrypted end to end using (as of the current version) 256-bit Salsa20 and authenticated using the Poly1305 message authentication (MAC) algorithm. MAC is computed after encryption (encrypt-then-MAC) and the cipher/MAC composition used is identical to the NaCl reference implementation .
As of today we do not implement forward secrecy or other stateful cryptographic features in VL1. We don't do this for the sake of simplicity, reliability, and code footprint, and because frequently changing state makes features like clustering and fail-over much harder to implement. See our discussion on GitHub .
We may implement forward secrecy in the future. For those who want this level of security today, we recommend using other cryptographic protocols such as SSL or SSH over ZeroTier. These protocols typically implement forward secrecy, but using them over ZeroTier also provides the secondary benefit of defense in depth. Most cryptography is compromised not by a flaw in encryption but through bugs in the implementation. If you're using two secure transports, the odds of a critical bug being discovered in both at the same time is very low. The CPU overhead of double-encryption is not significant for most work loads.
More information on ZeroTier's security practices
Trusted Paths for Fast Local SDN
To support the use of ZeroTier as a high performance SDN/NFV protocol over physically secure networks the protocol supports a feature called trusted paths . It is possible to configure all ZeroTier devices on a given network to skip encryption and authentication for traffic over a designated physical path. This can cut CPU use noticeably in high traffic scenarios but at the cost of losing virtually all transport security.
Trusted paths do not prevent communication with devices elsewhere, since traffic over other paths will be encrypted and authenticated normally.
We don't recommend the use of this feature unless you really need the performance and you know what you're doing. We also recommend thinking carefully before disabling transport security on a cloud private network. Larger cloud providers such as Amazon and Azure tend to provide good network segregation but many less costly providers offer private networks that are "party lines" and are not much more secure than the open Internet.
Multipath
Multipath allows the simultaneous (or conditional) aggregation of multiple physical links into a bond for increased total throughput, load balancing, redundancy, and fault tolerance. There is a set of standard bonding policies available that can be used right out of the box with no configuration. These policies are inspired by the policies offered by the Linux kernel. A bonding policy can be used easily without specifying any additional parameters.
- See here for more info and examples.
Ethernet Virtualization Layer (VL2)
VL2 is a VXLAN -like network virtualization protocol with SDN management features. It implements secure VLAN boundaries, multicast, rules, capability based security, and certificate based access control.
VL2 is built atop and carried by VL1, and in so doing it inherits VL1's encryption and endpoint authentication and can use VL1 asymmetric keys to sign and verify credentials. VL1 also allows us to implement VL2 entirely free of concern for underlying physical network topology. Connectivity and routing efficiency issues are VL1 concerns. It's important to understand that there is no relationship between VL2 virtual networks and VL1 paths. Much like VLAN multiplexing on a wired LAN, two nodes that share multiple network memberships in common will still only have one VL1 path (virtual wire) between them.
Network Identifiers and Controllers
Each VL2 network (VLAN) is identified by a 64-bit (16 hex digit) ZeroTier network ID that contains the 40-bit ZeroTier address of the network's controller and a 24-bit number identifying the network on the controller.
When a node joins a network or requests a network configuration update, it sends a network config query message (via VL1) to the network's controller. The controller can then use the node's VL1 address to look it up on the network and send it the appropriate certificates, credentials, and configuration information. From the perspective of VL2 virtual networks, VL1 ZeroTier addresses can be thought of as port numbers on an enormous global-scale virtual switch.
A common misunderstanding is to conflate network controllers with root servers (planet and moons). Root servers are connection facilitators that operate at the VL1 level. Network controllers are configuration managers and certificate authorities that belong to VL2. Generally root servers don't join or control virtual networks and network controllers are not root servers, though it is possible to have a node do both.
Controller Security Considerations
Network controllers serve as certificate authorities for ZeroTier virtual networks. As such, their identity.secret files should be guarded closely and backed up securely. Compromise of a controller's secret key would allow an attacker to issue fraudulent network configurations or admit unauthorized members, while loss of the secret key results in loss of ability to control the network in any way or issue configuration updates and effectively renders the network unusable.
It is important that controllers' system clocks remain relatively accurate (to within 30-60 seconds) and that they are secure against remote tampering. Many cloud providers provide secure time sources either directly via the hypervisor or via NTP servers within their networks.
Certificates and Other Credentials
All credentials issued by network controllers to member nodes in a given network are signed by the controller's secret key to allow all network members to verify them. Credentials have timestamp fields populated by the controller, allowing relative comparison without the need to trust the node's local system clock.
Credentials are issued only to their owners and are then pushed peer to peer by nodes that wish to communicate with other nodes on the network. This allows networks to grow to enormous sizes without requiring nodes to cache large numbers of credentials or to constantly consult the controller.
Credential Types
- Certificates of Membership : a certificate that a node presents to obtain the right to communicate on a given network. Certificates of membership are accepted if they agree , meaning that the submitting member's certificate's timestamp differs from the recipient's certificate's timestamp by no more than the recipient certificate's maximum timestamp delta value. This creates a decentralized moving-window scheme for certificate expiration without requiring node clock synchronization or constant checking with the controller.
- Revocations : a revocation instantaneously revokes a given credential by setting a hard timestamp limit before which it will not be accepted. Revocations are rapidly propagated peer to peer among members of a network using a rumor mill algorithm, allowing a controller to revoke a member credential across the entire network even if its connection to some members is unreliable.
- Capabilities : a capability is a bundle of network rules that is signed by the controller and can be presented to other members of a network to grant the presenter elevated privileges within the framework of the network's base rule set. More on this in the section on rules.
- Tags : a tag is a key/value pair signed by the controller that is automatically presented by members to one another and can be matched on in base or capability network rules. Tags can be used to categorize members by role, department, classification, etc.
- Certificates of Ownership : these certify that a given network member owns something, such as an IP address. These are currently only used to lock down networks against IP address spoofing but could be used in the future to certify ownership of other network-level entities that can be matched in a filter.
Multicast, ARP, NDP, and Special Addressing Modes
ZeroTier networks support multicast via a simple publish/subscribe system.
When a node wishes to receive multicasts for a given multicast group, it advertises membership in this group to other members of the network with which it is communicating and to the network controller. When a node wishes to send a multicast it both consults its cache of recent advertisements and periodically solicits additional advertisements.
Broadcast (Ethernet ff:ff:ff:ff:ff:ff ) is treated as a multicast group to which all members subscribe. It can be disabled at the network level to reduce traffic if it is not needed. IPv4 ARP receives special handling (see below) and will still work if normal broadcast is disabled.
Multicasts are propagated using simple sender-side replication. This places the full outbound bandwidth load for multicast on the sender and minimizes multicast latency. Network configurations contain a network-wide multicast limit configurable at the network controller. This specifies the maximum number of other nodes to which any node will send a multicast. If the number of known recipients in a given multicast group exceeds the multicast limit, the sender chooses a random subset.
There is no global limit on multicast recipients, but setting the multicast limit very high on very large networks could result in significant bandwidth overhead.
Special Handling of IPv4 ARP Broadcasts
IPv4 ARP is built on simple Ethernet broadcast and scales poorly on large or distributed networks. To improve ARP's scalability ZeroTier generates a unique multicast group for each IPv4 address detected on its system and then transparently intercepts ARP queries and sends them only to the correct group. This converts ARP into effectively a unicast or narrow multicast protocol (like IPv6 NDP) and allows IPv4 ARP to work reliably across wide area networks without excess bandwidth consumption. A similar strategy is implemented under the hood by a number of enterprise switches and WiFi routers designed for deployment on extremely large LANs. This ARP emulation mode is transparent to the OS and application layers, but it does mean that packet sniffers will not see all ARP queries on a virtual network the way they typically can on smaller wired LANs.
Multicast-Free IPv6 Addressing Modes
IPv6 uses a protocol called NDP in place of ARP. It is similar in role and design but uses narrow multicast in place of broadcast for superior scalability on large networks. This protocol nevertheless still imposes the latency of an additional multicast lookup whenever a new address is contacted. This can add hundreds of milliseconds over a wide area network, or more if latencies associated with pub/sub recipient lookup are significant.
IPv6 addresses are large enough to easily encode ZeroTier addresses. For faster operation and better scaling we've implemented several special IPv6 addressing modes that allow the local node to emulate NDP. These are ZeroTier's rfc4193 and 6plane IPv6 address assignment schemes. If these addressing schemes are enabled on a network, nodes locally intercept outbound NDP queries for matching addresses and then locally generate spoofed NDP replies.
Both modes dramatically reduce initial connection latency between network members. 6plane additionally exploits NDP emulation to transparently assign an entire IPv6 /80 prefix to every node without requiring any node to possess additional routing table entries. This is designed for virtual machine and container hosts that wish to auto-assign IPv6 addresses to guests and is very useful on microservice architecture backplane networks.
Finally there is a security benefit to NDP emulation. ZeroTier addresses are cryptographically authenticated, and since Ethernet MAC addresses on networks are computed from ZeroTier addresses these are also secure. NDP emulated IPv6 addressing modes are therefore not vulnerable to NDP reply spoofing.
Normal non-NDP-emulated IPv6 addresses (including link-local addresses) can coexist with NDP-emulated addressing schemes. Any NDP queries that do not match NDP-emulated addresses are sent via normal multicast.
Ethernet Bridging
ZeroTier emulates a true Ethernet switch. This includes the ability to L2 bridge other Ethernet networks (wired LAN, WiFi, virtual backplanes, etc.) to virtual networks using conventional Ethernet bridging.
To act as a bridge a network member must be designated as such by the controller. This is for security reasons as normal network members are not permitted to send traffic from any origin other than their MAC address. Designated bridges also receive special treatment from the multicast algorithm, which more aggressively and directly queries them for group subscriptions and replicates all broadcast traffic and ARP requests to them. As a result bridge nodes experience a slightly higher amount of multicast bandwidth overhead.
Bridging has been tested extensively on Linux using the Linux kernel native bridge, which cleanly handles network MTU mismatch. There are third party reports of bridging working on other platforms. The details of setting up bridging, including how to selectively block traffic like DHCP that may not be wanted across the bridge, are beyond the scope of this manual.
See our bridging tutorial
Public Networks
It is possible to disable access control on a ZeroTier network. A public network's members do not check certificates of membership, and new members to a public network are automatically marked as authorized by their host controller. It is not possible to de-authorize a member from a public network.
Rules on the other hand are enforced, so it's possible to implement a special purpose public network that only allows access to a few things or that only allows a restricted subset of traffic.
Public networks are useful for testing and for peer to peer "party lines" for gaming, chat, and other applications. Participants in public networks are warned to pay special attention to security. If joining a public network be careful not to expose vulnerable services or accidentally share private files via open network shares or HTTP servers. Make sure your operating system, applications, and services are fully up to date.
Ad-Hoc Networks
A special kind of public network called an ad-hoc network may be accessed by joining a network ID with the format:
Ad-hoc networks are public (no access control) networks that have no network controller. Instead their configuration and other credentials are generated locally. Ad-hoc networks permit only IPv6 UDP and TCP unicast traffic (no multicast or broadcast) using 6plane format NDP-emulated IPv6 addresses. In addition an ad-hoc network ID encodes an IP port range. UDP packets and TCP SYN (connection open) packets are only allowed to destination ports within the encoded range.
For example ff00160016000000 is an ad-hoc network allowing only SSH, while ff0000ffff000000 is an ad-hoc network allowing any UDP or TCP port.
Keep in mind that these networks are public and anyone in the entire world can join them. Care must be taken to avoid exposing vulnerable services or sharing unwanted files or other resources.
Click here to create your network and start adding devices.
- Origin and Design Philosophy
- Network Hypervisor
- The ZeroTier Peer to Peer Network (VL1)
- Network Topology and Peer Discovery
- Cryptography
- Trusted Paths for Fast Local SDN
- Ethernet Virtualization Layer (VL2)
- Network Identifiers and Controllers
- Certificates and Other Credentials
- Multicast, ARP, NDP, and Special Addressing Modes
- Ethernet Bridging
- Public Networks
- Ad-Hoc Networks
- Topology 3: Full tunnel
- Network Design considerations
- Host mode and ports
- Resolving address-range conflicts
- Global addressing
- Allow Managed Addresses
- Client status
- Peer status
- About persistent storage
- Container maintenance
- Zigbee2MQTT
- Zigbee2Mqtt Assistant
ZeroTier ¶
ZeroTier is a Virtual Private Network (VPN) solution that creates secure data-communications paths between devices at different locations. You can use ZeroTier to:
- give remote devices secure access to your home network's local services;
- provide secure network-to-network communications between your home network and the home networks of your friends and relations; and
- bypass carrier-grade network address translation (CGNAT) which can befuddle WireGuard.
ZeroTier Docker images ¶
This documentation covers two DockerHub images and two IOTstack templates:
zyclonite:zerotier
This image implements a standard ZeroTier client. It is what you get if you choose "ZeroTier-client" from the IOTstack menu. Its function is identical to the clients you install on Android, iOS, macOS and Windows.
zyclonite:zerotier-router
This is an enhanced version of the ZeroTier client. It is what you get if you choose "ZeroTier-router" from the IOTstack menu. In addition to connecting your Raspberry Pi to your ZeroTier network, it can also forward packets between remote clients and devices attached to your home LAN. It is reasonably close to WireGuard in its general behaviour.
References ¶
- Home Page (sign-up)
- ZeroTier Central (management)
- Documentation
- Knowledge Base - Networking
- GitHub (ZeroTier source code)
zyclonite/zerotier:
- GitHub (image source code)
- DockerHub (image repository)
IOTstack discussion paper : ZeroTier vs WireGuard
Definition ¶
- Catenet (a con cate nation of net works) means the collection of networks and clients that can reach each other either across a local network or via a path through a ZeroTier Cloud.
Getting started with ZeroTier ¶
Create an account ¶.
ZeroTier offers both free and paid accounts. A free account offers enough for the average home user.
Go to the Zerotier downloads page. If you wait a little while, a popup window will appear with a "Start here" link which triggers a wizard to guide you through the registration and setup process. At the end, you will have an account plus an initial ZeroTier Network ID.
Tip: Make a note of your ZeroTier network ID - you will need it!
You should take the time to work through the configuration page for your newly-created ZeroTier network. At the very least:
- Give your ZeroTier network a name. At this point you only have a single network but you may decide to create more. Meaningful names are always easier on the brain than 16-hex-digit numbers.
Scroll down until you see the "IPv4 Auto-Assign" area. By default, ZeroTier will have done the following:
- Enabled "Auto-Assign from Range";
- Selected the "Easy" button; and
- Randomly-selected one of the RFC1918 private ranges below the line.
If the range selected by ZeroTier does not begin with "10.x", consider changing the selection to something in that range. This documentation uses 10.244.*.* throughout and it may be easier to follow if you do something similar.
Tip: avoid 10.13.*.* if you are also running WireGuard.
The logic behind this recommendation is that you can use 10.x.x.x for ZeroTier and 192.168.x.x for your home networks, leaving 172.x.x.x for Docker. That should make it easier to understand what is going on when you examine routing tables.
Nevertheless, nothing about ZeroTier depends on you using a 10.x network. If you have good reasons for selecting from a different range, do so. It's your network!
Install client on "remote" ¶
You should install ZeroTier client software on at least one mobile device (laptop, iDevice) that is going to connect remotely. You don't need to go to a remote location or fake "remoteness" by connecting through a cellular system. You can do all this while the device is connected to your home network.
Connecting a client to your ZeroTier network is a three-step process:
Install the client software on the device. The Zerotier downloads page has clients for every occasion: Android, iOS, macOS, Unix and Windows.
Launch the client and enter your ZeroTier Network ID:
on macOS, launching the app adds a menu to the right hand side of your menu bar. From that menu, choose "Join New Network…", enter your network ID into the dialog box and click "Join".
on iOS, launching the app for the first time presents you with a privacy policy which you need to accept, followed by a mostly-blank screen:
- Tap + , accept the privacy policy (again) and enter your network ID into the field.
- Leave the other settings alone and tap "Add Network". Acknowledge any security prompt (what you see depends on your version of iOS).
- Turn on the slider button.
Android and Windows – follow your nose.
In a web browser:
- connect to ZeroTier Central: https://my.zerotier.com
- login to your account
- click on your network ID
- scroll down to the "Members" area
- find the newly-added client
- authorise the client by turning on its "Auth?" checkbox
- fill in the "Name" and, optionally, the "Description" fields so that you can keep track of the device associated with the client ID. Again, names are easier on the brain than numbers.
Each time you authorise a client, ZeroTier assigns an IP address from the range you selected in the "IPv4 Auto-Assign" area. Most of the time this is exactly what you want but, occasionally, you may want to override ZeroTier's choice. The simplest approach is:
Type a new IP address into the text field to the right of the + ;
your choice needs to be from the range you selected in the "IPv4 Auto-Assign" area
Click the + to accept the address; then
- Delete the unwanted address by clicking the trash-can icon to its left.
ZeroTier IP addresses are like fixed assignments from a DHCP server. They persist. The same client will always get the same IP address each time it connects.
- Clients can't join your ZeroTier network without your approval. If a new client appears in the list which you don't recognise, click the trash-can icon at the far right of its row. That denies the client access - permanently. The client needs to be reset before it can make another attempt.
Other devices ¶
Do not install ZeroTier on your Raspberry Pi by following the Linux instructions on the Zerotier downloads page. Those instructions lead to a "native" installation. We are about to do all that with a Docker container.
You can install ZeroTier clients on other systems but you should hold off on doing that for now because, ultimately, it may not be needed. Whether you need ZeroTier client software on any device will depend on the decisions you make as you follow these instructions.
Topology 1: ZeroTier client-only ¶
To help you choose between the ZeroTier-client and ZeroTier-router containers, it is useful to study a network topology that does not include routing.
Four devices are shown:
- A is a Raspberry Pi running "ZeroTier-client" installed by IOTstack.
B is some other device (another Pi, Linux box, Mac, PC).
The key thing to note is that B is not running ZeroTier client software.
C is your local router, likely an off-the-shelf device running a custom OS.
Again, assume C is not running ZeroTier client software.
G is the remote client you set up above.
Table 1 summarises what you can and can't do from the remote client G :
G can't reach B or C , directly, because those devices are not running ZeroTier client software.
G can reach B and C , indirectly, by first connecting to A . An example would be G opening an SSH session on A then, within that session, opening another SSH session on B or C .
It should be apparent that you can also solve this problem by installing ZeroTier client software on B . It would then have its own interface in the 10.244.0.0/16 network that forms the ZeroTier Cloud and be reachable directly from G . The no † entries would then become yes , with the caveat that G would reach B via its interface in the 10.244.0.0/16 network.
The same would be true for your router C , providing it was capable of running ZeroTier client software.
Lessons to learn:
- All hosts running a ZeroTier client and sharing a common ZeroTier Network ID can reach each other.
- You can springboard from a host that is reachable to a host that is otherwise unreachable, but your ability to do that in any given situation may depend on the protocol you are trying to use.
ZeroTier clients are incredibly easy to set up. It's always:
- Install the client software.
- Tell the client the network ID.
- Authorise the device.
After that, it's full peer-to-peer interworking.
The problem with this approach is that it does not scale if you are only signed up for a free ZeroTier account. Free accounts are limited to 25 clients. After that you need a paid account.
Installing ZeroTier-client ¶
Now that you understand what the ZeroTier-client will and won't do, if you want to install the ZeroTier client on your Raspberry Pi via IOTstack, proceed like this:
- Run the IOTstack menu and choose "Zerotier-client".
Bring up the container:
Tell the container to join your ZeroTier network by replacing «NetworkID» with your ZeroTier Network ID:
You only need to do this once . The information is kept in the container's persistent storage area. Thereafter, the client will rejoin the same network each time the container comes up.
Go to ZeroTier Central and authorise the device.
Job done! There are no environment variables to set. It just works.
Topology 2: ZeroTier router ¶
This topology is a good starting point for using ZeroTier to replicate a WireGuard service running on your Raspberry Pi. Remember, you don't have to make an either/or choice between ZeroTier and WireGuard. You can run both containers side-by-side.
With this structure in place, all hosts in Topology 2 can reach each other directly. All the cells in Table 1 are yes. Full peer-to-peer networking!
Installing ZeroTier-router ¶
The ZeroTier-router container is just the ZeroTier-client container with some iptables rules. However, you can't run both containers at the same time. If ZeroTier-client is installed:
Terminate the container if it is running:
See also if downing a container doesn't work
Remove the existing service definition, either by:
- running the menu and de-selecting "ZeroTier-client"; or
- editing your docker-compose.yml to remove the service definition.
The ZeroTier-router can re-use the ZeroTier-client configuration (and vice-versa) so you should not erase the persistent storage area at:
Keeping the configuration also means you won't need to authorise the ZeroTier-router client when it first launches.
To install Zerotier-router:
Run the IOTstack menu and choose "Zerotier-router".
Use a text editor to open your docker-compose.yml . Find the ZeroTier service definition and the environment variables it contains:
You should:
- Set your timezone.
Uncomment line 9 and replace "yourNetworkID" with your ZeroTier Network ID. This variable only has an effect the first time ZeroTier is launched. It is an alternative to executing the following command after the container has come up the first time:
The reason for the plural variable name ("IDS") is because it supports joining multiple networks on first launch. Network IDs are space-separated, like this:
If necessary, change line 10 to represent your active local interfaces. Examples:
if your Raspberry Pi only connects to WiFi, you would use:
if both Ethernet and WiFi are active, use:
Launch the container:
If the Raspberry Pi running the service has not previously been authorised in ZeroTier Central , authorise it. Make a note of the IP address assigned to the device in ZeroTier Central. In Topology 2 it is 10.244.0.1.
You also need to set up some static routes:
In ZeroTier Central …
Please start by reading Managed Routes .
Once you understand how to construct a valid less-specific route, go to ZeroTier Central and find the "Managed Routes" area. Under "Add Routes" are text-entry fields. Enter the values into the fields:
Click Submit .
With reference to Topology 2 :
- 192.168.202.0/23 is the less-specific route to the home network; and
- 10.244.0.1 is the IP address of A in the ZeroTier Cloud.
This route teaches ZeroTier clients that the 10.244.0.0/16 network offers a path to the less-specific range (192.168.202.0/23) encompassing the home subnet (192.168.203.0/24).
Remote clients can then reach devices on your home network. When a packet arrives on A , it is passed through NAT so devices on your home network "think" the packet has come from A . That means they can reply. However, this only works for connections that are initiated by remote clients like G . Devices on your home network like B and C can't initiate connections with remote clients because they don't know where to send the traffic. That's the purpose of the next static route.
In your home router C …
Add a static route to the ZeroTier Cloud pointing to the IP address of your Raspberry Pi on your home network. In Topology 2 , this is:
You need to figure out how to add this route in your router's user interface.
Here's an example of what actually happens once this route is in place. Suppose B wants to communicate with G . B is not a ZeroTier client so it doesn't know that A offers a path to G . The IP stack running on B sends the packet to the default gateway C (your router). Because of the static route, C sends the packet to A . Once the packet arrives on A , it is forwarded via the ZeroTier Cloud to G .
The process of a packet going into a router and coming back out on the same interface is sometimes referred to as "one-armed routing". It may seem inefficient but C also sends B what is called an "ICMP Redirect" message. This teaches B that it reach G via A so, in practice, not every B -to- G packet needs to transit C .
Topology 3: Full tunnel ¶
The ZeroTier Cloud does not offer a path to the Internet. It is not a VPN solution which will allow you to pretend to be in another location. Every ZeroTier client still needs its own viable path to the Internet.
In terms of traffic flows, what this means in a practical sense is:
- Traffic from G to [ A , B or C ] (and vice versa) flows over the ZeroTier Cloud and is securely end-to-end encrypted in transit; but
- All other traffic goes straight to the ISP or cellular carrier and is not encrypted.
This is the routing table you would expect to see on G :
Executing a traceroute to 8.8.8.8 (Google DNS) shows:
You can see that the first hop is via 172.20.10.1. This means the traffic is not flowing over the ZeroTier Cloud (10.244.0.0/16). The traffic is reaching 8.8.8.8 via the default route through the phone's connection to the carrier's network (172.20.10.0/28).
ZeroTier supports an option for forcing all of a client's traffic to pass over the ZeroTier Cloud. The client's traffic is then end-to-end encrypted, at least until it reaches your home. Traffic destined for the Internet will then pass back out through your home router. From the perspective of the Internet, your remote client will appear to be at your home.
Enabling this feature is a two-step process:
In ZeroTier Central, find the "Managed Routes" area and add:
This is setting up a "default route". 10.240.0.1 is the IP address of A in the ZeroTier network.
Each remote client (and only remote clients) needs to be instructed to accept the default route from the ZeroTier Cloud:
iOS clients:
- Launch the ZeroTier One app.
- If the connection is not already enabled, turn it on and wait for it to start.
- Tap on the network ID (brings up a details sheet).
- Turn on "Enable Default Route".
- Tap outside the details sheet to dismiss it.
- Turn the connection off.
- Turn the connection on again.
Linux clients: execute the command:
See change option for an explanation of the output and how to turn the option off.
macOS clients: open the ZeroTier menu, then the sub-menu for the Network ID, then enable "Allow Default Router [sic] Override".
- Android and Windows clients: follow your nose.
Once allowDefault is enabled on a client, the routing table changes:
Close inspection will show you that two entries have been added to the routing table:
Taken together, these have the same effect as a standard default route (0.0.0.0/0) but, because they are more-specific than the standard default route being offered by the cellular network, the path via ZeroTier Cloud will be preferred.
You can test this with a traceroute :
This time, the first hop is via the ZeroTier Cloud to A (10.244.0.1), then out through the local router C (192.168.203.1).
Topology 4: Multi-site routing ¶
In this topology, everything can reach everything within your catenet. The installation process for F is the same as it was for A . See Installing ZeroTier-router .
In ZeroTier Central you need one "less-specific" Managed Route pointing to each site where there is a ZeroTier router.
At each site, the local router needs two static routes, both via the IP address of the local host running the ZeroTier-router container:
- A static route pointing to the ZeroTier Cloud (10.244.0.0/16); plus
- A static route covering all of 192.168.0.0/16.
If the second route does not make sense, think of it like this:
- A packet destined for the local network (at any site) will match the more-specific routing table entry for that local network and be sent direct to the destination host.
- Otherwise, the packet will be sent to the local router (default gateway).
- On the router ( C or D ), the packet will match the less-specific static route for 192.168.0.0/16 and be forwarded to the local host running the ZeroTier-router container (one-armed routing).
- Courtesy of the Managed Routes set in ZeroTier Central, the local host running the ZeroTier-router container ( A or F ) will either have a more-specific route through the ZeroTier Cloud to the destination network, or it won't.
- If it has a more-specific route, the packet will be forwarded across the ZeroTier Cloud.
- Otherwise the packet will be dropped and the originator will receive an "ICMP destination network unreachable" message.
In essence, both these static routes are "set and forget". They assume catenet growth is a possibility, and that it is preferable to set up schemes that will be robust and not need constant tweaking.
tunnelling remote clients ¶
The diagram above for Topology 4 does not include a default route in ZeroTier Central. If you implement Topology 4 according to the diagram:
- traffic between G and your sites will travel via the ZeroTier Cloud (tunnelled, encrypted); but
- traffic between G and the wider Internet will not be tunnelled, will not be encrypted by ZeroTier, and will reach the Internet via the ISP or cellular carrier.
If you want remote clients like G to use full tunnelling, you can follow the same approach as for Topology 3 . You simply need to decide which site should used by G to reach the Internet. Having made your decision, define an appropriate default route in ZeroTier Central. For example, if G should reach the Internet via:
the left-hand site, the default route should point to the ZeroTier-router running on A :
the right-hand site, the default route should point to the ZeroTier-router running on F :
Once you implement the default route, everything else is the same as for Topology 3 .
Managed Routes ¶
Tl;dr ¶.
If your home network is a single subnet with a /24 prefix (a subnet mask of 255.255.255.0), you need to follow two rules when constructing the "destination" field of a Managed Route in ZeroTier Central:
- use a /23 prefix.
- if the third octet of your home network range is an odd number, subtract 1 to make it an even number.
If your home network has multiple subnets and/or you do not use /24 prefixes then you should either read through the next section or consult one of the many IP address calculators that are available on the Internet. One example:
- www.calculator.net
The details ¶
This is a slightly contrived example but it will help you to understand why you need Managed Routes and how to construct them correctly in ZeroTier Central.
Assume we are talking about Topology 1 and that this is the routing table for host A :
Suppose A wants to send a packet to B . The IP stack starts searching the routing table. For each row:
The destination IP address for B (192.168.203.60) is ANDed with the subnet mask (255.255.255.0). Given the last row in the routing table above:
The candidate (192.168.203.0) is compared with the value in the Destination column (192.168.203.0). If the two values are the same, the route is considered to be a match:
The result is a match so the packet is handed to Layer 2 for transmission via the eth0 interface.
Now suppose A wants to send a packet to 8.8.8.8 (Google DNS). The last row of the routing table will evaluate as follows:
The result is no-match so the routing algorithm continues to search the table. Eventually it will arrive at the 0.0.0.0 entry which is known as the "default route":
The result of comparing anything with the default route is always a match. Because the "Gateway" column is non-zero, the IP address of 192.168.203.1 ( C ) is used as the "next hop". The IP stack searches the routing table again. This new search for 192.168.203.1 will match on the bottom row so the packet will be handed to Layer 2 for transmission out of the eth0 interface aimed at C (the local router, otherwise known as the "default gateway"). In turn, the local router forwards the packet to the ISP and, eventually, it winds up at 8.8.8.8.
Let's bring ZeroTier into the mix.
The local subnet shown in Topology 1 is 192.168.203.0/24 so it seems to make sense to use that same subnet in a Managed Route. Assume you configured that in ZeroTier Central:
When the ZeroTier client on ( A ) adds that route to its routing table, you get something like this:
To all network gurus following along: please remember this is a contrived example.
Study the last two lines. You should be able to see that both lines will match when the IP stack searches this table whenever A needs to send a packet to B . This results in a tie.
What normally happens is a tie-breaker algorithm kicks in. Schemes of route metrics, route weights, hop counts, round-trip times or interface priorities are used to pick a winner. Unfortunately, those schemes are all "implementation defined". Although the algorithms usually converge on a good answer, sometimes Murphy's Law kicks in. Routing problems are notoriously difficult to diagnose and can manifest in a variety of ways, ranging from sub-optimal routing, where the only symptom may be sluggishness, to forwarding loops, which can render your network mostly useless.
Prevention is always better than cure so it is preferable to side-step the entire problem by taking advantage of the fact that IP routing will always match on a more-specific route before a less-specific route, and employ slightly less-specific Managed Routes in ZeroTier Central.
What do "more-" and "less-" mean when we're talking about searching a routing table? The terms refer to the length of the network prefix. In "/X" notation, a larger value of X is more-specific than a smaller value of X:
- a "/25" is more specific then a "/24"
- a "/23" is less specific than a "/24"
To ensure that the IP stack will always make the correct decision, the Managed Route you configure in ZeroTier Central should always be slightly less-specific than the actual subnet it covers. Given 192.168.203.0/24, your first attempt at constructing a less-specific route might be:
Sadly, that won't work. Why? Because the 192.168.203.0/23 subnet does not actually exist. That may surprise you but it's true. It has to do with the requirement that subnet masks use contiguous one-bits. It's easier to understand if you study the binary:
The left hand side of Table 3 shows a network prefix of 192.168.203.0/23 along with what that /23 expands to as a subnet mask of 255.255.254.0. The last row is the result of ANDing the first two rows. Notice the right-most 1-bit in the third octet (circled). That bit hasn't made it to the last row and that's a problem.
What's going on here is that the right-most 1-bit in the third octet is not actually part of the network portion of the IP address; it's part of the host portion. For a network prefix to be valid, all the bits in the host portion must be zero. To put it another way, the IP address 192.168.203.0/23 is host .1.0 (ordinal 256) in subnet 192.168.202.0/23.
Read that last sentence again because "in subnet 192.168.202.0/23" is the clue.
The right hand side of Table 3 starts with network prefix 192.168.202.0/23 and ANDs it with its subnet mask. This time the host portion is all-zero. That means it's a valid subnet and, accordingly, can be the subject of a Managed Route.
Table 3 tells us something else about a /23 prefix. It tells us that whatever value appears in that third octet, the right-most 1-bit must always be zero. That's another way of saying that a /23 subnet is only valid if the third octet is an even number.
At this point, you should understand the reason for the two rules in TL;DR above, and have a better idea of what you are doing if you need to use a subnet calculator.
Network Design considerations ¶
If you intend to set up multiple sites and route between them using ZeroTier, you need to be aware of some of the consequences that flow from how you need to configure Managed Routes.
First, it should be obvious that you can't have two sites with the same network prefix. You and a friend can't both be using 192.168.1.0/24 at home.
The second is that the set of less-specific prefixes in Managed Routes can't overlap either. If you are using the 192.168.0.0/24 subnet at home while your friend is using 192.168.1.0/24 at her home, both of your less-specific Managed Routes will be the same: 192.168.0.0/23. If you set up two Managed Routes to 192.168.0.0/23 with different "via" addresses, all the routers will think there's a single site that can be reached by multiple routes. That's a recipe for a mess.
Putting both of the above together, any network plan for multiple sites should assume a gap of two between subnets. For example, if you are using the subnet 192.168.0.0/24 then your friend should be using 192.168.2.0/24. Your Managed Route will be 192.168.0.0/23, and your friend's Managed Route will be 192.168.2.0/23.
None of this stops either you or your friend from using both of the /24 subnets that aggregate naturally under your respective /23 prefixes. For example, the single Managed Route 192.168.0.0/23 naturally aggregates two subnets:
- 192.168.0.0/24 - eg your Ethernet
- 192.168.1.0/24 - eg your WiFi
Similarly, if you are using more than two subnets, such as:
- 192.168.0.0/24 - your house Ethernet
- 192.168.1.0/24 - your house WiFi
- 192.168.2.0/24 - your workshop WiFi
then you would slide your ZeroTier Managed Route prefix another bit to the left and use:
Notice what happens as you slide the prefix left. Things change in powers of 2:
- a /24 prefix Managed Route spans exactly 1 /24 subnet
- a /23 prefix Managed Route spans exactly 2 /24 subnets
- a /22 prefix Managed Route spans exactly 4 /24 subnets
- a /21 prefix Managed Route spans exactly 8 /24 subnets
- a /17 prefix Managed Route spans exactly 128 /24 subnets
The direct consequence of that for Managed Routes is:
- a /23 prefix means values in the third octet must be wholly divisible by 2
- a /22 prefix means values in the third octet must be wholly divisible by 4
- a /21 prefix means values in the third octet must be wholly divisible by 8
- a /17 prefix means values in the third octet must be wholly divisible by 128
Understanding how adjacent subnets can be aggregated easily by changing the prefix length should also bring with it the realisation that it is unwise to use a scattergun approach when allocating the third octet among your home subnets. Consider this scheme:
- 192.168.0.0/24 - your Ethernet
- 192.168.100.0/24 - your house WiFi
- 192.168.200.0/24 - your workshop WiFi
You would need three /23 Managed Routes in ZeroTier Central. In addition, you would prevent anyone else in your private ZeroTier catenet from using 192.168.1.0/24, 192.168.101.0/24 and 192.168.201.0/24. It would be preferable to use a single /22 as shown in the example above.
Sure, that third octet can range from 0..255 but it's still a finite resource which is best used wisely, particularly once you start to contemplate using ZeroTier to span multiple sites.
Host mode and ports ¶
The default service definition for ZeroTier-router contains the following lines:
Line 13 tells ZeroTier to run in Docker's "host mode". This means the processes running inside the container bind to the Raspberry Pi's network ports.
Processes running inside non-host-mode containers bind to the container's ports, and then use Network Address Translation (NAT) to reach the Raspberry Pi's ports.
The x- prefix on line 14 has the effect of commenting-out the entire clause. In other words, the single x- has exactly the same meaning as:
The x-ports clause is included to document the fact that ZeroTier uses the Raspberry Pi's port 9993.
Documenting the ports in use for host-mode containers helps IOTstack's maintainers avoid port conflicts when adding new containers.
You should not remove the x- prefix. If docker-compose complains about the x-ports clause, the message is actually telling you that your copy of docker-compose is obsolete and that you should upgrade.
The Domain Name System ¶
Normal dns ¶.
If you have a DNS server running somewhere in your catenet, you can ask ZeroTier to propagate that information to your ZeroTier clients. It works the same way as a DHCP server can be configured to provide the IP addresses of DNS servers when handing out leases.
It is a two-step process:
In ZeroTier Central, find the "DNS" area, complete the (optional) "Search Domain" and (required) "Server Address" fields, then click Submit .
Examples. In Topology 4 , suppose the DNS server (eg PiHole or BIND9) is host:
- A , then "Server Address" = 10.244.0.1 (preferred) or 192.168.203.50 (less preferred);
- B , then "Server Address" = 192.168.203.60
Each client needs to be instructed to accept the DNS configuration:
- iOS clients: always enabled.
macOS clients: open the ZeroTier menu, then the sub-menu for the Network ID, then enable "Allow DNS Configuration".
- Notice that clients need to opt-in to receiving DNS via ZeroTier. It is generally more appropriate for remote clients to do this than devices attached to a home network. This is probably why ZeroTier-managed DNS is "always on" for iOS clients. Android clients may be the same. For local clients, is usually better to let DHCP hand out DNS servers with the lease.
There are reports of allowDNS being unreliable on Linux clients. If you have trouble on Linux, try disabling allowDNS and add the DNS server(s) to:
Multicast DNS ¶
The ZeroTier Cloud relays multicast traffic. That means that multicast DNS (mDNS) names are propagated between ZeroTier clients and you can use those names in connection requests.
In terms of Topology 4 , A , F and G can all reach each other using mDNS names. For example:
However, even if B and C were advertising mDNS names over 192.168.203.0/24, they would be unreachable from D , E , F and G using those mDNS names because B and C are not ZeroTier clients. The same applies to reaching D and E from A , B , C or G using mDNS names.
Resolving address-range conflicts ¶
As your network infrastructure becomes more complex, you may find that you occasionally run into address-range conflicts that force you to consider renumbering.
ZeroTier Central is where you define the subnet used by the ZeroTier Cloud (eg 10.244.0.0/16), while your home router is generally where you define the subnets used on your home networks.
Docker typically allocates its internal subnets from 172.16/12 but it can sometimes venture into 192.168/16. Docker tries to stay clear of anything that is in use but it doesn't always have full visibility into every corner of your private catenet.
The IOTstack menu adds the following to your compose file:
That structure tells docker-compose that it should construct two networks:
- iotstack_default
- iotstack_nextcloud
but leaves it up to docker-compose to work out the details. If you need more control, you can tell docker-compose to use specific subnets by adding two lines to each network definition:
A /22 is sufficient for 1,021 containers. That may seem like overkill but it doesn't really affect anything. Nevertheless, no part of those subnet prefixes is any kind of "magic number". You should feel free to use whatever subnet definitions are appropriate to your needs.
- If you are never going to run NextCloud on your Raspberry Pi, you can omit that network definition entirely. Doing so will silence unnecessary messages from docker-compose.
Global addressing ¶
Everything in this documentation assumes you are using RFC1918 private ranges throughout your catenet. ZeroTier Cloud makes the same assumption.
If some parts of your private catenet are using public addressing (either officially allocated to you or "misappropriated" like the 28/7 network), you may need to enable assignment of Global addressing:
- iOS clients: not mentioned - likely enabled by default.
macOS clients: open the ZeroTier menu, then the sub-menu for the Network ID, then enable "Allow Assignment of Global IPs".
Allow Managed Addresses ¶
The "Allow Managed Addresses" command (aka allowManaged option) is enabled by default. It gives ZeroTier permission to propagate IP addresses and route assignments. It is not a good idea to turn it off. If you turn it off accidentally, you can re-enable it either in the GUI or via:
See change option for an explanation of the output.
Useful Commands ¶
The commands in this section are given using this syntax:
When ZeroTier client software is running in a container, you can execute commands:
directly using docker exec :
or by first opening a shell into the container:
On macOS you can run the commands from a Terminal window with sudo :
Windows, presumably, has similar functionality.
Networks ¶
Check networks ¶.
To check the ZeroTier networks the client has joined:
Join network ¶
To join a new ZeroTier network:
Leave network ¶
To leave an existing ZeroTier network:
Client status ¶
To check the status of a device running ZeroTier client:
Peer status ¶
To check the status of peers in your ZeroTier Networks:
In the <link> column, DIRECT means ZeroTier has been able to arrange for this client (where you are running the command) and that peer to communicate directly. In other words, the traffic is not being relayed through ZeroTier's servers. Seeing RELAY in this field is not necessarily a bad thing but, to quote from the ZeroTier documentation:
If you see the peer you're trying to contact in the RELAY state, that means packets are bouncing through our root servers because a direct connection between peers cannot be established. Side effects of RELAYING are increased latency and possible packet loss. See " Router Configuration Tips " above for how to resolve this.
Options ¶
At the time of writing, these options are defined:
Check option ¶
To check an option:
The result is either "0" (false) or "1" (true). Example:
Change option ¶
To enable an option:
To disable an option:
The response to changing an option is a large amount of JSON output. The updated state of the options is near the start. In practice, you can limit the output to just the options with a grep :
About persistent storage ¶
Both ZeroTier-client and ZeroTier-router use the same persistent storage area. Should you choose to do so, you can freely switch back and forth between the -client and -router containers without worrying about the persistent storage area.
The contents of ZeroTier's persistent storage uniquely identify the client to the ZeroTier Cloud. Unlike WireGuard, it is neither safe nor prudent to copy ZeroTier's persistent storage from one Raspberry Pi to another.
An exception to this would be where you actually intend to move a ZeroTier client's identity to a different machine. That will work, providing your migration procedure never results in the same ZeroTier identity being in use on two machines at the same time.
You can erase ZeroTier's persistent storage area like this:
- always double-check sudo commands before hitting Enter .
- see also if downing a container doesn't work
Erasing persistent storage destroys the client's authorisation (cryptographic credentials). If you start the container again, it will construct a new identity and you will need to re-authorise the client in ZeroTier Central. You should also delete the obsolete client authorisation.
Container maintenance ¶
ZeroTier (either -client or -router) can be kept up-to-date with routine "pulls":
iOS tip ¶
On iOS, you must decide whether to select "Custom DNS" when you define the VPN. If you want to change your mind, you need to delete the connection and start over.
Providing you don't delete the Zerotier app, the client's identity remains unchanged so you won't need to re-authorise the client in ZeroTier Central.
An example of when you might want to enable Custom DNS is if you want your remote clients to use PiHole for name services. If PiHole is running on the same Raspberry Pi as your Zerotier instance, you should use the IP address associated with the Raspberry Pi's interface to the ZeroTier Cloud (ie 10.244.0.1 in the example topologies).
使用ZeroTier转发所有流量及ZeroTier Moon搭建
虽然我自己使用的蒲公英X1组网,但考虑到如果想让别人也连上我的emby,还是再搞个ZeroTier吧。考虑到我毕业之后去其他地方,学校的联通默认给公网IP,但以后住的地方不给的可能性比较大。
同时考虑到连接性的问题,往网络里加个Moon服务器比较好,自己家里有公网IP,虽然是动态的,但是看了下大半个月才会换一次,换了之后就再执行一下命令就行了。
话说我记得以前ZeroTier给的连接设备数量是100个,但我今天去看了看发现只有50个了,虽然50个也完全足够了。
Moon服务器就不解释了,简单的说就是个人的一个帮助其他节点连接用的一个节点,要求其有公网IP,最好是固定的。因为我对docker一窍不通,所以这两天在看ZeroTier的Knowledge Base,突然看到了这一篇:https://zerotier.atlassian.net/wiki/spaces/SD/pages/7110693/Overriding+Default+Route+Full+Tunnel+Mode
简单的说就是可以将接入ZeroTier的设备所有流量都由某一设备转发,那么这东西有啥用呢?想起前两天一位已经毕业的学长,让我帮他找几篇论文,因为出去工作后就没学校那些资源了。
所以ZeroTier就可以将一个节点设置在学校内,通过这个节点转发所有的流量,相当于其他设备都使用了校园网的IP,自然也就可以直接使用学校的资源库了。
那为什么又要用Moon服务器呢?因为ZeroTier的根服务器在国外,所以在国内的连接性比较差,如果自己的设备也处在一个连接性比较差的地方,就可能连不上了。
如何设置转发全部流量?
说实话,它的文章我完全没有看懂。。。。。主要是有一大堆代码我不懂啥意思我不知道该往哪放。照着下面的步骤可以弄成,但我不懂原理。
0、在学校(或者你想要的某个地方)放一个常年24小时开机的设备运行ZeroTier;
1、允许客户端NAT;
2、在ZeroTier里设置你的要用来转发的客户端;
3、在其他设备上打开AllowDefault。
那么我们先来第一步,教程参考:https://zerotier.atlassian.net/wiki/spaces/SD/pages/224395274/Route+between+ZeroTier+and+Physical+Networks
不想看英文的,推荐这个视频:

那么通过这个可以实现其他设备访问到其他路由下的子网络,这就实现了ZeroTier虚拟IP到实际的IP的访问,但我们访问其他网站其实也是域名对应的某个IP嘛,所以只需要把转发的IP地址范围扩大就可以了。
UNRAID的可以参考这个:https://post.smzdm.com/p/aekwwkeq/

在ZeroTier的管理界面设置0.0.0.0/0经由192.168.195.33转发,192.168.195.33是我学校里的路由器上运行的ZeroTier,在虚拟网络里的IP地址,请自行更换成自己的。
因为这里转发了全部的IP地址,一般ZeroTier是默认不允许这样的,因为可能会导致你无法上网。
第三步:在客户端允许全部的转发

原本只勾上了Allow Managed IP,现在把Default Route和Global IP也勾上。然后就可以用校园网的IP下论文了。

昨天请已经毕业的学姐试了试,网速只有这么慢,但下个论文还是足够用的(又不是不能用。
设置Moon服务器(Moon和刚才的转发没有必然联系,只是为了方便连接稳定、快速)
Moon服务器要求拥有公网IP,最好是固定的公网IP,如果是家庭宽带没有固定的公网IP,DDNS域名也是 不行的 。但我去看了下,家里一般大半个月才换一次公网IP,所以也可以拿现在的IP用着,一个月换一次。
如果你希望通过zerotier的ip能访问你的比如UNRAID或者群晖,就使用host网络,只想做个moon也可以使用bridge。
这是官方的文档:https://docs.zerotier.com/zerotier/moons
在UNRAID上搭建:
在应用商店搜索ZeroTier,有个现成的,只需要输入你的网络ID就可以了。

zerotier-cli

zerotier-idtool

看看这两个命令都能干啥。(你不输入也没事,能知道自己在干嘛比较好)
cd /var/lib/zerotier-one zerotier-idtool initmoon identity.public > moon.json
第一行是切换到这个目录,第二行是生成一个moon.json文件。因为是unraid,这个zerotier-one目录已经映射到我们的 appdata里了,可以进去随便找个比如FileBrowser去修改:

将stableendpoints后面的值改成你的“IP/9993”的形式,9993是端口,记得把这个端口开放到公网。别忘了双引号,也不要用域名。
然后再在这个目录下新建一个名为moon.d的文件夹,把生成的.mooo文件移动到里面,重启ZeroTier就可以了。

有两个映像比较推荐,使用zerotier官方的加入网络,再用上面的zerotier-moon自动生成moon文件,因为群晖敲命令行有些麻烦。这个人写的比较详细,我就不写了。
https://zhuanlan.zhihu.com/p/268050990
使用官方的docker之后,把你的docker下创建一个zerotier文件夹,映射到docker的/var/lib/zerotier-one
再把官方的docker关了,开始用那个seedgou的。(记得开高级权限)

把这个那个刚才映射给官方docker的文件夹再映射给这个docker的/var/lib/zerotier-one。

在环境这一页加这么一行命令“-4 12.34.56.78”,把12.34.56.78换成你的公网IP,以后每换一次都要重新装一次这个docker。
在客户端使用zerotier-cli orbit deadbeef00 deadbeef00,添加moon。将deadbeef00换成你Moon的ID。
昨天试的,有效降低的延迟,通过moon中转,带宽可以有10+,甚至可以看个视频啥的。

【远程访问三】无公网IP,用zerotier实现外网访问

导读:没有公网ip实现外网的方法很多,但限制也多,访问慢、限制端口、限制流量,想体验好必须氪金!新手最常用的应该是花生壳了,几乎所有路由器都内置了,但花钱就是让我氪命!费劲千辛万苦,终于找到zerotier这个不要钱的内网穿透。
优点1:速度快,理论上可以跑满宽带上线。
优点2:win、mac、android、ios、nas全平台适配。
优点3:不限端口、流量。
缺点1:访问前必须安装客户端。
第一步,打开zerotier官网,注册账号,登录。 ZeroTier - Global Area Networking

第二步,点击“Create A Network”,会创建出来一个新的“NETWORK ID”,点击

第三步,没什么卵用,不要被英文吓到。你可以改成自己喜欢的名字和简介,也可以不管。

第四步,(1)下载windows版zerotier。 Download – ZeroTier
(2)软件开启后,在win桌面右下角右键单击“zerotier”,选择“join network”。
(3)在弹窗输入NETWORK ID“a09acf02331ed58a”,点击join即可。

第五步,下载手机版zerotier,ios版在应用市场,安卓版在官网。
同样输入a09acf02331ed58a,点击join work加入。

第五步,(1)下载nas版zerotier。 Download – ZeroTier
(2)在app center安装nas版“zerotier”。
如果你不知道自己该使用哪个版本的套件,可以在putty种输入代码。

第六步,使用putty输入如下代码,代码含义“加入到某某 network 网络”。

第七步,返回zerotier官网控制页面,下拉页面会发现下方有3个IP,打勾即可。

第八步,使用手机、电脑输入nas的虚拟局域网IP访问即可。
中间的“Managed IP”为真是ip,输入即可访问你的nas!
可根据mac、版本号等辨认哪个是你的nas。


How to set up remote game streaming using Moonlight and Sunshine
Y ears ago, it was impossible to imagine running games on a remote system and streaming them to the device of your choice. Thanks to advancements in hardware capabilities and network bandwidth, today, you can not only broadcast your entire library from a cutting-edge PC , but also enjoy high graphical fidelity and solid frame rates while doing so.
However, you’ll need to configure some third-party applications to set up remote game streaming on your devices. Since this process can get rather cumbersome, we’ve created a step-by-step guide to help you set up remote game streaming via Moonlight and Sunshine.
How to remote desktop to Ubuntu
Setting up sunshine.
Sunshine is an application that lets you convert a powerful PC into a server capable of rendering games and sending the stream to any client device. It’s also quite easy to configure as all you have to do is:
- Head to Sunshine's official GitHub link and download the portable version of the app.
- Extract the folder and run sunshine.exe as an administrator.
- Copy the Configuration UI link from the Sunshine terminal onto your web browser.
- Pick a username and password and click on Log in before signing in with the newly-set account credentials.
- (Optional) If you prefer playing with controllers, you’ll need to download and install the ViGEmBus drivers .
Setting up Moonlight
With localhost set up, you’ll need to download Moonlight, an application that allows you to connect a client device to the Sunshine server.
- Download the latest version of Moonlight from the GitHub link .
- If you’re using the portable version, simply extract the folder you just downloaded and run Moonlight.exe with admin privileges.
- If your firewall tries to block Moonlight, click on the Allow access button.
- Assuming your Sunshine host and Moonlight client are on the same network, the server will appear inside the Moonlight client.
Pairing the Sunshine server with a Moonlight host
Now that you've installed Sunshine and Moonlight on your PCs, it’s time to pair them over the LAN/Wi-Fi.
- Inside the Moonlight app, click on the Sunshine server .
- Note the PIN displayed by Moonlight and switch to the other PC.
- Click on the PIN tab of the Sunshine UI and enter the four-digit code before clicking on the Send button.
- The lock icon on the host/server PC will disappear from Moonlight, and you're free to use it from the client system.
(Optional) Optimizing the video settings on Moonlight
Once you’ve set up both Sunshine and Moonlight, you can click on the server name in Moonlight and begin broadcasting your games and even the desktop screen to the client system. However, you’ll notice that the image quality on Moonlight can be somewhat lacking. To fix this, simply adjust the video settings on Moonlight by following these steps:
- Click on the Settings icon in Moonlight.
- Increase the resolution and FPS by clicking on the arrows and choosing the ideal values in accordance with your network bandwidth and speed.
- You can also modify the image quality with the help of the Video bitrate slider .
(Optional) Setting up ZeroTier to stream games over the Internet
So far, you're limited to streaming games across devices connected to the same network. But for those who want to stream games over the Internet, the ZeroTier application serves as a nice solution.
- Download the ZeroTier app on both the server and the client system from the official link .
- Run zerotier_desktop_ui.exe on both devices.
- Right-click on the ZeroTier app icon in the Taskbar and pick the Join new network… option to open a new dialog box.
- Switch to your web browser, and sign up on ZeroTier to gain access to the Network settings page.
- Click on the default Network created by ZeroTier.
- Choose 10.147.17.* as the IPv4 Auto-Assign range. Also, ensure that all the IPv6 Auto-Assign settings are disabled.
- Copy the Network ID into the Join ZeroTier Network dialog box and hit Join. Repeat this step for the client device.
- Head back to ZeroTier's Network page on your web browser, and enable the checkbox under the Auth? column for the server and client systems.
- Switch to the client system that’s running Moonlight and click on the Add PC manually button.
- Copy and paste the Managed IP of the server into the blank and hit OK .
Once the server shows up in the Moonlight app, you can access it from any network, not just your home Wi-Fi/LAN.
Wrapping up the procedure to set up Sunshine and Moonlight
Remote gaming is quite a neat facility, especially if you wish to play your PC games on other devices like a portable laptop, gaming handheld, or smartphone. It’s also a better alternative to cloud gaming as you retain full control over the actual hardware and games.
If you encounter random slowdowns during your remote gaming sessions, chances are your Wi-Fi router isn’t powerful enough to stream your games. So, you should turn down the resolution or upgrade to a high-speed router . But if that doesn’t work, the server PC could be the culprit, and it might be the time to upgrade to better components .
How to use Steam Link for remote play on your smartphone

Static ip for clients
hi. my zerotier working very well when ip addresses assigned auto. if i assign ip addresses manually, there is no connection. all clients online but i cant connect. what should i do?
That should work. The IP address needs to be in the same subnet as the managed route.
but it is not working.
I just tried this and it is working now. I was working on it yesterday and had the same issue as you did. This time, I left the auto-assigned address on the system AND added a static address in the same range. Specifically, I specified a range of 192.168.192.1-192.168.192.250 (/24) and then added the static address to the system of 192.168.192.254. The system also has the ZT managed address if 192.168.192.96. I can ping both. So… maybe it will work for you if you leave the automatically assigned address on there as well - pretty hacky but so far it is working.
yes, it works when the automatically assigned ip address is not deleted. but this time every device has 2 ip address. there must be a way.
Can you open the little wrench icon for that member and check “Do Not Auto-Assign” try that.
i tried, not worked.
also i tried to use my own managed route, but no success. i want to use 10.12.12.33/24. if i choose any other ip different from zerotier option, didn’t work.
The interface in my.zerotier.com isn’t working, or your device isn’t working? Please try to leave and rejoin the network after changing the ip address.
I rebuilt from scratch. I have accomplished exactly what I wanted to do as I do not have any problems at the moment. Thank you for such a beautiful product.
This topic was automatically closed 30 days after the last reply. New replies are no longer allowed.
IMAGES
VIDEO
COMMENTS
Client Configuration. ZeroTier One is a service that can run on laptops, desktops, servers, virtual machines, and containers to provide virtual network connectivity through a virtual network port much like a VPN client. It can also act as a network controller and as a federated root server. Binary packages are available on the ZeroTier site and ...
From Zerotier Manual : allowManaged (rw) boolean If true, ZT-managed IPs and routes are assigned. allowGlobal (rw) boolean If true, ZT-managed IPs and routes can overlap public IP space. allowDefault (rw) boolean If true, network can override system default route (full tunnel) Thanks. I don't fully understand still from those definitions.
Allowing default route override is required to allow the override of ::0/0, while allowGlobal is required to allow your network's controller to assign global IPv6 addresses. Without allowGlobal ZeroTier networks are only allowed to assign addresses and routes within private IP space. Step 4e: Set Up Gateway NDP Proxying (not always needed)
Allow routing configuration of global IPv6 adresses on all clients: sudo zerotier-cli set 8d6xxxxxxxxxxx65 allowGlobal=1 Get the nodeid: ... After authorisation make a note of the ip-addresses given to the routers. ZeroTier network routing. Site1: network: 10.70.10./24, 2001:41xx:xxxx:xxxx::/64
ZeroTier uses UDP hole punching to do this. It's a similar process to VoIP STUN/TURN. The difficulty for strict firewall configurations is: the my.zerotier.com controllers and your devices are on dynamic IP addresses and are listening on random UDP ports. Default zerotier-one listening ports are: 9993. Secondary Port, randomized each start up ...
Allow Managed - If checked, ZeroTier managed private IP addresses and routes are assigned. Allow Global - If checked, ZeroTier managed private IP addresses and routes are assigned, but can overlap with public IP space. Allow Default: the program can override the default path of the operating system, and forward all traffic through the tunnel.
This tab shows "Global" information concerning the overall health of the Zerotier service. ... and not have the Zerotier service auto-assign an IP address. Auto-assignment of IP addresses for nodes is controlled on the Zerotier Portal. After joining a Zerotier network (and authorising it on the portal) you may now wish to assign the ...
Configure the destination route as slightly larger than the actual physical subnet, here /23 instead of /24 (a smaller number is a bigger subnet in this notation) This makes devices that are on both the physical and the ZeroTier network prefer the physical connection.. Enable IP forwarding. This can vary depending on linux distribution. Typically: Edit /etc/sysctl.conf to uncomment net.ipv4.ip ...
Go to zerotier r/zerotier • ... In the Top 10% of largest communities on Reddit. People can connect to my Zero Tier Network, but not my managed IP . Hello, I recently set up a network on Zero Tier. ... I was able to connect my PC to the port address on my PC via Zero Tier network once I enabled "allow global" and "allow managed" settings, but ...
Allowing default route override is required to allow the override of ::0/0, while allowGlobal is required to allow your network's controller to assign global IPv6 addresses. Without allowGlobal ZeroTier networks are only allowed to assign addresses and routes within private IP space. Set Up Gateway NDP Proxying (not always needed)
ghost commented Nov 20, 2016. I want to replace my OpenVPN setup with ZeroTier but for that I need to be able to tell my users how they can enable the allowGlobal setting. It is possible to do this using the CLI: zerotier-cli set networkId allowGlobal=1 but telling end-users to do this is problematic, especially for Windows, Android and iOS ...
Setting static IP clientside - Community Support - ZeroTier Discussions. zerotier, support, networking. Secbits February 23, 2022, 1:30pm 1. So I selfhost a Zerotier controller, which is deployed using Saltstack as a means of constructing a VM. I have a requirement to server a set of internal services (which requires broadcasting) to a subnet ...
Detailed explanation of the ZeroTier wire protocol. Trusted Paths for Fast Local SDN . To support the use of ZeroTier as a high performance SDN/NFV protocol over physically secure networks the protocol supports a feature called trusted paths.It is possible to configure all ZeroTier devices on a given network to skip encryption and authentication for traffic over a designated physical path.
1 min read. For minimal operation, outbound UDP on port 9993 (and reply packets) should be allowed to ZeroTIer's root servers. Allowing other UDP is ideal since it allows peer to peer connectivity, but these IPs on 9993 are the minimal requirement for ZeroTier to work: root-lax-01.zerotier.com has address 104.194.8.134 root-lax-01.zerotier.com ...
macOS clients: open the ZeroTier menu, then the sub-menu for the Network ID, then enable "Allow Assignment of Global IPs". Android and Windows clients: follow your nose. Allow Managed Addresses¶ The "Allow Managed Addresses" command (aka allowManaged option) is enabled by default. It gives ZeroTier permission to propagate IP addresses and ...
Step 2: Add default route. Log into ZeroTier Central and add a route to 0.0.0.0/0 via the IP address of your new virtual edge router. On our net 10.6.4.0/22 is our network and 10.6.6.2 is our ...
因为这里转发了全部的IP地址,一般ZeroTier是默认不允许这样的,因为可能会导致你无法上网。 第三步:在客户端允许全部的转发. Windows客户端. 原本只勾上了Allow Managed IP,现在把Default Route和Global IP也勾上。然后就可以用校园网的IP下论文了。
Sorry but no. It is disabled by default so someone doesn't join a network and have their DNS overridden unknowingly. It's the same philosophy behind the Allow Default, and Allow Global settings. If you are deploying a fleet of machines that all need to have this setting, there are deployment and configuration management tools that can do ...
第一步,打开zerotier官网,注册账号,登录。. ZeroTier - Global Area Networking. 第二步,点击"Create A Network",会创建出来一个新的"NETWORK ID",点击. 第三步,没什么卵用,不要被英文吓到。. 你可以改成自己喜欢的名字和简介,也可以不管。. 第四步,(1)下载 ...
No. Let ZeroTier and UPnP, NAT-PMP, and IPv6 handle it automatically. System Firewalls and Security Software. If your computer has a local firewall, allow traffic to and from UDP port 9993. In some cases (such as the Windows built-in firewall) ZeroTier does this automatically if installed with one of our installation packages.
Inside the Moonlight app, click on the Sunshine server. Note the PIN displayed by Moonlight and switch to the other PC. Click on the PIN tab of the Sunshine UI and enter the four-digit code before ...
I was working on it yesterday and had the same issue as you did. This time, I left the auto-assigned address on the system AND added a static address in the same range. Specifically, I specified a range of 192.168.192.1-192.168.192.250 (/24) and then added the static address to the system of 192.168.192.254. The system also has the ZT managed ...