Live, Love, Bike, and Code.
- Newsletter & Feed


James Montemagno
Live, Love, Bike, and Code
Copyright © James Montemagno 2024 • All rights reserved. Privacy Policy
Proudly published with Ghost . Branding and design by Cinder Design Co.
- November 29th, 2019
Windows Mouse Pointer & Cursor Features for Presenting
When I present, I am constantly zooming in and out to help attendees focus in on what I am talking about. It is also nice because it makes all the text nice and large so it is easier to see from the back of the room or if someone has reduced vision. One thing that has always bothered me, is that the mouse pointer is always tiny and the typing cursor is so thin. Well, not anymore with the latest versions of Windows 10, that pack a new feature to adjust mouse & cursor size. Simply type: Windows + "mouse" and you will find "Change mouse pointer size":

This thing is packed full of features to enable you to control your mouse, cursor, and even touch feedback. Adjust:
- Pointer size
- Pointer color
- Cursor thickness
- Touch feedback indications
Check this out:

Go turn this on today, and thanks to Scott Hanselman for tweeting this out!
Copyright © James Montemagno 2019 • All rights reserved. Privacy Policy

How to Highlight the Mouse Cursor in Windows 10 & 11
Keep losing your Windows cursor? Identify it easier by highlighting it.
Highlighting the mouse cursor can enhance recorded Windows video tutorials or live presentations. Applying a highlight effect to a small mouse cursor will make the pointer somewhat clearer to follow for those watching any kind of Windows tutorial video or viewing your desktop while screen sharing.
So, most users who show their Windows desktop areas to others will recognize the appeal of highlighting their mouse pointers. You can highlight a mouse pointer in different ways with some third-party apps and extensions. This is how to highlight the mouse cursor in Windows 11/10 with PowerToys, Mouse Pointer Highlight, and Cursor Highlight.
How to Highlight the Cursor by Selecting the Show Location of Pointer Setting
Windows doesn’t include much in the way of cursor-highlighting features. However, it does have a Show location of pointer setting that enables you to briefly highlight the cursor’s position with a ring by pressing an activation key. That’s not the kind of color highlighting third-party apps offer, but it still shows where the cursor is. You can select the Show location of pointer setting like this:
- Use Win + I to open up Settings (see how to open Windows Settings for more ways).
- Select Bluetooth & devices in Windows 11’s Settings app. You’ll need to select the Devices category in Windows 10.
- Click Mouse to view settings for that device type.
- Then click the Pointer Options tab in the Mouse Properties window that opens.
- Click Apply in the Mouse Properties window.
Now try out the new pointer highlighting by pressing the Ctrl key. You’ll see a circle expand and quickly shrink around the cursor whenever you press that key. That’s supposed to help users find their mouse pointers. However, it’s a somewhat unnecessary feature for that purpose since moving the mouse around is usually the best way to find the cursor.
That feature can come in handy for Windows video tutorials though. Activating the circle animation will draw viewers’ attention to a cursor’s position. You can use it to briefly highlight settings by moving the cursor next to any option that needs selecting.
How to Highlight the Cursor With Mouse Pointer Highlight
If you would prefer to add a permanent color highlight to the cursor, check out the Mouse Pointer Highlight app. That freely available adds a transparent color circle to the cursor. This is how you can highlight the cursor with Mouse Pointer Highlight:
- Open the Mouse Pointer Highlight Microsoft Store page.
- Then click Get in Store app to bring up a dialog for opening Microsoft Store.
- Press that dialog’s Open Microsoft Store option.
- Then click Mouse Pointer Highlight’s Install button.
- Open the Mouse Highlight app window.
The app’s window will open with a default yellow circle highlight automatically applied to your mouse’s cursor. You can change the color of the circle by clicking Select Color . Then choose a different color on the palette and click OK .
The default size for the circle highlight is 30, but you can make it bigger or smaller. Enter a value less than 30 in the Size box. Or input a number higher than 30 to increase the circle’s size.
You can adjust the circle’s transparency by changing the value in the Opacity box. Entering a lower value there will increase transparency. Inputting 0 makes the circle invisible, and entering the max 255 value removes the transparency.
This app also has a click highlight effect you can enable. When enabled, you’ll see a second circle with a different color briefly appear around the cursor whenever you click the mouse. Select the Enable checkbox to turn on that feature.
Then you can configure that secondary click highlight circle by entering alternative values in the Size and Opacity boxes much the same. There’s also a Display Time box for click highlight. Enter an alternative millisecond value there to change how long the circle appears. The default display time of 800 milliseconds is close to a second.
When you’re done configuring your cursor highlighting, click the Apply Setting button. The app must be running for its cursor highlighting to work, but it doesn’t run in the background with a system tray icon. Minimize the app’s window to the taskbar when you’re utilizing it.
How to Highlight the Cursor With PowerToys
PowerToys is an app with which you can enable a variety of handy new tools and features in Windows 11.10. Our best things to do in PowerToys guide tells you about some of the tools you can activate with that software.
PowerToys includes a Mouse utilities tab from which you can enable a color highlight circle for your cursor. You can set mouse cursor highlighting with PowerToys like this:
- Open the Microsoft PowerToys app page on the Microsoft Store.
- Click Get in Store and the Open Microsoft Store options.
- Select Install to add PowerToys to your app library.
- Now open PowerToys, which you’ll find on your Start menu’s app list.
- Click the Mouse utilities tab.
- Then press the Windows logo key + Shift + H hotkey to activate the highlighter.
PowerToy’s cursor highlighting only applies to mouse clicking. You’ll see different color circles whenever you right or left-click the mouse. Those circles are set to yellow and blue colors by default.
To customize PowerToy’s cursor highlighting, click Appearance and Behavior to view further options. Then you can click the Primary or Secondary button boxes to bring up palettes from which to select different colors. Drag the Opacity bar’s slider lift and right to adjust the highlighting’s transparency level. Click the Radius option to select a different size value for the circle.
How to Highlight the Cursor in Edge and Chrome With the Cursor Highlighter Extension
If you only need to highlight your cursor in Edge or Chrome, check out the Cursor Highlight extension for those browsers. That extension adds a color circle to the mouse pointer in those browsers. It also highlights the cursor with a nice animation effect you don’t get with PowerToys or Mouse Pointer Highlighter. You can highlight your cursor with that add-on like this:
- Open the Cursor Highlighter page in Edge or Chrome.
- Click the Add button to install the extension.
- Click Cursor Highlighter to view the extension’s options.
- Click the color palette box to choose a color for the highlight and select save.
- Now open a new website page in your browser to see your highlighted cursor.
Note that extensions from other stores need to be enabled for Edge users to highlight their cursors with this Chrome add-on. You can access that option in Edge by pressing Alt + F and selecting Extensions > Manage Extensions . Then turn on the Allow extensions from other stores setting.
Make the Mouse Cursor Stand Out by Highlighting It in Windows
You can make your cursor shine by highlighting it in Windows 11/10. The highlighting options in PowerToys and Mouse Pointer Highlight apps will come in handy for numerous presentation and tutorial purposes in Windows 11/10. Windows' show pointer feature and the Cursor Highlighter extension also provide useful visual cursor indicators, albeit with slightly less functionality.
TechRepublic
Account information.

Share with Your Friends
How to add a highlighter to your mouse pointer in Windows 10
Your email has been sent

For many of us operating in a modern work environment, having a team meeting often means we are using some form of remote online collaboration tool like Microsoft Teams or Zoom . When you are leading one of these online meetings, getting and holding everyone’s attention can be a challenge. Any visual aid you can bring to the table would be helpful.
SEE: 83 Excel tips every user should master (TechRepublic)
In Microsoft Windows 10 , using a setting found deep in the Control Panel , you can add a simple pulsing highlighter visual cue to your standard mouse pointer. This small bit of flare can help you get and keep the attention of your audience during your next meeting or presentation. However, as you might expect, turning this mouse pointer highlighter feature on is not as simple as it should be.
This how-to tutorial shows you how to activate the pulsing mouse pointer highlighter feature in Windows 10.
SEE: Zoom 101: A guidebook for beginners and business pros (TechRepublic Premium)
For reasons we can only speculate, typing “mouse options” or “mouse properties” or “mouse settings” in the Windows 10 desktop search box will not take us to where we need to go for this specific setting. Any one of those search terms will, however, take us to the general mouse settings screen shown in Figure A .

As you scroll down the mouse settings page, you are presented with two links to additional mouse settings. The first link takes you to a page where you can adjust the color and size of your cursor and mouse pointer. The second link, labeled Additional Mouse Options, is where we need to go, so click it to get to the Windows 10 Control Panel for mouse settings shown in Figure B .

Click the Pointer Options tab to reveal the mouse setting screen shown in Figure C . Near the bottom of this screen you will see a checkbox labeled Show Location of Pointer When I Press the CTRL key. Check the box and click Apply.

When you click Apply, you may see a new screen informing you that some Microsoft .NET runtime files are being installed, click Continue to finish that process.
Once the setting is applied, click the OK button to close the mouse settings window.
SEE: How to activate and use Color Picker in Windows 10 PowerToys (TechRepublic)
Now, when you place your mouse over a button or other item you would like to highlight for your meeting or presentation and then press and release the CTRL button on your keyboard, Windows 10 will highlight the position with a circular highlighting pulse.
To turn it off after your meeting or presentation is over, just follow this process again, uncheck the setting and click Apply.
How to get more intense cursor highlights
This simple pulsing mouse pointer highlighter, used in conjunction with a larger and more colorful mouse pointer, may be all you need to give your next meeting a little spark. However, if you want to have more options for your mouse pointer during meetings you will have to resort to either installing new cursor images into Windows 10, opt for third-party software or apply a combination of both methods.
Subscribe to the Developer Insider Newsletter
From the hottest programming languages to commentary on the Linux OS, get the developer and open source news and tips you need to know. Delivered Tuesdays and Thursdays
- How to type on your screen with Windows 10
- How to display seconds in the system clock in Windows 10
- How to add Control Panel to File Explorer in Windows 10
- Microsoft 365: A cheat sheet
- Checklist: Securing Windows 10 systems
- Everything you need to know about the Microsoft Exchange Server hack
- Must-read coverage: Windows 10

Create a TechRepublic Account
Get the web's best business technology news, tutorials, reviews, trends, and analysis—in your inbox. Let's start with the basics.
* - indicates required fields
Sign in to TechRepublic
Lost your password? Request a new password
Reset Password
Please enter your email adress. You will receive an email message with instructions on how to reset your password.
Check your email for a password reset link. If you didn't receive an email don't forgot to check your spam folder, otherwise contact support .
Welcome. Tell us a little bit about you.
This will help us provide you with customized content.
Want to receive more TechRepublic news?
You're all set.
Thanks for signing up! Keep an eye out for a confirmation email from our team. To ensure any newsletters you subscribed to hit your inbox, make sure to add [email protected] to your contacts list.
Critical PowerPoint Shortcuts – Claim Your FREE Training Module and Get Your Time Back!
PowerPoint’s hidden laser pointer (and how to use it)
- PowerPoint Tutorials
- Shortcuts & Hacks
- January 19, 2024
Did you know that PowerPoint includes a free (hidden) laser pointer option that you can use without having to buy one? Even if you have a differetn pointer you like to use, this built in pointer is a great backup whenever you need it. It also comes in three colors too (red, green, and blue).

Table of Contents
[watch] the powerpoint laser pointer in action.
You are currently viewing a placeholder content from Youtube . To access the actual content, click the button below. Please note that doing so will share data with third-party providers.
Take your PPT skills to the next level
Why is a pointer useful during a powerpoint presentation.
A laser pointer is useful for highlighting or pointing out exactly what you want your audience to focus during your presentation. In other words, instead of trying to verbally tell somewhere where to look on your slide, you use your pointer to point it out.
For example, if you want to bring attention to the 100% year-on-year growth on your slide, you can simply use PowerPoint’s laser pointer to point it out on your slide.

The more content you have on your slide, the more useful it is to point out what you are talking about with your laser pointer.
In the same way, you could use it to highlight:
- Different rows in a table
- The different people on your team (as you talk about them)
- Ideas for a marketing campaign as you highlight them
In short, a laser pointer allows you to better control the ebb and flow of your presentation, by pointing things out on screen while you talk about them.
While there are probably a million different laser pointers you can use, the one I use most is the hidden laser pointer in PowerPoint. Read on to see how to use it.
How to change your cursor into a laser pointer
There are two different ways to turn your cursor into a laser pointer in PowerPoint. The first is using your mouse, the second is the laser pointer shortcut. Let’s start with your mouse first.
The advantage of this first technique is it locks the laser pointer, so you don’t have to hold any keys down on your computer. On top of that, once you turn it on using your mouse like this, the laser pointer remains on as you advance through your presentation. So you don’t have to turn it on for every slide.

To turn your mouse cursor into a laser pointer during your PowerPoint presentation, simply:
- Hit F5 to start your Slide Show ( see my guide here for other slide show shortcuts )
- Right-click your slide
- Open the Pointer Options
- Select Laser pointer
Doing so, your mouse cursor becomes a colored pointer that you can drag around on your screen to highlight things in your presentation as pictured below.
NOTE: You cannot change the color of the pointer while giving a presentation. If you want a different color, you need to change its color before you run your presentation

Turning off the laser pointer

There are two ways to turn the laser pointer off in PowerPoint. The first is simply to hit the Esc key on your keyboard. Hitting Esc, the laser pointer reverts back to the normal mouse cursor.

An alternative way to turn the laser pointer off, is simply to change it into something else. You can do that as follows:
- Right-click your slide in Slide Show view
- Select Pointer Options
- Select Arrow Options (or choose Pen or Highlighter)
- Select Visible
Selecting Visible turns your mouse cursor back into the normal PowerPoint arrow cursor.
Laser pointer shortcuts
My favorite way to use the laser pen is simply to use its shortcut. That’s becuase using shortcuts make everything easier in PowerPoint AND saves you a ton of time.
NOTE: If you want to learn all the best PowerPoint shortcuts and tricks, they are all inside our PowerPoint Pro Membership here .
To use this shortcut, simply hold the Ctrl key on your keyboard, then click and drag with your mouse. Doing so turns your cursor into the laser pointer color you have selected (red is the default).
When you are done, simply let go of the Ctrl key and the pointer disappears. This is a fast and easy way to highlight things in your presentation on the fly and impress your clients and colleagues.
I personally find this to be the fastest way to turn the laser pointer on and off. In the picture below, you can see what the blue laser pointer looks like in PowerPoint.

You can alternatively lock the laser pointer by hitting Ctrl + L on your keyboard. This locks the laser pointer, so you don’t have to hold down anything on your keyboard (like with the previous shortcut).

To unlock the pointer when you are done with it, simply hit the Esc key to return to the normal mouse cursor.
How to change the laser pointer color
PowerPoint has three different laser pointer colors you can choose from in PowerPoint. Red is the default color, but you can easily change its color to green or blue.
By default, the the PowerPoint pointer is red, but you can easily it to green or blue if you want to, through the Set Up Slide Show dialog box.
Just be aware that you need to set the color before you run your presentation.
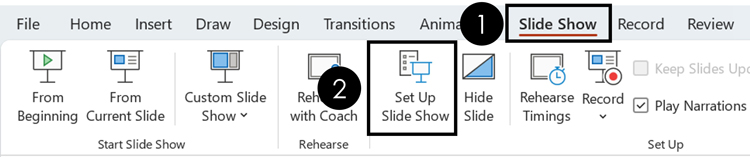
- Click the Slide Show tab
- Select the Set Up Slide Show command
- Open the Laser Pointer Color options
- Choose a color (red, green, or blue)
QUESTION: Does changing the laser pointer color change it’s color for all my presentations?
The color you choose for your pointer is saved in the PowerPoint presentation you changed it for. It is not set as the new default color for all your PowerPoint presentations. So, feel free to change your pointer color to best match the template / presentation you are working with.
By default, PowerPoint always starts with a red laser pointer. So unless you need a color other than red, you do not need to worry about changing it.
Does the pointer work when presenting two presentations at the same time?

The answer is yes (as you can see pictured above).
For example, if you are running an English and Chinese version version of your presentation at the same time for two different audiences (which is what we did all the time when I was living in China), the laser pointer still works in each presentation.
The catch is, you need to use the laser pointer shortcut (discussed above), and make sure you click into each presentation before you use it. To see how to set up two presentations to run at the same time as pictured above, see my guide here .
Why bother changing the pointer color?
The most important reason to change the color of your pointer, is so that it stands out against your slide background.
Notice in the picture below, how much clearer the green laser pointer is against the red slide background, than the red one is. If your audience cannot see the color against your slide background, then using the laser pointer is meaningless.

The same would be true if you were using a blue or green presentation background.
In short, you want a high contrast between your pointer color and the PowerPoint background color you are using for your presentation. That way your audience can clearly see what you are trying show them.
So that’s how to use PowerPoint’s built-in laser pointer and change its color between red, green and blue to have high contrast against your presentation.
This is one of those cool PowerPoint features that few people know how to use. And now that you know how to use it, you can take advantage of it during your presentations.
If you enjoyed the depth of this PowerPoint tutorial and want to learn more about our PowerPoint training courses and free resources, visit us here .
🔒 Unlock the PowerPoint Shortcuts Trusted by Industry Leaders KKR, American Express, HSBC, and More!
Join over 114,880 professionals from diverse fields including consulting, investment banking, advertising, marketing, sales, and business development who have supercharged their PowerPoint game with our proven methods.
✅ Customize compelling presentations effortlessly.
✅ Master time-saving techniques for faster deck creation.
✅ Boost your career prospects with top-notch PowerPoint skills.
Get FREE access to the Critical PowerPoint Shortcuts module of our premium training course by entering your name and email below.
DISCLAIMER: PC Users Only!
We respect your privacy and will keep your info safe and confidential.
Related Articles
About the author.

Popular Tutorials
- How to Strikethrough Text (l̶i̶k̶e̶ ̶t̶h̶i̶s̶) in Word, Excel & PowerPoint
- How to Make Animated Fireworks in PowerPoint (Step-by-Step)
- Strikethrough Shortcut (l̶i̶k̶e̶ ̶t̶h̶i̶s̶) for Word, Excel & PowerPoint
- How to Create a Flash Card Memory Game in PowerPoint (Like Jeopardy)
- Keyboard Shortcuts Not Working: Solved
PowerPoint Tutorial Categories
- Strategies & Opinions
- Presentation Design
- Pictures, Icons, Videos, Etc.
- New Features
- Miscellaneous
- Charts & Data Viz
We help busy professionals save hours and gain peace of mind, with corporate workshops, self-paced courses and tutorials for PowerPoint and Word.
Work With Us
- Corporate Training
- Presentation & Template Design
- Courses & Downloads
- PowerPoint Articles
- Word Articles
- Productivity Resources
Find a Tutorial
- Free Training
- For Businesses
We help busy office workers save hours and gain peace of mind, with tips, training and tutorials for Microsoft PowerPoint and Word.
Master Critical PowerPoint Shortcuts – Secure Your FREE Training Module and Save Valuable Time!
⌛ Master time-saving expert techniques.
🔥 Create powerful presentations.
🚀 Propel your career to new heights.
We value your privacy – we keep your info safe.
Discover PowerPoint Hacks Loved by Industry Giants - KKR, AmEx, HSBC!
Over 114,880 professionals in finance, marketing and sales have revolutionized their PPT skills with our proven methods.
Gain FREE access to a full module of our premium PowerPoint training program – Get started today!
We hate spam too and promise to keep your information safe.
You are currently viewing a placeholder content from Facebook . To access the actual content, click the button below. Please note that doing so will share data with third-party providers.

How to Use the Built-in Laser Pointer in PowerPoint (with Shortcuts)

Display a Laser Pointer During a PowerPoint Slide Show (and Choose Red, Green or Blue Pointers)
by Avantix Learning Team | Updated September 14, 2023
Applies to: Microsoft ® PowerPoint ® 2010, 2013, 2016, 2019, 2021 and 365 (Windows)
During a PowerPoint slide show, you can change your mouse into a laser pointer to focus attention on a specific area on your slide. You can show or hide the built-in laser pointer using keyboard shortcuts or by using the context menu.
Recommended article: 10 PowerPoint Slide Show Tips and Tricks
Do you want to learn more about PowerPoint? Check out our virtual classroom or in-person classroom PowerPoint courses >
There are 4 common ways to start a slide show in PowerPoint:
- Click the Slide Show button on the bottom right of the screen
- Click the Slide Show tab in the Ribbon and click From Beginning or From Current Slide
- Press F5 to start a slide show from the beginning
- Press Shift + F5 to start a slide show from the current slide
Change the mouse into a laser pointer using a keyboard shortcut
To change the mouse pointer into a laser pointer using a keyboard shortcut:
- Start a slide show.
- To display the laser pointer, press Ctrl + L. Press ESC to hide it.
Change the mouse into a laser pointer by dragging
To change the mouse pointer into a laser pointer by dragging:
- Press and hold Ctrl and then click and drag the left mouse button to point to the contents on the slide that you want to focus on.
Change the mouse into a laser pointer using the context menu
To change the mouse pointer into a laser pointer using the context menu:
- Right-click on the slide. A drop-down menu appears.
- Select Pointer Options and then Laser Pointer.
- Press ESC to hide the laser pointer.
The context menu appears as follows when you right-click during a slide show:

Change the color of the laser pointer
By default, the laser pointer is red. However, you can change it to green or blue.
To change the color of the laser pointer:
- In Normal View or Slide Sorter View, click the Slide Show tab in the Ribbon.
- In the Set Up group, click Set Up Slide Show. A dialog box appears.
- Under Show options, select the color that you want from the Laser pointer color drop-won menu.
The Set Up Show dialog box appears as follows:

Record laser pointer movements
To record your laser pointer movements for a self-running slide show:
- Click the Slide Show tab in the Ribbon.
- In the Set Up group, click the arrow beside or below Record Slide Show. A drop-down menu appears.
- Click either Start Recording from Beginning or Start Recording from Current Slide. If a dialog box appears, select the Narrations and laser pointer check box.
- Click Start Recording or Record. To pause the narration, in the recording controls, click Pause. To resume, click Resume.
- Display the mouse pointer using the methods outlined above. Press ESC to hide the pointer.
- Click the right arrow to move to the next slide.
- Move through the presentation and show and hide the laser pointer when needed.
- To end the slide show recording, right-click the slide and then click End Show. The recorded slide show timings are automatically saved and the slide show appears in Slide Sorter view with timings below each slide.
- To view the slide show with the pointer movements and timings you recorded, on the Slide Show tab, in the Start Slide Show group, click From Beginning or From Current Slide.
- To redo the laser pointer movements or slide timings, repeat the steps above.
You can also display a pen or highlighter during a slide show. Check out the article How to Highlight or Draw on PowerPoint Slides During a Slide Show.
Subscribe to get more articles like this one
Did you find this article helpful? If you would like to receive new articles, JOIN our email list
More resources
How to Change the Font on All Slides in PowerPoint
How to Hide or Unhide Slides in PowerPoint (with Shortcuts)
How to Insert a Video in PowerPoint (from a File or Your PC or Shared Drive)
Where to Find Free Pictures for PowerPoint Presentations (10 Great Stock Image Sites)
How to Add Animation in PowerPoint (Animate Images, Text and Other Objects in PowerPoint)
Related courses
Microsoft PowerPoint: Introduction
Microsoft PowerPoint: Intermediate / Advanced
Microsoft PowerPoint: Design for Non-Designers
Microsoft PowerPoint: Animations Bootcamp
VIEW MORE COURSES >
Our instructor-led courses are delivered in virtual classroom format or at our downtown Toronto location at 18 King Street East, Suite 1400, Toronto, Ontario, Canada (some in-person classroom courses may also be delivered at an alternate downtown Toronto location). Contact us at [email protected] if you'd like to arrange custom instructor-led virtual classroom or onsite training on a date that's convenient for you.
Copyright 2024 Avantix ® Learning
You may also like

How to Insert or Type E with an Accent Mark in PowerPoint (È, É, Ê, Ë, è, é, ê, or ë)
You can insert or type e with an accent mark in PowerPoint using built-in tools or keyboard shortcuts (including Alt code shortcuts). The letter e can be inserted with an accent in both upper or lower case in text boxes or placeholders on slides, the slide master or layouts. The following are common accents in upper or lower case – È, É, Ê, Ë, è, é, ê, or ë.

How to Fade a Picture or Part of a Picture in PowerPoint (Using a Gradient)
You can fade a picture in PowerPoint by drawing a rectangle shape on top of the picture and then filling the rectangle with a gradient from opaque to transparent. This technique is often used to fade an image into the background of a slide. Since the rectangle is placed on top of the image and then text may be placed on top of the rectangle, you may need to reorder the objects.

How to Lock an Image, Shape or Other Object in PowerPoint
You can now lock an image, shape or other object in PowerPoint. Objects can be locked in Normal View or Slide Master View. Only PowerPoint 365 users can lock objects to prevent moving and resizing. This is helpful if you want to select and move other objects on the slide or prevent others from moving or resizing an object. You can lock items using the context menu or the Selection Pane.
Microsoft, the Microsoft logo, Microsoft Office and related Microsoft applications and logos are registered trademarks of Microsoft Corporation in Canada, US and other countries. All other trademarks are the property of the registered owners.
Avantix Learning |18 King Street East, Suite 1400, Toronto, Ontario, Canada M5C 1C4 | Contact us at [email protected]
Our Courses
Avantix Learning courses are offered online in virtual classroom format or as in-person classroom training. Our hands-on, instructor-led courses are available both as public scheduled courses or on demand as a custom training solution.
All Avantix Learning courses include a comprehensive course manual including tips, tricks and shortcuts as well as sample and exercise files.
VIEW COURSES >
Contact us at [email protected] for more information about any of our courses or to arrange custom training.
Privacy Overview
Pin it on pinterest.
- Print Friendly
How-To Geek
Google slides will show you everyone’s mouse cursors.
Extreme collaboration.
Google's Workspace apps are excellent for getting work done, especially if you need to get work done between multiple people. It's completely free to use, and its collaboration features are pretty much unmatched. You can currently see in real time what parts of a document others are looking over or editing, but what if you want to take things a step further? Google Slides , the company's software for editing presentation slides, is now getting a new addition: live pointers.
Google is introducing a new feature in Google Slides called "live pointers" to enhance collaboration. This feature enables real-time visibility of mouse pointers for both the presenter and their collaborators while looking through or editing a presentation. It's designed to make communication and interaction easier when working together on slide decks. Basically, it's something like the existing writing indicator, except instead of just letting users know what part of a document you're editing, it shows your mouse pointer. The live pointers feature allows co-creators to easily highlight specific text or visual elements within a slide, making it easier to draw attention to important information and content.
The feature is not enabled by default, so if you don't like it, you can just not turn it on. Live pointers can be turned on by going to the "View" menu and selecting "Live pointers" and then "show my pointer." Alternatively, you can also use the pointer icon in the toolbar to turn on this feature. Once activated, live pointers will remain visible across all slides until manually turned off. Collaborator pointers can also be hidden during a session by entering presentation mode or selecting the "show collaborator pointers" option in the "View" menu.
This feature will be gradually rolled out to users starting today, but it can take up to 15 days for it to reach everyone. It's certainly an excellent improvement as far as collaboration goes, and I'd even dare to say that it could also fit very well onto both Google Docs and Google Sheets — right now, it's only available on Google Slides. Make sure to check it out if you already have it.
Source: Google

Use keyboard shortcuts to deliver PowerPoint presentations
Many users find that using an external keyboard with keyboard shortcuts for PowerPoint helps them work more efficiently. For users with mobility or vision disabilities, keyboard shortcuts can be easier than using the touchscreen and are an essential alternative to using a mouse.
For a separate list of shortcuts to use while creating your presentation, go to Use keyboard shortcuts to create PowerPoint presentations .
The shortcuts in this topic refer to the US keyboard layout. Keys for other layouts might not correspond exactly to the keys on a US keyboard.
A plus sign (+) in a shortcut means that you need to press multiple keys at the same time.
A comma sign (,) in a shortcut means that you need to press multiple keys in order.
This article describes the keyboard shortcuts and some other common shortcut keys that apply while you're delivering your presentation with PowerPoint for Windows.
To quickly find a shortcut in this article, you can use Search. Press Ctrl+F, and then type your search words.
If an action that you use often does not have a shortcut key, you can record a macro. For step-by-step instructions to record a macro, refer to the section “Record a macro” in Automate tasks with the Macro Recorder to create one.
During the presentation, to open a list of shortcuts, press F1. Use the arrow keys to move between the tabs in the Slide Show Help dialog box.
Get the PowerPoint 2016 keyboard shortcuts in a Word document at this link: PowerPoint 2016 for Windows keyboard shortcuts .
In this topic
Frequently used shortcuts, control the slide show, control media in the slide show, pointer and annotations in the slide show, rehearse the presentation, maneuver in presenter view.
This table lists the most frequently used shortcuts in PowerPoint for Windows.
Top of Page
You can use the following keyboard shortcuts while you’re delivering your presentation in Slide Show (full-screen) mode, with or without Presenter View .
Control media in the slide show
These keyboard shortcuts work with video files imported from your computer or other device. They don't work with online video files.
Use the following keyboard shortcuts to control the pointer and to use it to create annotations during your presentation.
You can use these keyboard shortcuts when you are rehearsing your presentation.
You can use the following keyboard shortcuts while you’re delivering your presentation using Presenter View in PowerPoint 2013 and newer. Presenter View lets you look at your presentation with your speaker notes on one screen (your laptop, for example), while the audience views the notes-free presentation on a different screen.
When you are connected to a second display, Presenter View is shown automatically when you start the slide show. To start a presentation in Presenter View even if you have only a single display, press Alt+F5.
Tip: If Presenter View does not start automatically with two displays, go the Slide Show tab, select the Use Presenter View checkbox, and select the preferred monitor.
PowerPoint help & learning
Screen reader support for PowerPoint
Use keyboard shortcuts to create PowerPoint presentations
Basic tasks to create a presentation in PowerPoint with a screen reader
Use a screen reader to explore and navigate PowerPoint
This article describes the keyboard shortcuts and some other common shortcut keys that apply while you're delivering your presentation with PowerPoint for macOS.
The settings in some versions of the Mac operating system (OS) and some utility applications might conflict with keyboard shortcuts in Microsoft 365 for Mac. For information about changing the key assignment for a keyboard shortcut, refer to Mac Help for your version of macOS or your utility application.
If you don't find a keyboard shortcut here that meets your needs, you can create a custom keyboard shortcut. For instructions, go to Create a custom keyboard shortcut for Office for Mac .
Many of the shortcuts that use the Ctrl key on a Windows keyboard also work with the Control key in PowerPoint for macOS. However, not all do.
To quickly find a shortcut in this article, you can use the Search. Press Command+F, and then type your search words.
During the presentation, to open a list of shortcuts, press forward slash (/).
Pointer and annotations in the slide show
Navigate the presenter view on macos 10.15 (catalina) and later.
This table lists the most frequently used shortcuts in PowerPoint for macOS.
You can use the following keyboard shortcuts while you’re delivering your presentation in Slide Show (full-screen) mode, with or without the Presenter View .
Use the following keyboard shortcuts to control media during a presentation.
You can use the following keyboard shortcuts while you’re delivering your presentation using the Presenter View on macOS 10.15 (Catalina) and later, and when the keyboard control navigation is turned on. For instructions, refer to Turn on the keyboard control navigation .
Use the shortcuts in the table below to move in the Presenter View in PowerPoint for macOS.
Skip ahead in your presentation
You can use your keyboard to skip ahead several slides without the audience seeing the slides as you transition to the new slide.
Press the Tab key until you reach the Slide Navigator control (filmstrip).
Press and hold down the Option key and press the Left or Right arrow key repeatedly until you find the slide you want to skip to.
Release the Option key to move to the slide you want to skip to.
Turn on the keyboard control navigation
To use your keyboard to move between and activate controls on your Mac, turn on the keyboard control navigation.
If you're not using VoiceOver, on your computer, select System Preferences > Keyboard > Shortcuts , and select the Use keyboard navigation to move focus between controls checkbox.
If you're using VoiceOver, the control navigation should be on by default. To check the setting, do the following:
On your computer, press Control+Option+M to access the Apple menu bar item. To open the Apple menu, press Control+Option+Spacebar.
Press Control+Option+Down arrow key until you hear "System preferences ellipses," and then press Control+Option+Spacebar.
The System Preferences window opens. The focus is in the Search text box.
Type Keyboard , and then press Return. The Keyboard dialog box opens.
Press Control+Option+Right arrow key until you hear "Shortcuts tab," and then press Control+Option+Spacebar.
Press Control+Option+Right arrow key until you hear: "Use keyboard navigation to move focus between controls." VoiceOver also announces if the option is selected or unselected. To toggle the option on or off, press Control+Option+Spacebar.
To close the Keyboard dialog box, press Command+W.
This article describes the keyboard shortcuts that apply while you're delivering your presentation with PowerPoint for the web.
If you use Narrator with the Windows 10 Fall Creators Update, you have to turn off scan mode in order to edit documents, spreadsheets, or presentations with Microsoft 365 for the web. For more information, refer to Turn off virtual or browse mode in screen readers in Windows 10 Fall Creators Update .
When you use PowerPoint for the web, we recommend that you use Microsoft Edge as your web browser. Because PowerPoint for the web runs in your web browser, the keyboard shortcuts are different from those in the desktop program. For example, you’ll use Ctrl+F6 instead of F6 for jumping in and out of the commands. Also, common shortcuts like F1 (Help) and Ctrl+O (Open) apply to the web browser – not PowerPoint for the web.
This table lists the keyboard shortcuts you can use to control the slide show.
Technical support for customers with disabilities
Microsoft wants to provide the best possible experience for all our customers. If you have a disability or questions related to accessibility, please contact the Microsoft Disability Answer Desk for technical assistance. The Disability Answer Desk support team is trained in using many popular assistive technologies and can offer assistance in English, Spanish, French, and American Sign Language. Please go to the Microsoft Disability Answer Desk site to find out the contact details for your region.
If you are a government, commercial, or enterprise user, please contact the enterprise Disability Answer Desk .

Need more help?
Want more options.
Explore subscription benefits, browse training courses, learn how to secure your device, and more.

Microsoft 365 subscription benefits

Microsoft 365 training

Microsoft security

Accessibility center
Communities help you ask and answer questions, give feedback, and hear from experts with rich knowledge.

Ask the Microsoft Community

Microsoft Tech Community

Windows Insiders
Microsoft 365 Insiders
Find solutions to common problems or get help from a support agent.

Online support
Was this information helpful?
Thank you for your feedback.
Stack Exchange Network
Stack Exchange network consists of 183 Q&A communities including Stack Overflow , the largest, most trusted online community for developers to learn, share their knowledge, and build their careers.
Q&A for work
Connect and share knowledge within a single location that is structured and easy to search.
Cursor options for Adobe Reader in Full Screen mode
I've made the change from Powerpoint to Beamer for most of my stuff. There is just one last detail that I need to address.
When I use Adobe Acrobat Reader in Full Screen mode as a presentation tool, the only cursor style I have access to is a silly white hand with a down arrow in the middle of it. It's not noticeable enough. I'd like to replace it with something much more noticeable, like the laser pointer option in Powerpoint.
If tried to figure out how to do this in the Windows 10 cursor options -- but I don't even see the hand with the arrow that Acrobat Reader uses in the list that comes up, which makes it very hard to replace.
I'm also quite willing to use any (free) pdf reader that would provide me with the right option, but Foxit and Sumatra don't seem to do any better.
If I could find a straightforward artifact-free way to bring the pdf's into powerpoint, that would work too, but I haven't found one. If I have to do this slide-by-slide instead of file-by-file, that's not an amenable solution.
- adobe-acrobat
- adobe-reader
- Have you tried the options in this Tex StackExchange question ? Otherwise, you could try to render to PNGs and then bring those into PowerPoint? – davidmneedham Jan 23, 2018 at 15:23
- @davidmneedham -- thanks, but I need to stick with realistically portable options. The lions share of the suggestions in the thread are for linux, and the recommendations are for a second-screen requirement, which I don't have. The png export is always an option, but that's what I meant by "Slide-by-Slide" – Scott Seidman Jan 23, 2018 at 16:53
2 Answers 2
I found a solution by combing your suggestion of using another pdf viewer - the Sumatra or PDF-XChange Editor - and changing the system mouse pointer as described here https://softwarerecs.stackexchange.com/questions/16761/presentation-software-with-a-cursor-looking-like-a-laser-pointer-instead-of-mous
"Go to the Mouse properties control panel, in the Devices and Pointers control panel section, click on the Pointers tab. Under the Customise scroll box there is a Browse... button. Clicking this allows you to select a .cur file to change the cursor's appearance. However, the built-in cursor files do not provide a laser-like cursor. This is where you have to create your own."
With just Adobe Acrobat:
- Cursor size: With current version of Adobe Acrobat Reader, the mouse pointer size follows the size set in Windows: Settings → Cursor & Pointer .
- Then, in full-screen mode, Shift + D switches to different annotation tools (side effect is that it changes the cursor for some of them). After pressing it about 7 times , you will get a pen . You can use it to draw on the slide as well!
- H will get you your hand cursor back.
- S For a speech-bubble (comment - sticky note) cursor
(More shortcuts and meaning: https://helpx.adobe.com/acrobat/using/keyboard-shortcuts.html )
You must log in to answer this question.
Not the answer you're looking for browse other questions tagged pdf adobe-acrobat adobe-reader cursor ..
- The Overflow Blog
- How to train your dream machine
- You should keep a developer’s journal
- Featured on Meta
- Our Partnership with OpenAI
- What deliverables would you like to see out of a working group?
Hot Network Questions
- Why did the Iranian president use an old American helicopter?
- What is the stalk map for a morphism of affine schemes?
- Cold Bee and Old Beer
- What is the difference (in the Hebrew) between 'sin' and 'sins' in Psalm 51:2 and Psalm 51:9?
- Indulging your vice when you've got no dice
- Is EU Blue Card visa actually a residence permit, and compatible with my work contract?
- With zero earnings aside from long term capital gains, when would AMT and/or NIIT kick in?
- Sampled Statistics Percentage Internal Calculation
- ex mode equivalent of ^R in powershell?
- Is it an offense to photograph a seahorse?
- Querying and executing actions on the result C++
- The static keyword and clarity in language design
- Are Fregian abstract objects Kantian noumena?
- Why are ND filters used in moon photography
- How are quantum systems different from dice?
- Will the NTSB be involved in the investigation of the crash that killed the President of Iran?
- Where does Planck's constant come from in non-renormalizability of quantum gravity?
- Should I remove a reference after applying to job?
- Visa to Czech republic revoked before travelling
- Expectation conditional on a sigma algebra, what expectation does it refer to?
- Singularity or stiff system suspected in ODE that shouldn't have a singularity in the solution range
- What does "those mythical relations started needing her to cure their mythical ailments in far-off places" mean?
- Why does a charge need to have a velocity to experience force in a magnetic field?
- Is there an obligation to check blood spots in non-chicken eggs
Presentation Mode
The Presentation mode represents another way to view documents in Okular . It can be enabled in View → Presentation . It shows the document on a page per page basis. The pages are shown with zoom to page, that means all the page is visible.
PDF documents can even specify that they are always opened in presentation mode.
When in presentation mode, you have an helper bar located on the top of the screen. Just move the mouse cursor to the top of the screen to make it appear.

To navigate between pages you may use the left mouse button (next page) and the right mouse button (previous page), the mouse wheel, the arrow icons or the line edit in the top bar, or the keys specified in the Navigating section.
Use Play/Pause button in the top bar to start playing presentation or pause it, correspondingly.
You can exit presentation mode at any time by pressing the Esc key or clicking the Quit icon in the top bar.
You can also draw on the current page with a pencil. Click on the Toggle Drawing Mode icon in the top bar to enable or disable the possibility to draw in the presentation mode. The drawings are cleared automatically when leaving the presentation mode. You can also click on the Erase Drawings icon to remove the drawings in the current page.
The presentation mode has support for more than one screen in a multi-monitor configuration. With more than one screen a new button will appear in the top bar, with the icon of a screen: this is a drop down box that allows you to move the presentation to any of the other available screens.
Presentation mode has some configuration options, you can find their description in the chapter Configuring Okular .
Microsoft Learn Q&A needs your feedback! Learn More
May 20, 2024
Microsoft Learn Q&A needs your feedback!
Want to earn $25 for telling us how you feel about the current Microsoft Learn Q&A thread experience? Help our research team understand how to make Q&A great for you.
Find out more!
Teams Forum Top Contributors: EmilyS_726 ✅
May 10, 2024
Teams Forum Top Contributors:
EmilyS_726 ✅
Contribute to the Teams forum! Click here to learn more 💡
April 9, 2024
Contribute to the Teams forum!
Click here to learn more 💡
- Search the community and support articles
- Microsoft Teams
- Teams for business
- Search Community member
Ask a new question
Teams: PowerPoint Presenter View: showing the mouse or a "laserpointer"
Is it possible to enable a mouse cursor or a Laserpointer on the active sheet in a PowerPoint shared via the new Presenter View?
Or is the only way to share the PowerPoint-Window and not use the presenter view?

Report abuse
Reported content has been submitted
- Independent Advisor
2 people found this reply helpful
Was this reply helpful? Yes No
Sorry this didn't help.
Great! Thanks for your feedback.
How satisfied are you with this reply?
Thanks for your feedback, it helps us improve the site.
Thanks for your feedback.
Replies (3)
Question info.
- Meetings and calls
- Screen sharing
- Norsk Bokmål
- Ελληνικά
- Русский
- עברית
- العربية
- ไทย
- 한국어
- 中文(简体)
- 中文(繁體)
- 日本語
IMAGES
VIDEO
COMMENTS
Turn on the laser pointer. Do one of the following: To use the laser pointer in Slide Show view: On the Slide Show tab, click either From Beginning or From Current Slide to start your slide show. To use the laser pointer in Reading view: On the View tab, click Reading View. Press and hold the Ctrl key, and then click and drag the left mouse ...
Well, not anymore with the latest versions of Windows 10, that pack a new feature to adjust mouse & cursor size. Simply type: Windows + "mouse" and you will find "Change mouse pointer size": This thing is packed full of features to enable you to control your mouse, cursor, and even touch feedback. Adjust: Pointer size. Pointer color.
Are there any plans for Microsoft to incorporate the ability to highlight a presenter's mouse cursor. A basic yellow halo and possibly have the ability to use "focus" to draw the viewer's attention to a specific area or feature? Maybe even have a function to emulate a laser pointer or some other tool to call attention to specific areas of the ...
Click the Mouse utilities tab. Scroll down and turn on the Enable Mouse Highlighter option. Then press the Windows logo key + Shift + H hotkey to activate the highlighter. PowerToy's cursor highlighting only applies to mouse clicking. You'll see different color circles whenever you right or left-click the mouse.
Figure B. Click the Pointer Options tab to reveal the mouse setting screen shown in Figure C. Near the bottom of this screen you will see a checkbox labeled Show Location of Pointer When I Press ...
To turn your mouse cursor into a laser pointer during your PowerPoint presentation, simply: Hit F5 to start your Slide Show ( see my guide here for other slide show shortcuts) Right-click your slide. Open the Pointer Options. Select Laser pointer.
Once you've started your presentation and you want to change your cursor into a laser, press and hold the "Ctrl" key while clicking and holding the left mouse button. As you can see in this GIF, we want to draw attention to "How-To Geek" in the question, then show the correct answer. You can also see that the cursor converts back to a ...
Click the Slide Show tab in the Ribbon. In the Set Up group, click the arrow beside or below Record Slide Show. A drop-down menu appears. Click either Start Recording from Beginning or Start Recording from Current Slide. If a dialog box appears, select the Narrations and laser pointer check box.
Learn how to convert your mouse cursor into a laser pointer or pen when you are presenting your PowerPoint slides. Make more professional presentations with ...
Alternatively, you can also use the pointer icon in the toolbar to turn on this feature. Once activated, live pointers will remain visible across all slides until manually turned off. Collaborator pointers can also be hidden during a session by entering presentation mode or selecting the "show collaborator pointers" option in the "View" menu.
When starting the presentation the mouse cursor is always invisible and also if it is not being moved it again disappears. Is it possible to keep the mouse cursor visible at all times? Open the PowerPoint presentation and run it, now right click on a slide and select 'Pointer Options' and then on 'Arrow Options' and select 'visible'.
Highlight mouse pointer with a colored circle, and when you click the mouse button the ring animation can show your mouse click actions to your audience.: Keystroke visualization can show your audience which shortcuts you have just pressed. This feature can help you make your demonstration more understandable. Mouse Spotlight - when you choose this tool, it will dim the screen and put a ...
To do this. Press. Start a presentation from the beginning. F5. Start a presentation from the current slide. Shift+F5. Start the presentation in Presenter View. Alt+F5. Perform the next animation or advance to the next slide.
Click the options button to open the Options tab. You can change the Highlight Color, Size, Opacity and the color of left and right click circle. The hotkey to toggle this function is F8. 2. Use mouse spotlight to focus your audience's attention to the area of interest.
Use this free app to change your Windows mouse cursor into presentation mode. Ideal when showing computer output to an audience via a large projection screen. Makes it easier for the audience to follow mouse movement see important details on the screen. If your job duties include standing on a stage with the out from your computer shown on a ...
Turn On or Off Presentation Mode in Windows Mobility Center. 1. Open the Windows Mobility Center (mblctr.exe). 2. Click/tap on the available Turn on or Turn off button for Presentation Settings. (see screenshots below) 3. When finished, you can close the Windows Mobility Center if you like. OPTION TWO.
2. With just Adobe Acrobat: Cursor size: With current version of Adobe Acrobat Reader, the mouse pointer size follows the size set in Windows: Settings → Cursor & Pointer. Pen cursor and functionality: in Adobe Acrobat: Preferences → General → Basic Tools → Use single-key accelerators to access tools (checked) Then, in full-screen mode ...
Just move the mouse cursor to the top of the screen to make it appear. To navigate between pages you may use the left mouse button (next page) and the right mouse button (previous page), the mouse wheel, the arrow ... The presentation mode has support for more than one screen in a multi-monitor configuration. With more than one screen a new ...
As of the moment, I'm afraid it's still not possible to do so. therefore you keep using the application view or desktop view to go about this. However, I believe this is indeed a good suggestion to be considered by the developer team. I invite you to submit a feature request or suggestions for improvements to the developer team: https ...
Currently, in the presentation mode the mouse cursor is hidden, along with other interface elements. While GoodNotes 5 already has a very nice laser pointer feature, this still requires you to be near the iPad. On the other hand, when doing a presentation, the ability to move away from the podium would be very nice.