How to record your Chromebook screen
Master capturing your Chromebook display on video

Chrome book users rely on third-party apps for a great majority of traditional desktop applications. But for recording your screen, Chrome OS offers a built-in utility with all the trappings you need.
Screen recorders come in handy for a variety of purposes. You can use them to teach your parents a new app or demonstrate a workflow in your presentation. With your Chromebook’s native screen recorder, you can capture what’s happening on your entire screen (or a portion of it), record your voice alongside it and more. Here’s how to use the Chrome OS screen recorder utility.
Note: For this tutorial, you'll at least need Chrome OS 89 installed on your Chromebook. You can check for updates from Settings > About Chrome.

Record your Chromebook screen with the built-in recorder
On your Chromebook, click the status bar at the bottom-right corner, and in the following quick settings panel, select “Screen Capture.” Alternatively, you can press Ctrl+Shift and the Show Windows key. The Show Windows key is typically the sixth key on the top row of the keyboard; it has a rectangle and two bars on it.

When you do this, your Chromebook will launch the screen recorder, which features a floating row of options and turns your mouse cursor into a crosshair.

By default, the screen-recording tool is set to take still screenshots. To switch to video, click the camcorder button on the bottom.
Record your Chromebook screen with mic input
The footage from your Chromebook’s screen recorder won’t include audio from any video or audio file you play, but you can add a live voiceover to it. For enabling mic input, click the cogwheel icon and toggle “Record microphone.”
Stay in the know with Laptop Mag
Get our in-depth reviews, helpful tips, great deals, and the biggest news stories delivered to your inbox.

Record a specific portion of your Chromebook screen
Next, you have to specify what part of your screen you want to record and pick one from the set of square-like buttons on the floating menu. The first one lets you capture all of your Chromebook’s screen content. With the one that has a little plus at the corner, you can record a particular area of your screen. The third option fixes the recording to a single app window.
The way you begin recording depends on which of the three options you pick. For the first, you can click anywhere on the screen to record; with the second option, you drag to select the screen area and hit “Record”; the third option requires you to tap the app’s window.
Your Chromebook will run a three-second countdown and start recording. In order to stop it, click the red button on the bottom-right of the taskbar. The video file will be saved in the “Downloads” folder.
Third-party alternatives
Although Chrome OS’s native screen recorder is convenient and gets the job done, it lacks a handful of pro abilities. For instance, you can’t adjust the video’s resolution or overlay your Chromebook’s webcam view. For that, you’ll have to turn to the Chrome Web Store where you’ll find a bunch of reliable and advanced third-party alternatives. Here are your two best options.
Screencastify
Screencastify comes equipped with a host of handy features you’d miss using your Chromebook’s built-in screen recorder. Apart from the essentials, Screencastify allows you to adjust the footage resolution, your audio output, and you can add a little webcam window over the screen’s content.

Plus, Screencastify houses real-time annotation tools you can access while recording your screen. You can annotate to bring attention to a specific element or highlight the cursor pointer whenever you click. There’s also a full-fledged editor you can use to tweak and trim your recorded clips.
Screencastify can sync with cloud storage services, too, which means you can choose to automatically upload your recordings online instead of clogging up your local drive. Furthermore, you can export Screencastify files in a bunch of formats such as GIF and MP3.

Screencastify is free as long as your video’s length doesn’t exceed five minutes. If you want longer recordings, you’ll have to pay the $49 yearly fee.
Awesome Screenshot and Screen Recorder
In addition to offering more control over your screen recordings, Awesome Screenshot, a Chrome add-on, can help you take better screenshots as well. It can capture full-length web pages instead of restricting you to what’s on your screen at the moment.

There’s even a comprehensive image editor for tasks like annotating your screenshots or blurring a person’s face in a picture. Awesome Screenshot can function offline, which means you can edit images on your Chromebook’s local storage even if you lose internet connectivity.

For recording your screen, Awesome Screenshot does just about everything Screencastify can do. You can record either a specific Chrome tab or your entire desktop, enable webcam and microphone input, use annotation tools while recording, and sync your saved files with your cloud accounts.
Similar to Screencastify, Awesome Screenshot is free for up to five-minute-long videos. For unlimited access, it costs $5 per month.
Shubham Agarwal is a freelance technology journalist from Ahmedabad, India. His work has previously appeared in Business Insider, Fast Company, HuffPost, and more. You can reach out to him on Twitter .
ChromeOS may add 3 cutting-edge features to Chromebook
Best Chromebook deals in May 2024
ROG Ally X: With specs like these, who needs a Nintendo Switch 2?
Most Popular
- 2 HP Memorial Day sale 2024: Save up to 65% sitewide
- 3 Reliable analyst reveals Apple's first foldable MacBook: Price, release date, and render
- 4 Best Buy Memorial Day sale 2024: 21 deals I recommend
- 5 Windows chief Pavan Davuluri responds to a long-running complaint about Bing
- I Tried Both: Apple Watch 9 vs Fitbit Charge 6
- Best Places to Print Photos Online
How to Screen Record on Chromebook
Your keyboard has a dedicated key, so all you have to choose is what to record
:max_bytes(150000):strip_icc():format(webp)/matthew.s.smith.biopic-075658983c0849d5b7b0e849f94070cc.jpg "how to record presentation on chromebook")
- Beloit College
:max_bytes(150000):strip_icc():format(webp)/GlamProfile-7bfa34647d8e4c8e82097cc1daf8f5ec.jpeg "how to record presentation on chromebook")
- Saint Mary-of-the-Woods College
In This Article
Jump to a Section
- Using the Keyboard
How to Screen Record on a Chromebook with the System Tray
- Finding the Saved Screen Recordings
- What File Type Is Created?
- Frequently Asked Questions
What to Know
- Press the screenshot key.
- Select Screen Record .
- Choose from one of three screen recording modes: record full screen, record partial screen, and record window.
This article shows how to screen record on a Chromebook or ChromeOS desktop using the built-in screen recording utility.
How to Screen Record on Chromebook with the Keyboard
This method works on any Chromebook or ChromeOS desktop with a bundled ChromeOS keyboard.
Press the Screenshot key on your Chromebook's keyboard.
They key is located in the function row and has a camera icon printed on it.
Press the Screen Record icon to switch to screen recording mode.
You can now choose from three screen recording options, each located in the center of the toolbar.
- Record full screen : Used to record the entire screen at once.
- Record partial screen : Used to record only a portion of the screen. This option, when selected, will ask you to drag a box around the area you want to record.
- Record window : Will only record the current browser or app window you select.
A brief countdown will be displayed before the screen recording begins.
Your microphone will not be turned on by default. Select Settings and then Record microphone to enable it.
Select Stop screen recording , found in the ChromeOS task bar, to end the recording session.
This method accesses screen recording through the system tray on the lower right-hand side of the desktop. It works on any device running ChromeOS.
Open the system tray .
Select Screen capture .
Choose from three screen recording options.
- Record full screen : Used to record the entire screen.
- Record partial screen : Used to record a portion of the screen. This option will ask you to drag a box around the area you want to record.
Select Stop screen recording to end the recording session.
Where Are Screen Recordings Saved on a Chromebook?
A notification will appear when a screen recording ends. Tap this notification to view the file.
All screen recordings save to the Videos folder. You can view this folder in the Files app, which is located on the taskbar.
You can also find screen recordings listed under Downloads.
Screen recordings aren't saved to Google Drive. You'll have to manually move them from the Videos folder to your Google Drive folder.
What File Type Are Screen Recordings on a Chromebook?
Screen recordings are saved as .webm video files. This is not a common format, so you may need to reformat the video to use it with some video editing software. Our free video converter software article will point you in the right direction.
Enable the microphone in the Chromebook screen recorder to record system sounds including any media you're playing on the device. To cut down on background noises, use a noise-canceling microphone .
To just record audio, use an online tool like Vocaroo.com , or use a Chrome extension like Reverb Record .
To record a Zoom meeting , use your Chromebook's screen recorder, or use the Zoom app's built-in recorder. To allow others to record in a meeting, go to Participants , hover over the participant's name, and select More > Allow Record .
Get the Latest Tech News Delivered Every Day
- How to Connect Chromebook to Your TV
- How to Screen Record With Audio in Windows 11
- How to Fix It When Your Chromebook Won’t Turn On
- How to Fix it When a Chromebook Won't Connect to Wi-Fi
- How to Screen Record on a Laptop
- How to Screen Record on a Windows Laptop
- How to Fix a Chromebook Touchscreen That's Not Working
- How to Record a Phone Call on iPhone
- How to Record a Phone Call on a Samsung Phone
- How to Take Screenshots (Print Screen) on Chromebook
- How to Screen Record on Your Mac
- The 22 Best Chrome Extensions for Chromebooks in 2024
- How to Update Zoom on Chromebook
- How to Screen Record on iPhone 13
- How to Screen Record on the iPhone 12
- How to Screen Record on FaceTime
How to Screen Record on a Chromebook
Plus how to troubleshoot recording problems
Google integrated a screen recording tool into Chrome OS 89 primarily to foster virtual learning. If you take a lot of online classes on your Chromebook, or you teach students online, the tool lets you record lessons, reports, and presentations for reference purposes.
However, screen recording isn’t limited to academics only; there are other interesting use cases. You can also record YouTube videos, sports broadcasts, games, and other entertainment content or activities. Proceed to the next section to learn how to screen record on a Chromebook.

How to Record Your Chromebook’s Screen
Press and hold Control + Shift + Overview mode (or Show windows key) to launch the Chrome OS snipping tool.

If your Chromebook is in tablet mode, open the Status area and select Screen capture .

The snipping tool will pop up at the bottom of your screen, just right above the Shelf. Tap the camcorder icon to navigate to the Screen Record menu.

The snipping tool will preselect the “Record Partial Screen” mode by default. In this mode, use the plus-shaped crosshair icon to select an area of the screen you want to record.

This is perfect for recording a video playing on a website (like YouTube) without having to record the entire web page.
Note: You cannot move the selected area during recording. To record another portion of the screen, cancel the ongoing recording and map out a new recording area.
The “Record window” option lets you record the content of a particular app or window. If you’re using two apps in split-screen mode on your Chromebook , this option lets you record the content of one app without closing the other.

When you select the “Record window” option, your cursor changes to a camcorder icon. Use the touchpad to move the icon and click anywhere on the window you want to record.
Lastly, there’s the option to “Record full screen.” Click the dashed-square icon and click anywhere on the screen to take a recording of the entire display.

When you choose your preferred recording option, the snipping tool will display a 3-second countdown on the screen, selected area, or window before it records. The screen recorder will capture all the visual elements on the screen, including the cursor. However, you should note that the screen recorder doesn’t capture audio by default.
You’ll need to manually enable your Chromebook’s microphone to record your screen with audio. Follow the steps in the next section to learn how it’s done.
How to Record Chromebook Screen Without Audio
Before you hit the record button, click the gear icon on the snipping tool and toggle on the Record microphone .

The snipping tool will save the settings, so you don’t have to manually enable the microphone on subsequent recordings. To record without audio, repeat the steps above and toggle off the Record microphone option.
Recording your screen with the microphone enabled will capture audio from the media playing on your Chromebook. The microphone will also pick up background sound from the environment. Therefore, if you’re screen recording with audio on your Chromebook, make sure to do so in a quiet room with minimal ambient noise.
Better yet, use an external noise-canceling microphone , if you have one. That may help filter out background noise and ultimately enhance the sound quality of the recording.
How to Stop Screen Recording on Chromebook
When the screen recording commences, you should see a red-colored stop icon close to the Status area—the bottom-right corner of the screen. Clicking the icon will immediately stop the recording and save the file.

You’ll also get a notification in the Status Area. Click Show in folder to view the recording in the Files app. Chrome OS saves screenshots and screen recordings in the Downloads folder.

Troubleshoot Screen Recording Problems on Chromebook
It’s possible to run into certain problems or difficulties while screen recording on Chromebook. In this section, we cover potential solutions to some of these issues.
Chromebook Not Saving Screenshots or Screen Recordings?
As mentioned earlier, Chrome OS saves screenshots and screen recordings to the Downloads folder by default. If you don’t find your recordings in the Downloads folder, your Chromebook could be low on storage space.
Go to Settings > Device > Storage management to check your device’s storage status.
Free up some space, try recording the screen again, and check if the video is saved to your device.
Chromebook Not Recording Audio?
You enabled the “Record microphone” option but your recordings don’t have audio. What could be the problem?
Well, the snipping tool may fail to capture audio if your Chromebook’s microphone is muted. Before you record, make sure you check the Chrome OS audio settings and confirm that audio input is allowed.
Open the Status Area and click the arrow icon next to the volume slider.

In the Input section, move the Microphone (Internal) slider to the right to increase the volume of your Chromebook’s built-in microphone.

If there’s an external audio device connected to your Chromebook, you’ll find the device’s microphone slider in this section, too. Should the problem persist after increasing audio input volume, restart your Chromebook and try again.
Can’t Find the Screen Recording Tool?
We mentioned in the intro of this article that Google integrated the screen recording tool into Chrome OS 89. If you access the screen recording tool from the Status Area or via the keyboard shortcut, make sure your Chromebook is running the latest Chrome OS version.
Go to Settings > About Chrome OS and click Check for updates . Restart your device if there’s a pending update on the page.

Updating your Chromebook could also fix other issues causing the screen recording tool to malfunction.
Not All Chromebook Apps Support Screen Recording
You can’t record your screen when using apps with protected content. For example, try recording a movie on the Netflix or Amazon Prime Video app. You’ll get a “Can’t capture content” error message in the notification panel.

Interestingly, we were able to record Netflix through a web browser. Note that we do not recommend doing this because it’s outright illegal to record or reproduce copyrighted content—either on Netflix or elsewhere—without permission. Before you record content on your device, confirm that you’re allowed to do so.
Related Posts
- Top 6 Ways to Lock Your Chromebook Screen
- How to Delete Search and Browsing History on Your Chromebook
- How to Add a Printer to Your Chromebook
- How to Use Google Cursive on Your Chromebook
- How to Connect a Phone to Chromebook Using Phone Hub

Sodiq has written thousands of tutorials, guides, and explainers over the past 4 years to help people solve problems with Android, iOS, Mac, and Windows devices. He also enjoys reviewing consumer tech products (smartphones, smart home devices, accessories, etc.) and binge-watching comedy series in his spare time. Read Sodiq's Full Bio
How to record the screen on a Chromebook in two easy ways
There are two different ways to record your screen on a Chromebook: the built-in option and through extensions
Recording the screen on your new Chromebook can be incredibly useful. Sometimes, you might want to show off a process for something, or you might want to record your screen for a presentation at work or school. Luckily, there are two good ways to record your screen. ChromeOS has screen recording functionality built in, but you can also use Google's Screencast app.
Record screen on a Chromebook with ChromeOS screen recorder
Using the ChromeOS built-in screen capture functionality is the easiest way to record your screen on a Chromebook. Here's how you can do just that. Note that if you prefer keyboard shortcuts , you can also bring up the screen capture tool using Ctrl + Shift + Show Windows . After bringing up the toolbar, the rest of the process is identical to the steps described below.
- Click the clock on the Shelf in the bottom-right corner to open the Quick Settings panel.
- You may also want to turn on microphone access using the settings cog on the right. This will record audio with your screen recording.
- You can stop the recording by clicking on the red stop button in the right-hand corner of the dock
If you want to record the full screen, choose the leftmost icon on the screen capture toolbar and click anywhere on the screen. To record only part of your screen, you need to select the second leftmost option, then select the portion of the screen you want recorded. Finally, to record a specific window, click the icon of the app you wish to record, and you're good to go. You can always click Record to start the recording. Once you stop the recording, you'll receive a notification that the screen recording is ready to view in your Downloads folder.
Record your screen on ChromeOS with the Screencast app
ChromeOS has a Screencast app that's designed to help you create screen recordings and then share them later. It's pretty similar to the built-in screen recorder but with some additional controls like recording your webcam feed and transcribing your voice into text.
- Click the circular icon in your ChromeOS launcher on the bottom left of the screen.
- You'll see a toolbar at the bottom of your screen. You can click the settings gear.
- Turn on your microphone under Audio input to record audio.
- Turn your camera if you want it in the footage under Camera.
- When ready, click anywhere to record full screen. You'll see a countdown.
Your recording will always be saved locally via the Screencast app. You can view these under My Screencasts. To share, click the downwards-facing dots and choose Share. To play, just double-tap the icon to play it .
When it comes to screen recording on your Chromebook, these are your two best options. For simple recording, the built-in screen capture toolbar works very well. You can easily record short videos and upload them or share them with friends. If you need more advanced editing functionality or want to embed webcam footage, you can use Screencast. For teachers out there, it's a solid option. Feel free to check out our ChromeOS settings guide for more tips on getting started with a Chromebook.
Byte Bite Bit
How to Screen Record on Chromebook: A Simple Step-by-Step Guide
Recording your screen on a Chromebook is a straightforward process, easily accomplished with tools built directly into the Chrome OS. Whether you’re looking to create a tutorial, capture gameplay, or save a video call for later, Chromebooks offer native functionality that facilitates screen recording without the need for additional software.

We’ll walk you through the steps to capture your screen, edit the footage, and share your recordings. Our experience has shown us that even users who are new to Chromebooks can manage screen recording with ease, thanks to the user-friendly interface of the operating system.
With both “Screen Capture” and “Screencast” as our go-tos, personal preference plays a role in choosing which to use. We appreciate having options tailored for different recording needs—whether it’s grabbing a full screen, a partial screen, or a specific window.
- 1.1 Understanding Chromebook’s Built-In Screen Recording Functionality
- 1.2 Accessing the Screen Record Tool
- 1.3 Selecting Recording Options
- 2.1 Starting the Screen Record
- 2.2 Capturing Audio with Video
- 2.3 Using Webcam Overlay
- 3.1 Locating Recorded Files
- 3.2 Editing and Annotating Recordings
- 3.3 Sharing and Publishing Recordings
- 4.1 Customizing Recording Preferences
- 4.2 Exploring Third-Party Screencast Apps
- 4.3 Resolving Common Issues
Getting Started with Screen Recording on Chromebook

When you need to share a tutorial, report a problem, or create a presentation, screen recording on a Chromebook is invaluable. We’ll guide you through understanding the tool, accessing it, and selecting various recording options.
Understanding Chromebook’s Built-In Screen Recording Functionality
Chrome OS comes with a built-in screen recorder that allows us to capture video footage of what’s happening on our Chromebook’s screen. No extra software is needed to start recording sessions, and we can include system audio as well as audio from our microphone.
- Built-in functionality — no third-party software required.
- Record system and microphone audio alongside the video.
Accessing the Screen Record Tool
To start recording the screen, we use the Quick Settings panel in Chrome OS. Clicking on the clock area on our screen brings up this panel. From there, choosing ‘Screen Capture’ is our gateway to creating recordings. We can also access screen recording through keyboard shortcuts, like pressing Ctrl + Shift + Show windows keys together.
- Quick Settings panel or keyboard shortcuts for ease of use.
Selecting Recording Options
Once the Screen Capture toolbar is open, we have the freedom to pick from various recording options. Whether we need a full screen, partial screen, or a specific window, it’s all selectable with simple clicks or drags. We also have the choice to enable or disable audio recording, depending on whether we need to capture sound or not.
Through these straightforward steps, we can tailor our screen recordings on Chromebook to suit any task, all while maintaining a clear and concise workflow.
Performing the Screen Recording
In this section, we’ll guide you through starting a screen recording session, capturing audio along with your video, and using your webcam overlay. Our experience with Chromebooks ensures you can confidently record your screen for various purposes.
Starting the Screen Record
Capturing audio with video.
When we want to record audio with our video, we ensure the microphone is active. Before starting the recording, you’ll find the option to include audio in the screen capture toolbar. Simply click on the microphone icon to toggle audio recording on. This ensures that the audio from the Chromebook’s microphone is captured along with the video footage of our recording session.
Using Webcam Overlay
Sometimes, we prefer to include our webcam footage in the recording. For this, the Chromebook allows adding an overlay of the webcam footage on the screen recording. We click on the camera icon to turn on the webcam. This activates the camera, and a small window showing our live webcam footage appears, which will be recorded along with the screen. It’s useful for picture-in-picture effects, such as when we’re narrating a presentation or demonstrating a process.
Tips for Smooth Recording:
- Close unnecessary applications for better performance.
- Check your Internet connection if you’re recording online content.
- Adjust the Chromebook’s volume to avoid audio distortion.
Managing Screen Recordings
After capturing your Chromebook’s screen, handling the screen recordings effectively is crucial for organization and distribution. We’ll explore how to locate, edit, and share your recordings with ease.
Locating Recorded Files
Editing and annotating recordings.
For editing, Chromebooks might not have robust built-in video editors, but we can opt for third-party apps available on the Chrome Web Store. Google Drive also offers a convenient way to store and even perform basic cuts on our recordings before we share them. When we need to add annotations, various online tools can handle .mp4 or .webm files, allowing us to enhance our recordings with written commentary or highlights.
Sharing and Publishing Recordings
Sharing and publishing are straightforward on a Chromebook. We can immediately share recordings stored on Google Drive, ensuring smooth collaboration. Those destined for a wider audience can be exported and uploaded to various platforms, where we can publish content easily for viewers to access.
Advanced Tips and Third-Party Alternatives
Expanding beyond the basic screen recording functions on Chromebook, let’s explore how to customize our recording preferences, consider third-party screencast apps for more flexibility, and address common issues we might encounter.
Customizing Recording Preferences
Customizing video captures tailors the content to our specific needs. We can adjust resolution, frame rate, and choose whether to record system audio. In the system tray, we can access these settings before starting the recording. Selecting the gear icon in the screen capture toolbar lets us dive deeper into these preferences. This flexibility enhances our screencasting experience, whether for presentations or tutorials.
Exploring Third-Party Screencast Apps
While Chromebook’s built-in tools get the job done, third-party alternatives like Screencastify offer advanced features. With these apps:
Resolving Common Issues
We often run into common problems like unsaved recordings or poor audio quality. Thankfully, frequently-asked questions (FAQs) sections in apps and community forums offer quick solutions. Ensuring that we have sufficient storage and that the microphone is selected in the recording options can resolve these issues. If we’re using third-party apps, checking for updates or reinstalling can get us back on track.
Related posts:
- How Many SATA Ports Do I Have: Figure Out the Number With Ease
- Is Alienware Good: A Detailed Guide Covering Its Features
- Power Supply Clicking: Learn How To Solve Clicking Sound Issues in PSU
- Belkin N450 DB Review: Discovering Its Uses, Benefits and Drawbacks
- Private Folders Mac: How to Access Your Important Files
- How to Add AirPods to Find My iPhone: A Step-by-Step Guide
- Are PSU Extension Cables Safe? Understanding the Risks and Benefits
- How to Break Bar Chart Axis in MS Excel: Step-by-Step Guide
- Can ProtonMail Be Traced? Understanding Email Privacy and Security
- Cant Install Windows 10 from Bootable USB: Troubleshooting Steps for a Smooth Setup
- Why is One Airpod Louder Than the Other? Understanding Uneven Audio Output
- You Don’t Have Permission to Open Outlook on Mac: Troubleshooting Guide
Leave a Comment Cancel reply
Save my name, email, and website in this browser for the next time I comment.
Disclosure: MyeLearningWorld is reader-supported. We may receive a commission if you purchase through our links.
How to Screen Record on Chromebook with Audio (Beginner’s Guide)
Last Updated: 10/25/2023
By Scott Winstead
- Share on Facebook
- Share on LinkedIn
- Share on Reddit
- Share on Pinterest

As an eLearning professional, I’ve often leaned on screen recording to craft tutorials, presentations, and other instructional materials. From adding audio to Google Slides or a PowerPoint presentation to creating a step-by-step how to video , there are lots of applications where I’ve found myself using the screen recording functionality.
Chromebooks, with their growing popularity in educational settings , can sometime pose various challenges when it comes to screen recording. If you’re wondering how to effectively screen record on a Chromebook, especially with audio, you’re not alone.
This guide is tailored for educators and content creators like you, aiming to demystify the process. I’ll delve into various methods, from simple built-in functionalities to advanced tools like VEED, ensuring you have a comprehensive toolkit at your disposal. This guide will equip you with the know-how to screen record on your Chromebook seamlessly.
The Best Ways to Screen Record on Chromebook
Use a professional screen recording tool.
VEED is the fastest and easiest way to make high quality, professional videos for eLearning, business training, sales presentations, and other applications.
VEED is one of my favorite screen recording tools out there. Here’s why I recommend it to Chromebook users:
- Browser-Based Functionality: Given that Chromebooks heavily rely on cloud-based operations and browser functionalities, VEED’s browser-centric design fits like a glove. Users don’t need to download hefty software; a simple browser extension does the trick.
- Versatility: VEED isn’t just about screen recording. It offers a suite of tools that allow users to integrate slides, utilize text-to-speech features, and even record via webcam. This multifunctional approach ensures that Chromebook users can craft comprehensive eLearning materials, blending various elements seamlessly.
- Collaborative Features: Chromebooks are popular in educational settings where collaboration is key. VEED’s cloud-based sharing and real-time feedback mechanisms align perfectly with this, allowing educators and students to work together effortlessly.
- Editing Made Easy: Post-recording edits can elevate the quality of a video. VEED provides a range of editing tools, from adding subtitles to integrating visual effects, ensuring that the final output is polished and professional.
- No Compromise on Quality: Despite being browser-based, VEED doesn’t skimp on quality. Whether you’re recording a detailed tutorial or a quick demonstration, the output is crisp, clear, and high-definition.
- Accessibility Features : With the ability to add subtitles in multiple languages, VEED ensures that eLearning materials are accessible to a diverse audience, a feature that resonates with the inclusive ethos of many educational institutions using Chromebooks.
- Cost-Effective: VEED offers both free and paid plans, catering to a range of needs. For educators or institutions on a budget, this flexibility is invaluable.
Simply put, for Chromebook users, especially those in the eLearning domain, VEED provides a holistic solution. It’s not just a screen recording tool; it’s a comprehensive platform that caters to the wide range of needs in modern education.
Whether you’re an educator, a student, or a content creator, VEED’s features align seamlessly with the Chromebook’s ethos, making it an option worth looking into.
Click here to try VEED for free .
Use the Built-In Screen Recording Function
Another way to screen record on Chromebook is to use the built-in function.
This method is easy and straightforward, although it may lack some advanced features.
To screen record with audio on Chromebook, follow these simple steps:
- Open Chrome and go to the website you want to record.
- Press Ctrl+Shift+I to open the Developer Tools.
- Click the Record button (next to the network tab).
- The recording will start automatically. To stop recording, press Ctrl+Shift+I and then click the Stop button.
When you’re done recording, the video will be automatically saved in your Downloads folder. You can also find it by going to the Files app and opening the Videos folder.
The downside of using the built-in function is that the video quality isn’t as good as some of the other methods we’ll discuss. The video also doesn’t have a lot of options for editing. However, it’s a quick and easy way to record your screen on Chromebook with audio.
Try This Free Extension
There are many extensions available to screen record on Chromebooks, and one good option is Screencastify .
This free extension has all the features most people would need to record their screens how they want. You can also add your own logo or watermark and upload it directly from the app. It’s easy to use and simple to download.
However, Screencastify may not work in some highly secure environments because it requires access to your computer and the webpages you visit. This may prevent you from using this extension if you’re in a government or business setting.
Another downside is that the video quality isn’t as good as some other options. If video quality is important, you should try another option for recording your Chromebook’s screen.
A Final Word on Chromebook Screen Recording
Screen recording on Chromebook devices is pretty easy, and as you can see above, there are plenty of options available.
Our best advice is to start with the free options, and see if any of those will do the job to the level you need. If you end up needing more advanced video recording features, then you can upgrade to a paid app or service plan.
Have any questions about how to screen record on Chromebook? Just drop a comment below!
What Is An Omnidirectional Microphone? The Ultimate Guide for Newbies
Pandemic college enrollment decline could lead to $1 trillion lost in lifetime income for students skipping out, leave a comment cancel reply.
Save my name, email, and website in this browser for the next time I comment.

How-To Geek
Chromebooks have a new screen recorder app.
Goodbye Bandicam, hello Screencast.
It's already possible to record your screen on a Chromebook , but the built-in screen recorder is fairly basic. Google has now released an upgraded recorder that you can try out on your Chromebook .
Related: How to Screen Record on a Chromebook
Screencast is a new screen recorder for Chrome OS, with more options and features than the built-in recorder that has been available for a while. A camera feed appears at the bottom right corner of the recording, with your face and voice, and you can draw on the screen as you record. When the recording is finished, Screencast transcribes your words into text, and can upload the file to Google Drive for easy sharing.
The new app is mainly intended as a presentation tool for use in schools, but it can come in handy for other use cases too. For example, you could make a recording to show a friend or family member how to do a certain task on their computer, or use it to create a tech guide for publishing to YouTube and other sites.
You can try out Screencast by updating your Chromebook to Chrome OS 103, which is currently rolling out to all (supported) models. You can also just keep using the built-in screen recorder, which is accessible from the quick settings panel.
Source: Google
How to Screen Record on Chromebook

Like most operating systems, the Chromebook OS has functions that allow you to record your screen. These can then be shared with others for a variety of purposes.
A Chromebook’s out-of-the-box capturing capabilities even allow you to take clips of a portion of your screen or even specific windows.
Whatever your needs may be, below you’ll find everything there is to know about recording your Chromebook’s screen.
Why Screen Record on Your Chromebook?
Screen recordings can serve many purposes on any device, and Chromebooks are no different. The most common use is for troubleshooting. From error messages to unexpected OS behaviors, capturing them as they happen on your screen to share with a support person can help speed up fixing whatever’s ailing your device.
Using a Chromebook’s screen record tools can also help in various situations that call for visual aids. For instance, if you’re trying to demonstrate to an audience how a particular function of your company’s product works in motion, you can record yourself using it and add the recording to a presentation.
Finally, screen clips can be used to build step-by-step instructions, especially when teaching others how to use certain apps. IT professionals, digital educators, and other computer-based professionals can cut down on assisting more digitally illiterate people by sending them videos instead of written instructions.
No matter the purpose, Chromebooks have two ways of accessing their capture tools.
How to Screen Record Using the Quick Settings Menu
You can turn on a Chromebook’s Screen Capture tool via the Quick Settings menu, located on the far right of the bottom bar. It’s the space where you find the WiFi and battery indicators as well as the time.

After selecting it with your mouse, a small menu will appear, and the icon for the Screen Capture tool will typically be fourth in the bottom row. Select it to turn on Screen Capture. You’ll know you’ve done this successfully when the screen blurs slightly and a menu pops up at the bottom.
This menu is set to screenshotting by default. You need to click on the switch located on its left side with the two camera icons to switch to recording. You’ll know you have activated screen recording when the switch moves to the right, turning the recording camera icon blue and the regular camera icon grey.

If you want to record a specific part of your Chromebook’s screen, you’ll need to select the middle icon, then click and drag across the portion you want to capture. The third icon allows you to choose specific windows to screengrab, which is perfect for taking clips of apps.

Finally, the left icon allows you to record your entire screen. After selecting it and clicking anywhere, you’ll begin recording the whole screen. You’ll know you’ve done this successfully when the menus disappear, and a short countdown begins on screen.

If you initiated the recording by accident, you can press the Esc key on your keyboard to halt the countdown and terminate the screengrab.

Once you are done recording, you can stop and save your clip by selecting the red circular icon that appears on the bottom right side of your taskbar, to the left of where you see your WiFi indicator and time. A notification will pop up to show that your recording was done.

Chromebook Keyboard Shortcuts for Screen Recording
You can access the Screen Capture method using the following keyboard shortcut:
Ctrl + Shift + Show Windows
After that, you can follow the same instructions as above to record your entire screen, a portion of it, or a specific window. You can also use the same methods to halt the recording countdown and stop the recording.
How Can I Record My Microphone While Screen Recording?
Chrome OS allows you to capture your voice through your microphone while recording your screen. By default, it’s disabled. To enable it, use one of the two above methods to access the Screen Capture menu. Then, select the cogwheel icon. From here, you can choose which mic you want to use through the Microphone portion of the menu.

You will know you have enabled your mic from the blue tick that appears on its right. To disable microphone recording, simply go back to this menu and select Off.
Where Can I Find my Screen Recordings on Chromebook?
The files all go to the same location, no matter which option you use to capture videos of your Chromebook’s screen. You can find them in the Downloads folder, which you can reach through the file manager.

This default folder can also be changed. You can do this by accessing your Chromebook’s Screen Capture menu through any of the above methods and selecting the cogwheel icon. At the bottom of the menu that appears, you’ll find the option to choose the destination folder for your recordings. This option also pins folders so you can save individual ones for different purposes. A blue checkmark indicates the selected folder.
By default, Chrome OS outputs screen recordings in WebM format. This lightweight file can be played almost anywhere, so it’s ideal for sharing. If you need to use a different format, you’ll need to convert the file using a converter app or website.

Yannis Vatis
Yannis is a veteran gamer with over 30 years of experience playing a wide spectrum of video games. When not writing about games, he's playing them, and if he's not playing them then he's definitely thinking about them.
Leave a Comment Cancel reply
This site uses Akismet to reduce spam. Learn how your comment data is processed .
How To Screen Record On Chromebook With Audio? [Step by Step]
- Updated May 7, 2024
- No Comments
Screen recording with audio on a Chromebook can be a handy tool for tutorials, presentations, or capturing moments. Fortunately, Chrome OS offers built-in functionality for this task.
You can easily capture your screen activities and system audio using the right extensions or built-in features. Whether you’re a teacher, content creator, or simply want to share your screen interactions, mastering this skill is invaluable.
In this guide, we’ll explore the different methods and steps to screen record on your Chromebook with audio, including native options and powerful third-party tools, ensuring you can effortlessly create engaging and informative content with just a few clicks. Let’s dive in!
Methods of Screen Recording On Chromebook With Audio
- Screen Recording On Chromebook Natively With The Keyboard
Chromebooks offer a built-in screen recording feature that allows you to capture your screen without installing additional software. Here’s how to access it using keyboard shortcuts:
- Press `Windows key+Alt+window show` on your keyboard to open the screen recording tool.

- Select the area you want to record by clicking and dragging your mouse.
- Choose whether to record audio from your microphone or capture system audio.
- Click the “Record” button to start recording your screen.
- To stop recording, click the red “Stop” button in the taskbar.
Your recorded video will be saved automatically in your Downloads folder.
- Screen Recording on Chromebook Using Screencast
Another native option for screen recording on Chromebooks is the Screencast app. Follow these steps to use Screencast:
- Open the Screencast app from your Chromebook’s app launcher.

- Click the “New Recording” button to start a new screen recording session.

- Customize your recording settings, such as the capture area, audio source, and video quality.
- Click the “Start Recording” button to begin capturing your screen. Make sure to turn on the microphone from the settings.

- To end the recording, click the “Stop” button in the Screencast app. Your recorded video will be saved within the Screencast app, and you can easily access and share it from there.

- Screen Recording On Chromebook With Screen Capture
Chromebooks also offer a screen capture tool in OS 89 or newer versions that allows you to take screenshots and record your screen. Here’s how to use it:
- Locate a clock icon on your Chromebook in the bottom right corner, which will make a “quick setting panel” pop up on your screen.
- Select the “Screen capture” option from the panel at the bottom when you expand the panel.

- Once you’ve entered screen capture mode, you’ll notice options to choose from for different types of captures. Choose whether to record the full screen, a specific window, or a custom area.

- Modify the settings according to your requirements and turn the mic on. You can attach Hollyland Lark M2 to record audio as it is compatible with a wide range of devices.

- Click the “Record” button to start recording your screen.

Your recorded video will be saved in your Downloads folder.
- Alternative Built-In Screen Recording Function
Chromebooks have a built-in screen recording function that you can access through the quick steps given below:
- Open the website that you wish to record.
- Press ctrl+shift+l, which will open a developer tool.
- Now click on the record button, which will start the process automatically.
- Record and then “press ctrl+shift+l” to stop recording after you are done. Your recorded video will be saved automatically in your Downloads folder.
- Some Chrome Extensions for Screen Recording with Audio
Screencastify
Screencastify is another excellent tool for educators, professionals, and content creators looking for a comprehensive screen recording solution. It not only allows you to record your screen but also edit and share your videos efficiently. Features include:
- Unlimited Recordings : Create videos up to 5 minutes long with the free version.
- Video Editing Tools : Offers simple editing tools like trimming, adding text, and more.
- Integration with Google Drive : Automatically saves videos to Google Drive for easy access and sharing.
ScreenApp is another noteworthy addition to the suite of screen recording options available for Chromebook users. Simplifying the process of screen capturing, ScreenApp prides itself on offering a no-download solution for users who are keen on quick, efficient recording sessions without the need for additional software installations.
- Use a Professional Screen Recording Tool
While the native screen recording options on Chromebooks are useful, they may not offer advanced features or editing capabilities. For more versatility and professional-grade recordings, consider using a dedicated screen recording tool. Here are some recommended options:
Notta is a feature-rich screen recording tool that works seamlessly on Chromebooks. It offers a user-friendly interface and powerful editing features. With Notta, you can:
- Record your screen, webcam, and audio simultaneously
- Annotate your recordings with text, shapes, and drawings
- Edit your recordings with a built-in video editor
- Collaborate with others by sharing your recordings or inviting them to edit
Vmaker is another excellent screen recording tool for Chromebooks. It provides a smooth recording experience and offers a range of customization options. With Vmaker, you can:
- Record your screen, webcam, and audio with a single click
- Customize your recording settings, such as resolution and frame rate
- Edit your recordings with an intuitive video editor
- Share your recordings directly to popular platforms like YouTube and Google Drive
Veed is a versatile online screen recording and editing tool that works seamlessly on Chromebooks. It offers a simple, user-friendly interface and powerful video editing capabilities. With Veed, you can:
- Record your screen, webcam, and audio with just a few clicks
- Trim, crop, and add text to your recordings
- Add transitions and filters to enhance your videos
How To Find Your Recordings On Chromebook?
By default, screen recordings made on a Chromebook are automatically stored in the “Downloads” directory. To locate this folder, navigate through the “Files” application accessible from the app drawer, and then select the “Downloads” option listed on the sidebar.
Should your preferences dictate a different storage location for these recordings, this can be easily achieved by tweaking the settings to suit your needs.
The format for these screen recordings is typically .webm, which, while standard, might not always be the most practical format depending on your usage scenario. For broader compatibility, especially across various devices and applications, converting these files into the MP4 format could be beneficial.
For those utilizing the Screencast application for screen recording purposes on a Chromebook, the process diverges slightly. Recordings made with Screencast are not stored locally on your device; instead, they are automatically uploaded to cloud storage. These cloud-stored recordings can be conveniently accessed within the Screencast application, allowing for ease of sharing with others through the distribution of a direct link to the recording.
Screen recording on Chromebooks has never been easier or more accessible. With a variety of tools available, users can choose the one that best fits their needs, whether it’s for professional-quality recordings, collaborative projects, or simple video captures.
These recommended tools ensure that every Chromebook user can take full advantage of video recording features without compromising on quality, functionality, or budget.
Frequently Asked Questions about Screen Recording with Audio on Chromebooks
Q: Can I record audio from my microphone and system audio simultaneously?
A: Yes, most screen recording tools for Chromebooks support recording both microphone input and system audio at the same time. This feature is particularly useful for creating tutorials or presentations where you need to explain what is happening on the screen while also demonstrating audio from the application you are showcasing.
Q: Are there any limitations on the length of recordings with these extensions?
A: The recording length can vary depending on the specific tool you are using. For instance, Screencastify’s free version limits videos to 5 minutes, which is sufficient for short clips or tutorials. However, some extensions may offer unlimited recording time with their paid versions. It’s advisable to check the specific features of each tool to understand their limitations.
Q: Do I need an internet connection to record my screen?
A: While most screen recording tools for Chromebooks are browser-based and require an internet connection to access and run the software, some extensions allow you to record offline once they’ve been installed. Nonetheless, an internet connection will likely be required to upload and share your recordings.
Q: How can I ensure high-quality video and audio in my recordings?
A: To ensure high-quality recordings, use a good-quality microphone and try to record in a quiet environment to minimize background noise. Additionally, adjust the recording settings in your chosen tool to select the highest video quality possible. Some tools also offer the ability to record in HD or even 4K, depending on your subscription plan.
Q: Is it possible to edit my recordings within these Chrome extensions?
A: Many screen recording extensions offer basic editing features such as trimming, cropping, and adding text annotations directly within the tool. For more advanced editing, you may need to use a separate video editing software. However, extensions like Screencastify and Loom provide a range of editing options that are sufficient for most users’ needs without requiring external software.
- Audio , Chromebook , Screen record

I am John, a tech enthusiast with a knack for breaking down complex camera, audio, and video technology. My expertise extends to social media and electronic gadgets, and I thrive on making the latest tech trends understandable and exciting for everyone. Sharing my knowledge through engaging content, I aim to connect with fellow tech lovers and novices alike, bringing the fascinating world of technology to life.
Leave a Reply Cancel reply
Your email address will not be published. Required fields are marked *
Table of Contents

Related Posts
![How to Add Audio to a PowerPoint Presentation? [Step by Step]](https://www.hollyland.com/wp-content/uploads/2024/05/how-to-add-audio-to-a-powerpoint-presentation-step-by-step.jpg "how to record presentation on chromebook")
How to Add Audio to a PowerPoint Presentation? [Step by Step]
Ever thought about adding sounds to your presentations? Well, besides the visuals, audio can be a game-changer. Whether it’s a catchy tune, your own voice
![How to Add Audio to Canva [Step by Step]](https://www.hollyland.com/wp-content/uploads/2024/05/how-to-add-audio-to-canva-step-by-step.jpg "how to record presentation on chromebook")
How to Add Audio to Canva [Step by Step]
Whether you’re a professional or an enthusiast, adding audio to your Canva designs is crucial for your project. In addition to adding music, Canva offers
![How to Add Audio to PowerPoint [Step by Step]](https://www.hollyland.com/wp-content/uploads/2024/05/how-to-add-audio-to-powerpoint-step-by-step1.jpg "how to record presentation on chromebook")
How to Add Audio to PowerPoint [Step by Step]
Adding audio to PowerPoint presentations provides an immersive experience and enhances the audience’s engagement. From professional to educational fields, adding background music, audio narrations, or
![How to Fade Out Audio in iMovie [Step by Step]](https://www.hollyland.com/wp-content/uploads/2024/05/how-to-fade-out-audio-in-imovie-step-by-step.jpg "how to record presentation on chromebook")
How to Fade Out Audio in iMovie [Step by Step]
Audio fading in video editing is considered a vital element in optimizing the quality of your videos in iMovie. It is essentially a strategy that

- Help Center
- Privacy Policy
- Terms of Service
- Submit feedback
- Tour of your Chromebook
Take a screenshot or record your screen
You can take a screenshot or record a video of your Chromebook's screen. After you capture your screen, you can view, edit, delete, and share the image or video.
Tip: Screenshots and recordings are automatically copied to your clipboard.
Take a screenshot
- On your keyboard, to change the section that you want to screenshot, you can also press the space bar.
Record your screen
Find recordings & screenshots
Recordings and screenshots get saved to your “Downloads” folder. You can change where your recordings or screenshots are saved:
Learn how to open, save, or delete files .
Was this helpful?
Need more help, try these next steps:.
- Meta Quest 4
- Google Pixel 9
- Google Pixel 8a
- Apple Vision Pro 2
- Nintendo Switch 2
- Samsung Galaxy Ring
- Yellowstone Season 6
- Recall an Email in Outlook
- Stranger Things Season 5
How to record your screen on Mac, Windows, and Chromebook
Recording your screen on your Mac, Windows PC, or Chromebook is a great way to show friends your cool gaming tricks, make tutorial videos for software you use, and show off your techniques in digital art. Unfortunately, screen recording isn't quite as easy as taking a screenshot . There are however, a ton of ways to accomplish this task and you should be able to record your screen on Windows or any other device in just a few minutes after picking one.
How to screen record on Windows using Xbox Game Bar
How to screen record on windows using powerpoint, how to screen record on a mac using the screenshot tool, how to screen record on a mac using quicktime player, how to record your screen on a chromebook, multiplatform (chrome extension), alternative offline apps for professional work, obs studio (free), snagit ($63+), what you need.
Device with Windows 10 (Computer, Xbox), Mac, or Chromebook
PowerPoint (optional)
QuickTime Player (optional)
Screencastify (optional)
The task is easier than you might think, as Windows 10/11, MacOS, and even Chrome OS have built-in tools that can get the job done. In this guide, we’ll show you how by using native, open-source, and paid third-party tools.
Windows 10 includes a native video capture tool, but it’s primarily designed for gamers. However, it can be used for any open application, offering a convenient way to record the screen and even add audio if needed.
Note: All steps for Windows devices will also all work on Windows 11, including options to use PowerPoint explained below. However, Windows 11 will look a little different from the images we are using. If you prefer step-by-step instructions for Windows 11, be sure to check out our Windows 11-specific screen recording how-to guide .
To use the Xbox Game Bar feature, your PC needs to support one of the following encoders . Most modern graphics cards or processors support them.
- Intel Quick Sync H.264 (Intel second-generation CPU or newer)
- Nvidia NVENC (most Nvidia GeForce 600 or newer; most Quadro K series or newer)
Step 1: Select the Start button, followed by the Gear icon located in the Start Menu.
Step 2: Select Gaming in the Settings app.
- 4 high-end features Windows laptops still have over MacBooks
- How to choose between a MacBook and a Windows laptop
- How to change your Google background in Chrome
Step 3: The Xbox Game Bar section should load by default. As shown below, there’s a toggle under the second paragraph that should be set to On . If it reads Off , then select the toggle.
Step 4: Select Captures listed on the left to view and adjust further customization options if needed.
Under Captures , you can change your save location for your recordings and screenshots , enable background recording, and enable recordings even when your laptop isn’t plugged in. There are also options to enable recording while projecting your screen, set a maximum recording length, and adjust your audio settings and video quality settings.
Step 5: When you’re done adjusting your settings, type the default keyboard shortcut to open the Xbox Game Bar: Win + G .
You may or may not see a prompt asking if the highlighted application on your screen is a game. If you do, just select Yes . Sure, it’s a lie, as Xbox Game Bar is meant for capturing gameplay, but this little fib extends this feature out to other applications. However, Xbox Game Bar does not record the desktop or File Explorer, it only opens with applications.
Step 6: The Xbox Game Bar appears near your screen’s top-center edge. It provides buttons to access these overlays and settings:
- Widget Menu
- Performance
- Xbox Social
- Looking for Group
The Game Bar’s Capture overlay should appear by default. If not, select the Webcam icon on the Xbox Game Bar, as shown below.
Note : If your PC has more than one connected display, like a three-monitor setup, the Xbox Game Bar interface will appear on the screen where you last clicked.
Step 7: To begin, select the round Start Recording button on the Capture overlay. To stop the recording, select the Stop recording button, which looks like a square within a circle.
Alternatively, you can type the Win + Alt + R key combination to start and stop recording with Xbox Game Bar enabled.
All captured videos are saved as MP4 files in the Videos > Captures folder under This PC in File Explorer.
Recording your screen with PowerPoint is relatively easy. The drawback is that you need Microsoft’s desktop software for this to work — and a Microsoft 365 subscription . This does not work with the online-only version.
Step 1: With a PowerPoint file already open, select Insert on the menu bar followed by the Media icon on the far right side.
From the drop-down menu that appears, choose the Screen recording option.
Step 2: The screen dims white and renders a toolbar along your screen’s top-center edge, as shown below. Select the Select area button and use your mouse to draw a box around the area you want to record. The target area is then outlined with a red dashed line and devoid of the white transparency.
Alternatively, press the Windows + Shift + R keys simultaneously to record the entire screen.
Step 3: Select the Record button or press the Windows + Shift + R keys simultaneously.
Step 4: You can choose the Pause button — it replaces the Record button — to halt the recording as needed. Select the square Stop button to end the capture.
Step 5: To save the recording, right-click on the video displayed within PowerPoint and select the Save media as option on the pop-up menu. Follow the on-screen prompts to save your recording.
When you’re done, you can save the video as a separate file to access or embed as you see fit. Editing and control options are very limited after that, but PowerPoint is a great option for quick-and-dirty recording — especially if you’re doing it for a looming presentation.
Included with macOS Ventura is a native feature that allows you to record the screen and take screenshots . Here’s how:
Step 1: Press Shift + Command + 5 to bring up the screenshot toolbar.
Step 2: The toolbar appears on the screen with two sets of buttons: Three on the left to capture a screenshot and two in the middle for recording the screen. It also provides Options and Capture (or Record ) buttons.
Step 3: Select the Record entire screen button (left) or the Record selected portion button (right) followed by the Record button — it replaces Capture if the tool was originally in screenshot mode — located on the right.
Step 4: When done, select the little Record button located on the menu bar at the top of the display, as shown below. Alternatively, press Command + Control + Esc . The video saves to the desktop by default.
If you’re running a version of MacOS older than Mojave, you can always use QuickTime Player for basic screen recording, as well as audio recording. QuickTime recordings aren’t easy to edit, but if you want a fast and easy recording method, it’s one of the simplest.
Note : QuickTime Player is also available on Catalina and Big Sur.
Step 1: Open QuickTime Player from the Launchpad. If you don’t see it, check the Launchpad’s Other folder.
Step 2: With the app open, select File , located on the Menu Bar .
Step 3: Choose the New screen recording option listed on the drop-down menu.
Step 4: You may see a prompt asking permission to record the computer’s screen. Select the Open System Preferences button and add a tick to the checkbox next to QuickTime Player . You may need to restart QuickTime Player. If not, skip to Step 6.
Step 5: When QuickTime restarts, select File , followed by New screen recording .
Step 6: The Screenshot tool toolbar appears on the screen with two sets of buttons: Three on the left to capture a screenshot and two in the middle for recording the screen. Choose Options to add or remove mouse clicks, use the built-in microphone, and designate the video’s destination.
Step 7: Select the Record entire screen or Record selected portion button, followed by the Record button located on the right.
Step 8: When finished, navigate to the menu bar and select the Stop recording button, as shown below. Alternatively, select the appropriate symbol if your Mac has a Touch Bar.
Step 9: To save your recording, select File on the menu bar, followed by Save in the drop-down menu. Choose an appropriate save location (if you haven’t already) and name for the recording, then select Save to confirm.
If you have one of the best Chromebooks , Google offers a native screen recording tool for Chrome OS.
Step 1: Log in to Chrome OS. Simultaneously press Shift + Ctrl + the Show windows button (which looks like a box with lines beside it).
Step 2: Click the Screen capture button on the pop-up menu.
Step 3: The screen dims, and a toolbar appears along the bottom. In this example, the screen capture tool is set to Record partial screen , as shown above. Press and hold the mouse button or touchpad to draw a box around the area on the screen you want to capture. The toolbar also provides options for Record full screen and Record window .
Step 4: By default, the screen capture tool is set to Screenshot . Select the Screen record button on the toolbar — it resembles a movie camera pointing to the right — to capture video.
Step 5: Select the Record button centered within the selected area.
Step 6: To finish, choose the Stop screen recording button displayed on the Shelf next to the system clock.
By default, the captured video saves to the Downloads folder as Screen recording [date][time] in the WebM file format.
If you’re not keen on the native solutions listed above, you can install a Chrome extension called Screencastify that does a good job. Here’s how to install and use it:
Step 1: Open the Screencastify listing in the Chrome Web Store and select the Add to Chrome button, followed by Add extension in a pop-up window.
Step 2: Select the Screencastify icon located next to the address bar. If the icon doesn’t automatically appear there, you will need to select the Extensions icon (looks like a puzzle piece) and then select the pin icon next to Screencastify so you can pin the extension’s icon next to your address bar.
Step 3: Sign in with your Google account and follow the prompts to create a Screencastify account.
Step 4: Select the Screencastify icon in the top-right corner again. A drop-down menu will appear.
Step 5: Select a source: Browser tab , Desktop , or Webcam only .
Step 6: Enable the microphone and/or webcam if needed.
Step 7: Select Show more options for additional settings, like a countdown timer.
Step 8: Select the blue Record button. You can only record for 30 minutes using the free account.
Note : If you choose Desktop , the following screen prompts you to select your Entire Screen or application Window . After that, choose Share .
Step 9: When you’re done recording, select the pink and white End recording button in the bottom left corner of your screen.
Another tab will open with your recorded video ready to playback for you.
Step 10: You can now edit the video, share a copy, download it, and more. To edit the name, select the text field to the left of the Open in editor button.
The video saves to your Google Drive by default.
If you want an enhanced recording experience from an app specifically designed for more professional — and gaming-oriented — clips, then your best bet is to download one of the apps below.
As one of the more advanced and freely available screen-recording apps, OBS Studio is open-source and has built-in streaming functions for those who want a live audience while recording. OBS Studio is more fully-featured than some freemium apps, but setting up your personal preferences can take a little longer. However, it’s still the best of the free screen-recording apps currently available. It’s available for Windows, macOS, and Linux.
Snagit targets startups more than gamers. It packs a ton of recording features primarily for use in a workplace setting. You can use Snagit to help you put together your next training presentation or illustrate an idea or new workflow. These features include a screen recorder, annotations for screenshots, templates, and the ability to create video from a series of screenshots. It does cost $63 (and possibly more after the first year with a yearly Maintenance subscription), but if you don’t mind paying for the privilege, the added features are worth it. Snagit also offers a 15-day free trial.
Editors' Recommendations
- How to build a PC from scratch: A beginner’s guide
- How to insert a signature in Apple Pages
- How to deactivate your Instagram account (or delete it)
- How to block a website
- How to keep your Microsoft Teams status active
- How-To Guides
- Microsoft Windows
- Windows Guides

When you log into your Mac every day, one of the first things you see is a circular login picture above your username. On its own, this UI element is how you and other household members will know what user profile belongs to whom. Fortunately, Apple also gives you the ability to customize this image. You’ll be able to choose from your own personal photos, emojis, as well as Memojis.
Each and every web-connected component in your household has a MAC address. One can think of these 12-digit identifiers as digital name tags that computers, smartphones, tablets, and smart TVs use to say “present” on our home Wi-Fi networks. MAC addresses are also integral in maintaining a safe and reliable gateway to the internet.
Upgrading storage on your Mac isn't always easy, or even possible, so knowing how much storage space you have, and how to free up more, is a great idea. Often when you buy a Mac, that's the storage you're stuck with -- although external drives and cloud storage are always an option.
Luckily, checking your available storage -- and then freeing up space for the things you want to keep -- is very easy to do. In this guide, we’ll walk you through the process of checking your Mac’s storage space, then show you a few quick ways of clearing out the junk you no longer need.
TechRepublic
Account information.

Share with Your Friends
How to Record a Video Presentation With Google Slides
Your email has been sent

Google Slides now lets you record a presentation with inset video from your webcam. Each recording may be a maximum of 30 minutes long. No longer do you need to turn to a third-party tool or web meeting app, such as Google Meet , to record a presentation. Instead, you can start and finish the task with nothing more than Google Slides on a laptop.
As of March 2024, slide recordings may be made by customers who use Google Workspace Business Standard or Plus; Enterprise Starter, Essentials, Essentials Plus, Standard or Plus; and Education Plus editions.
How to make a basic slide recording in Google Slides
To create a slide recording, you’ll need to use Google Chrome on a computer that has a camera and microphone.
- Go to Google Slides and open your presentation.
- Select the Rec button in the upper right area, then select the Record new video button ( Figure A ).
The system will switch to the screen recording interface, with recording controls displayed below your slides. By default, the system will display your inset (picture-in-picture) video in medium size in the lower right corner of a slide, since this portion of a slide is often empty.

- Optionally, before you start recording, you might adjust three settings:

- Modify the size of the inset video frame. Select the size icon, found to the right of the video inset location icon, then choose either a small, medium or large video frame size.
- Open speaker notes with the button found to the immediate left of the back slide (<) icon. This will display speaker notes for your reference while recording. (Ideally, you would not need to refer to speaker notes, so that you could instead look directly at the camera as you record.)
- When you are ready to record, select the large red button at the bottom of the screen.
- If prompted, you may need to allow access ( Figure C ) to the tab, along with the camera and microphone. For example, when recording on a Chromebook, you may be prompted to “Allow docs.google.com to see this tab?” and “Also allow tab audio.” Select Allow, if prompted.

In a few cases, you may need to visit the following links in Chrome to adjust permissions for:
- Camera: chrome://settings/content/camera.
- Microphone: chrome://settings/content/microphone.
- A brief countdown should display (i.e., 3, 2, 1), then your recording will begin. Record your video, advancing your slides as desired.
- To pause recording, press the large red button at the bottom of the screen.
- Once paused, you may select from two options ( Figure D ):

After you select Save to Drive, wait a bit until the system indicates the file has been saved. If you leave or close the tab too soon, you may lose your recording.
How to select inset video shapes and sizes
On any slide, you may use the Insert | Speaker spotlight option ( Figure E ), then select a shaped video frame. This inserts a frame where the speaker video will display on that slide. You may reposition or resize the frame: Select the shape, and then drag-and-drop it to move it to a different place on your slide, or select a corner and drag it to resize it.

When you insert a speaker spotlight shape, that supplants the position and size you might have selected on a basic recording. In other words, the speaker’s video will display in one of the corners or the center, and in the small, medium or large shape chosen with the settings — unless you’ve inserted a speaker spotlight shape on a page ( Figure F ). Use the speaker spotlight option to convey the most polished professional effect, since it allows precise control over the shape, size and location of a video frame.

How to play, share and manage slide recordings
You may access slide recordings within Google Slides on a computer. However, unlike recording, which requires you to use Google Chrome, you may access and play existing recordings within Google Slides on a variety of modern browsers. For example, the following steps all work when you use Google Slides within either Google Chrome or Apple’s Safari browser.
To access recordings associated with a Google Slides presentation, follow these steps.
- Select the Rec button in the upper right area. The recordings you’ve made of the presentations will display. Importantly, the system shows both the date and duration of each recording.
- To view, share or download a recording, click anywhere on the playback icon or title of the recording ( Figure G ). It should open in a new tab. Within this tab, you might:
- Select the Play icon in the center of the video image to play the recording.
- Select the Share button in the upper right corner of the screen to modify access settings and give other people access to the file.
- Select the Download icon in the down arrow above a tray icon in the upper right area of the screen to download the file.

- Select the three dot menu to the right of a listed recording to:
- Rename a file something other than the default recording title.
- Remove a previously made recording you no longer need.
- Copy link and obtain the Google Drive URL for the recorded file.
All Google Slides recordings are stored in a Slides recordings folder on Google Drive. The recordings are saved as .webm files, which is a widely supported web video format. You may easily open and play .webm files on both Apple and Android mobile phones. Any recordings you make using Google Slides should be easy to view on almost any device.
Does the ability to record a presentation within Google Slides streamline your workflow? What sorts of video presentations will you create with this new capability? Mention or message me on X ( @awolber ) to let me know how you use screen recording within Google Slides.
Subscribe to the Google Weekly Newsletter
Learn how to get the most out of Google Docs, Google Cloud Platform, Google Apps, Chrome OS, and all the other Google products used in business environments. Delivered Fridays
- How to share video with Google Sites
- How to present Google Slides in Google Meet
- Prezi announces Google Slides integration
- Google Meet: A cheat sheet to the app and platform features
- Google Meet: 3 presenter controls for smoother presentations
- Best software for businesses and end users

Create a TechRepublic Account
Get the web's best business technology news, tutorials, reviews, trends, and analysis—in your inbox. Let's start with the basics.
* - indicates required fields
Sign in to TechRepublic
Lost your password? Request a new password
Reset Password
Please enter your email adress. You will receive an email message with instructions on how to reset your password.
Check your email for a password reset link. If you didn't receive an email don't forgot to check your spam folder, otherwise contact support .
Welcome. Tell us a little bit about you.
This will help us provide you with customized content.
Want to receive more TechRepublic news?
You're all set.
Thanks for signing up! Keep an eye out for a confirmation email from our team. To ensure any newsletters you subscribed to hit your inbox, make sure to add [email protected] to your contacts list.
How to Run a PowerPoint Presentation on Chromebook
Whether using Microsoft PowerPoint or Google Slides, creating a presentation on a Chromebook is not a problem.
Chrome OS is largely a cloud-based operating system, which means you can easily synchronize your data between devices. This can be helpful for students and corporate users who want to keep their data and presentations at hand at all times.
A boost in hybrid work environments has increased the demand for the virtual sharing of ideas, and presentations are one of the best ways of doing so. The good news is you can use your Chromebook to create and run presentations pretty conveniently.
So, let's look at how you can run PowerPoint presentations on your Chromebook using two different apps.
Running a Presentation on a Chromebook
The two commonly used apps for running presentations on your Chromebook are Microsoft PowerPoint and Google Slides. Both are developed by two top tech giants and are quite reliable tools.
Since Chrome OS is a Google product, your presentation slides will open in Google Slides by default. However, you can use either app. Both have diverse features, along with some unique ones.
To determine your preference and which is more suitable for you, let's see how you can utilize PowerPoint and Slides to efficiently run presentations on your Chromebook.
But if you aren't already familiar with both products, here is a more general comparison of PowerPoint and Slides .
How to Use the PowerPoint Chrome App
PowerPoint is part of Microsoft Office and is available as an online app on your Chromebook. It enables you to create and run presentations, and you can use it for educational, business, or professional purposes.
To use PowerPoint on your Chromebook, you have to install the PowerPoint Chrome app . Microsoft created this app for users who can't install Office on their devices.
Once installed, the app will appear in your Chromebook's app drawer, which you can access by clicking on Launcher in the bottom left and then the Caret icon.
To get started, PowerPoint will ask you for your Outlook account. Enter your details, and you are ready to go.
To run an existing PowerPoint presentation, simply click on Upload and open and locate the file that you want to run. When the time comes, you can run it in full-screen mode by going to Slide Show > From Beginning or From Current Slide from the top bar.
If you are going to create a presentation using this app, here are some features to look out for.
1. Templates
Don't have the time to do all the styling and design? You can choose from various PowerPoint templates to get started.
Templates are pre-built slides with unique designs and formatting such as colors, font size, images, and animations. Templates can help you save time since all you have to do is write your content on the slides.
Templates are easy to find. When you open the PowerPoint web app, it will show you several templates on the screen alongside a New blank presentation . Press on More themes on the right to access all the templates available.
2. Designer
If you want to design your customized presentation, PowerPoint will help you with that as well. Designer is an innovative feature of PowerPoint to help you in designing the slides based on the content, colors, styles, and fonts used in the slides. You can access Designer by going to Design > Designer .
It will give you several design recommendations, and you can access these design ideas by simply clicking on them from the right sidebar. This feature can save you a lot of time in designing and styling your slides.
3. Animations
Animations make the presentation more interactive and visually appealing. The transition of objects with different animation styles such as fade-in, fade-out, appear, and split really embellish your presentation. You can access them from the top bar by clicking on Animations .
4. Images & Videos
Multimedia is essential for any presentation. Whether it is a business presentation showing your growth and revenue or a college assignment on a semester project, you need to add images and videos to help your viewers focus.
PowerPoint makes it easy for you to add images and videos. You can add your multimedia through the Insert option in the top bar.
Here are some more PowerPoint tips for preparing a professional presentation .
How to Use Google Slides
Google Slides is a presentation app part of Google Workspace and the default presentation viewer and editor on your Chromebook. It is cloud-based, which means it incrementally stores all your progress in your Google Drive, helping prevent data loss.
The app has good integration with other Google apps, such as Google Docs, and you don't need to buy any premium subscription to use it. You can find the Google Slides app in the Chrome Web Store.
Once installed, go to your app drawer as you did above and open Slides . If you have a pre-existing presentation at hand, go to Open file picker and open that file. You can run it in full-screen mode by going to View > Full screen . You can even run your slide on a loop .
If you are going to create a presentation using Google Slides, you might want to use the following useful features.
Templates are pre-built slides made for different purposes. You just have to write your content in them. They help you save time on design, fonts, colors, and animations.
When you open Google Slides, it shows you several templates, and you can browse more templates by going into the Template gallery . You might also want to check out these useful resources for finding Google Slides themes .
Google Slides allows you to search for an image and add it to the slide without leaving the app. You can search the internet for the image you want to add and can also add one from your Google Drive.
This helps you save time by staying inside the presentation. Simply go to Tools > Explore from the top bar to access this option. From there, you can drag and drop the images from your search results.
3. Host Q&A
Presentations are meant to deliver information and communicate with the audience. So, a good communication response from the audience is vital. This response can be in the form of questions or suggestions.
Google Slides has Q&A features that allow you to get responses or queries from the audience. It can be anonymous or from the users' email IDs. The audience members need to follow a link, and they can add their questions virtually.
Go to Presenter view > Audience Tools > Start New to begin the Q&A session. There, it will show the link that your audience needs to access.
4. Publish to Web
If you want to share your presentations with a broader audience, you can publish your Google Slides file on the web. It lets you share the link to your slides with others. Anyone with the link can open the slides without having a Google account.
To do so, go to File > Publish to the web . Click on it and publish the slides after choosing the right options.
Use Your Chromebook for Presentations
PowerPoint and Google Slides are both great options for creating presentations on a Chromebook. They offer great features to help you create and run compelling presentations.
You can try both on your Chromebook easily—no long installation steps are required. Just add the Chrome app or open the website to get started.
How to video record yourself presenting a PowerPoint

What type of content do you primarily create?
Recording yourself presenting a PowerPoint can be challenging, especially getting the technical aspects right. You need to capture your screen, webcam, and audio seamlessly while delivering your content naturally and avoiding awkward transitions between slides.
Finding a tool that integrates all these components can seem daunting. However, recording yourself presenting a PowerPoint doesn't have to be reserved for the tech-savvy or professional speakers.
Whether you're a teacher creating online lessons, a marketer producing a product demo, or someone looking to improve their presentation skills, this guide will walk you through user-friendly tools and strategies that will teach you how to video record yourself presenting a PowerPoint.
- Recording yourself presenting a PowerPoint can be challenging, but it doesn't have to be reserved for experts.
- Video recording offers unlimited reach, repurposing opportunities, and a more engaging experience.
- Use PowerPoint's built-in recording feature or tools like Descript for a polished presentation.
- Other tools like Zoom, Loom, OBS Studio, Clipchamp, and Quick Time Player can also be used for recording.
- Tips include practicing your script, using slide notes, ensuring high-quality audio and lighting, and incorporating storytelling techniques.
Why video record yourself presenting a PowerPoint?
Video recording your PowerPoint presentations offers several advantages:
- Unlimited reach : Unlike in-person presentations confined to a specific time and location, recorded videos allow your message to reach audiences globally at their convenience.
- Repurposing opportunities: Recorded presentations can be repurposed as evergreen content across multiple platforms, such as social media, online courses, webinars, and internal training materials, maximizing their value.
- Personal and engaging : Recording yourself narrating a presentation adds a personal touch and dynamic element that static slides alone cannot replicate. Your viewers can see and hear you deliver the content, creating a more immersive and engaging experience.
How to record your presentation with the PowerPoint app
Built-in recording feature in powerpoint.
1. Open the PowerPoint slide you want to record.
2. Click on the Record tab of the top toolbar.
3. Click on the Record button and choose from any of the following options:
- From Current Slide
- From Beginning
4. You'll see the PowerPoint screen recording window.
5. Select the microphone and camera from the icon on the top-right.
6. Click the Stop and Replay buttons to end or replay your recording.
7. To export your presentation's recording, click Export to Video within the Recording tab.
Benefits : Easy to use, no external tools needed
Limitations : Limited editing capabilities.
How to make a more polished recording of your presentation with Descript
While PowerPoint's built-in recording features are helpful, they may not produce the refined result you want for your presentation. That's where Descript comes in handy.
It’s a whole production studio at your fingertips, with video recording, transcription, and editing capabilities, ready to transform dull PowerPoint slides into an engaging experience for your audience. Descript also has a built-in screen recorder.
You can use Descript on Windows, Mac, or even straight from your web browser.
Here's step-by-step guide to recording your PowerPoint presentation with Descript.
Set up your screen recording
1. Install and open Descript. At the top of the editor, click and open the Record panel.
2. Select Screen.
3. Set Recorder settings:
Adjust the default recording settings to your liking, including the transcription language, the maximum recording resolution, and more.
4. Set recording options. Choose which audio and video sources to record (e.g., microphone, computer audio, camera). Remember to turn the camera on to capture your talking head video alongside your PowerPoint presentation.
5. Click the Additional Settings icon for
- Studio Sound (Optional): Enhance audio quality with noise reduction and background removal
- Transcription (Optional): Enable automatic transcription for easier editing
- Recording separate audio tracks
6. Add (optional) Speaker labels for each audio track (e.g., "Narrator," "Expert") by typing them in the text box next to your audio inputs.
Capture your screen recording
1. Select the right recording option:
- Recording into script : Choose this if you haven’t recorded anything yet.
- Replace selection : Choose this if you already have a script and want to replace a specific section with a new recording.
- Record new layer : Pick this for recording your video as a new layer on top of an existing recording.
2. Click Record at the bottom of the Record panel.
3. Drag over the area of your screen you wish to record. Click Start Recording. Press Space to start recording the full screen.
4. Click Stop to finish recording
Bonus: Descript creates separate tracks for camera, microphone, and computer audio. You can edit each track individually for more precise control.
- Do a short test recording to ensure everything is set up correctly.
- Set your recording to transibe for easier editing.
Editing and polishing your PowerPoint recording in Descript
Descript's AI video editing tool makes it a breeze to trim, cut, and splice your video footage, ensuring a seamless flow from start to finish. You can add smooth transitions and other visual effects to make your presentation pop.
Here’s a glimpse of how to edit and polish your PowerPoint recording in Descript:
Edit your recording like a doc
Did you make a mistake during a slide transition? No problem. Just delete those sections in the text transcript (created automatically by Descript) and the video will adjust to match.
Remove filler words
Sound smoother and more confident by easily removing filler words like "um" and "uh" from the transcript.
Fix voiceover mistakes by typing
Didn't nail your delivery on a specific slide? No need to start from scratch! Descript's Overdub feature lets you simply type in the correct narration and replace the audio on that slide with AI voice cloning.
Boost video quality and engagement :
- Crisp up audio quality by reducing background noise and room reverb with the AI-powered Studio Sound feature.
- Replace your background completely with the Green Screen Video Editor —look like you're presenting in a sleek studio or broadcasting from a beach.
- Enable Eye Contact simulation with AI, so it appears you're making direct eye contact with viewers, even if you’re looking or reading something off-camera.
Other ways to video record yourself presenting a PowerPoint
Use Zoom’s meeting recording feature to record yourself giving a PowerPoint presentation. Start a Zoom meeting with yourself, share your PowerPoint window, and enable recording
Loom is a handy screen recording tool that also offers a webcam overlay. Launch the Loom app or Chrome extension and set it to record your screen and webcam. Expect high-quality recordings but no advanced editing features. The free plan offers only five minutes of recording at a stretch.
3. OBS Studio
OBS Studio is a free, open-source screen recorder/streaming software with a steeper learning curve. It’s popular among advanced or tech-savvy users who need granular customization and control.
To record your presentation, add a "Screen Capture" source to capture your PowerPoint window and a "Video Capture Device" source for your webcam.
4. Clipchamp: Recording natively in Windows
You can use Microsoft’s Clipchamp , the built-in screen recorder and video editor for Windows, to simultaneously capture your computer screen, webcam, and audio for recording your PowerPoint presentation. It’s also available as a browser-based app. You can record up to 30 minutes on screen and webcam recordings.
Users can also adjust the screen and webcam recordings in the editing timeline separately.
5. Quick Time Player Recording natively in Mac
Use Mac’s Quick Time Player to record your PowerPoint presentation. It’s not as straightforward as the other options on this list, so here’s a quick guide to help you out:
- Launch Quick Time Player.
- Select File and go to New Movie Recording.
- You'll be recording your entire screen in addition to recording your face, so adjust the size and location of the recording window so that it's in a nonintrusive corner of your PowerPoint.
- Go to View and select Float on Top .
- Next, go to File and select New Screen Recording.
- On the menu that appears, select Record Selected Portion and drag a border around your PowerPoint and the webcam recording window.
- Press Record and start presenting.
- You can adjust the video quality and the audio source in the webcam recording window.
How to turn your PowerPoint presentation slides into a video
Did you know PowerPoint lets you save your presentation as a video, too?
Here's a breakdown of the two ways you can do so—keeping all the presentation elements (narration, animation, pointer movements, timings, and so on) intact in the presentation itself.
Save your PowerPoint presentation as a video
This creates a separate video file (MP4 or WMV) that anyone can play, even without PowerPoint.
Follow these steps:
- Save your presentation
- Go to File > Export > Create a Video
- Ultra HD (4K): Best for large screens (if you have Windows 10+)
- Full HD (1080p): Great for computers and TVs
- HD (720p): Good for streaming online or on DVDs
- Standard (480p): Smallest size, good for phones
4. Decide on narration
- If you haven't recorded yourself talking, choose "Don't Use Recorded Timings and Narrations" from the dropdown menu
- If you have a recording, choose "Use Recorded Timings and Narrations." You can also set how long each slide shows for (default is 5 seconds)
5. Click Create Video
6. Name your video, pick a folder to save it in, and choose a file type (MPEG-4 or Windows Media Video)
Creating the video might take a while, especially for longer presentations. You can even leave it running overnight. Once done, find your video in the chosen folder and double-click to play it.
Save your PowerPoint presentation as a slideshow
This saves your presentation as a special file (PPSX) that starts playing automatically on full screen when opened. It only works with PowerPoint.
Here’s how it works:
- Make sure your presentation is saved (regular PowerPoint file)
- Go to File > Save As .
- Pick a folder to save the slideshow in.
- Under Save as type, choose PowerPoint Show (*.ppsx) .
- Click Save .
Now when someone opens the file, it will automatically play the slideshow.
Pro tips for making better video PowerPoint presentations
Practice your script.
Recording a flawless PowerPoint video rarely happens in one take. The key is practice.
Record practice run-throughs and watch them back. Make notes on areas that need improvement or parts lacking clarity. The more you drill your script, the more confident and natural you'll sound in the final recording.
Take advantage of PowerPoint's built-in Speaker Coach . The feature shows you whether your pace is too fast or slow, your use of filler words like "um," and suggestions to improve your voice modulation.
Use slide notes for coherent delivery
Wouldn’t a personal teleprompter make presentations so much easier? That’s what slide notes are for.
Having your thoughts and talking points organized within your PowerPoint file lets you have all crucial information and prompts readily available when recording.
Go ahead and add detailed notes or even a full script for each slide. This will help you stay on track and provide a handy transcript reference if you need to do any editing or voiceover work in post-production.
Use high-quality audio equipment or turn on Studio Sound
Poor audio recording quality is a surefire way to make even the most visually polished video feel amateurish. Do your presentation justice by investing in a decent external or Bluetooth microphone and audio interface to capture clear voiceover audio.
If you must use a built-in mic, record in a quiet environment to minimize background noise pickup. Or better yet, pair up with an AI-powered audio enhancement tool like Descript's Studio Sound , which reduces background noise , reverb, and other artifacts.
Ensure a clean background and even lighting
Ditch cluttered backgrounds. You want people to focus on the content of your PowerPoint and not be distracted by the funny shapes and colors in your video.
Your video lighting and framing matters, too. Position yourself facing a natural light source or bring supplemental video lighting to eliminate weird shadows and squinting-level glare.
Look directly into the camera or turn on Eye Contact
Looking directly into the camera is essential to create a sense of connection with the audience. Position your webcam or camera at eye level and imagine you're talking to a friend. If you're using Descript, enable the Eye Contact feature to auto-adjust your gaze towards the camera.
- Dress professionally and maintain a good posture to project confidence and authority.
- Use visuals, animations, and multimedia elements to enhance your presentation and keep your audience engaged.
- Consider adding closed captions or subtitles to your video for better accessibility and engagement, especially for those watching without sound.
- Speak clearly and at a moderate pace, using vocal variety to emphasize key points and maintain interest.
- Incorporate storytelling techniques, real-life examples, or personal anecdotes to make your video presentation more relatable and memorable .
Take your PowerPoint presentations from amateur to amazing
Recording yourself virtually presenting a PowerPoint allows you to distribute your message using the most engaging type of content: video. And there are many screen recording tools out there that can capture your screen and web camera footage with just a few clicks.
But how do you stand out?
By focusing on the presentation's depth, your delivery, and the video's quality. The first two are the bare minimum to communicate your message effectively.
But the right screen capture software and all-in-one video creation tool like Descript can help you with third. Use the tool to improve the quality of your recorded PPT presentations.
With Descript, it's easier than ever to record your screen, polish up the audio, and create stunning visuals all in one place. So why wait?
Sign up for Descript today and simplify your workflow while creating a PowerPoint presentation video that sticks with your audience in the long term.
How do you make a presentation video with your face?
To create a presentation video with your face, follow these steps:
- Open your presentation in PowerPoint.
- Go to the Slide Show tab.
- Click on Record and choose From Current Slide or From Beginning .
- Choose your microphone and camera by clicking on a sound icon on the top-right.
- Start recording by clicking on the record button.
- Speak into your microphone to narrate the presentation.
- Your webcam will capture your face during the recording.
- Click Stop when you finish recording.
- Export your recorded presentation by clicking on File> Export>Create a video.
How do you present yourself in PowerPoint?
To present yourself effectively in PowerPoint, follow these steps:
- Determine the key information to include in your presentation.
- Design and prepare your PowerPoint slides with a cohesive theme.
- Craft a compelling introduction to engage your audience.
- Tailor your presentation to different time constraints for flexibility.
- Capture the audience's attention before you begin speaking.
Related articles

Featured articles:
10 excellent Loom alternatives to record your screen
Looking for the best ways to record your screen without Loom? Find out 10 Loom alternatives, their features, and pricing.

How to record a YouTube video: A guide for all devices
If you want to record a YouTube video for personal use or fair-use repurposing, here are the steps to get started.

For Business
Social media video marketing: Everything you need to know
Learn how to win over potential customers (and the algorithms) with the right social media video marketing tools, strategy, and optimizations.

How to record a podcast on Zoom: A beginner’s guide
Follow this step-by-step guide on how to record a podcast on Zoom, then learn about why it may not be your best recording option.

How to record a Microsoft Teams meeting: 5 easy ways
Learn how to record a Microsoft Teams meeting on any device and get answers to common problems.

10 effective how-to videos to engage your audience
How-to videos are a great way to educate your audience. Whether you’re recording a software demo or training instructions, here’s how to create a how-to video.

Articles you might find interesting
How do teleprompters work, and do I need one?
A teleprompter might sound like a dream come true — why wouldn’t you want to read something while still making eye contact with your audience? But just like with anything, there are tradeoffs to using a teleprompter.

AI for Creators
100+ ChatGPT prompts for creators: Speed up your workflow with AI
There are many ways creators can use ChatGPT to remove guesswork, improve their workflows, and grow their audience. You just need the right prompts. Think Mad Libs, but for content production.

Automatic Apple Podcasts transcripts are coming. Here's how to make sure they're accurate.
Automatic Apple Podcasts transcripts are coming—and bringing better accessibility and SEO along. Make sure yours are accurate with this guide.

The best free video editing software with no watermark: Top 10 picks
Free video editing software usually leaves ugly watermarks on your project, but these 10 picks let you create the video you want with no watermark at no cost.

Point of view shot: Why a subjective shot is important in film
Here’s a deep dive on this essential shot, including how best to use it and some of the classic film scenes that made it famous.

How They Made It
My Perfect Console’s Simon Parkin on how to make your interview podcast stand out
Simon Parkin didn't set out to make an indie podcast, but that's what he did. He shares how a sharp format helps his interview show stand out and how to stay creative with a day job.
%20(1).JPG)
Join millions of creators who already have a head start.
Get free recording and editing tips, and resources delivered to your inbox.
Related articles:
Share this article
How to Record a Presentation on Google Slides?
- Share on Facebook
- Share on Twitter
By Nikolay Kaloyanov
in How-To Tutorials
2 years ago
Viewed 3,828 times
Spread the word about this article:
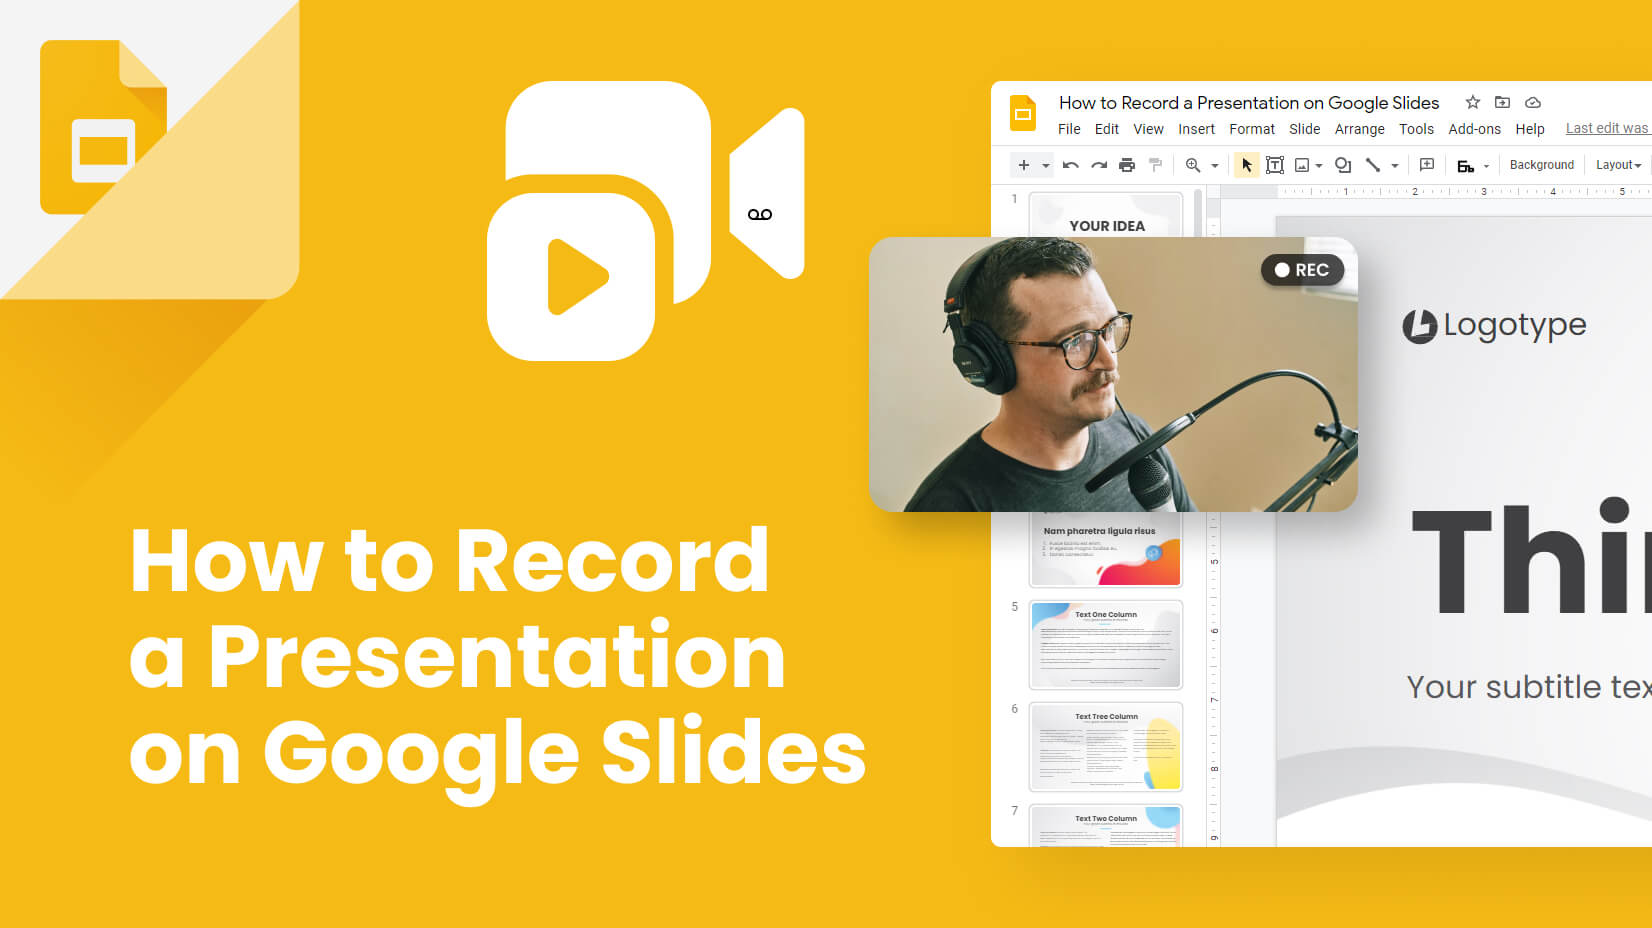
Recording your presentation can be a very powerful move, as you don’t want to embarrass yourself in front of your audience. Instead of relying on your “inner feelings”, you can check how you sound, how you look, what gestures you make, and how well you play with words and details.
For this guide, we will use some of the most popular online tools on the market (Panopto and Loom) and some totally free options for Windows and Mac computers.
Article overview: 1. Why do people record their presentations? 2. How to record a presentation on Google Slides using Panopto? 3. How to record a presentation on Google Slides using Loom? 4. How to record a presentation on Google Slides using Microsoft Windows? 5. How to record a presentation on Google Slides on a Mac? 6. Other tools you can try
1. Why do people record their presentations?
There is a reason why people record their presentations. Unfortunately, you don’t know how your voice will sound or articulate when you are presenting. In such situations, it will be best to record your presentation to see if there is something you need to change before doing it live. Also, recording your presentations is a very good way to remember what you are about to say. But let’s see the main use cases when recording your Google Slides presentation will make great sense:
- Practice your presentation skills – you can’t hear yourself while talking. That is why recording your voice might be a good indicator of how you present. Is your tone of voice smooth? Do you need to raise it? Are you mumbling or “like”-ing? Recordings can help you identify problems in advance.
- Save valuable time – instead of recording each lecture, you can save your efforts once, and later sent them.
- When you have stage fright – not everyone has the natural confidence of Elon Musk. If you are a shy person who gets terrified when speaking in front of huge audiences, recording your presentation is a great move.
- Avoid distractions – during live presentations, interruptions are more common which can affect your flow. A recording of your presentation at home can later be sent as a follow-up.
2. How to record a presentation on Google Slides using Panopto?
There are plenty of tools that could be utilized, so feel free to use anything which you might find suitable. Panopto is a good option since it doesn’t require us to download a software extension, and it has a free plan which is more than enough for starters. Your videos are also stored on Panopto’s drive, so you will avoid issues with cluttering your computer or mobile device.
✔️ Panopto is very easy to use.
✔️ The software is cloud-hosted.
✔️ Speech and OCR (optical character recognition).
❌ Pricing model is scaling.
❌ Slow rendering process.
❌ Issues with captions.
Step 1. Open Panopto.com
When you open the website, you will see there are plenty of options out there.
Step 2. Click on “Record”
Once you’ve opened the website, click on the big red button “Record” (next to Company and before Get Started ).

Step 3. Select your Audio, Video, and Screen Options
The browser will ask for permission, so make sure you grant Panopto access to your webcam(s) and audio source(s). Usually, if you don’t have more than one source, they will be launched by default.

Step 4. Choose what to share
Now, you have to click on Screens and Apps , and select your preferred option.
Entire screen (if you have 2 or more, you can either select one of the screens or all of them), a Window , or a Chrome Tab .

Step 5. Fix the settings
When you click on the “Settings” button (in the bottom right corner), there will be a menu that you can access.

Step 6. Start recording
Click on the big circle in the center to start recording.

Step 7. Save your recording
Once you end your recording, you can send it to Panopto , YouTube , Classroom , or download it on your computer.

3. How to record a presentation using Loom?
Loom is among the most used recording pieces of software globally. It is great for teamwork and has a lot of collaboration tools. Let’s see where it shines.
✔️ It is very easy to use.
✔️ You can share the videos with a single click.
✔️ Developers are constantly updating the app.
❌ The 5-minute free plan is not enough for long projects.
❌ It renders the videos slowly.
❌Lack of options to insert tags and notes in a video.
Step 1. Open Loom.com
The first step is to launch Loom. Just like Panopto, it’s an online-based service, so you don’t have to download or install anything.
Step 2. Sign up
Now, you have to open an account. The good news is you can use your Google Account to log in.
Step 3. Enter the recording settings
In order to start recording, click on New Video , and then from the dropdown menu select Record a video .

Step 4. Start the recording
Once you have selected whether or not you will use your Screen, Camera (or both), you can add some specific options and start recording. You’re limited to five minutes on the free plan, so don’t waste much time.

Step 5. Pause/Finish the recording
On the bottom left corner, you will have the option to pause or finish (the red square button) the recording. Before saving, you will have the options to Trim the Video, change the title (Loom | Free Screen & Video Recording Software – Day/Month/Year is by default), and make some Video Preferences.
Step 6. Share the video

Video Tutorial
4. How to record a presentation using Microsoft Windows?
There is also a free way to record presentations on your Windows computer. If you use Windows 10 or 11, this might be a good option.
✔️ You don’t have a record limit (as long as you have memory).
✔️ It is totally free forever.
❌ It is a very basic recording option.
Step 1. Open Game Bar
Many of you may seem surprised, but Windows has a built-in recording tool. It’s called Game Bar. To access it, you need to press the WIN + G . Of course, make sure it is enabled first.
Step 2. Click on “Capture”
The Capture button is next to the sound button. It will unlock you with the option to record.

Step 3. Click on “Record”
Click on the Record button which is the third from left to right. You can also start recording with Win + Alt + R .

Step 4. Record your clip
Now, you can freely record your clip.
Step 5. Delete or save the clip
Once you have filmed your presentation, you can either go to the folder where your file is stored, or delete it.
5. How to record a video on a Mac?
Last but not least, we have another free option for Apple users.
✔️ QuickTime is free forever.
✔️ There are plenty of recording options.
✔️ You can record an unlimited time.
❌ You are storing the files on your Mac.
❌ Not available on desktop PCs for free.
Step 1. Open QuickTime
The first thing you need to do is open your QuickTime.
Step 2. Click on File -> New Screen Recording
Once you’ve opened QuickTime, you have to select File -> New Screen Recording .
Step 3. Select what portion you would like to be recorded
There are several options that you can choose from.

Step 4. Start recording
After you have selected what portion of your screen you will record, you are free to start recording your screen. You have plenty of options for convenience, such as a timer, built-in microphone, where to save the recording, etc.
Video tutorial
6. Other recording tools
Of course, these 4 are just the tip of the iceberg. There are many more apps that also deserve attention but couldn’t rank higher on our list. Let’s see which they are:
- Zoom – Zoom is one of the most popular presentation software on the market, and the only reason it doesn’t appear here is because of its significance. We have prepared a separate tutorial on how to record a presentation in Zoom .
- AnyMeeting – it’s a very powerful presentation recording software. However, over the past few years, it lost some of its sheer power and it got passed by different platforms that offer much more versatility at more affordable prices.
- Camtasia – what we love about Camtasia is that you can create a next-level video experience. The cross-platform functionality is a great addition. However, it seems too hard for small tasks and the $300 purchase is not the value we are looking for here.
- OBS Studio – it’s a top solution for cross-platform live streaming. It has high-end functionalities and it is open-source. That’s great but there’s a catch – it’s too complicated for the average user.
- Debut – Debut is a great free tool that allows webcam recording and presentation recordings, too. However, it’s not compatible with any other OS than Windows, and the user interface looks dull.
- Screencast-O-Matic – it’s a very simple and effective tool but you need to pay a decent amount of money to get value out of the app. The free version doesn’t support HD recordings which limits its capabilities a lot.
Many people wonder how to record a presentation on Google Slides. Fortunately, there are many programs, and you can easily switch to anything you want. We have found that QuickTime and the Game Bar are amazing options for unlimited recording which also comes for free. However, if you’d like to upload your content online with a click of a button, you might fight Panopto and Loom better.
If you liked our presentation about screen recording, you can find these tutorials helpful, too:
- How to Write Scannable Content? Step-by-Step Guide
How to Convert Your PowerPoint Presentation into Google Slides
- How to Start and End a Presentation: 10 Practical Tips to Grab Attention and Make an Impact

Add some character to your visuals
Cartoon Characters, Design Bundles, Illustrations, Backgrounds and more...
Like us on Facebook
Subscribe to our newsletter
Be the first to know what’s new in the world of graphic design and illustrations.
- [email protected]
Browse High Quality Vector Graphics
E.g.: businessman, lion, girl…
Related Articles
Adobe character animator: everything you need to know + free puppets, color theory basics for non-designers: everything you should know, how to create a character profile for your brand mascot [+ free character design template], top 16 tutorials to learn adobe character animator [2022], 500+ free and paid infographic templates compatible with google slides:, enjoyed this article.
Don’t forget to share!
- Comments (0)
Nikolay Kaloyanov
Nikolay is a copywriter with vast experience in Technology, Marketing, and Design. When he isn't playing with words and crafting texts, he watches sports and asks questions. He is a funny person...until you put him on a diet.

Thousands of vector graphics for your projects.
Hey! You made it all the way to the bottom!
Here are some other articles we think you may like:

How-To Tutorials
How to turn yourself into animated cartoon in zoom.us.
by Lyudmil Enchev
20+ Secrets to Taking Amazing Photos For Blogs and Social Media
by Bilyana Nikolaeva

How to Make a Business Card Template With Bleeds in Adobe Illustrator
by Iveta Pavlova
Looking for Design Bundles or Cartoon Characters?
A source of high-quality vector graphics offering a huge variety of premade character designs, graphic design bundles, Adobe Character Animator puppets, and more.
Is it possible to turn off AI Overview in Google Search? What we know.

If you've opened up your phone to do a Google Search lately, you've probably noticed Google's new language model, Gemini , at work.
Google now produces AI-generated answers to your search queries, pulling from everything on the internet to provide you with the information you need.
Gemini is a multimodal model, which means it can "generalize and seamlessly understand, operate across and combine different types of information including text, code, audio, image and video," according to Google.
But some people are wary of it and want to know how they can turn Google Search's new AI feature off.
Is it possible? Here's what we know.
Can you turn off AI Overview in Google search?
The previous Search Generative Experience that included a similar feature was opt-in for users, but AI Overviews aren't, USA TODAY previously reported.
AI Overviews are a part of Google Search now and will show up if your queries trigger them, though they don't yet show up for every query.
There is a way to get closer to the previous results model, though. You can filter for web links by clicking on the "more" tab and then "web" to filter your results.
Google all in on AI and Gemini: How it will affect your Google searches
Gemini can be toggled off in Google app, but not in Safari
If you are conducting web searches in the Google app, you can turn off Gemini's results by following these steps:
- On your iPhone, open the Google app
- At the top right, tap your Profile picture then click on Settings and then Voice
- If it’s on , the Gemini tab will appear at the top of your Google app
- If it’s off , the Gemini tab will no longer be available on your Google app home screen, but you can still find your prior chats with Gemini in your Gemini Apps Activity .
How to delete your Gemini activity in the app
"Gemini used to be just a chatbot, and now we're seeing it become a personal AI assistant" Amar Subramanya, vice president of engineering for Gemini experiences, said in an interview with USA TODAY , but some aren't as excited about the integration.
Search history and activity is automatically deleted by Google after 18 months, but it can be deleted any time by following these steps:
- On your iPhone or iPad, go to gemini.google.com
- You can also go to myactivity.google.com/product/gemini
- All your Gemini activity: Above your activity, tap Delete All time
- The last hour or day: Above your activity, tap Delete Last hour or Last day
- A specific time period: Above your activity, tap Delete Custom range
- A specific day: Next to the day, tap Delete all activity from [day] .
- A specific activity: Next to the activity, tap Delete activity item .
Contributing: Felecia Wellington Radel
IMAGES
VIDEO
COMMENTS
Partial: Drag to select the area you want to record and then click the "Record" button. Window: Click the window or area of the screen you want to record to begin recording. A three-second countdown will appear on-screen, and then the recording will begin. When you're finished recording, click the red stop button on the Shelf.
Full Screen: Click anywhere on the screen to begin recording. Partial: Drag to select the area you want to record and then click the "Record" button. Window: Click the window or area of the screen you want to record to begin recording. A three-second countdown will appear on-screen, and then the recording will start.
Record your Chromebook screen with the built-in recorder. On your Chromebook, click the status bar at the bottom-right corner, and in the following quick settings panel, select "Screen Capture ...
Step 2: Choose your recording preferences. Image used with permission by copyright holder. Select the arrow icon when you are ready to start recording. Screencastify will pop open a small window ...
Here's how. Press Shift + Ctrl + Show windows (rectangle-shaped icon with two vertical lines in the function row). Depending on your Chromebook model, you can use the Screenshot key (small camera icon) on the right side of the Show windows key. Select Screen record (video camera icon) in the screen recording options from the menu at the ...
Press the Screenshot key on your Chromebook's keyboard. They key is located in the function row and has a camera icon printed on it. Press the Screen Record icon to switch to screen recording mode. You can now choose from three screen recording options, each located in the center of the toolbar. Record full screen: Used to record the entire ...
Google integrated a screen recording tool into Chrome OS 89 primarily to foster virtual learning. If you take a lot of online classes on your Chromebook, or you teach students online, the tool lets you record lessons, reports, and presentations for reference purposes.. However, screen recording isn't limited to academics only; there are other interesting use cases.
Click the circular icon in your ChromeOS launcher on the bottom left of the screen. Search for Screencast and open the app. Start a new Screencast by clicking New Screencast. You'll see a toolbar ...
Recording your screen on a Chromebook is a straightforward process, easily accomplished with tools built directly into the Chrome OS. Whether you're looking ... When you need to share a tutorial, report a problem, or create a presentation, screen recording on a Chromebook is invaluable. We'll guide you through understanding the tool ...
To screen record with audio on Chromebook, follow these simple steps: Open Chrome and go to the website you want to record. Press Ctrl+Shift+I to open the Developer Tools. Click the Record button (next to the network tab). The recording will start automatically. To stop recording, press Ctrl+Shift+I and then click the Stop button.
For a window screen recording, press CTRL + ALT + Window keys together. After the tool opens up, it will ask you to select a window. After you have selected the window, it will start recording the ...
Create a presentation that plays itself, including transitions and narration.This video shows a brief overview of making a presentation in Google Slides. It ...
Screencast is a new screen recorder for Chrome OS, with more options and features than the built-in recorder that has been available for a while. A camera feed appears at the bottom right corner of the recording, with your face and voice, and you can draw on the screen as you record. When the recording is finished, Screencast transcribes your ...
Chromebook Keyboard Shortcuts for Screen Recording. You can access the Screen Capture method using the following keyboard shortcut: Ctrl + Shift + Show Windows. After that, you can follow the same instructions as above to record your entire screen, a portion of it, or a specific window. You can also use the same methods to halt the recording ...
Screen recording on a Chromebook can be incredibly useful for a variety of reasons, whether you want to create tutorials, record gameplay, or share a presentation. In this section, we will explore the steps to record your screen on a Chromebook, including installing a screen recorder extension and adjusting screen recording settings.
Enable "Screen capture test" from the drop-down menu, then reboot. You can now use the Chrome OS screen recording tools: Press CTRL + SHIFT + Overview to open the recorder. Drag your mouse to ...
Open your presentation slides (such as PowerPoint or Google Slides) or any program you want to show on the screen(s) you're recording. You're all set up. Click the red record button and begin teaching. When you're done presenting your lesson, click the red button again to stop the recording.
Open the Screencast app from your Chromebook's app launcher. Click the "New Recording" button to start a new screen recording session. Customize your recording settings, such as the capture area, audio source, and video quality. Click the "Start Recording" button to begin capturing your screen. Make sure to turn on the microphone from ...
Take a screenshot. If your Chromebook has it, press the Screenshot key . If your Chromebook doesn't have a Screenshot key , press Shift + Ctrl + Show windows. If your external keyboard doesn't have a Show windows key , press Ctrl + Shift + F5. In the menu at the bottom, select Screenshot. Take a full screen screenshot .
Here's how you can use the built-in screen recorder on your Chromebook: Open the Quick Settings menu: To access the screen recorder, click on the clock located in the bottom-right corner of your Chromebook's screen. This will open the Quick Settings menu. Find the Screen Recorder icon: In the Quick Settings menu, you will see an icon that ...
Step 1: Press Shift + Command + 5 to bring up the screenshot toolbar. Step 2: The toolbar appears on the screen with two sets of buttons: Three on the left to capture a screenshot and two in the ...
To create a slide recording, you'll need to use Google Chrome on a computer that has a camera and microphone. Go to Google Slides and open your presentation. Select the Rec button in the upper ...
Enter your details, and you are ready to go. To run an existing PowerPoint presentation, simply click on Upload and open and locate the file that you want to run. When the time comes, you can run it in full-screen mode by going to Slide Show > From Beginning or From Current Slide from the top bar.
Create a presentation that plays itself, including transitions and narration.This video shows how to record the narration for your video in WeVideo.For more ...
Nimbus Screenshot & Screen Video Recorder is a chrome extension that let's you screen record even if you're on a Chromebook and upload directly to YouTube, G...
Record new layer: Pick this for recording your video as a new layer on top of an existing recording. 2. Click Record at the bottom of the Record panel. 3. Drag over the area of your screen you wish to record. Click Start Recording. Press Space to start recording the full screen. 4. Click Stop to finish recording.
Step 2. Click on "Record". Once you've opened the website, click on the big red button "Record" (next to Company and before Get Started ). Step 3. Select your Audio, Video, and Screen Options. The browser will ask for permission, so make sure you grant Panopto access to your webcam (s) and audio source (s).
How to delete your Gemini activity in the app "Gemini used to be just a chatbot, and now we're seeing it become a personal AI assistant" Amar Subramanya, vice president of engineering for Gemini ...