Screen sharing a PowerPoint presentation
There are three methods you can use to screen share a PowerPoint presentation in a Zoom meeting. If you have dual monitors, you can share a slide show while viewing the presenter's notes on another monitor. If you have a single monitor, you can also start the slide show in a window so you have access to other meeting features while sharing your presentation.
If you have other participants presenting portions of the PowerPoint, you can give them slide control in Zoom, so that they can control the slideshow on their end, without needing to ask you to move the slides forward. Additionally, PowerPoint slides can be shared as a Virtual Background for a more immersive sharing experience.
This article covers:

Dual monitors with slide show and presenter's views
Single-monitor setup with slide show view in a window, single-monitor setup with slide show in full screen.
Follow these steps if you are using multiple monitors and want to present your PowerPoint in one monitor, while viewing the presenter's notes in another monitor.
- Open the PowerPoint file you want to present.
- Start or join a Zoom meeting.
- Select your primary monitor then click Share . If you are not sure which monitor is your primary, select the one that PowerPoint opens in.
- Switch back to Powerpoint and click the Slide Show tab.

Follow these steps if you have a single monitor and want to share your PowerPoint presentation in slide show view, but have it contained in a window rather than in full screen. This is useful if you need to access meeting features, such as in-meeting chat or managing participants, while sharing your PowerPoint presentation.
- Click the Slide Show tab and then select Set Up Slide Show .
- Under Show type , select Browsed by an individual (window) and then click OK .

- In Zoom, start or join a meeting .
- Select the PowerPoint window and then click Share .
Note : Be sure you select the PowerPoint window, not the entire screen. Sharing the PowerPoint window only will allow you to use other features without interrupting the view of the presentation.
- Select your monitor then click Share .
How to Record A PowerPoint Presentation [2022 User Guide]
- Share on Facebook
- Share on Twitter
By Nikolay Kaloyanov
in How-To Tutorials
2 years ago
Viewed 610 times
Spread the word about this article:

If knowing how to record a PowerPoint presentation wasn’t necessary a decade ago, this isn’t how things stand today. The pandemic taught us a valuable lesson – if we don’t catch up with technology, we will fall short.
Fortunately, Microsoft’s app is the global leader in presentation software and provides you with all the required tools to create an excellent presentation you can show in front of your audience. But how to record a presentation on PowerPoint, and is it easy to do so?
Article overview: 1. What are the benefits of recording PowerPoint presentations? 2. How to record a PowerPoint presentation? 3. How to live stream a PowerPoint presentation? 4. Frequently asked questions
1. What are the benefits of recording PowerPoint presentations?
I am are pretty sure that if recording presentations weren’t helpful, PowerPoint wouldn’t offer it to its users. Well, we all know that’s not the case. Recording your PowerPoint slides can bring a ton of benefits. Let’s see which they are:
- Save time – regardless if you’re a lecturer or present in front of colleagues, having a video of your recording will save you many hours. Imagine speaking in front of your marketing team, but 2 members are on summer holidays. It’s fine. They’ll catch up later when they watch your PowerPoint recording.
- Focus on the presentation – usually, if you’re presenting in front of an audience, it’s typical to get asked many questions that you need to answer promptly. But that is a good reason to get distracted from your core information. Thus, it makes sense to record your presentation beforehand.
- Practice before presenting – the best way to carry out a great presentation is to spend some time at home, focusing on key details. When you record your PowerPoint slides, you can find areas of improvement and work on them.
2. How to record a PowerPoint presentation?
There are many tools that you can use to record a PowerPoint presentation. From Loom and Panopto, and even Apple’s basic Quicktime and Windows’ own recording tool. But here we will discuss none of the other options. Why? The answer is simple: PowerPoint has its own in-built, robust recording tool.
Unlike other options, PowerPoint’s recording feature enables you to record slide by slide. This effectively means you can create as many recordings as you like, until you like the playback version, and move on to the next slide.
Pro tip : PowerPoint doesn’t record slide transitions. You need to start recording each slide when it is opened and finish the recording before you move on to the next one.
Let’s see how to record a PowerPoint presentation with video and audio in just a few steps.
Step #1: Open your PowerPoint presentation
The first step is to open the PowerPoint presentation you wish to record. Ensure you have all the necessary slides and information on them. While this seems logical, there aren’t one or two cases when presenters have recorded wrong or unfinished slides, which leads to a disappointing outcome.
Step #2: Prepare your video and audio devices
Before you start the recording, you should check your camera and microphone. Try to make a sound check and see if your camera works properly.
Step #3: Select the slides you wish to record
PowerPoint gives you the option to record a presentation right from the beginning, or from a specifically selected slide.
- Pick “ From Beginning ” (1) from the Record tab of the Ribbon if you wish to start from the first slide.
- Pick “ From Current Slide ” (2) from the same tab in case you would like to start from a selected slide (which isn’t the first one).
- Click the Record button (3) which is positioned in the top right corner, between the Comments and Share buttons. It starts the recording from the slide you have currently selected.

Step #4: Start the recording
Once you click on one of the options, you are ready to start narrating your PowerPoint presentation. You will see a countdown timer, after which you can start narrating slides.

Step #5: Manage your PowerPoint recording
You have probably seen a couple of other options aside from the recording one. Let’s see which they are:
- Timer with a grey/red light – if you are recording your narration, you will see a timer and a small circle with a red light that indicates you are recording. If you pause, the small circle indicator will become grey again and the timer will stop counting.
- Refresh icon – right next to the timer there is a refresh-like icon but it serves a different purpose – to re-take the recording. You have the option to record again the current slide or all slides.
- Start/Stop button – the big red button serves as a start/stop button for your recordings. Only stop the recording when you want to move on to the next slide.
- Pause button – if you would like to stop the slide recording, in order to drink some water or read your speaker notes, you can use the Pause button, and then resume the recording. Bear in mind you cannot pause and move to the next slide. You have to stop the recording, to indicate you have finished with the current slide.
- Camera button – clicking the camera button will work as a toggle on/off.
- Microphone Button – clicking the microphone button will work as a toggle on/off.
- Ellipsis – this is the place where you can select camera and microphone settings, as well as erase recordings from the current slide or all slides.

Step #6: Export your PowerPoint video recording
The last button from the menu is the Export setting. You can export your narration as an mp4 file in Full HD size by default. However, you can customize your export and get your narration in 4 sizes – 480p, 720p (HD), 1080p (Full HD – standard), and 4K. We don’t recommend Ultra HD exports.
Pro Tip : Exporting 4K PowerPoint presentation recordings doesn’t necessarily mean you will get better quality (unless you have 4K resources within your presentation) but it does guarantee a significantly larger file size – up to 4 times more than on standard Full HD recordings.

3. How to live stream a PowerPoint presentation?
If you have already honed your skills and would like to stream your PowerPoint slides directly to your audience, there are many ways to do so. We are going to cover two of them.
3.1. How to stream a PowerPoint presentation from OneDrive?
Microsoft has invested a lot of resources to make OneDrive a powerful cloud service, and so far they have been quite successful. Let’s see how to record a PowerPoint presentation in front of live audiences.
Step 1 – save your PowerPoint presentation in OneDrive.

Step 2 – open your PowerPoint slides from PowerPoint online.

Step 3 – go to Present Live from the Slideshow Ribbon tab.

Step 4 – share a live link with your audience.

3.2. Stream your PowerPoint presentation in Zoom

Zoom is one of the most popular conference call apps which has plenty of tools, including live streaming presentations. Since PowerPoint is the leading presentation program in the world, Zoom developers have created some amazing things, like PowerPoint presentation recording with a web camera on a transparent background. If you’re interested, you can check our guide on how to record a Zoom presentation .
Does PowerPoint have a screen recording?
PowerPoint has a screen recording window and you can select the area you would like to be recorded. Go to Record (from the Ribbon), then select Screen Recording , choose the area and start recording.
Can I view speaker notes while recording narration?
You are able to access your speaker notes if you have created them beforehand. To insert speaker notes, you have to go to View -> Notes Page and you will have a text box that you can utilize for speaker notes.
What format does PowerPoint use for video?
PowerPoint records videos in mp4 format. The default resolution is 1080p (Full HD).
Recording your PowerPoint presentations can make the difference between a successful and smooth speech and a bad narration. Being able to record each slide means you can get the best narration possible for your whole presentation.
And if you would like to stream your presentation live, there are more than enough options to do so – both via the online version of PowerPoint or via third-party apps like Zoom.
If you found this article helpful, you can also check some of our other PowerPoint tutorials:
- Add Audio to PowerPoint: The Quick Step-by-Step Guide
- Insert GIFs into PowerPoint – a 2022 Pocket Guide
- How to Convert Your PowerPoint Presentation into Google Slides ?

Add some character to your visuals
Cartoon Characters, Design Bundles, Illustrations, Backgrounds and more...
Like us on Facebook
Subscribe to our newsletter
Be the first to know what’s new in the world of graphic design and illustrations.
- [email protected]
Browse High Quality Vector Graphics
E.g.: businessman, lion, girl…
Related Articles
How to add fonts to google slides [quick guide], the 25 absolute best adobe xd tutorials in 2022, how to add a gif to google slides and make it look nice, how to insert gifs into powerpoint: the quick step-by-step guide, how to craft a cartoon facebook cover in photoshop, enjoyed this article.
Don’t forget to share!
- Comments (0)
Nikolay Kaloyanov
Nikolay is a copywriter with vast experience in Technology, Marketing, and Design. When he isn't playing with words and crafting texts, he watches sports and asks questions. He is a funny person...until you put him on a diet.

Thousands of vector graphics for your projects.
Hey! You made it all the way to the bottom!
Here are some other articles we think you may like:

How-To Tutorials
Character animator tutorials part 4: rigging and tools.
by Slavena Simeonova

The Top 24 Figma Tutorials To Create a Killer Design In 2022
by Nikolay Kaloyanov

How To Write a Killer Blog Post in 10 Easy Steps
by Bilyana Nikolaeva
Looking for Design Bundles or Cartoon Characters?
A source of high-quality vector graphics offering a huge variety of premade character designs, graphic design bundles, Adobe Character Animator puppets, and more.
How to Give a Presentation on Zoom? [A Step-by-Step Guide!]
By: Author Shrot Katewa
![How to Give a Presentation on Zoom? [A Step-by-Step Guide!]](https://artofpresentations.com/wp-content/uploads/2021/03/Featured-Image-How-to-Give-a-Presentation-on-Zoom.jpg "how to record a presentation on zoom with powerpoint")
If you’ve never used Zoom, giving a presentation on it might seem a bit challenging. But, that’s a challenge we will have to learn to overcome as the world moves digital more and more day by day. The key question really is how to give a presentation on Zoom!
To give a presentation on Zoom, first, start by joining a meeting. Now open the presentation file on your computer and share the slides on Zoom using its “Share Screen” feature. You should test your camera, mic, speaker, and internet connection before you start with your presentation.
As easy as it may seem, some of you may need further detailed instructions. So, in this article, I will provide a step-by-step guide on things that you need to do in order to deliver a presentation on Zoom successfully! Plus, I will also share some tips that can help you ace your presentation on Zoom!
So, without any further delay, let’s get started!
Understanding the Zoom Application Interface
Before we understand the steps to give a presentation using Zoom, it is perhaps a good idea to acquaint yourself with the Zoom user interface first. If you are well-versed with it, then perhaps you may want to skip this section and click here instead.
Logging into Zoom
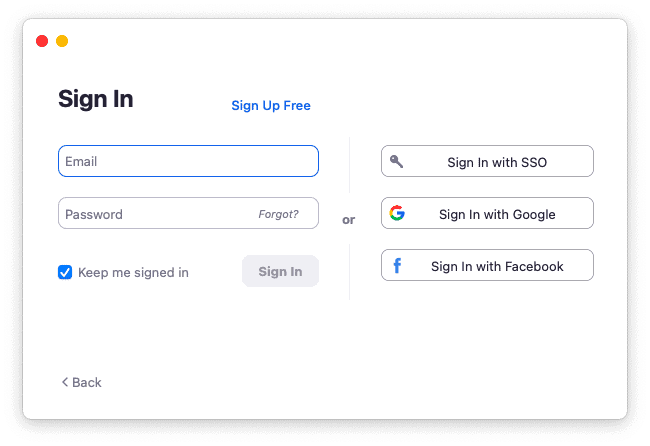
Although you can login to your account using zoom website too, but it is best to download and use the zoom app .
Once you have download the app, you will be prompted to login to your account. If you don’t have an existing account, you can either sign up or even login using your social account such as Google or Facebook. It’s actually quite simple.
If you feel that you don’t want to sign up or even use the social accounts for your meeting, you can choose to use “Sign In with SSO” option. SSO stands for single sign on and this allows you to sign in even when you don’t have an account with Zoom just once.
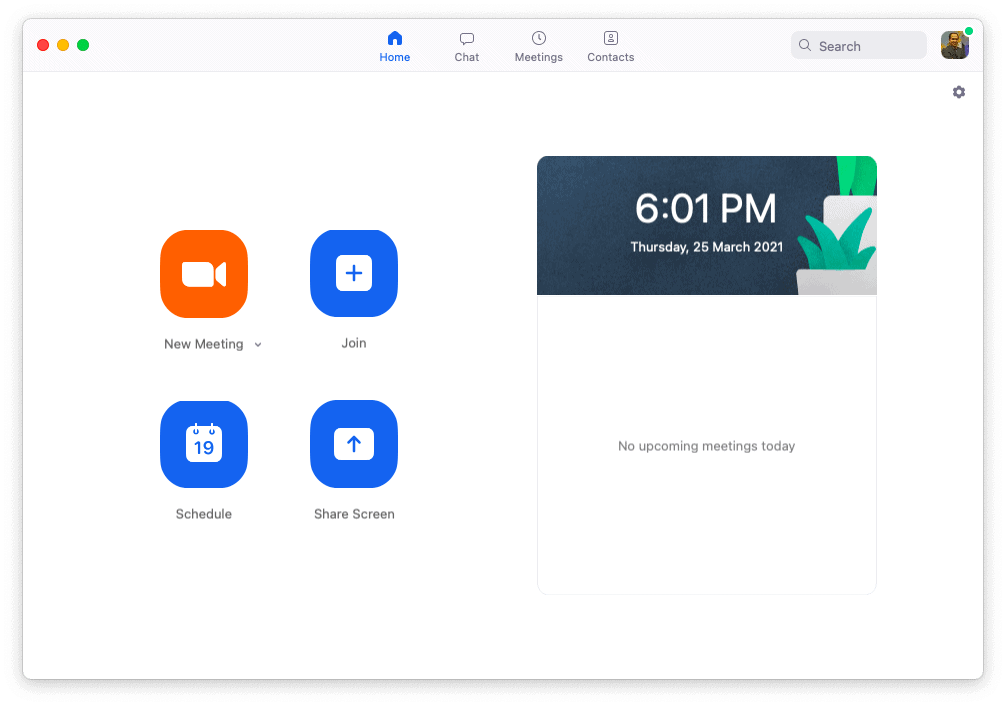
Zoom Home Screen
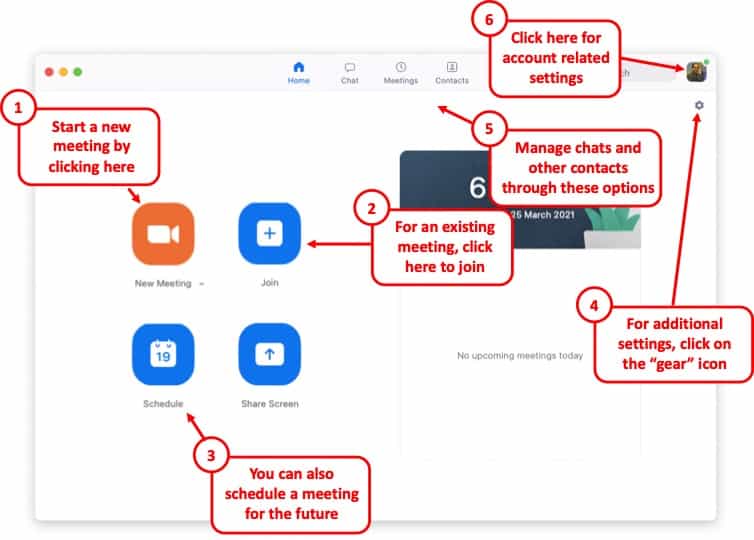
Once you’ve logged in, you will be taken to the home screen on Zoom.
There are a bunch of different things that you ca do with the home screen on Zoom. If you have been invited for a meeting, you will need to click on “ Join “. However, you will also need the meeting ID and the password for the meeting. If you don’t have the details, you will perhaps need to contact the person hosting the meeting.
You can also host the meeting yourself by using the “ New Meeting ” button. You can set a new meeting and invite others to join using this option.
Likewise, you can also schedule a meeting in the future using the “ Schedule ” option.
Furthermore, for changing the account related information, just click on your profile picture in the top-right corner of your window.
Lastly, there are several other detailed settings that you can tweak for your Zoom application. Almost all the other settings can be found in the “ Settings ” section by clicking on the “ Gear Icon “.
Zoom Virtual Meeting Window Interface
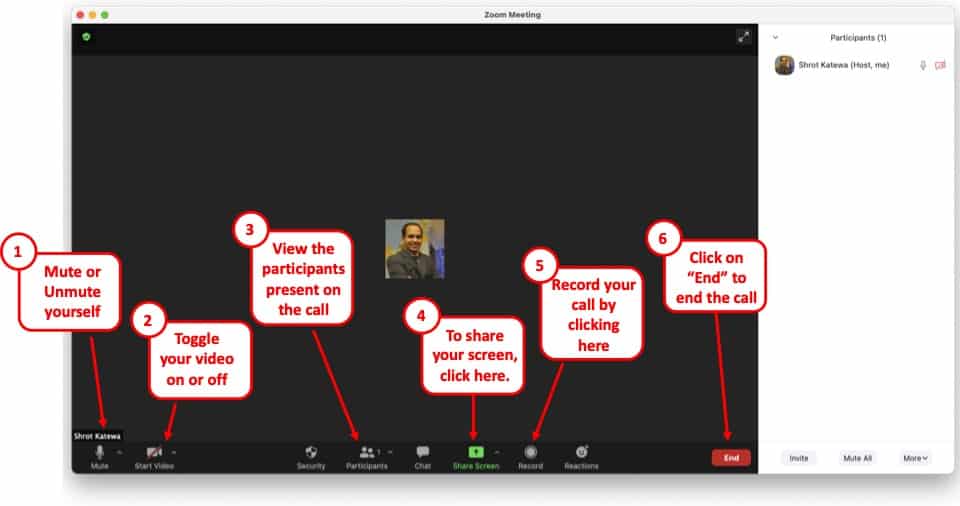
Once you are a participant in a virtual meeting, either by joining an existing meeting or by starting a new meeting, you will be greeted with an image similar to the one mentioned above.
On this screen, you will be presented with several different options. Some of the key functions that you will need to be aware of are as follows –
- Mute – Turning on the Mute or Unmute
- Video – Toggling between your Video
- Participants – Checking the names of the Participants
- Share Screen – to deliver a presentation (more on this later)
- Record – To record a meeting session
- End – Knowing how to end a meeting and exiting a call.
All the above functions will be visible on a small bar at the bottom of the window. If you are not able to see this option bar at the bottom, just hover over at the bottom part of your screen and all the options will appear .
Although there are other features that are also available for a zoom user or a participant, however, the aforementioned features should be good enough to deliver a presentation. These 6 features are at the very least something that you should be aware of.
How to Give a Presentation on Zoom (Step-by-Step)
Zoom has become a common tool for giving virtual presentations today. It is a widely used tool at conferences, meetings, and other events! If you are giving a presentation on Zoom for the first time, then perhaps you should be aware of a few things –
Here is a quick step-by-step guide on how you can give a presentation on Zoom:
Step 1: Install Zoom
Download and install the Zoom application to your desktop. To download the application, visit https://zoom.us/download and download the Zoom Client to your computer.
Step 2: Login to your Zoom Account
After installing the application, open it and log into your Zoom account. If you don’t have one, you can sign up for free using your email account.
Zoom also has options to sign in using SSO (Single Sign-On) or with your Facebook or Google account.
Step 3: Test Audio and Video Settings
Before you start or join a meeting, you will need to configure and test your audio and video settings.
To do that click on the gear icon on the Zoom application’s home screen. This will open the settings menu.
Now click on the “Audio” tab and select the microphone you are going to use. Try our different audio settings. After the microphone, select the speaker for audio output. If you can’t hear anything, try out another speaker source.
After configuring audio, click on the “Video” tab. From there, select the camera that is connected to your desktop. Tweak different video settings and find out what works best for you.
Step 4: Join or Schedule a Meeting
Now start a meeting by clicking on “New meeting”. You can also schedule a meeting on Zoom. To do that, click on “Schedule” and set up when you want to start the meeting. After completing the set-up, Zoom will give you a URL. Share it with the team members to join the meeting.
Or you can join a meeting by clicking “Join” on the Zoom client’s home screen. You can use a meeting ID or URL to join a meeting in Zoom.
Step 5: Open the Presentation
Once you have everything setup, you then need to prepare to show your presentation with your audience. To do that, open the presentation slides on your computer.
Step 6: Share Your Presentation
The last step in giving your presentation is to make sure that you share your presentation with your audience. To do that, click on “Share Screen” from the Zoom clients meeting window , select the screen where your presentation slides are open, and click “Share”. Now start presenting your slides to the audience.
Step 7: Stop Sharing to end the Presentation
One thing to know is how to end the presentation. To stop screen sharing, simply click on “Stop Share” located at the top of the screen . This option will only appear when you start sharing your screen.
How to Share a PowerPoint with Presenter View on Zoom?
To share your PowerPoint presentation slides with presenter view on Zoom, follow the steps given below:
Step 1: Open the Zoom App and Login
The first step really is to open the zoom app and login to your account.
Step 2: Join or Setup a Virtual Meeting on Zoom
Next, join the meeting. Remember, you need the meeting ID and password to join a meeting. Make sure you have requested for the details beforehand.
Step 3: Open Your PowerPoint Presentation
First step is really to open your presentation file that you want to present on the PowerPoint application.
Step 4: Put the Presentation in Presenter View
Now select the “Slide Show” tab from the top of the screen and click on either “From Beginning” or “From Current Slide” depending on your preference. This will open the slides in the “Presenter” view.
Step 5: Switch to the Zoom Application
Now, go to the Zoom application, start or join a meeting. While you are in the “Presenter” view on PowerPoint, press “ Alt+Tab ” to switch between applications in Microsoft Windows-powered computers. For iMac, use “Command+Tab” to move through open apps.
Step 6: Share Screen on Zoom’s Meeting Window
Once you are in Zoom’s meeting window, click on “Share Screen”, select the window where your PowerPoint slides are open in the presenter’s view, and click “Share”.
And that’s all you have to do in order to share PowerPoint with the presenter’s view in your Zoom meetings.
How to Share PowerPoint on Zoom Without Showing Notes?
There are two methods that you can use to share PowerPoint slides on Zoom without sharing your presenter notes. For the first method, you will need to have two monitors connected to your computer.
As for the second one, you can still share your PowerPoint slides on Zoom without sharing your notes (and you won’t need two monitors either). I’ve briefly explained both methods below.
Method 1 – Dual Monitor Method
In this method, you will be presenting your PowerPoint file on one monitor while looking at your presenter’s notes on the other one. Here’s how you can do that:
Step 1: First of all, open your slides on PowerPoint.
Step 2: Now join or start a Zoom meeting.
Step 3: Now click on “Share Screen” and select “Screen 1”. Then click “Share”. Here, “Screen 1” is your primary monitor.
Note: If you are not sure which one is your primary monitor, select where the PowerPoint file opened in.
Step 4: Now go to the PowerPoint application, click on the “Slide Show” tab, and from there click on “Monitor” and select “Primary Monitor”.
Step 5: Open the presentation file in the presenter’s view by clicking on the “Slide Show” tab and selecting “From Beginning” or “From Current Slide”.
If you have done everything correctly, participants will only be able to see the presentation slides while you have your presenter’s notes open on the second monitor.
In case you shared the wrong monitor on Zoom, click on “Screen Share” on Zoom’s meeting window, select “Screen 2” and click on share. This should fix your problem.
When you are sharing a screen on Zoom, you will notice a green border around that screen. This indicates which monitor you are currently sharing.
Method 2 – Sharing Portion of Your Screen
Follow the steps below if you have only a single monitor connected to your computer.
Step 1: Join or start a meeting on Zoom.
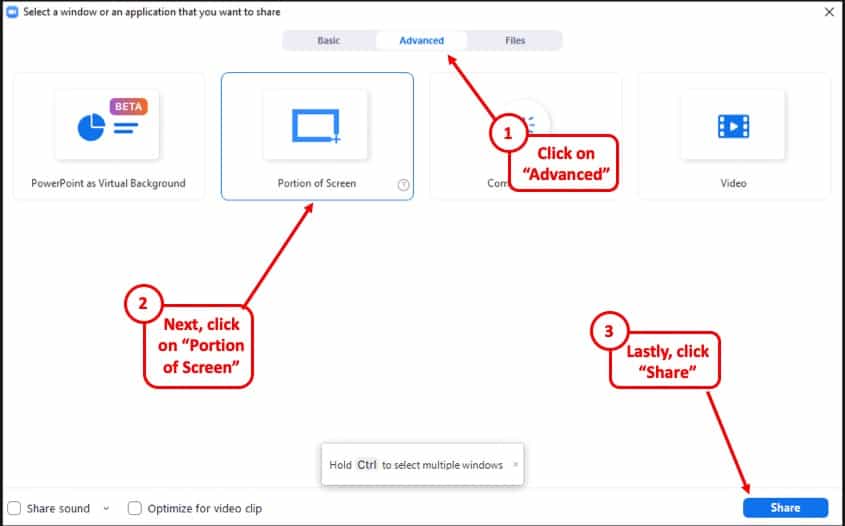
Step 2: Click on “Share Screen” and from the pop-up window select “Advanced”. From there select “Portion of Screen” and click on “Share”. This will give you a green border on your screen that you can adjust. Only the things that are inside this border will be shared on Zoom.
Step 3: Now open the presentation file in PowerPoint, and go to the presenter’s view by selecting “Slide Show> From Current Slide or From Beginning”.
Step 4: Adjust the size of the green border so that it only shows the presentation slides in the presenter’s view.
And that’s all you have to do. By doing so, your audience will only see the slides that you are presenting, but not your notes.
How to Show Yourself During a Zoom Presentation?
Ensuring that you are visible from time to time during a presentation can make it slightly more engaging and much more interactive. Here is how you can do that-
Step 1: First, start or join a Zoom meeting.
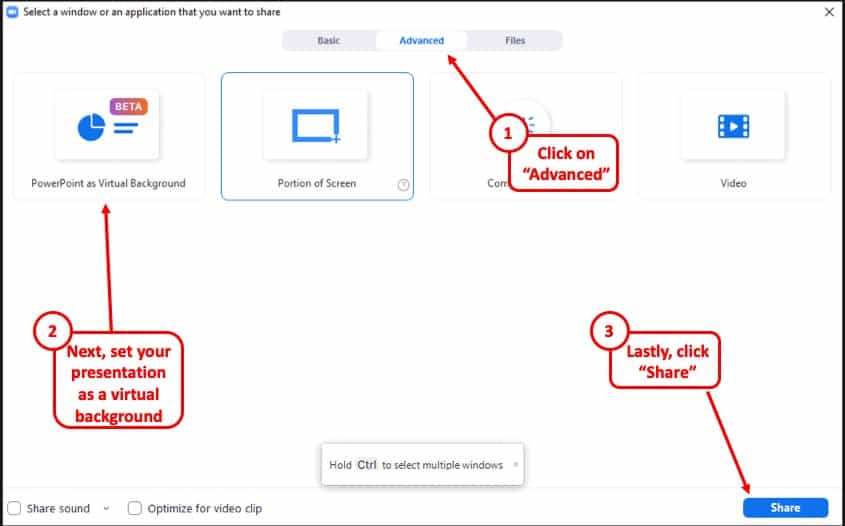
Step 2: Click on “ Share Screen ” and select the “ Advanced ” option. From there, select “ PowerPoint as Virtual Background ” and select the file you want for your presentation. Then click on “ Share ”.
Step 3: Make sure your video is switched on so that you are also visible to your audience. You can do that by clicking on “ Start Video ” on the Zoom Virtual Meeting Interface.
It will take some time for your slides to appear on the Zoom client. When it is done, participants will be able to see your face in front of the slides in Zoom. Make sure that your camera is connected to your computer and configured correctly.
This feature works best if you have a green screen behind you . If you have one, go to Zoom’s settings menu, select the “Background and Filter” tab and check “I have a green screen”. If you want to stop showing yourself during a zoom presentation, click on “Stop Video” on the meeting window and that will do the job.
Furthermore, you may sometimes want to show just yourself to the audience and not show the presentation at all. For that, all you need to do is simply click on “Start Video” in the Zoom Virtual Meeting Interface.
How to Record a Presentation on Zoom?
If you want to record your presentation on Zoom, you can do it easily. After joining or starting a meeting on Zoom, click on the “Record” icon located at the bottom of the meeting window. Once the recording starts, you can pause the recording or stop it whenever you like.
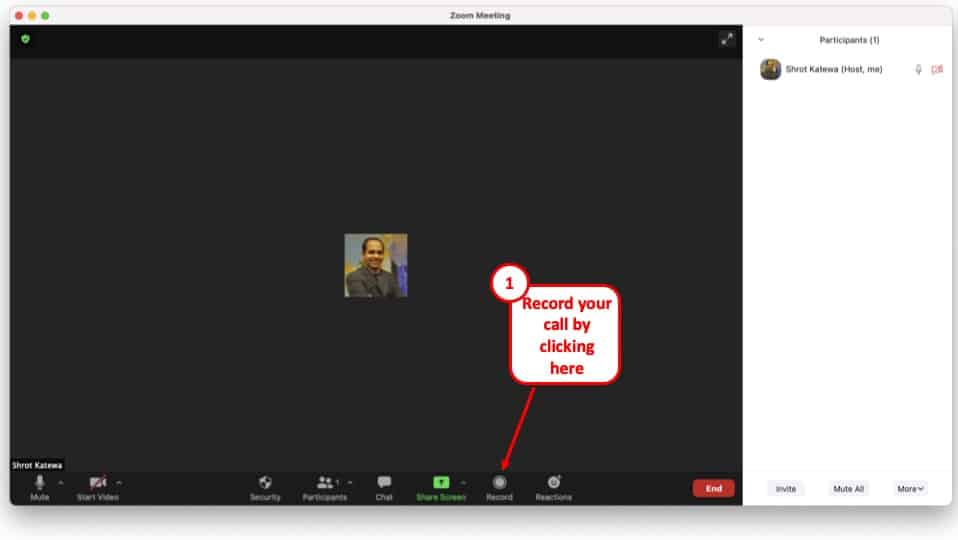
After the end of the meeting, the recorded video will be automatically converted into “.mp4” format and stored on your computer.
Tips for Giving an Awesome Presentation on Zoom
Giving a presentation in front of an audience is always a challenging task. Especially if it is online, many things can go wrong during your presentation. This is why I’m sharing some tips that can help you deliver an awesome presentation on Zoom. These are as follows –
1. Make a Professional Looking Presentation
There are several ways to make your presentation look really professional and high quality. One obvious method is to outsource your presentation to a specialised design agency! But, that can become really expensive depending on your budget.
Another (non-obvious) option is to use a PowerPoint Presentation Template! There are several high-quality and professional templates that you can get quite easily! In fact, using these Presentation Designs is quite inexpensive! You can download as many presentation templates as you want for as little as $16.5/month!
My favorite one is Agio PowerPoint Presentation template. It is perfectly suited to give a professional look to your presentation and yet it is quite quick and easy to use. Check out some of the images below –
Agio PowerPoint Presentation Template
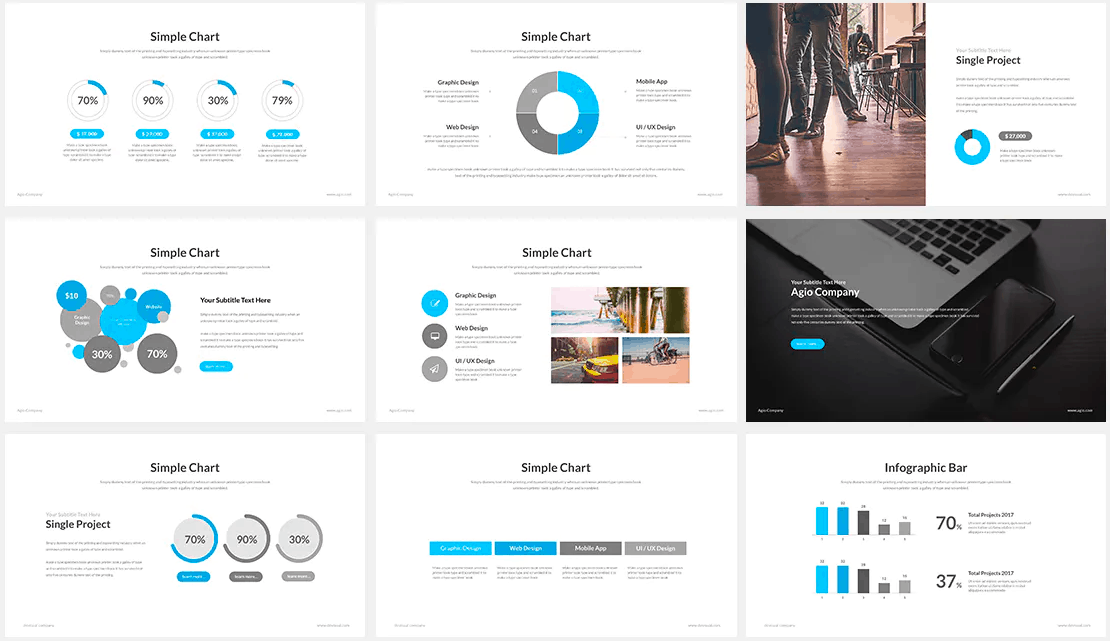
Furthermore, make the presentation as simple and straightforward as possible. Do not confuse your audience with a network of colorful texts, graphs, or other contents.
Only use data and graphs that are relevant to your presentation. Also, the clever use of transition animations can make the slide appear much more engaging.
2. Check Your Equipment Beforehand
Whenever you are giving your presentation online, many things can go wrong. For example, your camera or mic may not function properly. Such interruptions will only make you a laughing stock in front of the participants.
Check your mic, camera, and speakers to find out whether they are working properly or not. Also, check your internet connection and your laptop’s battery level. If everything is ok, then you are good to go on with your presentation.
More Related Topics
- Change the Style of Your Bullet Points and Stand-out from the Crowd!
- 7 EASY Tips to Always Make your Presentations Attractive! (Even if You are a Beginner)
- How to Reduce the Size of Your PowerPoint File? The Perfect Method!
- Auto Create Your PowerPoint Slides using Design Ideas Feature!
- Main Features of PowerPoint! [I bet You DIDN’T Know These]
Credit to Cookie_Studio for the featured image of this article
Teaching with Technology
Information Technology
Recording a lecture with Zoom and a slidedeck without your video showing
If you want to record your slidedeck (e.g. PowerPoint presentation) without yourself in the video (example above), follow these steps:
- Open the Zoom app and your PowerPoint file. Close all other files and applications.
- In Zoom, click “New Meeting” (orange icon); make sure your microphone is on. Do not turn on your camera.

- Go to PowerPoint and launch your slide show.
- At the bottom toolbar, choose Record, then choose “Record on this Computer” from the menu that pops up. Your lecture is now recording. Note: if you don't see the Record button, you may need to click on the "More" button in the Zoom toolbar, and choose the "Record on this Computer" option there.
- Start your lecture. Advance your slides with the right arrow key; return to a previous slide with the left arrow key.
- When you are finished, click on the "Stop Recording" button in the bottom toolbar. Note: if you don't see the Stop Recording button, you may need to click on the "More" button in the Zoom toolbar, and choose the "Stop Recording" option there.

- Trim the beginning and ending of your video (if needed) using QuickTime, then upload your video to Ensemble, Reed’s media server.
Want to do more? Read how to annotate your powerpoint slides with Zoom .
How to Record a Presentation on Zoom [Detailed Guidance]

Zoom, as one of the popular online communication tools, is mostly used to launch and record online meetings . Besides the internal recording feature, it also comes with tools that make screen sharing, webcam capturing and annotation process simple. Therefore, it can not only make Zoom meeting recordings but also produce a video presentation. Since you may not hear this method before, here we will talk about how to record a presentation on Zoom with explicit wizard for you.
Using Zoom to Record a Presentation Video
You can initiate a Zoom meeting without any other participants since you still have all of Zoom’s presentation tools at your disposal as well as the ability to record. First and foremost, you need to register a free Zoom account and then follow the guidance on how to record a presentation on Zoom.
Settings about PowerPoint: If you are using PowerPoint, you are suggested to make configuration as below: Open the PowerPoint file >> Click Slide Show>> Click Set Up Slide Show >> Under Show Type choose Browsed by and individual (windows) . This operation will allow you to present in slideshow view without being in fullscreen mode since fullscreen mode will cause more difficulties to make recording with Zoom.
Now let’s turn back to the kernel aspect of Zoom to record presentation videos .
Start screen sharing of PowerPoint slides and webcam Step 1: Open the Zoom app on your computer and then initiate a New Meeting to begin a video conference session. If you’re asked to choose an audio conference option, click Join with Computer Audio .
Step 2: Now you will find the Share Screen option at the bottom of the Zoom window, choose it to enter the next operation interface. In the Share window, you need to select the active window display your PowerPoint slide. Check the box for Share computer sound and Optimize Screen Sharing for Video Clip options if your presentation includes sound and a video.
Step 3: Once you click the Share button, you will see your face on the screen. You can reposition and resize the webcam window as needed. When a window is being “shared” in Zoom, the Zoom control bar will minimize and move to the top of the screen. You need to keep on the sharing status during the recording process.
Start video presentation recording in Zoom Step 1: To begin recording in Zoom, find out the More icon in the Zoom control bar. There are two options for recording: Record on this Computer (files can be saved on your computer as mp4 file) and Record to Cloud (files will be uploaded into the Zoom Cloud server). Here you can decide according to your actual needs.
Step 2: Now you’re recording and ready to give your presentation. It’s highly recommended that you practice using Zoom before recording so that you’re comfortable with the controls before you record your presentation. Here you can do a short 30 seconds test run and publish your video to make sure that it sounds and looks good.
Step 3: You can change the window being recorded with ease during the recording process. When you are finished, click as below to end: More >> tap Stop Recording in the Zoom control bar at the top of the screen >> choose Stop Share >> End Meeting >> End Meeting for All .
Now you’ve got the recorded presentation video with Zoom but there are still some limitations by virtue of this method. 1. The whole process is a little complicated since you need to start a screen sharing process and then record in Zoom. 2. If your video was 10minutes, it could take 20+ minutes to process on the Zoom cloud server. Besides, you need to guarantee the internet connected status all the time. 3. You can’t make changes to settings and parameter like format, quality.
Record a Video Presentation with Better Alternative of Zoom
It can be denied that Zoom owns the basics of recording a presentation video. But if you want to produce professional-looking presentation videos, you are suggested to work with RecMaster . As a multi-function screen recorder, RecMaster is competent for online meeting saving including recording Microsoft Teams meeting , Zoom meetings as well as Webex Meeting capturing. Besides, it also performs well to create presentation involving videos like Keynote presentation video recording , PowerPoint screen recording and more. Additionally, it embeds all-in-one operation feature and carries out screen recording offline. At the same time, some advanced tools like editor, mouse cursor effect and annotation are all accessible. To sum up, with the help of RecMaster you can easily make slideshows as expressive videos . Now let’s see the workflow of RecMaster.
Step 1: Please download and install RecMaster on your computer in advance and follow the wizard to have an overview of this tool.

Step 2: Under Full screen mode you can display the whole content of your PowerPoint. If you only want viewers to focus on the slide at present, you need to choose Custom area option.
Step 3: Using a webcam plugged-in will make your video more reliable and personal. Besides, you’re suggested to turn on microphone button so that your real-time narration can be recorded as well. If you’re making presentation videos for social platforms like YouTube, you are suggested to record as popular formats like MP4. >> Best formats for YouTube upload, download, record etc.
Step 4: Now it’s time to make PowerPoint as videos by pressing REC button. You can highlight key points or add mark-ups by means of mouse cursor effect and annotation tool. Step 5: End the recording process with Stop icon. Here you can perfect your recorded video by cutting out unwanted clips. When all the processes are over, you can upload the video to YouTube or Google Drive in one-click workaround.
Conclusion This article illustrates how to record a presentation on Zoom and at the same recommend the easier solution for presentation video making. You can choose the suitable one as you like to assist your recording work.
See also: How to record Webex meeting on computer How to record GoToMeeting on your computer How to record Google Hangouts/Meet video or voice call
Screen recording made easy.
Record every moment on your PC or Mac within few clicks.
How to Screen Record KissCartoon Episodes?
How to Screen Record hianime.to?
How to Record Screen at 9:16 Aspect Ratio?
How to Screen Record aniWatch Episodes?
How to Screen Record 4Anime Episodes?
How to Screen Record Funimation Before Moving to Crunchyroll Subscription?
How to Record Crunchyroll on Windows 10/11?
How to Screen Record Aniwave Anime Videos? (Formerly 9Anime)
Best Anime Streaming Services of 2024 [with Guide to Record & Download]
How to Record Chamet Videos on PC: Step-by-Step Guide
[Solved] PowerDirector Screen Recorder Isn’t Picking up Audio
How to Download Online Songs on a PC?
How to Record Screen with Webcam on Windows and Mac: A Comprehensive Guide
How to Record Snapchat Videos? [on Windows/Mac/iOS/Android]
How to Record Full Gaming Screen on Desktop
RecMaster is professional screen recording software which offers different kinds of recording modes. RecMaster is professional screen recording of recording modes.
--> Free Trial --> MacOS X 10.11 or above --> Free Trial --> window 10/8/7 -->